10 Mid-Century Kitchen Ideas for Retro Style
Function always comes before nostalgia in a kitchen that actually gets used. If a design choice looks cool but makes cooking harder, it won’t last. That’s why midcentury kitchens still work today—they were built around efficiency first, then style.
Clean lines, smart storage, and warm materials do most of the heavy lifting. When you layer in a little retro flavor without turning the space into a theme park, the result feels timeless instead of trendy.
Let’s break down ten midcentury kitchen ideas that look amazing and actually make sense in real life.
1. Flat-Front Wood Cabinets with Warm Tones

Busy cabinet doors make small kitchens feel chaotic fast. Raised panels and heavy detailing pull attention in too many directions. Flat-front cabinets in warm wood tones instantly calm things down while still giving the room personality.
I’ve seen kitchens transform overnight just by swapping ornate doors for simple slab fronts. Walnut, teak, or even a warm oak stain brings that midcentury vibe without screaming “retro diner.”
Why This Works
Midcentury design leaned hard into clean geometry. Flat fronts create uninterrupted visual lines, which makes the room feel larger and more organized.
Warm wood tones also balance out stainless steel appliances and modern countertops. That contrast keeps the space from feeling cold or overly sleek.
How to Do It
- Choose slab-style cabinet doors with minimal hardware for a true midcentury look.
- Stick to medium-to-warm wood stains like walnut or teak.
- If replacing cabinets isn’t realistic, refinish existing doors in a warm stain.
- Pair with simple bar pulls or small round knobs in brushed brass or matte black.
Each step reduces visual noise and keeps the focus on texture instead of ornament.
Style & Design Tips
Avoid overly dark espresso stains unless your kitchen gets tons of natural light. Midcentury style favors warmth, not gloom.
Mixing wood with white upper cabinets can lighten the room if you’re worried about too much brown. Just keep the lines consistent so the space still feels cohesive.
Pro Tip or Budget Hack
If full cabinet replacement isn’t in the budget, consider cabinet refacing instead of a complete overhaul. You’ll get that flat-front look for a fraction of the price, and honestly, most people can’t tell the difference.
2. Statement Backsplash in Retro Patterns
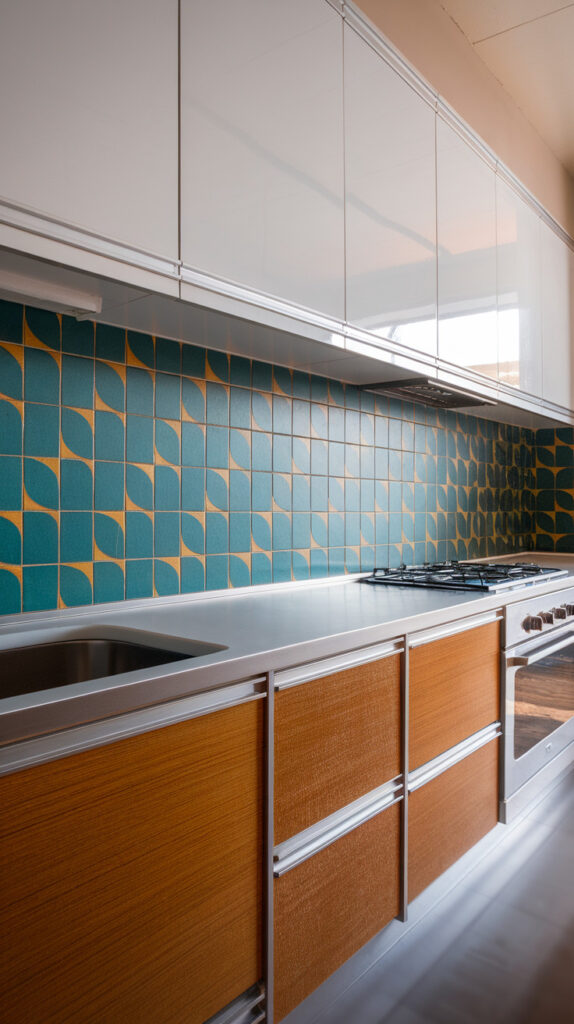
Plain subway tile is safe, but safe doesn’t exactly say midcentury. If your kitchen feels a little bland, the backsplash is the easiest place to inject personality without overwhelming the whole space.
Geometric patterns, subtle atomic motifs, or elongated rectangular tiles laid horizontally can completely shift the mood. I once added a simple teal geometric backsplash to a neutral kitchen, and it suddenly felt intentional instead of generic.
Why This Works
Midcentury kitchens embraced pattern in controlled doses. A bold backsplash creates a focal point without competing with cabinetry or appliances.
Because the surface area is limited, you can experiment without committing to something you might regret later.
How to Do It
- Choose a geometric or linear tile pattern that complements your cabinet color.
- Keep the color palette tight—two or three colors max.
- Install tiles horizontally to emphasize width.
- Use light grout if you want the pattern to pop, darker grout if you want it subtle.
The pattern should add energy without making the room feel chaotic.
Style & Design Tips
Avoid overly intricate mosaics that feel Mediterranean or farmhouse. Midcentury patterns are clean and graphic.
Stick with colors like muted teal, mustard, burnt orange, or olive green for authenticity without going full 1950s diner.
Pro Tip or Budget Hack
Peel-and-stick backsplash tiles have improved a lot. If you’re renting or testing a look, they’re an easy, low-risk way to try a retro pattern before committing to permanent tile.
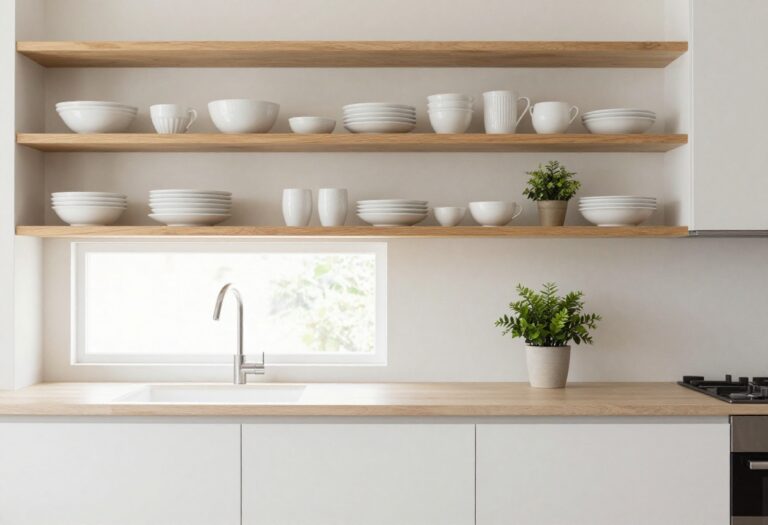
3. Open Shelving with Sculptural Dishware
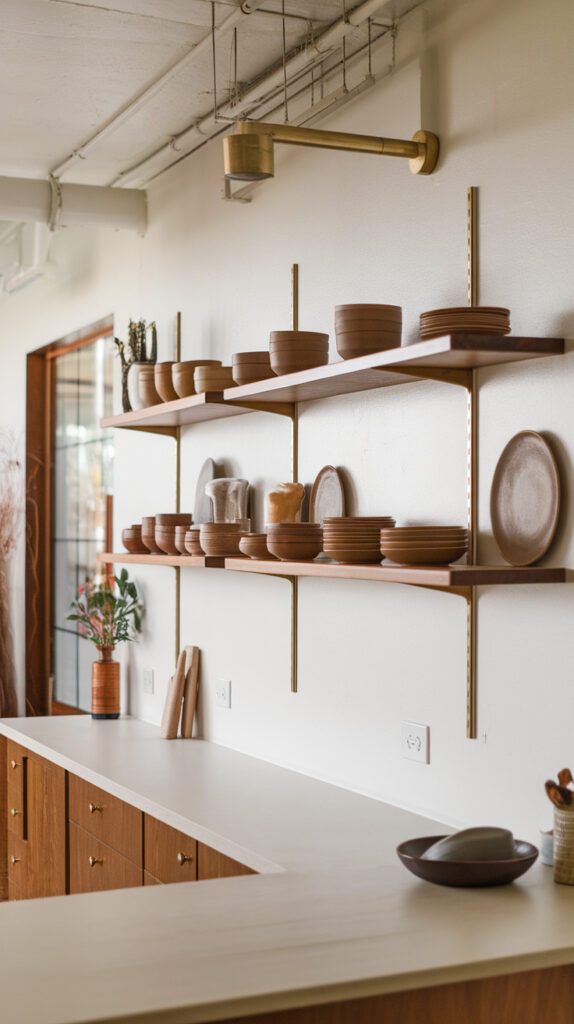
Upper cabinets can make a kitchen feel heavy. Midcentury homes often favored open shelving to create visual breathing room.
Swapping one or two upper cabinets for floating shelves instantly opens the space. It also gives you a reason to finally use those cool ceramic bowls instead of hiding them.
Why This Works
Open shelving adds negative space, which keeps the kitchen from feeling boxed in. It also lets texture and shape become part of the design.
Midcentury style celebrates form, even in everyday objects. Displayed dishware becomes décor instead of clutter.
How to Do It
- Remove one section of upper cabinets carefully and patch the wall.
- Install wood floating shelves in a tone that matches or complements your cabinets.
- Style shelves with evenly spaced stacks of plates and bowls.
- Leave some empty space to avoid overcrowding.
Spacing matters more than the number of items displayed.
Style & Design Tips
Choose ceramics with organic shapes or subtle retro colors. Matte finishes look more authentic than glossy ones.
Avoid cramming every mug you own onto the shelf. Midcentury style thrives on restraint.
Pro Tip or Budget Hack
You can build floating shelves with basic lumber and concealed brackets. A simple DIY project saves serious money compared to custom cabinetry.
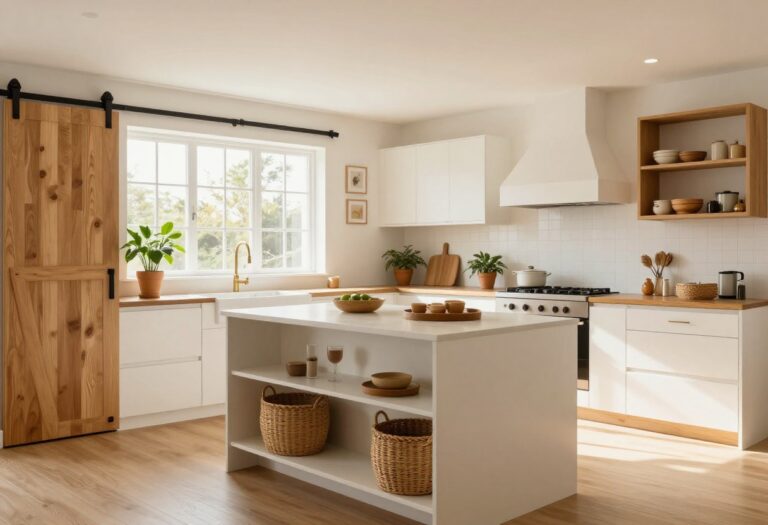
4. Slim Profile Kitchen Island with Tapered Legs
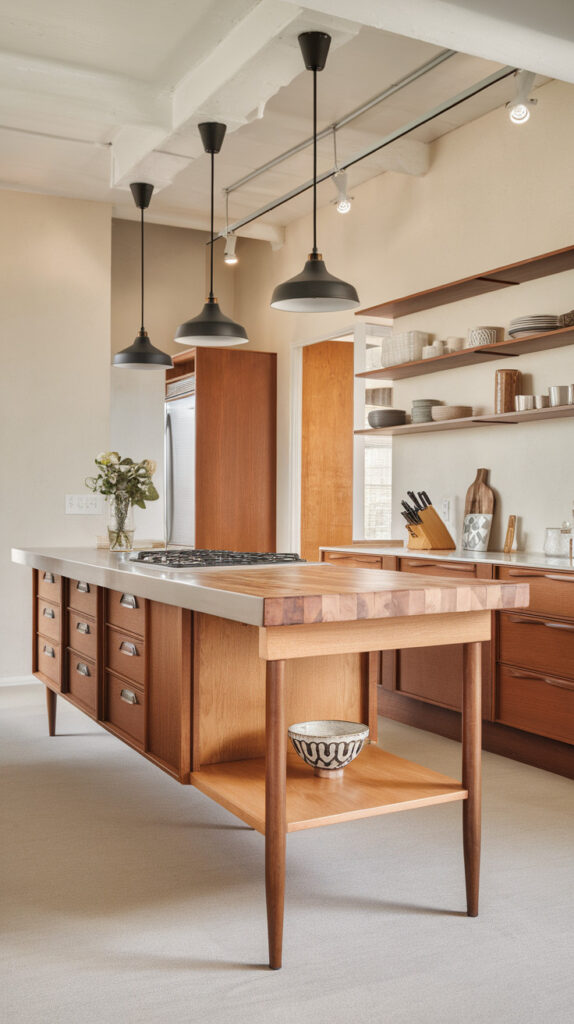
Bulky islands eat up valuable floor space. A slim island with tapered legs feels lighter and more in line with midcentury proportions.
I love this move in smaller kitchens because it adds prep space without turning the room into an obstacle course.
Why This Works
Tapered legs are a signature midcentury detail. They visually lift furniture off the ground, which makes everything feel lighter.
A slimmer footprint improves flow and keeps pathways clear for real-life cooking.
How to Do It
- Choose or build an island no deeper than necessary.
- Add tapered wooden legs instead of a solid base.
- Include open shelving underneath for storage.
- Keep countertop material simple and clean-lined.
Prioritize movement space over oversized storage.
Style & Design Tips
Match the wood tone to your cabinets or contrast intentionally. Random wood shades can look accidental.
Avoid ornate trim or decorative corbels. Clean edges keep it authentic.
Pro Tip or Budget Hack
Repurpose a vintage console table as a kitchen island. Add a butcher block top, and you’ve got a custom-feeling piece for way less.
5. Retro-Inspired Lighting Fixtures
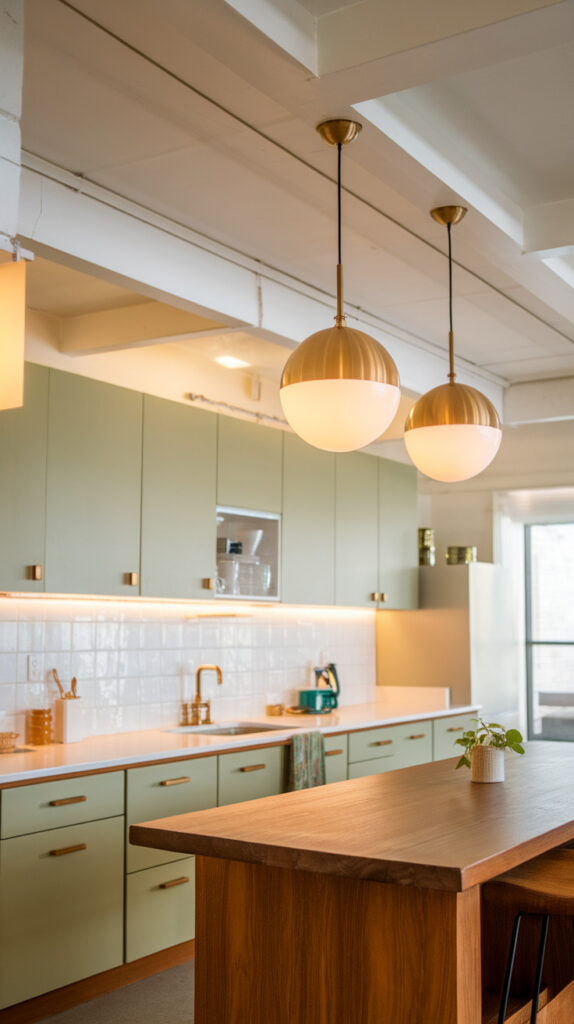
Lighting can ruin a midcentury kitchen faster than almost anything else. Oversized farmhouse pendants just don’t belong here.
Instead, go for globe pendants, sputnik-inspired fixtures, or simple cone-shaped lights in brass or matte finishes.
Why This Works
Midcentury lighting focused on sculptural forms and clean shapes. The right fixture acts like jewelry for the room.
Because lighting hangs at eye level, it has a major visual impact without major renovation.
How to Do It
- Choose globe or cone-shaped pendants in warm metallic finishes.
- Hang them evenly spaced above islands or dining nooks.
- Keep cords neat and proportional to ceiling height.
- Use warm white bulbs to maintain that cozy tone.
Placement is just as important as style.
Style & Design Tips
Avoid overly industrial cage lights. They skew more modern farmhouse than midcentury.
Brass, black, or even muted color finishes feel right at home in a retro-inspired space.
Pro Tip or Budget Hack
Check secondhand stores for vintage light fixtures. Many just need rewiring, which is usually cheaper than buying new designer lighting.
6. Built-In Banquette Seating
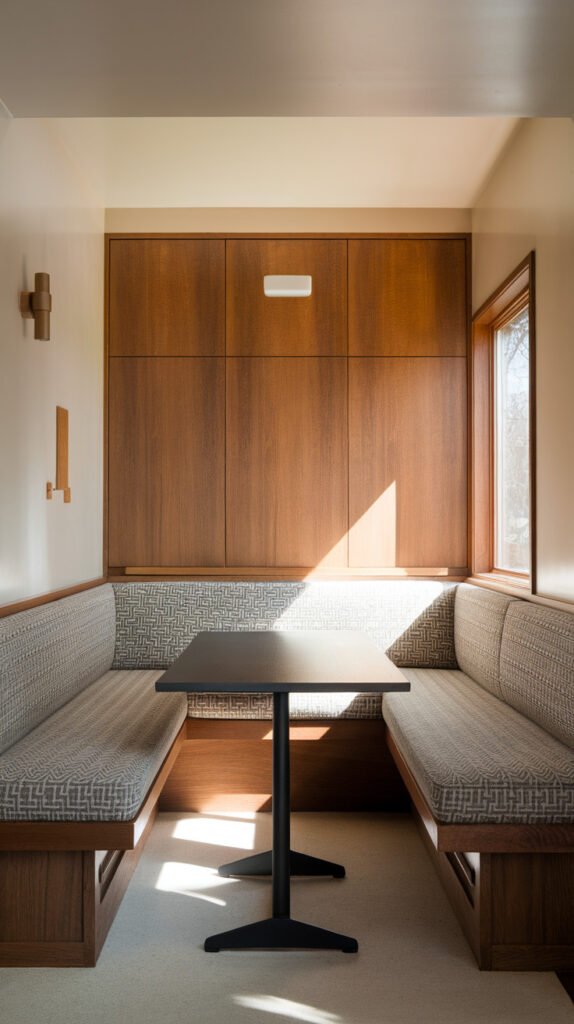
Standard dining tables with four identical chairs feel predictable. A built-in banquette instantly adds character and maximizes seating.
I’ve seen tiny breakfast corners turn into the most loved spot in the house just because someone added a simple bench along the wall.
Why This Works
Midcentury homes often emphasized built-in elements to maximize space. Banquettes create a cozy, efficient dining zone.
They also free up floor space by pushing seating against walls.
How to Do It
- Build a simple bench frame along one wall.
- Add cushions in retro-inspired fabric like subtle geometric prints.
- Include hidden storage under the seat if possible.
- Pair with a slim rectangular table.
Make sure the height aligns with standard table dimensions.
Style & Design Tips
Keep upholstery colors warm or earthy. Too bright can feel kitschy instead of stylish.
Use throw pillows sparingly to avoid visual clutter.
Pro Tip or Budget Hack
IKEA bench frames or storage units can be hacked into custom-looking banquettes with a little trim and paint.
7. Two-Tone Cabinet Color Blocking
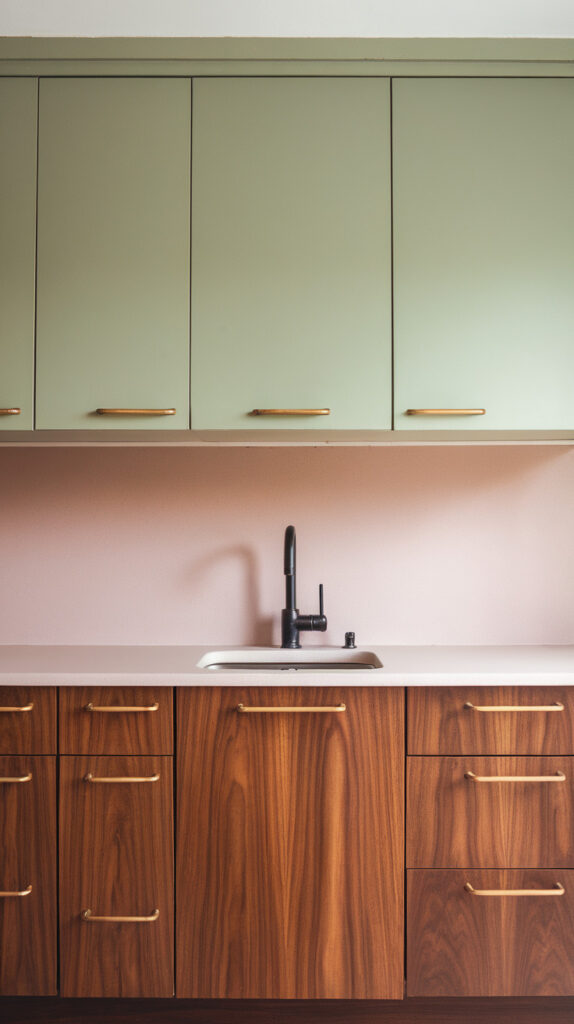
An all-wood kitchen can feel heavy. Breaking things up with two-tone cabinetry keeps the look dynamic without losing warmth.
Think wood lowers and painted uppers, or muted color bases with neutral walls.
Why This Works
Midcentury design embraced color thoughtfully. Two-tone cabinets create contrast while maintaining clean lines.
It also visually lowers or raises the ceiling depending on where you place the darker tone.
How to Do It
- Paint upper cabinets a soft neutral or muted retro color.
- Keep lower cabinets in wood or a deeper shade.
- Use consistent hardware across both tones.
- Test paint samples before committing.
Balance matters more than boldness.
Style & Design Tips
Stick with muted greens, blues, or mustard tones for authenticity. Neon shades will age badly.
Avoid more than two main cabinet colors.
Pro Tip or Budget Hack
You can paint just the lower cabinets for a dramatic shift without a full repaint. It’s less work and still makes a statement.
8. Minimalist Hardware with Warm Metals
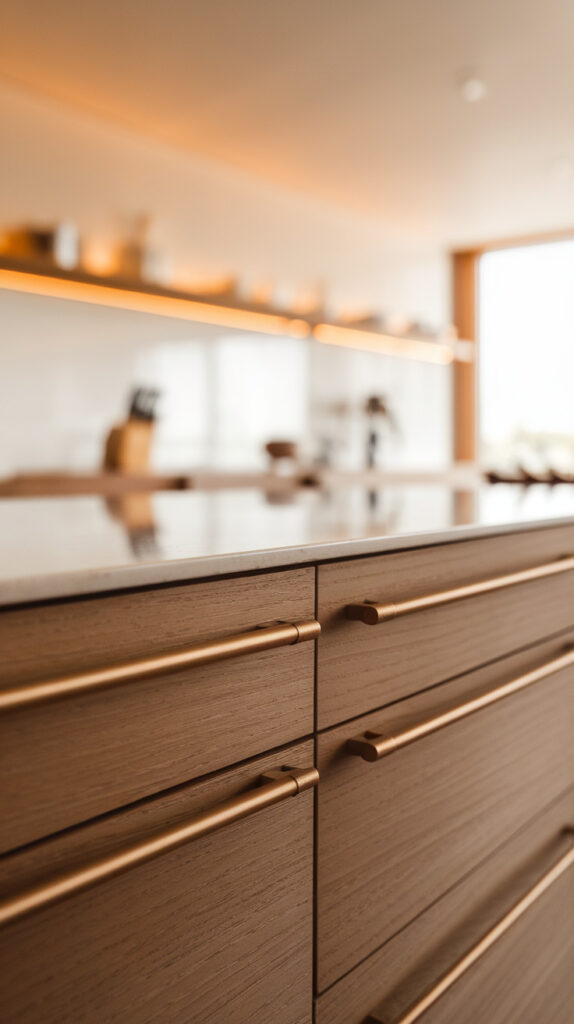
Chunky handles and decorative pulls distract from clean cabinetry. Midcentury kitchens thrive on subtle hardware.
Slim bar pulls, small round knobs, or even integrated pulls keep things sleek.
Why This Works
Hardware should complement, not dominate. Minimal designs maintain the visual flow of flat-front cabinets.
Warm metals like brass add contrast without overpowering the wood.
How to Do It
- Choose slim bar pulls or round knobs in brass or matte black.
- Install hardware consistently across all cabinets.
- Measure carefully to maintain alignment.
- Avoid mixing too many finishes.
Consistency creates polish.
Style & Design Tips
Brushed finishes feel softer than shiny chrome. Overly reflective hardware can look too modern.
Keep spacing even to avoid a sloppy look.
Pro Tip or Budget Hack
Swap hardware first before changing anything else. It’s the cheapest upgrade with one of the biggest visual payoffs.
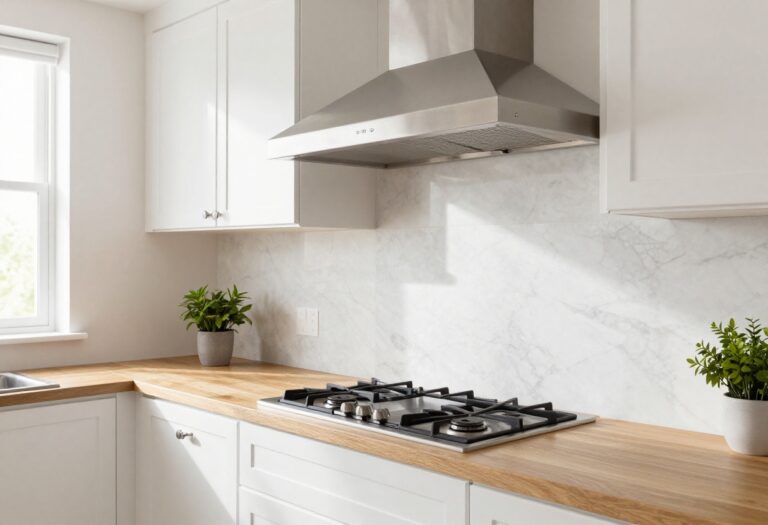
9. Organic Counter Materials
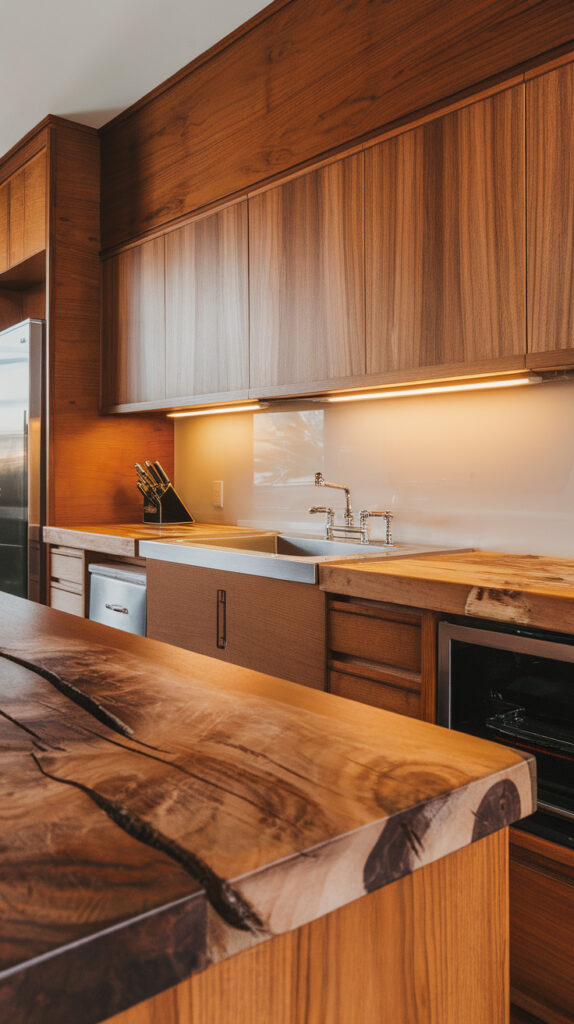
Ultra-gloss countertops can clash with midcentury warmth. Materials like butcher block or matte quartz feel more authentic.
Texture matters here. A slightly imperfect surface adds depth and warmth.
Why This Works
Midcentury design favored natural materials. Wood or stone with subtle variation keeps the kitchen from feeling sterile.
It also softens the clean geometry of cabinets.
How to Do It
- Install butcher block or matte-finish quartz.
- Seal wood properly to prevent stains.
- Keep edge profiles simple and squared.
- Avoid ornate edging details.
Simple shapes keep the focus on material.
Style & Design Tips
Choose lighter wood if your cabinets are dark. Balance prevents the space from feeling heavy.
Avoid overly busy granite patterns.
Pro Tip or Budget Hack
You can use butcher block on just the island to cut costs while still bringing in that organic element.
10. Retro Color Accents in Small Doses
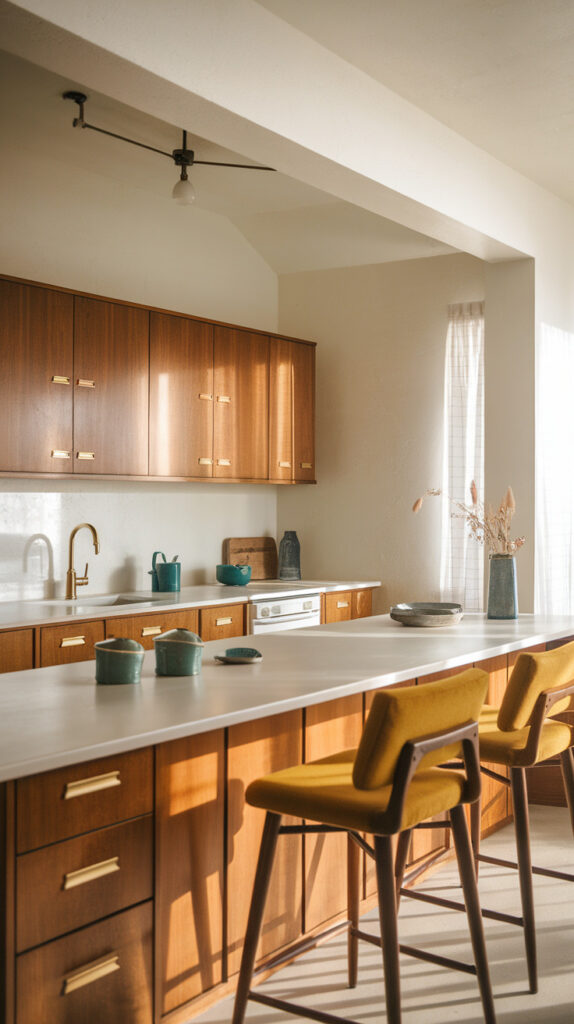
Painting the entire kitchen avocado green might sound bold, but it rarely ages well. Instead, sprinkle retro color in smaller ways.
Bar stools, small appliances, or even artwork can carry the vibe without overwhelming the room.
Why This Works
Accent colors create personality without permanent commitment. They allow flexibility if your tastes shift.
Midcentury style uses color strategically, not randomly.
How to Do It
- Choose one retro-inspired accent color.
- Add it through bar stools, dishware, or small décor.
- Repeat the color subtly in two or three spots.
- Keep the rest of the palette grounded.
Restraint keeps it classy.
Style & Design Tips
Mustard, teal, and burnt orange work beautifully with wood tones. Overuse can tip into theme territory fast.
Let neutral surfaces balance stronger colors.
Pro Tip or Budget Hack
Start with accessories you can swap out easily. If you get tired of the color, you’re not repainting cabinets—just replacing stools.
The Foundation of a Timeless Midcentury Kitchen
Midcentury design only looks effortless when the foundation is handled properly. Before choosing colors or lighting, the layout, materials, and proportions need to support how the kitchen actually functions day to day.
Start with flow. The classic kitchen work triangle—sink, stove, refrigerator—should feel natural and unobstructed, especially if you’re adding islands or banquette seating.
Midcentury spaces were designed around efficiency, not decoration. Storage, prep space, and movement paths always came first, and that’s a mindset worth keeping.
Layout Before Aesthetics
It’s easy to fall in love with walnut cabinets or retro pendants before checking measurements. Always map out clear walking paths and confirm door swings won’t collide with appliances or islands.
In smaller kitchens, slim profiles and visual openness matter more than oversized features. Prioritize usable counter space over decorative extras.
Materials That Age Well
Midcentury kitchens succeed long-term because they use materials that develop character over time. Real wood, matte finishes, and subtle textures wear in rather than wear out.
Avoid overly trendy finishes that may look dated in two years. A strong foundation makes it easier to swap accents later without needing a full renovation.
Color Discipline
Midcentury color palettes feel bold but controlled. Most successful kitchens use a neutral base, one primary accent tone, and one subtle secondary accent.
When you limit the palette intentionally, the design feels curated instead of chaotic.
Common Mistakes to Avoid
Midcentury style can quickly cross into theme territory if you’re not careful. The goal is retro-inspired, not a museum recreation.
Here are mistakes that commonly derail the look.
Overloading on Retro Colors
Avocado green, mustard, and burnt orange are iconic, but using all of them at once rarely works. Too many saturated tones compete and overwhelm the space.
Choose one dominant accent color and repeat it intentionally.
Mixing Too Many Wood Tones
Warm wood is essential, but random wood shades can look accidental. If you mix tones, do it deliberately with contrast or consistency in undertones.
Cool-toned wood paired with warm walnut often clashes.
Ignoring Lighting Temperature
Bright white bulbs can make a midcentury kitchen feel sterile. Warm white lighting enhances wood tones and softens clean lines.
Lighting temperature affects the entire mood more than most people realize.
Choosing Decorative Over Functional Pieces
Sputnik chandeliers look amazing, but if they block sightlines or hang too low, they become impractical. Always measure height and clearance before committing.
Midcentury design balances sculptural beauty with usability.
Going Too Minimal
There’s a difference between clean and empty. If a space feels flat, layer in texture through textiles, ceramics, or wood grain rather than adding more color.
Warmth prevents minimalism from feeling cold.
Budget Planning & Renovation Considerations
A midcentury kitchen upgrade can range from a simple refresh to a full remodel. Setting a realistic budget early prevents half-finished projects.
Small upgrades often deliver surprisingly strong results.
High-Impact, Low-Cost Upgrades
Swapping hardware, adding new lighting, or repainting cabinets can dramatically shift the look without demolition. These changes often cost a fraction of full cabinet replacement.
Peel-and-stick backsplash options also provide temporary flexibility.
Mid-Range Investments
Refacing cabinets, installing butcher block counters, or building a banquette fall into the mid-range category. These upgrades improve both function and style.
They’re ideal if you want lasting change without tearing out everything.
Full Renovation Planning
If you’re redesigning layout, plumbing, or electrical systems, consult a professional early. Structural changes affect cost and timeline significantly.
Always include a contingency buffer in your budget for unexpected issues.
Styling for Everyday Living
A kitchen should look good in photos, but it needs to work on a Tuesday night when you’re tired and cooking dinner. Styling should support daily use, not complicate it.
Midcentury kitchens excel when form and function stay balanced.
Keep Surfaces Intentionally Edited
Open shelves and countertops should feel styled but not cluttered. Leave breathing room between objects.
Editing regularly keeps the space looking intentional.
Rotate Accessories Seasonally
Instead of redesigning the whole kitchen, swap smaller accent items. Changing bar stool cushions or small décor pieces refreshes the look without major effort.
This keeps the retro style feeling current rather than frozen in time.
Prioritize Maintenance
Wood countertops require sealing. Brass hardware develops patina over time.
Understanding upkeep ensures materials age gracefully instead of becoming a frustration.
Frequently Asked Questions
1. Can I mix midcentury style with modern appliances?
Yes, and you should. Stainless steel appliances blend well with warm wood cabinets and clean lines.
The key is keeping appliance finishes consistent.
2. Is midcentury design suitable for small kitchens?
Absolutely. The emphasis on clean lines and visual openness often makes small kitchens feel larger.
Slim islands and open shelving help maximize space.
3. What colors work best in a midcentury kitchen?
Warm wood tones combined with muted greens, mustard, teal, or burnt orange work beautifully.
Stick to one or two accent colors for balance.
4. Do I need authentic vintage pieces?
No. Modern reproductions often provide better durability and functionality.
A single vintage accent can add charm without complicating the space.
5. Are open shelves practical for everyday use?
They work well if you stay organized and avoid overcrowding. Display only frequently used items.
If you prefer hidden storage, limit open shelving to one section.
6. How do I prevent the style from feeling outdated?
Focus on timeless foundations like layout and materials. Use color and accessories for personality.
This makes it easy to update accents without redoing the entire kitchen.
Final Thoughts
Midcentury kitchens succeed because they prioritize function and clarity over trend-chasing. When every choice serves a purpose, the style feels effortless instead of forced.
The key is restraint. Add warmth, keep the lines clean, and layer in personality without overdoing it.
I’ve seen these ideas work in tiny apartments and full renovations alike. Stick to the basics, trust your eye, and don’t overthink it—you’ve got this.