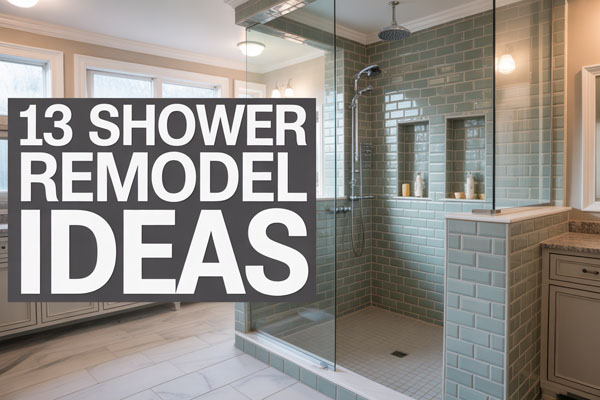
10 Stand-Up Shower Ideas That Instantly Upgrade Your Space
A stand-up shower usually looks better when it solves two problems at once: it makes the bathroom feel less cramped and it cuts down on visual clutter. That is why the smartest upgrades are not always the flashiest ones.
A lot of bathrooms get stuck in that awkward middle zone where the shower technically works, but the whole space feels dated, tight, or just kind of forgettable.
I’ve seen tiny bathrooms look expensive with a few smart changes, and I’ve also seen big bathrooms waste every bit of their potential with bad tile, bulky doors, and weird layout choices.
1. Go Doorless for a Cleaner, More Open Look
A shower door can make a small bathroom feel boxed in fast, especially when the glass is framed, bulky, or constantly covered in water spots. A doorless stand-up shower immediately opens the sightline and makes the room feel less fussy.
This idea works best when the layout already gives you enough depth to control splash, so it is not some magic trick for every bathroom on earth. Still, when the space allows it, this is one of those upgrades that makes the bathroom feel custom instead of builder-basic.
Why This Works
A doorless shower removes visual interruptions, which helps the eye move across the room without hitting a hard stop. That simple shift makes even an average bathroom feel calmer, bigger, and way more modern.
It also cuts back on hardware, hinges, tracks, and all the annoying little areas where grime loves to settle in and act like it pays rent. Less stuff in the way usually means less cleaning, and I will never argue with that.
How to Do It
- Measure the full shower depth first, because a doorless layout needs enough length to keep water from splashing all over the floor.
- Add a fixed glass panel or a partial wall near the entry so the opening stays open without turning the room into a splash zone.
- Slope the floor correctly toward the drain, because this is one of those details that quietly makes or breaks the whole setup.
- Use a handheld shower head on a rail if possible, since that gives you more control over water direction.
Style & Design Tips
Keep the opening simple and avoid overcomplicating the design with too many materials fighting each other. Large-format tile, clear glass, and a minimal metal finish usually look sharper than trendy add-ons that age badly.
Skip dark grout on pale tile unless you truly love a high-contrast look, because it can make the whole shower feel chopped up. I also think doorless showers look best when the rest of the bathroom stays visually quiet.
Pro Tip or Budget Hack
If a full custom doorless conversion is too pricey, remove a dated shower door and replace it with one fixed glass panel instead of rebuilding everything. That single change can give you the open look without dragging your budget into nonsense territory.
2. Use Floor-to-Ceiling Tile to Make the Shower Feel Taller
Short tile stops can make a stand-up shower feel unfinished, even when the materials themselves look nice. Running tile all the way to the ceiling gives the shower a more polished, intentional feel right away.
This is one of my favorite tricks because it does not rely on a huge footprint or a luxury budget to make an impact. The room just looks more complete, and honestly, that matters more than people think.
Why This Works
Vertical coverage pulls the eye upward, which makes the space feel taller and more architectural. It also protects more wall area from moisture, which is practical and not just pretty.
A fully tiled shower tends to look more custom because it avoids that awkward cutoff line where cheap installs usually scream for attention. Even simple tile looks richer when it is carried through with confidence.
How to Do It
- Choose one main wall tile and commit to taking it all the way up, because stopping halfway weakens the effect.
- Use a clean edge trim or finished tile edge at transitions so the install looks deliberate instead of patched together.
- If the ceiling is low, run the tile vertically or use elongated shapes to enhance height.
- Caulk the corners properly and seal where needed, because a gorgeous shower with bad finishing is still a bad shower.
Style & Design Tips
Stick with a tile that has enough variation to feel interesting but not so much movement that the shower starts looking chaotic. Matte porcelain, soft stone looks, and subtle vertical stacks usually age better than super-busy patterns.
If you want the space to feel larger, match the shower tile to the bathroom floor or at least keep the tones close. Too many color jumps can make a stand-up shower feel like a separate little box shoved into the room.
Pro Tip or Budget Hack
Use premium-looking tile on the most visible shower walls and a more affordable coordinating tile on the less noticeable surfaces. That move saves money without making the shower look cheap, which is the sweet spot.
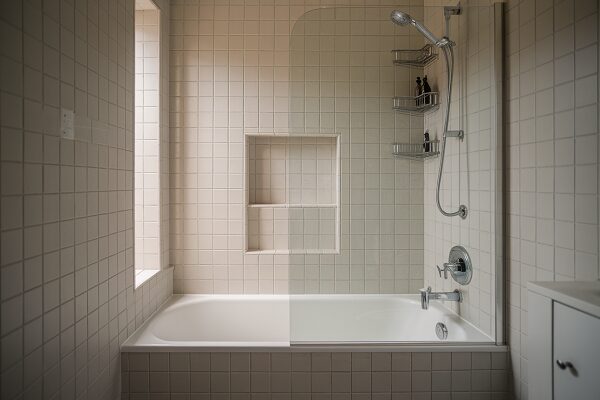
3. Add a Built-In Shower Niche Instead of Clunky Caddies
Nothing ruins a nice shower faster than plastic bottles balancing on the floor or a rusty corner rack trying its best. A built-in niche gives you storage without adding visual clutter, and that alone is a major upgrade.
It also makes the shower feel planned instead of improvised, which is a big difference. Even a basic stand-up shower starts to look more high-end when storage is built into the wall.
Why This Works
A niche keeps daily essentials accessible while preserving a clean layout, so the shower stays functional without looking crowded. It also removes the need for hanging baskets or tension poles, which almost always make the whole setup feel temporary.
From a design standpoint, a niche adds depth and gives you a chance to bring in contrast or detail in a controlled way. That is useful when the rest of the shower is simple and needs one focal point.
How to Do It
- Place the niche at a height that feels natural for grabbing bottles, because too high or too low gets annoying fast.
- Make sure it lands between wall studs or plan framing changes early if you want a wider layout.
- Slope the niche shelf slightly forward so water drains instead of pooling in the back.
- Waterproof the niche carefully, because this is not an area where shortcuts end well.
Style & Design Tips
A horizontal niche looks sleek and modern, while a stacked vertical niche can work better if multiple people use the shower and each needs their own space. Matching tile creates a seamless look, while accent tile inside the niche gives you a little design moment without turning dramatic for no reason.
Do not make the niche tiny unless you enjoy knocking bottles over every morning. I also avoid overly intricate mosaic patterns inside niches unless the rest of the shower is extremely simple.
Pro Tip or Budget Hack
If cutting into the wall is not realistic during a quick refresh, create the look with a recessed storage shelf kit made for shower walls. It is not as custom as a fully built niche, but it still beats a dangling metal caddy by a mile.
4. Choose a Frameless Glass Panel for a More Modern Finish
A heavy metal-framed shower enclosure can date a bathroom almost instantly. Swapping that for a frameless glass panel gives the whole space a cleaner, lighter look without changing the full layout.
This works especially well in bathrooms that already feel a little tight or dark. Clear glass lets the tile and the shape of the shower do the talking instead of hiding everything behind visual clutter.
Why This Works
Frameless glass keeps the room feeling open because it allows light and sightlines to move through the space freely. It also highlights the materials inside the shower, which is great when you actually picked tile you want people to notice.
The lack of thick framing makes the bathroom feel more refined. There is something about chunky old trim around shower glass that always feels one bad decision away from 2007.
How to Do It
- Measure the opening carefully and confirm the wall is plumb, because frameless glass needs precise installation.
- Choose tempered safety glass with the right thickness so it feels sturdy and not flimsy.
- Pair it with minimal hardware in a finish that matches your other fixtures.
- Use a pro for the install if the panel is large, because this is not the place for chaotic DIY confidence.
Style & Design Tips
Keep the metal finish consistent across the shower head, faucet trim, towel hooks, and glass hardware. Black, brushed nickel, and warm brass all work, but mixing three finishes usually makes the room feel confused.
Avoid frosted glass unless privacy is absolutely necessary, because it visually closes the space more than clear glass does. When the goal is to upgrade a stand-up shower, openness is usually your friend.
Pro Tip or Budget Hack
A single fixed frameless panel often costs less than a full custom enclosure and still gives you that modern look. It is one of those upgrades that feels expensive without demanding full luxury-money behavior.
5. Install a Bench or Corner Seat for Function and Style
A stand-up shower does not need a giant footprint to include seating. Even a compact bench ledge or triangular corner seat can make the shower more comfortable and make the design feel more intentional.
I like this idea because it balances comfort with practicality. It gives you a spot for shaving, setting products down, or just not feeling like you are rushing through everything.
Why This Works
Built-in seating adds function while also giving the shower a more spa-like layout. That extra surface breaks up flat wall space in a useful way, so the design feels layered instead of plain.
It can also improve accessibility, which matters more than people admit when planning long-term bathroom upgrades. A shower that looks good now but works badly later is not exactly a genius investment.
How to Do It
- Decide whether the seat should be a full bench, a floating ledge, or a small corner perch based on your shower size.
- Build it with waterproof backing and proper pitch so water does not sit on the surface.
- Finish it in the same tile as the shower for a seamless look or in a coordinating slab for contrast.
- Test the height before finalizing, because comfort matters more than guessing.
Style & Design Tips
A floating bench looks sleek and contemporary, while a full built-in bench feels more solid and architectural. Quartz, stone-look slabs, and matching tile wraps all work beautifully when the lines stay clean.
Do not oversize the seat in a small shower just because it looked cute online. A bulky bench can eat up standing space fast and make the shower feel awkward instead of upgraded.
Pro Tip or Budget Hack
A small prefab corner seat costs less and uses less material than a full bench while still delivering the same practical benefit. That is a smart move when you want the comfort without rebuilding half the shower.
6. Try a Bold Accent Wall Without Overdoing the Whole Bathroom
A stand-up shower can completely change the feel of the bathroom when one wall gets special treatment. An accent wall adds personality without forcing you to tile every surface like you are trying to win an award for Most Dramatic Bathroom in the Zip Code.
This idea works especially well if the rest of the room is simple and needs one strong focal point. Done right, it brings energy to the space without making it feel busy.
Why This Works
An accent wall creates visual depth and gives the eye a clear place to land, which makes the shower feel more designed. It also lets you take a little risk with color or pattern without committing the entire bathroom to that choice.
Because the accent stays contained, the bathroom still feels balanced. That is the beauty of this move: you get impact, but you do not end up trapped by a trend you hate in a year.
How to Do It
- Pick the most visible wall, which is usually the back wall of the shower, so the accent feels intentional.
- Choose one standout material such as zellige-look tile, vertical stripe tile, pebble, or a moody stone finish.
- Keep the surrounding walls simpler so the accent has room to breathe.
- Repeat one color or finish elsewhere in the bathroom so the wall feels connected to the whole design.
Style & Design Tips
Bold does not have to mean loud. Deep green, charcoal, warm clay, or textured off-white can all create interest without making the shower feel like a theme park.
Avoid combining a strong accent wall with busy floor tile and flashy hardware at the same time. When everything screams, nothing actually looks good, and the bathroom just ends up tired.
Pro Tip or Budget Hack
Use the statement tile only on one wall and a more affordable coordinating field tile everywhere else. You still get the custom look, and your budget does not have to take a dramatic little collapse.
7. Upgrade the Shower Floor With Small Tile or Pebble Detail
People focus so much on shower walls that the floor gets ignored, which is wild because the floor is doing actual work every day. Changing the shower floor can instantly upgrade the whole stand-up shower even if the wall tile stays pretty simple.
This is also a smart move when you want texture, slip resistance, or a subtle design feature. I have seen a boring shower wake right up from a good floor choice alone.
Why This Works
Smaller tile or pebble detail adds grip and handles slope better around the drain, so it is practical first and pretty second. It also introduces contrast at the bottom of the shower, which gives the design more depth.
A fresh floor can make the shower feel custom because it looks more intentional than a one-material-everywhere install. It is one of those details people notice without always realizing why the space feels better.
How to Do It
- Choose mosaic tile, sliced pebble, or another small-format option rated for wet floors.
- Use grout lines to your advantage, because more grout joints can improve traction when the tile is selected well.
- Keep the drain placement in mind early so the layout does not look awkward once installed.
- Seal natural stone or pebble properly if you use it, because maintenance matters.
Style & Design Tips
A contrasting floor works well when the walls are simple, while a tone-on-tone floor creates a softer, more seamless look. Matte finishes usually feel better underfoot and look less slippery than glossy tile.
Be careful with super-rounded pebble floors that feel lumpy or uncomfortable. I prefer flatter pebble styles or small mosaics because they look great without making your feet work overtime.
Pro Tip or Budget Hack
If a full shower redo is too much, upgrading only the floor during a focused remodel can still make the shower feel dramatically newer. That smaller surface area can give you room to splurge on a better material without wrecking the budget.
8. Add Warm Metal Fixtures for an Instant Luxe Touch
Sometimes the shower itself is fine, but the fixtures look like they came free with the house and a shrug. Swapping basic hardware for warmer, richer metal finishes can upgrade the shower fast without changing the bones of the room.
I especially like this move when the tile is simple and neutral. Good fixtures can make a plain stand-up shower look intentional instead of unfinished.
Why This Works
Fixtures act like jewelry for the shower, which sounds slightly dramatic but is still true. When the finish looks elevated, the entire setup feels more polished and put together.
Warm metals also add contrast and softness in bathrooms that otherwise feel cold or flat. That little bit of warmth can keep an all-white or gray bathroom from feeling sterile.
How to Do It
- Pick one finish such as brushed brass, champagne bronze, or warm nickel and use it consistently.
- Replace the shower head, control trim, handle, and any matching accessories at the same time if possible.
- Check valve compatibility before buying trim kits, because not every pretty fixture set plays nicely with existing plumbing.
- Balance the finish with the rest of the room so it feels intentional and not random.
Style & Design Tips
Warm finishes pair especially well with white tile, greige stone looks, deep green accents, and soft wood tones. Brushed finishes usually hide water spots better than highly polished ones, which is a practical win.
Avoid mixing a cool chrome shower with warm brass cabinet pulls unless you really know what you are doing. A little contrast can be chic, but accidental mismatch usually just looks like the renovation ran out of steam.
Pro Tip or Budget Hack
If you cannot replace everything, start with the most visible shower trim and head first. That one change often delivers most of the visual payoff without forcing a full fixture overhaul.
9. Bring in a Half Wall for Privacy Without Closing Off the Room
A full enclosure is not the only way to create structure around a stand-up shower. A half wall gives you some privacy and splash protection while still keeping the room visually open.
This is a great option for bathrooms that feel exposed but cannot afford to lose openness. It adds shape and separation without making the shower feel boxed in.
Why This Works
A half wall creates a sense of division, which helps the shower feel like a defined zone inside the bathroom. At the same time, because the wall stops short, the room still breathes and does not feel chopped into tiny pieces.
It also opens the door for layered designs with tile below and glass above, which can look seriously sharp. That combo often feels custom in a way that standard enclosures do not.
How to Do It
- Decide the right wall height based on privacy, splash control, and sightlines from the rest of the bathroom.
- Frame and waterproof the wall correctly, because this is still part of a wet zone.
- Finish the top with stone, slab material, or a clean tile cap so it looks complete.
- Add clear glass above or beside it if you want extra protection without sacrificing openness.
Style & Design Tips
A half wall looks best when its proportions feel deliberate and tied to the shower layout. Tile-wrapped walls, slab caps, and minimal glass extensions keep the overall design looking crisp.
Do not make the wall too chunky in a tight bathroom. A bulky pony wall can dominate the room fast, and then the whole point of keeping things open starts falling apart.
Pro Tip or Budget Hack
If full custom glass is too expensive, pair a half wall with one standard-size glass panel instead of a full door setup. That combination often saves money while still delivering a modern, high-end look.
10. Keep It Minimal With One Cohesive Color Palette
One of the easiest ways to make a stand-up shower feel upgraded is also one of the least flashy: stop mixing too many finishes, tones, and tile ideas in one small space. A tight, cohesive color palette makes the shower look calmer, cleaner, and way more expensive.
I come back to this all the time because it works in almost every bathroom size. You do not need twenty dramatic choices when three good ones will do the job better.
Why This Works
A limited palette reduces visual noise, which helps the shower feel bigger and more intentional. It also lets texture, shape, and layout stand out without fighting against random color changes.
When every element relates to the next, the bathroom feels settled instead of scattered. That is usually the difference between a shower that feels designed and one that feels pieced together during three separate sale weekends.
How to Do It
- Pick one main tile color, one supporting tone, and one metal finish before you buy anything.
- Repeat those choices consistently across the shower walls, floor, fixtures, and nearby bathroom elements.
- Use texture for interest if the color palette is simple, because contrast does not have to come only from color.
- Review all samples together in the bathroom before committing, since lighting can shift undertones more than people expect.
Style & Design Tips
Soft white, warm beige, muted gray-green, taupe, and natural stone tones tend to age well and work with a lot of styles. Tone-on-tone layering often looks more expensive than harsh contrast, especially in smaller bathrooms.
Avoid throwing in a random accent color just because the space feels too plain during planning. Nine times out of ten, the real issue is that the texture mix is weak, not that the bathroom needs a surprise turquoise moment.
Pro Tip or Budget Hack
Use paint, towels, and smaller accessories to bring in changeable color outside the shower while keeping the permanent materials neutral. That way the expensive parts stay timeless, and you can switch the mood later without another remodel.
Shower Design Factors to Consider Before You Commit
A beautiful shower can still be a pain to live with if the layout ignores water control, cleaning, or daily use. Before picking tile and fixtures, make sure the shower size, entry position, drain slope, and storage plan actually work for real life.
Think about who uses the bathroom, how much maintenance you can tolerate, and whether the style choices will still look good once shampoo bottles, steam, and hard water enter the chat. I always say the best shower upgrades are the ones that still feel smart six months later, not just on installation day.
Common Mistakes That Can Ruin a Stand-Up Shower Upgrade
One of the biggest mistakes is chasing trendy materials without thinking about scale, maintenance, or how the room actually functions. Huge drama on every surface usually makes a small bathroom feel messy, not luxurious.
Another mistake is spending all the money on finishes while ignoring practical details like storage, splash control, or fixture placement. The prettiest shower in the world still gets annoying fast if you cannot set down a bottle or stop water from escaping.
FAQ
What is the best stand-up shower idea for a small bathroom?
A doorless layout, frameless glass, or a cohesive light color palette usually works best in a small bathroom. Those choices keep the room feeling open instead of chopped up.
Are doorless showers hard to keep dry?
They can work very well when the layout has enough depth and the water direction is planned correctly. Without that, yes, the bathroom floor may end up getting more action than it asked for.
What tile size works best in a stand-up shower?
Large-format tile works beautifully on walls because it creates a cleaner look with fewer grout lines. Small tile is often better on the shower floor because it handles slope and traction more effectively.
Is a built-in bench worth it in a smaller shower?
It can be, but only if the shower is large enough to keep comfortable standing room. In tighter spaces, a corner seat often makes more sense than a full bench.
What shower finish looks the most timeless?
Brushed nickel, soft stone looks, white or warm neutral tile, and simple clear glass tend to hold up really well over time. Trendy choices can still work, but they need more restraint.
How can I make my shower look expensive on a budget?
Focus on one or two upgrades that carry the most visual weight, like better glass, full-height tile, or upgraded fixtures. A clean layout and a consistent palette usually do more than a bunch of random expensive add-ons.
Final Thoughts
The best stand-up shower upgrades do not rely on size alone. They rely on smart choices, good proportions, and a little restraint, which is not always the fun answer but it is usually the right one.
Even one solid change can make the whole bathroom feel better. Personally, I’d start with the layout first and the flashy stuff second, because a shower that works well will always look better too.