10 Standing Shower Ideas That Instantly Upgrade Your Space
Standing showers usually look better when they solve a layout problem instead of trying too hard to look fancy. That is why the best upgrades are the ones that make the bathroom feel cleaner, easier to move through, and less visually crowded.
I have noticed that a lot of bathrooms feel dated for one simple reason: the shower takes up space without giving anything back. A smart standing shower fixes that by improving function, sharpening the overall look, and making the room feel more intentional.
Some of these ideas are great for full remodels, and some are surprisingly doable without ripping apart the whole bathroom. Either way, the goal is the same: make the shower look more custom, more polished, and way less like an afterthought.
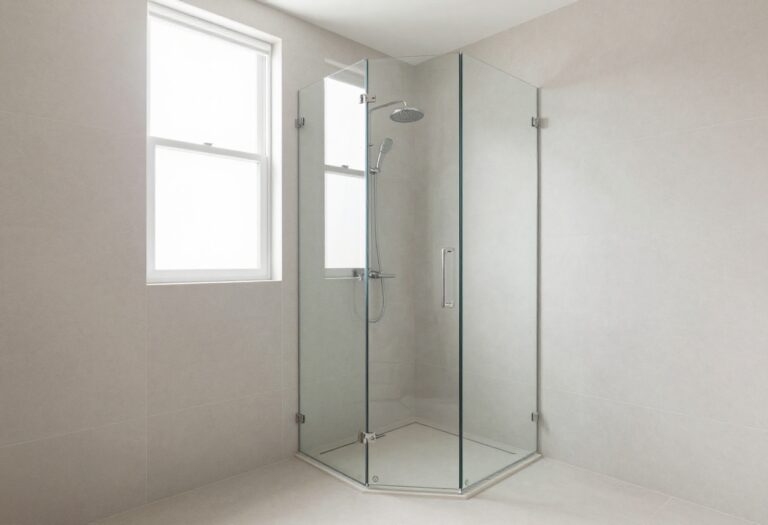
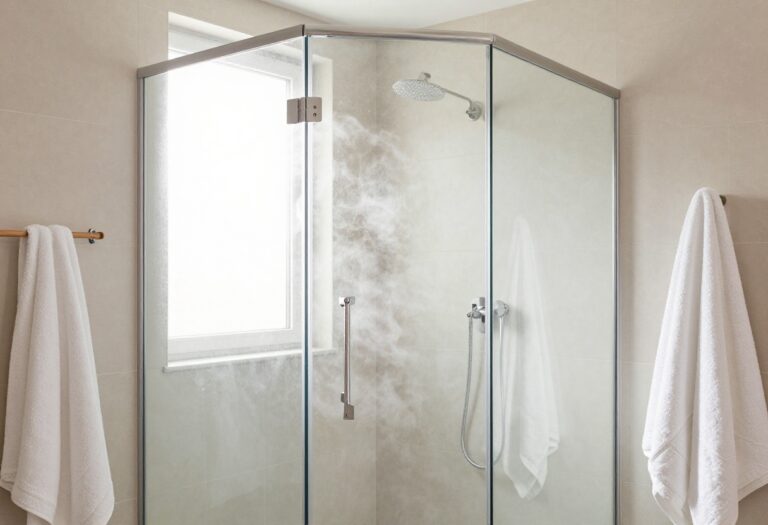
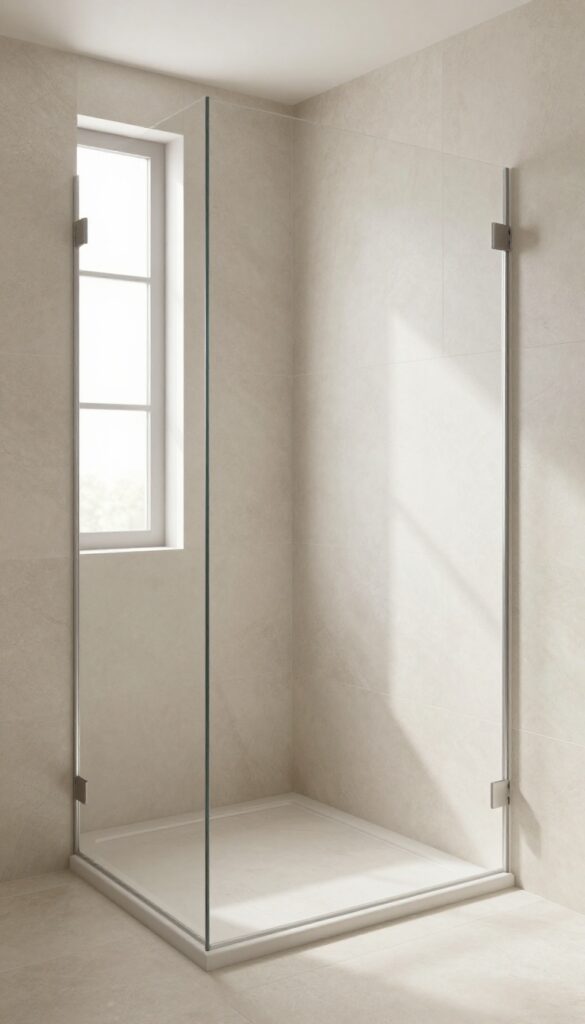
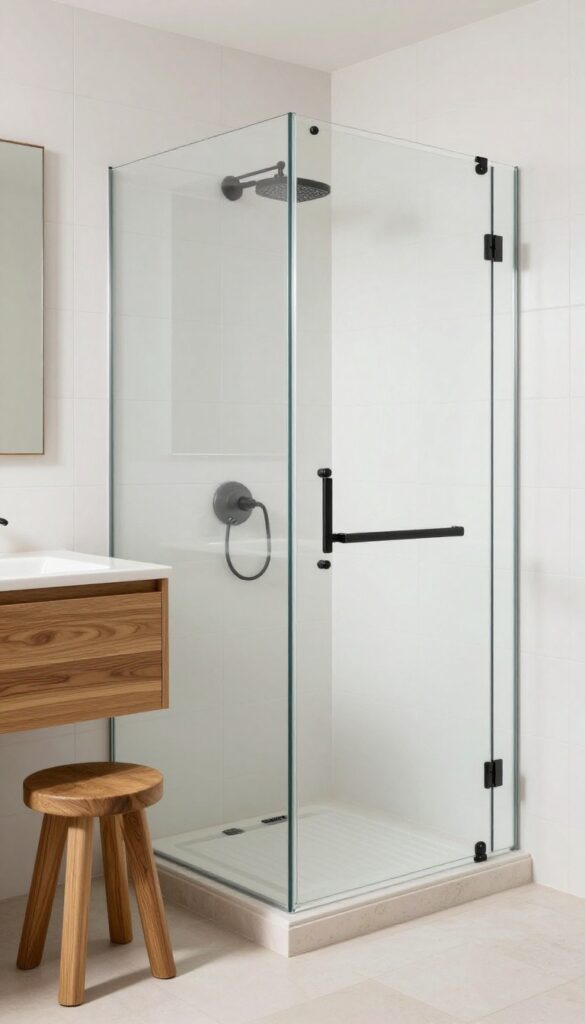
1. Frameless Glass Standing Shower
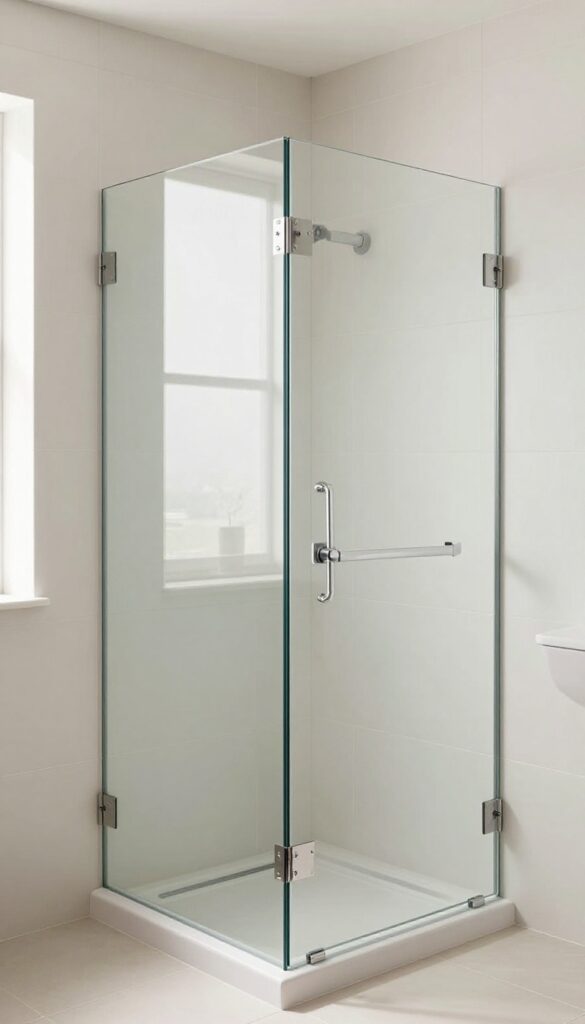
A bulky shower frame can make the whole bathroom feel chopped up, especially in smaller layouts where every visual break matters. A frameless glass standing shower solves that fast because it opens the sightline and makes the room feel less boxed in.
I like this idea because it works with almost any style, from modern to soft farmhouse to simple neutral spaces. It also gives tile, hardware, and wall color a chance to stand out instead of letting metal trim steal all the attention.
Why This Works
Frameless glass creates visual flow, and that matters more than people think in a bathroom. When your eye can move across the room without hitting thick borders, the space instantly feels larger and cleaner.
It also makes the shower feel more custom, even if the rest of the bathroom is fairly simple. That is one of my favorite design tricks, honestly: use one clean upgrade to make everything around it look more expensive.
How to Do It
- Measure the shower opening carefully and decide whether you want a fixed panel, a hinged door, or a sliding option based on clearance.
- Choose tempered glass with minimal hardware because the whole point is to keep the look open and light.
- Pick hardware finishes that match your faucet and other metal details so the bathroom feels coordinated instead of randomly assembled.
- Keep the surrounding tile simple and neat because frameless glass shows everything, including sloppy lines and awkward grout choices.
Style & Design Tips
Clear glass usually works best if the goal is openness, but low-iron glass looks even better when you want that extra-crisp finish. Thin hardware and clean edges make a bigger difference here than fancy accessories ever will.
Try not to pair frameless glass with too many competing elements like busy tile, loud wall art, and oversized fixtures all at once. The mistake I see a lot is people paying for sleek glass and then cluttering the rest of the room until the effect disappears.
Pro Tip or Budget Hack
If a full custom frameless setup is out of budget, use a fixed glass panel with one open entry side instead of a full enclosure. It often costs less, still looks high-end, and skips the hassle of a swinging door in a tight bathroom.
2. Floor-to-Ceiling Tile Standing Shower
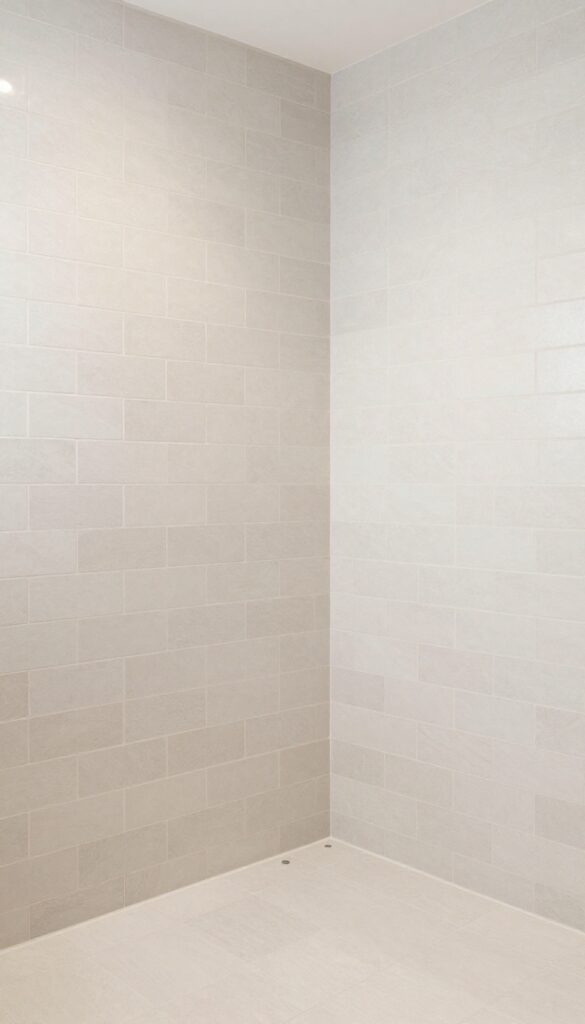
A standing shower can look unfinished when the tile stops at an awkward height or changes direction for no real reason. Running tile from floor to ceiling fixes that by giving the shower a strong, built-in look that feels intentional from top to bottom.
This idea works especially well in basic bathrooms that need structure without adding clutter. I have always liked how full-height tile makes even an average shower feel like somebody actually made design decisions instead of just checking off plumbing requirements.
Why This Works
Vertical coverage makes the shower zone feel taller, which is great if the bathroom is short on drama or height. It also protects the walls better in a wet area, so this is one of those rare upgrades that is both practical and good-looking.
There is also a visual calm that comes from finishing the whole space in one material. Your eye reads it as one clean architectural feature instead of a half-decorated corner trying to pretend it is enough.
How to Do It
- Choose a tile style that can handle full-wall coverage without feeling too busy, such as large-format tile, soft stone looks, or classic subway tile.
- Extend the tile all the way to the ceiling, even if the showerhead does not sit that high, because stopping early usually looks accidental.
- Use a matching trim or schluter edge for a cleaner finish, especially around corners and transitions.
- Pick grout color carefully since it changes the whole vibe, with matching grout feeling softer and contrast grout feeling more graphic.
Style & Design Tips
Large tiles can make the shower feel calmer because they reduce grout lines, while smaller tiles bring more texture and movement. Keep the tile pattern consistent unless you are intentionally creating a feature wall, because random changes can make the shower feel smaller.
If you want the room to feel brighter, go for warm white, pale greige, or soft beige instead of icy gray. That cool gray bathroom trend had a long run, but some of those spaces now feel like they were designed by a filing cabinet.
Pro Tip or Budget Hack
Use the splurge tile on the main visible shower wall and choose a more affordable coordinating tile for the side walls if needed. Nobody walks into a bathroom and starts judging the left wall like a tile detective.
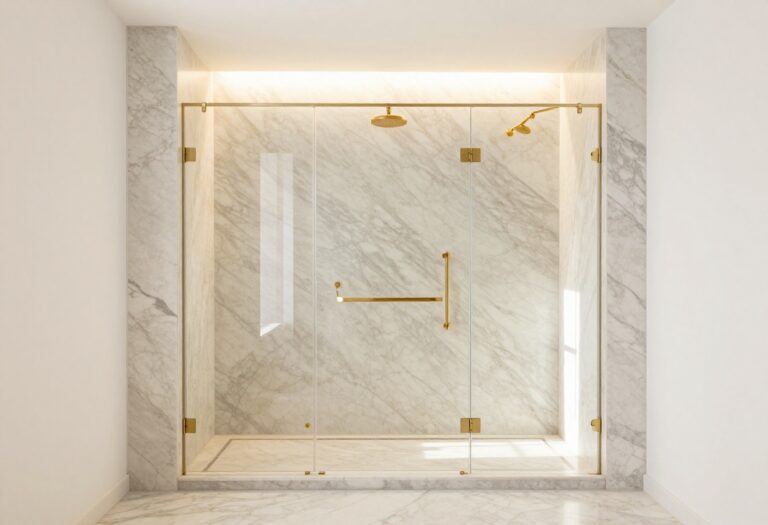
3. Black Hardware for a Stronger Contrast
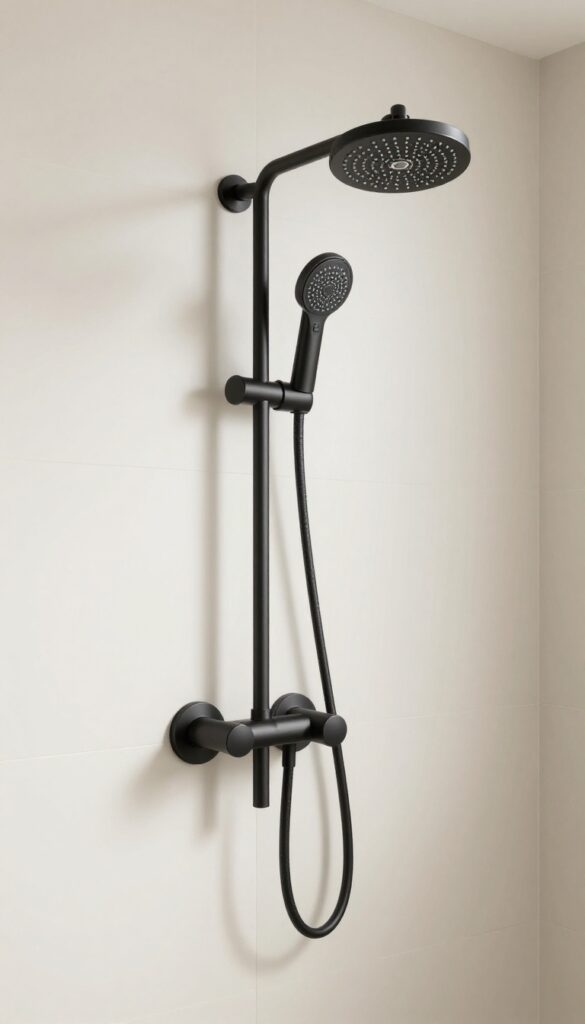
Some standing showers look fine but still feel forgettable because there is no contrast pulling the design together. Swapping in black hardware can change that fast by giving the shower sharper lines and a more finished, modern edge.
I like black accents when the room needs definition but not more stuff. A matte black shower frame, handle, showerhead, and drain cover can make a basic shower look styled without adding extra shelves, decor, or fussy details.
Why This Works
Black hardware acts like an outline, which helps the shower feel more structured and intentional. That contrast also works especially well in white, beige, or stone-toned bathrooms where everything else leans soft and quiet.
It is also one of the easiest ways to make builder-grade finishes look updated. Even if the tile is simple, black details can push the whole setup into that polished, magazine-ish zone people are usually chasing.
How to Do It
- Start by identifying all the visible metal in the shower, including the showerhead, handle, hinges, brackets, drain, and towel hooks.
- Replace as many of those pieces as possible in the same black finish so the space looks coordinated.
- Choose matte black over glossy black because it hides water spots better and feels more current.
- Pair the hardware with a neutral backdrop so the contrast has room to stand out instead of fighting with other bold elements.
Style & Design Tips
Black works best when it is repeated at least a few times throughout the bathroom. Consistency matters more than quantity, so even a few matching black elements will look stronger than a mix of finishes that never quite agree with each other.
Try not to force black into a bathroom full of warm brass and soft traditional details unless you are intentionally mixing styles. A little contrast is chic; a finish identity crisis is not.
Pro Tip or Budget Hack
If replacing every fixture is not realistic, focus on the shower trim kit, the showerhead, and one other visible detail like the door handle or towel ring. Those are the parts people notice first, so they do the heavy lifting for less money.
4. Built-In Shower Niche Instead of Caddies
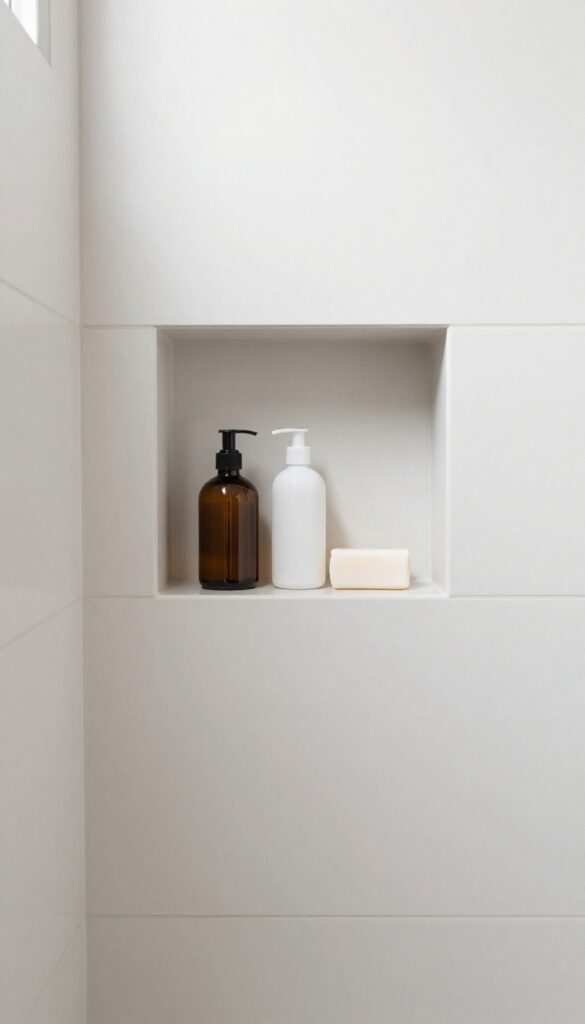
Nothing drags down a standing shower faster than a rusty caddy stuffed with half-used bottles and mystery razors. A built-in niche instantly makes the shower feel neater because storage becomes part of the wall instead of something hanging there for dear life.
This is one of those upgrades that feels small on paper but changes the daily experience in a big way. I am a huge fan of anything that makes a bathroom easier to clean and less annoying to look at, and niches absolutely do both.
Why This Works
A niche keeps toiletries off the floor and out of the corners, which makes the shower feel more open. It also creates a tailored look that feels custom, especially when the niche is lined up cleanly with the tile pattern.
It helps visually because it reduces clutter without asking you to become the kind of person who owns only two matching bottles. Most of us are not living like that, and the shower should not require a minimalist personality transplant to look decent.
How to Do It
- Decide where the niche should go based on reach, wall space, and the height of the people using the shower most.
- Make sure it is large enough for real bottles, not just cute sample-size products that belong in a hotel.
- Waterproof the niche correctly before tiling because this is not the place for shortcuts.
- Consider adding a slight slope on the bottom shelf so water drains out instead of pooling.
Style & Design Tips
A niche can either blend in with the tile or stand out with an accent tile, and both approaches can work well. Blending feels calmer, while a contrasting back panel gives the shower a focal point without taking over the whole wall.
Do not make the niche too small or place it at a weird height just to fit a tile layout. Good design still has to function, and nobody wants to do bottle gymnastics every time they shampoo.
Pro Tip or Budget Hack
If creating a recessed niche is not possible, install a slim wall-mounted shelf in a finish that matches your shower hardware. It is not quite as seamless, but it still looks far better than those wire baskets that scream rental survival mode.
5. Large-Format Tile for a Cleaner Look
Some standing showers feel busy before you even add products, towels, or a bath mat, and tiny tile is often the reason. Large-format tile calms everything down because it cuts the number of grout lines and makes the shower feel more open.
I have seen this make an especially big difference in narrow standing showers where too much pattern can make the walls feel like they are closing in. Bigger tile tends to read as cleaner, more modern, and easier on the eyes.
Why This Works
Fewer grout lines mean less visual interruption, which helps the shower feel sleek instead of fussy. That cleaner surface also means easier maintenance, and I do not know anyone who wakes up hoping for more grout to scrub.
Large-format tile can also mimic stone slabs without the slab-level price tag. That gives you a more elevated look while still keeping the project grounded in reality.
How to Do It
- Choose a large-format tile in a finish that suits your style, such as marble-look porcelain, soft concrete, or warm stone tones.
- Ask the installer to plan the layout carefully so you avoid tiny slivers at the edges, which can ruin the whole effect.
- Use a grout color that closely matches the tile if you want the surface to feel seamless.
- Pair the wall tile with a simpler floor tile that has enough grip, since shower floors still need traction even when you want everything to look sleek.
Style & Design Tips
Go for warm neutrals if you want the shower to feel current without leaning cold or sterile. Subtle veining and soft texture usually age better than loud patterns that look trendy for six months and exhausting for six years.
Do not forget scale when choosing large tile for a small shower. Oversized pieces can look amazing, but only when the layout still feels proportionate and not like someone wrestled a kitchen floor into the bathroom.
Pro Tip or Budget Hack
Use large-format tile on the shower walls only and keep the rest of the bathroom more basic if you need to control costs. That one move can make the shower look custom while the rest of the room quietly rides its coattails.
6. Warm Neutral Color Palette
A standing shower can feel cold even when it is technically updated, and the color palette is usually the problem. Warm neutrals make the space feel softer and more welcoming without sacrificing that clean, fresh bathroom look people want.
This is one of my favorite directions because it works in almost every home. White can be beautiful, sure, but when a bathroom leans too stark, it starts feeling more like a showroom than a space where actual humans brush their teeth.
Why This Works
Warm tones create visual comfort, which matters in a room full of hard surfaces like tile, glass, and metal. They soften the shower without making it look dark, dated, or overly decorated.
They also give you more flexibility with finishes. Black, brass, chrome, wood, and stone all play nicely with warm beige, creamy white, taupe, or greige, which makes the design process a lot easier.
How to Do It
- Start with a main tile or wall tone in a warm white, sandy beige, pale taupe, or mushroom shade.
- Test samples in the actual bathroom because artificial lighting can make a nice warm neutral turn weird fast.
- Layer in texture through tile finish, grout, wood accents, or soft stone looks so the palette does not feel flat.
- Choose one metal finish and let the warm tones support it instead of piling on too many competing statements.
Style & Design Tips
Warm neutral does not mean boring when you mix textures the right way. Matte tile, brushed metal, and soft natural tones can make a simple shower feel expensive without needing flashy colors or trendy patterns.
Avoid leaning too yellow, especially in bathrooms with limited natural light. The goal is calm and creamy, not “why does my bathroom look like soup” beige.
Pro Tip or Budget Hack
You do not always need new tile to shift the color feel. Sometimes repainting the bathroom walls, changing the bath mat, and swapping harsh white accessories for warmer ones can help the standing shower feel more intentional right away.
7. Statement Shower Floor Tile
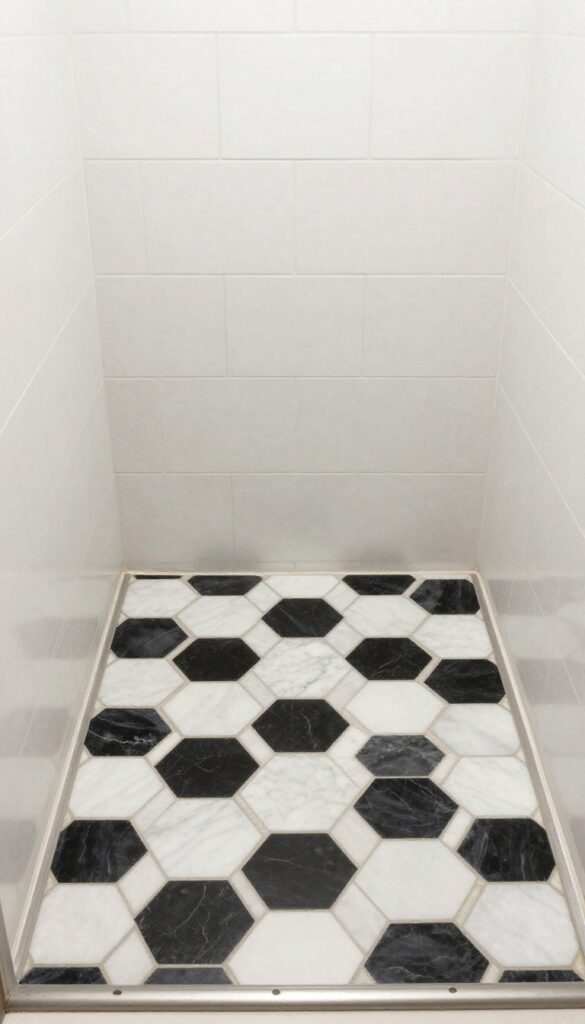
When the walls of a standing shower are simple, the floor is a great place to add personality without overwhelming the room. A statement floor tile brings interest at ground level, which gives the shower a custom feel while keeping the rest of the space calm.
I really like this move for bathrooms that need character but not chaos. It lets you do something fun with pattern, shape, or texture while still keeping the overall shower easy to live with.
Why This Works
The shower floor is a small zone, so you can afford to be a little bolder there. That makes it perfect for mosaic tile, pebble looks, geometric shapes, or a stronger contrast color without turning the whole bathroom into a visual shouting match.
It also draws the eye downward in a good way, which can make the walls feel taller and the overall shower more balanced. Used well, it adds detail without asking the entire room to commit to a dramatic personality.
How to Do It
- Keep the shower walls simple if the floor tile has pattern, texture, or strong contrast.
- Choose a floor tile rated for wet areas with enough grip to be safe underfoot.
- Repeat one color from the floor tile elsewhere in the bathroom so it feels connected to the rest of the design.
- Use clean grout lines and proper slope because even the prettiest floor tile will annoy you if water pools around it.
Style & Design Tips
Hex tile, penny tile, and subtle patterned mosaics are all solid choices depending on the vibe you want. Contrast works best when it feels controlled, so let the floor be the star and keep the walls from trying to compete.
Avoid picking a floor pattern that is so busy it makes the small space look chaotic. The floor should add interest, not make the shower feel like a game board.
Pro Tip or Budget Hack
If you love the look of a bold shower floor but need to save money, use a more affordable porcelain mosaic instead of natural stone. It still gives you the style hit without the extra cost and maintenance drama.
8. Wood-Look Elements for Warmth
A lot of standing showers look clean but still feel a little too hard around the edges. Adding wood-look elements nearby brings warmth and balance, which helps the whole shower area feel more grounded and less clinical.
I am not saying the bathroom needs to turn into a cabin spa overnight, but a little wood tone goes a long way. Even one floating vanity, teak stool, or wood-look tile detail can make the shower feel more layered and expensive.
Why This Works
Wood tones break up the glass, tile, and metal that usually dominate shower areas. That contrast keeps the bathroom from feeling flat and gives the eye something warmer to land on.
It also makes the standing shower feel more connected to the rest of the home. Bathrooms can get weirdly sterile if every finish screams “wipeable surface” and nothing adds softness or natural texture.
How to Do It
- Introduce wood tone through nearby cabinetry, shelving, a bath stool, or wood-look tile accents that can handle moisture.
- Stick to one wood tone family so the space feels intentional instead of mixed by accident.
- Use sealed or bathroom-safe materials in any zone that gets frequent moisture.
- Balance the warmth with simple finishes like white tile, black hardware, or soft stone so the room still feels clean.
Style & Design Tips
Medium oak, walnut, and natural teak tones usually work beautifully in modern bathrooms. The texture matters just as much as the color, so avoid fake-looking finishes that have that shiny printed pattern effect.
Do not overload a small bathroom with too many rustic elements unless that is the full design direction. One or two wood-inspired details can soften the shower; ten of them can start feeling like a themed restaurant bathroom.
Pro Tip or Budget Hack
A teak-style shower stool is one of the easiest ways to test this look without committing to a renovation. It adds warmth, looks elevated, and gives you a spot for shaving, products, or that one fancy body scrub you pretend is essential.
9. Open-Entry Standing Shower

Traditional enclosed showers can feel cramped, especially when the bathroom layout is tight and the door swing gets in the way. An open-entry standing shower makes the space feel easier to move through and instantly more modern.
I like this idea most in bathrooms that need a cleaner footprint and a more custom feel. It has that spa-inspired look people love, but it also solves actual layout headaches instead of being design fluff for the sake of drama.
Why This Works
Open-entry showers reduce visual bulk and make the room feel less segmented. They also improve accessibility because there is no door threshold or awkward opening angle to deal with.
When designed properly, they feel airy without sacrificing function. The key is making sure the layout controls splash zones, because “chic and open” stops being cute the minute water is halfway across the bathroom floor.
How to Do It
- Use a fixed glass panel or half wall to guide water while keeping the shower entrance open.
- Position the showerhead so it sprays away from the entry opening.
- Slope the floor correctly toward the drain because drainage is everything in this design.
- Keep enough clearance around the opening so the shower feels purposeful instead of unfinished.
Style & Design Tips
This look pairs especially well with large-format tile, minimal hardware, and warm neutral colors. Simplicity is the whole strength here, so try not to crowd the space with too many decorative details or fussy accessories.
Avoid forcing an open-entry design into a layout that clearly needs more containment. There is a difference between streamlined and constantly mopping the floor, and I strongly recommend staying on the right side of that line.
Pro Tip or Budget Hack
A partial glass panel can give you the open-shower look without the cost of a full custom enclosure. It is often enough to create that airy effect while still keeping water where it belongs.
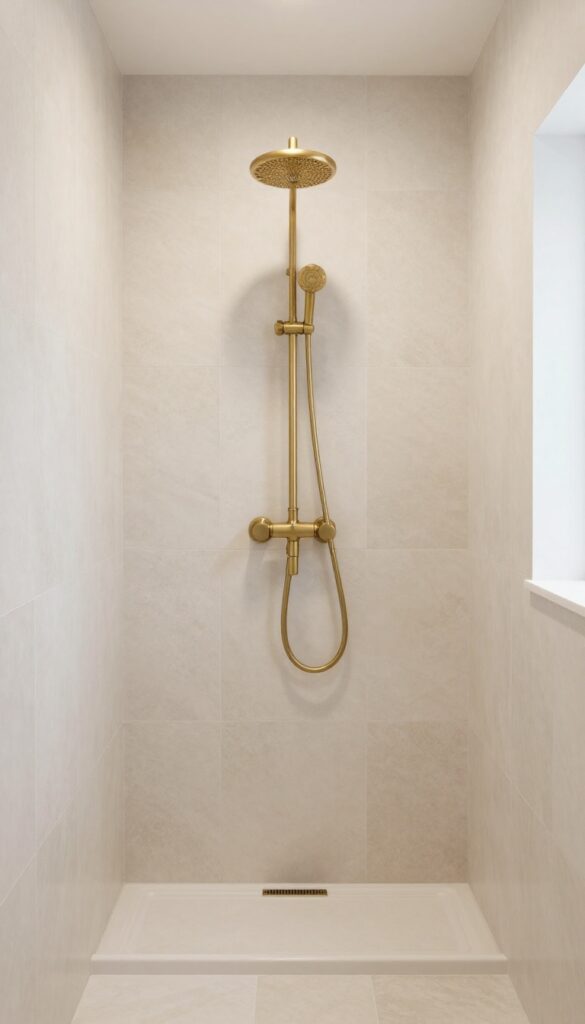
10. Ceiling-Mounted Rain Shower Feature
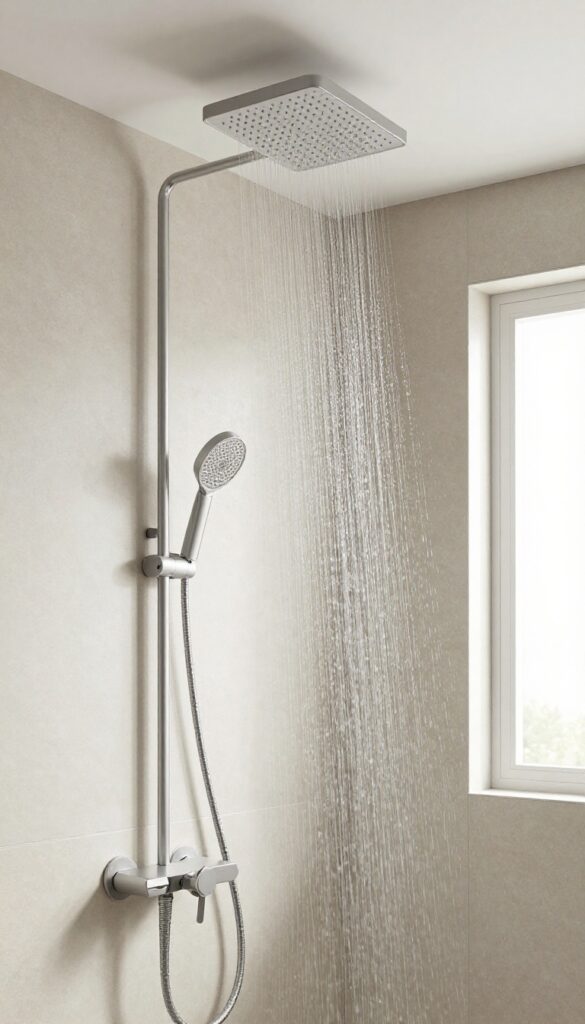
If the standing shower already looks decent but still feels a little ordinary, a ceiling-mounted rain shower can take it up a notch. It gives the shower a more luxurious feel without needing a ton of decorative extras.
I am usually careful with “spa-like” claims because people throw that phrase around for every bathroom with a rolled towel. Still, a good rain shower really does make the space feel more elevated when the rest of the design supports it.
Why This Works
A ceiling-mounted rain shower creates a cleaner line because the fixture does not jut out from the wall in the same way. That small change makes the shower feel more intentional and a lot more high-end.
It also changes the experience of the space, which matters just as much as the look. When an upgrade affects both function and feel, it usually ends up being worth it.
How to Do It
- Confirm that your plumbing setup can support a ceiling-mounted fixture before getting attached to the idea.
- Choose a rain shower head size that suits the shower scale so it feels balanced.
- Pair it with a handheld option if you want easier cleaning and more flexibility.
- Keep the ceiling finish simple and clean because the fixture naturally draws the eye upward.
Style & Design Tips
This feature works best in showers with enough overhead space and a clean overall layout. Minimal surroundings let the fixture feel luxe, while too much visual clutter can make it seem random or overly try-hard.
Do not install a rain shower just because it sounds fancy if the water pressure is weak or the shower is too small. A disappointing “luxury” feature is still disappointing, no matter how sleek the hardware looks.
Pro Tip or Budget Hack
If a true ceiling-mounted rain shower is too expensive, use a wall-mounted rain-style showerhead with a slim arm extension. You still get that softer overhead effect without opening the ceiling and inviting a whole new level of renovation chaos.
FAQ
1. What is the best size for a standing shower?
A comfortable standing shower usually starts around 32×32 inches, but 36×36 inches feels much better in real life. Anything smaller can feel tight, especially when you start adding niches, shelves, or thicker tile layers.
If space allows, going slightly bigger makes a huge difference in daily use. You will notice it immediately the moment you are not bumping your elbows every time you reach for shampoo.
2. Is a frameless glass shower hard to maintain?
It is not difficult, but it does require consistency if you want it to stay spotless. Water spots and soap residue show more easily on clear glass, especially in areas with hard water.
A quick wipe-down after showers and a weekly clean usually keeps it looking sharp. Using a water-repellent coating also helps reduce buildup and saves time long term.
3. Are standing showers better than bathtubs?
Standing showers are better for space, convenience, and everyday use, especially in smaller bathrooms. They make the room feel more open and are easier to step into compared to traditional tubs.
That said, if you enjoy soaking or need a tub for family use, removing it completely might not be the best move. It really depends on how you actually use your bathroom, not just what looks good online.
4. What type of tile is best for a standing shower?
Porcelain and ceramic tiles are the most popular because they are durable, water-resistant, and relatively easy to maintain. Natural stone can look beautiful, but it usually needs more upkeep and sealing.
For floors, always choose tiles with good grip to avoid slipping. Walls give you more flexibility, but it is still smart to pick finishes that handle moisture well over time.
5. How do I prevent water from splashing out of an open shower?
The layout does most of the work here, not just the glass panel. Positioning the showerhead away from the opening and creating the right floor slope helps keep water contained.
A fixed glass panel or half wall also blocks most splash without closing off the space. When done properly, you should not need to constantly deal with wet floors outside the shower.
6. Can I add a shower niche without a full renovation?
Yes, but it depends on your wall structure and whether you are already working with tile. Retrofitting a niche into an existing tiled wall can be tricky and sometimes not worth the hassle.
If a full niche is not practical, a sleek wall-mounted shelf is a solid alternative. It still improves organization without requiring you to tear into the wall.
7. What is the most budget-friendly way to upgrade a standing shower?
Start with small but visible changes like updating hardware, adding a better showerhead, or improving storage. These upgrades cost less but still make the shower feel more intentional.
If you want a bigger impact without a full remodel, focus on one key area like tile or glass instead of trying to change everything at once. A targeted upgrade usually looks more polished than spreading the budget too thin.
Final Thoughts
The best standing shower upgrades are the ones that make the bathroom feel easier, cleaner, and more pulled together all at once. A lot of the time, one strong change does more than five random trendy ones piled into the same space.
I would personally start with the layout first, then the tile, then the finishes. Once those pieces make sense, the whole shower usually starts looking better without much convincing.