10 Zero-Entry Shower Ideas for a Bathroom You’ll Actually Love
Good bathroom upgrades usually come down to one thing: whether they make daily life easier without making the room feel cold or overly “designed.” A zero-entry shower does that better than most remodel ideas because it removes the awkward step, opens up the layout, and instantly makes the space feel more modern.
I’ve always liked upgrades that look expensive but also solve an actual annoyance, and this is one of those rare ones. It feels cleaner, works better for all ages, and gives even a basic bathroom that custom look people usually chase with far more complicated changes.
The trick is knowing that “zero-entry” does not automatically mean sterile, bland, or hotel-like in the boring way. With the right layout, materials, and little design choices, it can feel warm, stylish, practical, and honestly a lot easier to live with.
1. Keep It Seamless With One Continuous Floor Tile

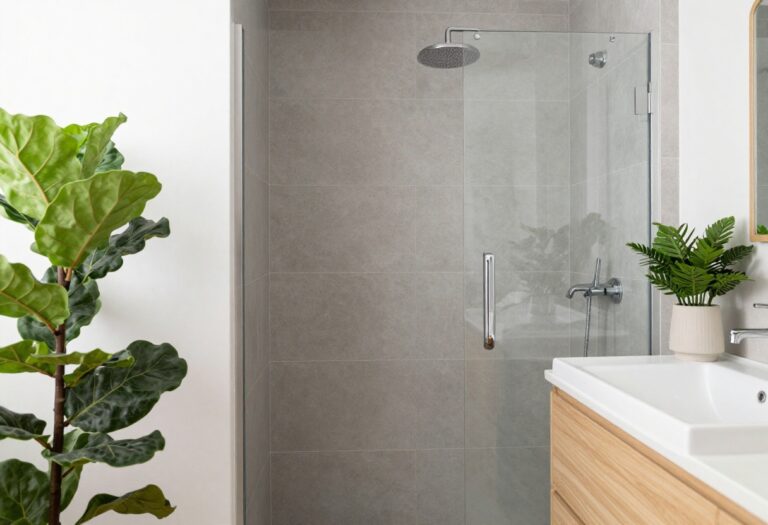
A lot of bathrooms feel chopped up because the shower floor and main floor look like they belong to two different rooms that happen to share plumbing. One of the smartest zero-entry shower ideas is using the same tile inside and outside the shower so the whole space flows without visual breaks. I’ve seen this make even a small bathroom feel noticeably bigger, and it works especially well when the tile has a soft matte finish.
That continuous look also solves a design problem people do not always think about until the remodel is done. When the floor changes too abruptly, the shower zone can feel like an afterthought instead of part of the overall design. Keeping it consistent makes the whole room look calmer and more intentional.
Why This Works
Visual continuity matters more than people think in a bathroom because the room is usually small and every contrast gets amplified. When the floor tile runs straight through, the eye does not stop at the shower entrance, so the room feels wider and less cluttered.
It also helps the zero-entry design look truly built in instead of trendy for the sake of being trendy. The shower blends into the layout, which gives the bathroom that smooth custom feel you usually notice in better remodels.
How to Do It
- Choose a slip-resistant porcelain tile that works safely both inside and outside the shower.
- Use a tile size that fits the whole bathroom well, because forcing giant tiles into a tiny room usually looks awkward fast.
- Make sure the installer plans the proper slope toward the drain so water moves where it should.
- Ask for tight, clean grout lines to keep the floor looking continuous instead of busy.
- Stick with matte or softly textured finishes, since shiny floors in wet bathrooms can turn into a bad idea pretty quickly.
Style & Design Tips
Go with warm white, soft greige, sandy beige, or muted stone tones if the goal is a bathroom that still looks good five years from now. High-contrast flooring can look dramatic in photos, but in real life it often makes a zero-entry shower feel more segmented, which defeats the point.
Try to avoid overly patterned tile unless the rest of the bathroom is very simple. Too much movement underfoot can make the room feel chaotic, especially when there is no curb to separate the shower zone visually.
Pro Tip or Budget Hack
If running the exact same tile through the whole bathroom pushes the budget too high, use one affordable field tile everywhere and save the splurge for wall accents or hardware. That move gives you the same open look without blowing money on the part people mostly walk on.
2. Use a Linear Drain for a Cleaner, More Modern Finish

A center drain can work in a zero-entry shower, but a linear drain usually makes the design look cleaner and the installation feel more intentional. Since the slope can move in one direction instead of several, the floor often looks flatter, simpler, and more architectural. I’m a big fan of this option when the goal is a sleek bathroom that still feels easy to maintain.
It also helps when you want larger tiles on the shower floor, which many people prefer because they look less busy. With some center-drain setups, installers need more small cuts to handle the slope, and that can make the finished floor look fussier than expected.
Why This Works
A linear drain supports the whole zero-entry concept because it keeps the shower floor visually quiet. Instead of drawing attention to the mechanics of drainage, it lets the tile and layout do the talking.
There is also a functional reason this idea works so well. A single-direction slope simplifies water flow and can make the shower area feel more comfortable underfoot, especially when paired with larger-format tile.
How to Do It
- Place the linear drain near the back wall for a clean, streamlined look.
- Pick a finish that matches your hardware, such as brushed nickel, matte black, or warm brass.
- Confirm that your installer has experience with linear drains, because this is not the spot for guesswork.
- Use larger floor tiles if your layout allows, since the one-way slope makes that easier.
- Test the drainage plan before final tile installation so water does not end up wandering into the dry zone.
Style & Design Tips
A tile-in drain cover is worth considering if you want the drain to nearly disappear into the floor. That detail looks polished without screaming, “Please notice how modern this is,” which is always appreciated.
Try not to mix too many statement finishes in the same bathroom. The drain should support the design, not compete with the faucet, showerhead, mirror, and light fixture like they’re all auditioning for attention.
Pro Tip or Budget Hack
If a full tile-in drain cover feels too pricey, choose a simple slim metal grate in a matching finish instead. It still looks high-end, and most people will read it as stylish rather than budget-conscious.
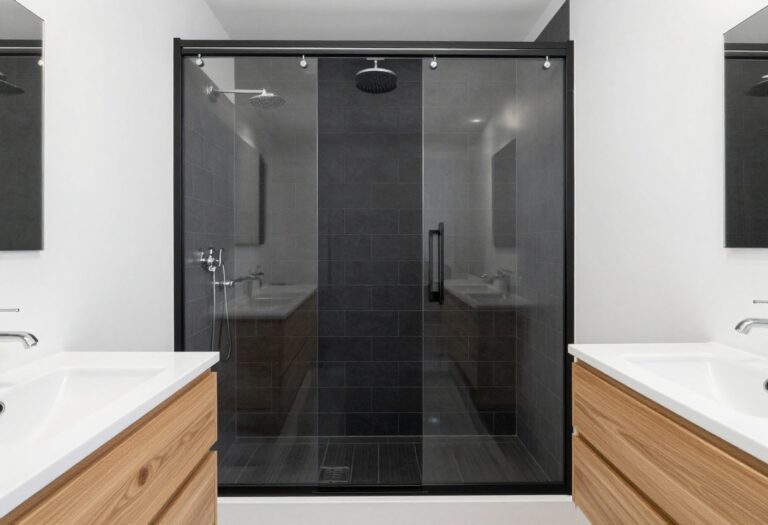
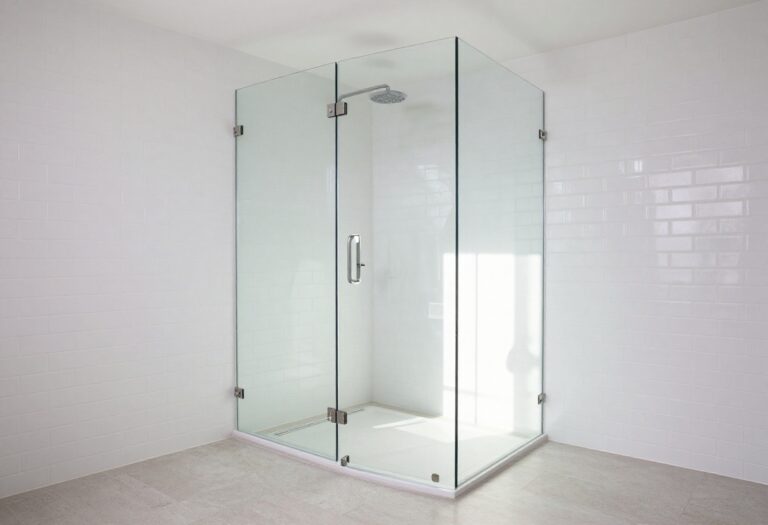
3. Add a Frameless Glass Panel Instead of a Full Enclosure

Some zero-entry showers look amazing on paper and then annoy people in real life because water gets everywhere. A single frameless glass panel is one of the easiest ways to keep the open look while still controlling splash. It feels lighter than a full enclosure, and it lets the bathroom breathe instead of boxing off one whole side of the room.
This setup also works nicely in bathrooms where a door would swing awkwardly or make the layout feel tight. I like it because it keeps the space modern and open without pretending water has suddenly agreed to follow the rules out of respect for your design choices.
Why This Works
A partial glass panel creates just enough separation to define the shower area without visually cutting the room in half. That matters in a zero-entry design because the whole appeal is openness, not just accessibility.
It also strikes a smart balance between style and practicality. You still get the airy, walk-in feel, but you reduce the everyday mess that can make an open shower more irritating than elegant.
How to Do It
- Install a fixed frameless glass panel on the side most likely to catch splash.
- Keep the opening wide enough for easy entry and comfortable movement.
- Pair the panel with a properly placed showerhead so water is directed inward.
- Use minimal hardware to preserve the clean look.
- Choose tempered glass with an easy-clean coating if possible, because less scrubbing is always a win.
Style & Design Tips
Clear glass usually works best if you want the bathroom to feel larger and brighter. Frosted or textured glass can look nice, but it often interrupts the open effect that makes zero-entry showers so appealing in the first place.
Avoid heavy metal framing unless the rest of the bathroom leans strongly industrial. Too much frame can make the shower feel bulky, and that is the opposite of what most people want from this style.
Pro Tip or Budget Hack
If custom glass costs more than expected, simplify the dimensions rather than abandoning the idea. Standard-size panels are often easier to source and can still look custom when the surrounding tile and hardware are done well.
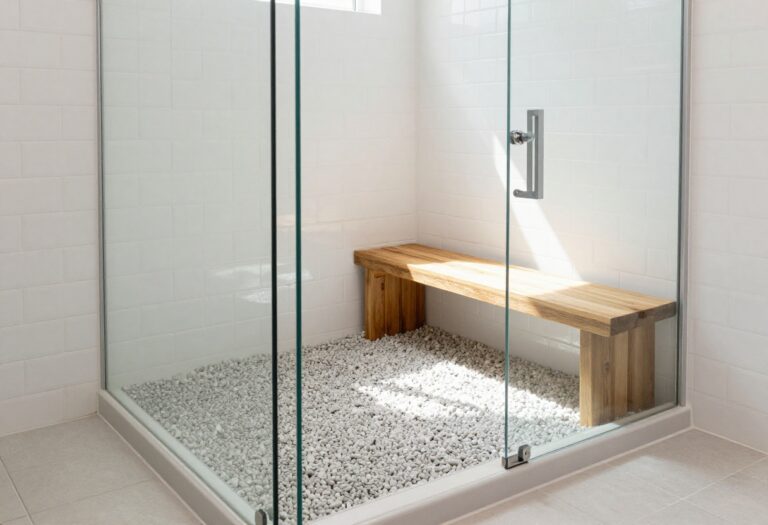
4. Build in a Floating Bench for Comfort and Style

A floating bench makes a zero-entry shower feel more thoughtful, especially if the bathroom needs to work for comfort, shaving, aging in place, or just daily convenience. It gives the shower a finished look and adds function without making the space feel crowded. I honestly think benches are one of those features people assume are optional until they have one and then never want to go back.
The floating version works particularly well because it keeps the floor more open. That little bit of visible space underneath makes the whole shower feel lighter, and it is easier to clean than a bulky built-in base.
Why This Works
A bench adds usability without disrupting the open layout that makes zero-entry showers so appealing. It gives the room a spa-like touch, but more importantly, it makes the shower more comfortable for actual living, not just photos.
Floating designs also help preserve visual openness. Since the floor stays visible beneath the bench, the shower still feels airy instead of loaded down with too much structure.
How to Do It
- Choose a wall that allows for a built-in floating bench without crowding the entry.
- Use waterproof construction materials rated for wet zones, not just pretty wood and optimism.
- Finish the bench in matching tile for a seamless look or contrast it with stone for a more custom feel.
- Keep the depth practical so it is comfortable to sit on but does not eat up too much shower space.
- Confirm the wall framing can properly support the bench before installation begins.
Style & Design Tips
A bench looks best when it feels integrated, not randomly attached. Matching the bench finish to the shower walls or floor helps it feel architectural, while a contrasting slab can create a more upscale focal point.
Do not oversize it. A giant bench in a modest bathroom can make the shower feel cramped, and suddenly the “luxury feature” starts behaving like an obstacle.
Pro Tip or Budget Hack
If a fully floating custom bench stretches the budget, build a simple tiled bench with clean lines and skip expensive stone fabrication. The key is getting the proportions right, because good shape and placement matter more here than showing off costly materials.
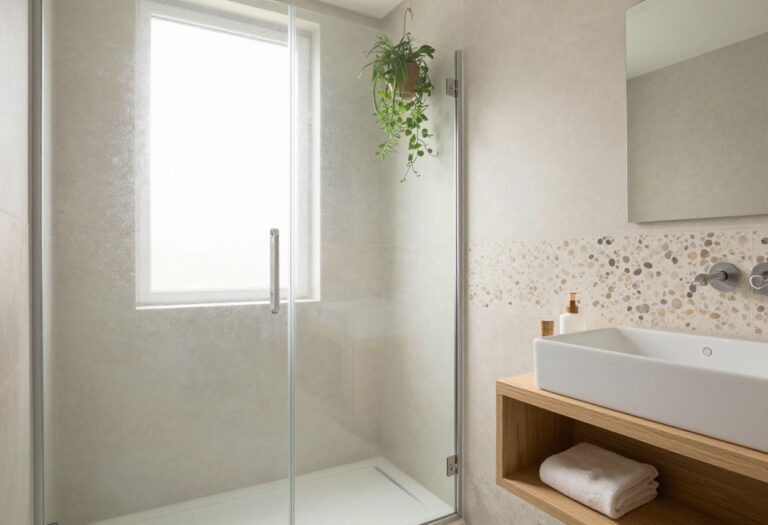
5. Warm It Up With Natural-Looking Stone or Stone-Look Tile

One common mistake with zero-entry showers is making them so minimal that they end up feeling cold. Stone or stone-look tile fixes that fast because it adds texture, variation, and warmth without cluttering the design. I like this approach when someone wants a bathroom that feels calm and elevated but not sterile in that expensive showroom way.
Real stone can look amazing, but good stone-look porcelain has become seriously impressive. It gives you that grounded, natural feel with less maintenance, and for most busy households, that trade is more than fair.
Why This Works
A zero-entry shower already leans modern because of its open layout and clean lines. Adding stone texture balances that out by bringing in organic variation, which keeps the room from feeling too flat or clinical.
It also helps the shower feel more connected to the rest of the home. When the materials look natural and layered, the bathroom feels designed with personality instead of assembled from whatever was trending on the internet last week.
How to Do It
- Pick a stone-look porcelain tile in warm gray, beige, taupe, or soft charcoal.
- Use a larger tile on walls if you want fewer grout lines and a calmer overall look.
- Bring the same material into niches, benches, or accent walls for cohesion.
- Choose a finish with subtle movement instead of loud, high-contrast veining.
- Seal real stone properly if you go that route, because maintenance matters more in showers than people like to admit.
Style & Design Tips
Warm undertones make a huge difference here. Cool gray can look sleek, but too much of it can make the bathroom feel chilly and a little joyless unless you balance it with wood, brass, or warmer paint.
Try mixing textures instead of mixing ten different colors. Soft variation reads sophisticated, while too many competing tones can make the space feel messy instead of natural.
Pro Tip or Budget Hack
Use stone-look porcelain on the main surfaces and reserve real stone for one smaller feature, like a bench top or niche shelf. That combination gives you the richer look without handing your budget over for a full dramatic performance.
6. Create a Built-In Niche Wall That Actually Holds Real Products

Tiny shower niches are one of my least favorite bathroom habits because they look neat for exactly five minutes and then hold one shampoo bottle and half a loofah. In a zero-entry shower, a generous built-in niche wall feels far more useful and keeps the open layout looking organized. It is one of those details that quietly improves the whole shower experience.
This idea works especially well when the shower has a long back wall or side wall that needs a little visual structure. Instead of adding clutter with hanging caddies or corner shelves, the storage becomes part of the design from the start.
Why This Works
A well-sized niche keeps products off the floor and out of the visual path, which matters even more in an open shower. Since there is no curb or tight enclosure to hide clutter, every item left out becomes part of the room’s look whether you like it or not.
It also brings balance to the wall design. A horizontal or vertically stacked niche can break up large tile expanses in a way that feels intentional and useful at the same time.
How to Do It
- Plan the niche size based on actual products you use, not idealized tiny bottles from a catalog.
- Place the niche where it is easy to reach but not directly in the main water stream.
- Line it up carefully with your tile layout so it looks built in, not squeezed in later.
- Add a slight slope on the niche shelf to prevent water from sitting there.
- Consider integrated lighting only if the rest of the bathroom is simple, because too many “wow” features can get silly fast.
Style & Design Tips
A niche can either blend in or stand out, and both approaches can work. Matching tile makes it feel sleek and subtle, while a contrasting mosaic or stone insert can give the shower a focal point without needing more accessories.
Do not overdecorate it. A niche stuffed with colorful bottles, decor pieces, and random bath extras will kill the clean look immediately, so keep only the products you actually use.
Pro Tip or Budget Hack
One larger niche often works better than two or three smaller ones. It is usually cheaper to build, easier to tile cleanly, and much more useful when real-life bottles enter the chat.
7. Pair the Zero-Entry Layout With a Wall-Mounted Vanity

A zero-entry shower opens up the floor, so it makes sense to carry that lighter feeling through the rest of the bathroom. A wall-mounted vanity is a smart pairing because it keeps sightlines open and makes the whole room feel less crowded. I’ve seen bathrooms look almost a full size bigger just from getting bulky furniture off the floor.
This combo also gives the room a more updated shape. Instead of the shower looking modern and everything else looking heavy and dated, the bathroom feels consistent from one end to the other.
Why This Works
Good design usually comes from repeating the same logic throughout a room. If the shower says open, clean, and unobstructed, a floating vanity supports that message and helps the bathroom feel cohesive rather than pieced together.
There is also a practical upside. More visible floor space usually means the room feels easier to clean and easier to move through, which is always a smart direction in a bathroom.
How to Do It
- Choose a wall-mounted vanity with enough storage for daily essentials.
- Leave enough clearance underneath to keep the floating effect visible.
- Pick a width that suits the bathroom instead of automatically going as large as possible.
- Coordinate the vanity finish with shower materials for a more connected look.
- Add under-vanity lighting only if it serves the design, not because every remodel on social media told you to.
Style & Design Tips
Wood-look vanities add warmth fast, especially in bathrooms with lots of tile and glass. Painted finishes can work too, but muted oak, walnut, or ash tones often make the room feel more relaxed and less sharp.
Avoid overly thick vanity boxes if you want a true floating effect. Slimmer profiles look lighter and more current, while chunky ones can look like they are trying very hard to pretend they are not still bulky.
Pro Tip or Budget Hack
If a custom floating vanity is too expensive, look for a simple wall-hung model and upgrade the hardware and countertop instead. Those two small moves can make an affordable vanity look much more expensive than it really is.
8. Define the Shower Zone With a Subtle Accent Wall

Open showers sometimes need a little visual definition so the bathroom does not feel like one long blank tile box. A subtle accent wall is a great fix because it marks the shower area without interrupting the zero-entry flow. I prefer accents that rely on texture, tone, or tile shape instead of wild color because they age better and feel easier to live with.
This is also a nice way to add personality if the rest of the bathroom is intentionally simple. You get one area with a little more interest, and the room still stays calm instead of turning into a design mood board that got out of hand.
Why This Works
A zero-entry layout removes physical barriers, so visual cues become more important. An accent wall gives the shower its own identity while still keeping the room open and connected.
It also helps direct attention where you want it. When the back wall looks intentional, the shower feels like a design feature instead of just a wet section of floor with expensive plumbing.
How to Do It
- Choose one wall, usually the back shower wall, to carry the accent.
- Use a tile with subtle variation in pattern, shape, or texture rather than a loud color shift.
- Keep the surrounding walls simpler so the accent has room to breathe.
- Repeat one element from the accent elsewhere in the room for cohesion.
- Sample the tile in the actual bathroom light before committing, because some “soft neutrals” turn weird fast.
Style & Design Tips
Vertical stack tile, soft ribbed tile, zellige-look finishes, or slightly darker stone tones can all work beautifully here. The goal is interest, not chaos, so look for depth and texture more than dramatic contrast.
Try not to combine an accent wall with a flashy floor and oversized niche trim all at once. One strong move is stylish; three strong moves start arguing with each other.
Pro Tip or Budget Hack
Use the accent tile only on one wall and keep the rest of the shower in a more affordable field tile. That gives you a custom look while keeping material costs from getting rude.
9. Bring in Warm Metal Fixtures for a Softer Look

A zero-entry shower can feel clean and modern very easily, but “clean and modern” can slide into cold if every finish leans hard into chrome, white, and gray. Warm metal fixtures, like brushed brass or champagne bronze, soften the look without making it fussy. I’ve become a big fan of this move because it adds polish without needing extra decor.
Even matte black can work if the bathroom has enough warmth elsewhere, but warm-toned metal usually feels more inviting. It gives the space a little richness and helps the shower feel designed, not just efficiently assembled.
Why This Works
Metal finishes act like jewelry in a bathroom, and the right tone changes the whole mood. Warm metals add contrast in a softer way than black and more character than standard chrome, which makes the zero-entry shower feel less clinical.
They also pair beautifully with natural-looking materials. Stone, wood, warm whites, and sandy neutrals all tend to look better when the hardware has a bit of warmth to it.
How to Do It
- Choose one primary finish, such as brushed brass, and stick with it across major fixtures.
- Match the showerhead, trim, drain finish, vanity hardware, and faucet as closely as possible.
- Use brushed finishes instead of highly polished ones if you want a softer look.
- Test finish samples against your tile before ordering everything.
- Keep the fixture shapes simple so the finish stands out in a refined way.
Style & Design Tips
Warm metals work especially well in bathrooms that need a little softness but do not want to feel traditional. Pair them with creamy tile, wood tones, and clean lines for a look that feels modern without being cold or harsh.
Do not mix warm brass, cool chrome, matte black, and random gold all in one room unless you are extremely confident with finish layering. Most bathrooms are not improved by that level of chaos.
Pro Tip or Budget Hack
Use the warmer metal on the most visible fixtures and keep hidden plumbing parts standard where possible. That way the bathroom gets the elevated look where it counts without forcing you to upgrade every tiny piece behind the scenes.
10. Make It Feel Custom With Layered Lighting and a Soft Color Palette

A zero-entry shower can have perfect tile, great hardware, and smart layout choices, then still feel flat because the lighting and color palette were treated like an afterthought. Soft layered lighting and a calm color scheme make the whole bathroom feel more finished and far more enjoyable to use. This is the part people sometimes skip because it feels less exciting than tile shopping, but it changes everything.
I’ve noticed that bathrooms with thoughtful lighting always feel more expensive, even when the materials are not wildly high-end. Good lighting flatters the finishes, makes the room more comfortable, and keeps the open shower from feeling stark.
Why This Works
Open shower designs expose more of the bathroom at once, so every finish and surface matters. A soft palette and layered lighting smooth out the entire room and help all those materials work together instead of sitting there looking disconnected.
It also improves daily use in a very real way. Better light makes shaving, makeup, cleaning, and basic morning survival easier, while a softer palette keeps the bathroom from feeling tiring over time.
How to Do It
- Start with a soft base palette such as warm white, greige, mushroom, sand, or pale taupe.
- Add overhead lighting that fully covers the room without creating harsh shadows.
- Include task lighting near the mirror for everyday function.
- Consider a wet-rated recessed light in the shower if the space feels dim.
- Use dimmers whenever possible, because flexible lighting is one of those adult upgrades that feels annoyingly smart.
Style & Design Tips
Keep the palette restrained and let texture do more of the work. Slight shifts in tile finish, paint tone, wood grain, and metal warmth often look richer than throwing six obvious colors into a small room.
Avoid bright blue-whites unless you specifically want a very crisp, modern look. Softer whites usually make skin tones, tile, and metal finishes look better, which is nice for both the room and your patience.
Pro Tip or Budget Hack
If you cannot overhaul every finish, paint and lighting can still move the bathroom in the right direction fast. A better bulb temperature, a calmer wall color, and one upgraded light fixture can make older materials look a lot more intentional.
Frequently Asked Questions

Are zero-entry showers worth it?
Zero-entry showers are absolutely worth it if you want a bathroom that feels more open and easier to use every day. They remove that annoying step, make cleaning simpler, and instantly upgrade the overall look without needing a full luxury remodel.
From my experience, this is one of those upgrades that feels good long after the “new bathroom excitement” wears off. It’s not just about aesthetics—it actually improves how the space functions.
Do zero-entry showers cause water to spill everywhere?
They can if they’re poorly planned, but a well-designed zero-entry shower controls water very effectively. Proper slope, smart drain placement, and a glass panel (or even just correct showerhead positioning) make a huge difference.
Most of the messy situations I’ve seen came from skipping those details. When everything is set up correctly, water stays where it should.
Are zero-entry showers good for small bathrooms?
Yes, and honestly, they often work better in small bathrooms than traditional setups. Removing the curb and visual barriers makes the space feel bigger, cleaner, and less boxed in.
I’ve seen tiny bathrooms feel almost double in size just from switching to a zero-entry layout. It’s one of the smartest ways to open things up without moving walls.
Is a zero-entry shower more expensive to build?
It can cost a bit more upfront, mainly because of the floor slope, waterproofing, and drainage setup. However, the price difference is not always as big as people expect, especially if you’re already remodeling the bathroom.
If you focus on smart material choices instead of expensive finishes everywhere, you can keep the budget under control without sacrificing the look.
Do you need special flooring for a zero-entry shower?
Yes, the flooring needs to be slip-resistant and properly installed for water drainage. Porcelain tiles with a matte or textured finish are usually the safest and most practical option.
Avoid overly smooth or glossy tiles, because they might look nice at first but can become slippery and frustrating in daily use.
Are zero-entry showers safe for older adults?
They’re actually one of the best options for long-term safety. Since there’s no step to climb over, they reduce the risk of tripping and make the shower easier to access for all ages.
Adding features like a bench, grab bars, or non-slip flooring makes the setup even more comfortable and secure without ruining the design.
Do zero-entry showers need a door?
No, they don’t require a door, which is part of their appeal. Many designs use a partial glass panel or leave the shower open for a more spacious feel.
That said, if your bathroom layout allows water to escape too easily, adding a glass panel is a simple fix that keeps things practical without closing off the space.
How do you keep a zero-entry shower warm?
Open showers can feel slightly cooler, especially in larger bathrooms. Using warmer materials like wood tones, stone-look tiles, and soft lighting helps balance that out.
You can also add heated flooring or position the shower away from drafts if temperature is a concern. Small adjustments make a noticeable difference here.
Can you install a zero-entry shower in an existing bathroom?
Yes, but it depends on your floor structure and plumbing setup. Sometimes the subfloor needs to be adjusted to create the proper slope, which can add complexity.
It’s definitely doable in most cases, but it’s one of those projects where a good installer matters more than trying to cut corners.
How do you clean and maintain a zero-entry shower?
They’re usually easier to clean because there’s no curb trapping grime or water. A simple routine of wiping down surfaces and keeping the drain clear goes a long way.
Using fewer grout lines and choosing easy-clean materials also helps. The more minimal the design, the less time you’ll spend scrubbing later, which is always a win.
Final Thoughts
The best zero-entry shower ideas are the ones that make the bathroom feel easier, calmer, and more pulled together without trying too hard. Good design usually looks simple in the end, but it works because the details were handled well.
I’d rather have one zero-entry shower with smart materials, solid drainage, and a clean layout than a bathroom full of trendy stuff that ages badly in a year. Keep it practical, keep it warm, and the finished space will feel like something worth loving every single day.