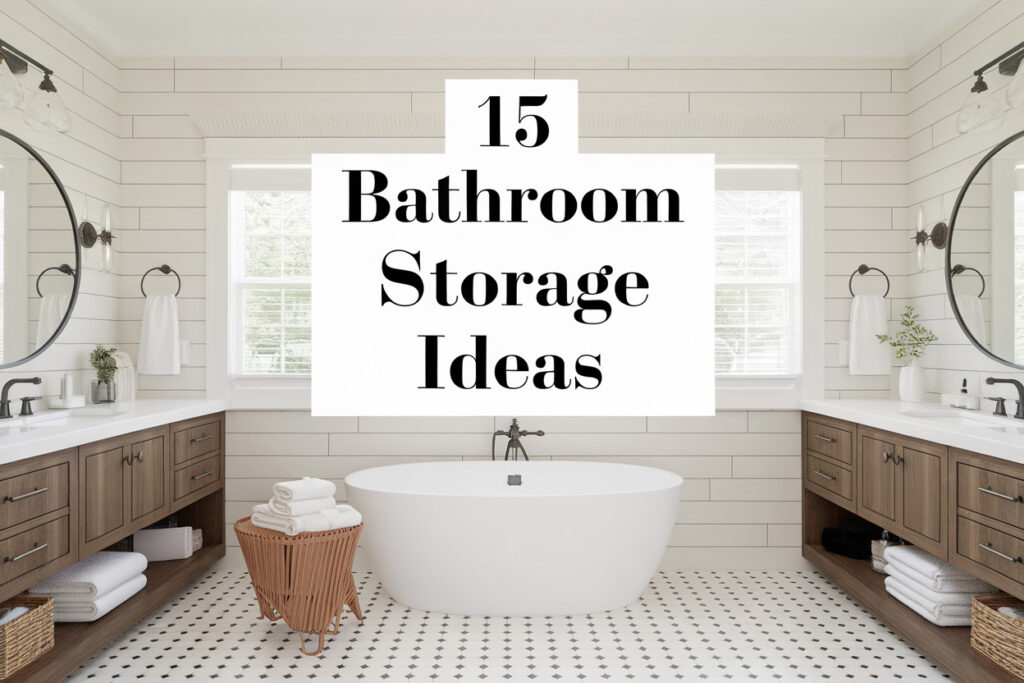
15 Bathroom Storage Ideas to Maximize Every Inch
My bathroom used to stress me out every single morning. I always bumped into bottles, knocked over skincare, and somehow never found a clean towel when I needed one. I finally realized the space wasn’t small, it just worked against me.
Once I stopped blaming the square footage, everything changed. I tested a few smart storage ideas, hated some, loved others, and slowly figured out what actually works in real life. Most bathrooms actually have plenty of hidden potential, but clutter hides it so well that you stop noticing the opportunities.
The real problem usually comes down to how the space functions day to day. Counters collect random items, drawers become tiny junk drawers, and cabinets turn into black holes where products disappear forever. When storage doesn’t match your routine, even a large bathroom can feel cramped and frustrating.
That realization pushed me to rethink how every inch of the room worked. Instead of cramming more containers into cabinets, I started using vertical space, awkward corners, cabinet doors, and even small wall gaps that normally get ignored. Small adjustments made a huge difference, and the room started to feel calmer almost immediately.
If your bathroom constantly feels cluttered, you’re definitely not alone. Most homes simply weren’t designed with modern routines in mind, especially with skincare, hair tools, and backup toiletries taking over. The good news is you don’t need a renovation to fix the problem.
Smart storage simply means using the space you already have more intentionally. With the right shelves, organizers, and a few clever tricks, even the smallest bathroom can feel organized, functional, and surprisingly spacious. Let’s walk through some storage ideas that actually make everyday life easier.
1. Over-the-Toilet Shelving That Doesn’t Look Cheap

You probably stare at the empty wall above your toilet and feel like it mocks you. That space begs for storage, yet most people either ignore it or install something flimsy that screams dorm room energy. A solid over-the-toilet shelf gives you storage without stealing floor space, which feels like a small miracle in a tight bathroom.
I avoided this idea for years because I hated how bulky most units looked. I finally tried a slimmer wood-and-metal shelf, and it instantly made the room feel intentional instead of cluttered. The right shelf turns dead air into a functional zone without making your toilet the visual star.
Why This Works
Bathrooms usually waste vertical space, especially above fixtures. When you add shelves there, you pull storage upward instead of outward, which keeps the floor clear and the room feeling bigger. Your eye travels up, and that subtle shift makes everything feel more balanced.
How to Do It
- Measure the space above your toilet carefully so the shelf doesn’t hover awkwardly.
- Choose a shelf with adjustable height if possible to avoid hitting the tank lid.
- Anchor it securely into studs or use heavy-duty wall anchors for safety.
Style & Design Tips
Stick to materials that match your existing hardware so the shelf blends in. Avoid glossy plastic shelves, because they cheapen the entire room instantly. Add baskets instead of loose items to keep the look calm and intentional.
Pro Tip or Budget Hack
Check secondhand furniture stores for narrow bookcases and cut the legs shorter. You’ll get sturdier storage for half the price, and no one will ever know it wasn’t designed for the bathroom.
2. Drawer Dividers That Finally Tame the Chaos
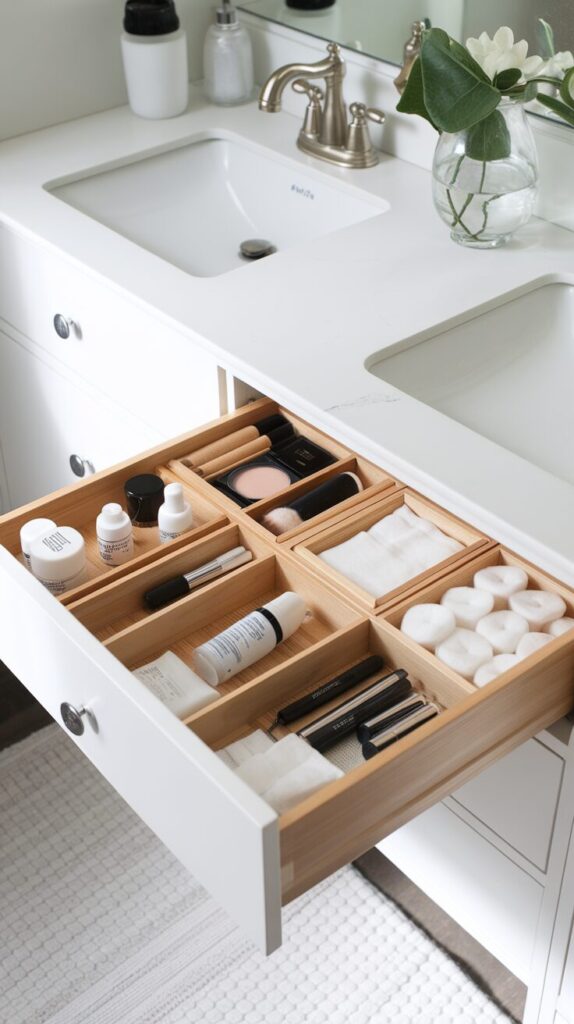
Bathroom drawers love chaos more than any other room. I swear cotton swabs and hair ties reproduce overnight when no one watches. Drawer dividers give every item a home, which stops that annoying daily shuffle.
I resisted buying dividers because I thought I could “just organize better.” That lie lasted about a week. Once I added adjustable dividers, mornings felt smoother and less irritating, which honestly surprised me.
Why This Works
Dividers create boundaries, and boundaries create habits. When everything has a specific spot, your brain stops treating the drawer like a junk zone. You grab what you need faster, and clutter stops creeping back in.
How to Do It
- Empty the drawer completely before adding dividers.
- Group items by use, not by size, for easier routines.
- Adjust dividers snugly so nothing slides around.
Style & Design Tips
Clear or bamboo dividers work best because they don’t visually clutter the drawer. Avoid over-segmenting, since too many tiny sections feel stressful. Leave a little breathing room so the drawer stays flexible.
Pro Tip or Budget Hack
Use small food storage containers or cut-down shoe boxes if you want a free solution. They work shockingly well and let you test layouts before committing.
3. Wall-Mounted Baskets for Daily Essentials
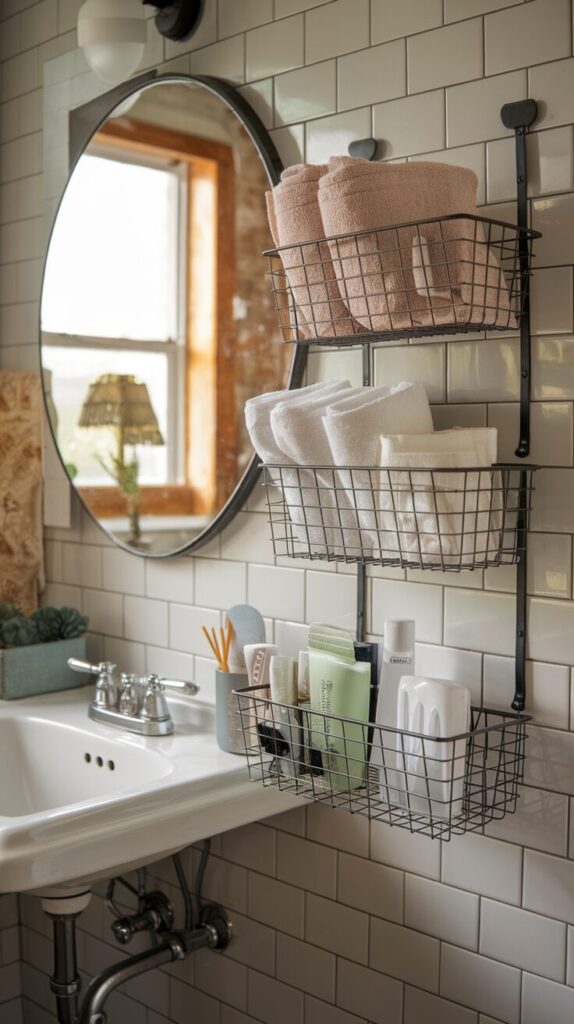
Countertops attract clutter like magnets. You set something down “just for a minute,” and suddenly the surface disappears. Wall-mounted baskets pull everyday items off the counter while keeping them within arm’s reach.
I installed two wire baskets near the sink, and my counter instantly felt calmer. I loved that I could grab things quickly without digging through cabinets. The setup felt practical instead of precious.
Why This Works
When storage sits at eye level, you actually use it. Wall baskets reduce visual noise on the counter while keeping essentials accessible. You gain function without sacrificing convenience.
How to Do It
- Mount baskets near the sink but away from splashing zones.
- Use anchors rated for bathroom humidity.
- Keep weight limits in mind to avoid sagging.
Style & Design Tips
Choose baskets that match your faucet finish for cohesion. Don’t overload them, because clutter defeats the purpose. Stick to daily-use items only.
Pro Tip or Budget Hack
Repurpose kitchen rail systems with hanging bins. They cost less and offer modular flexibility.
4. Slim Rolling Carts for Awkward Gaps
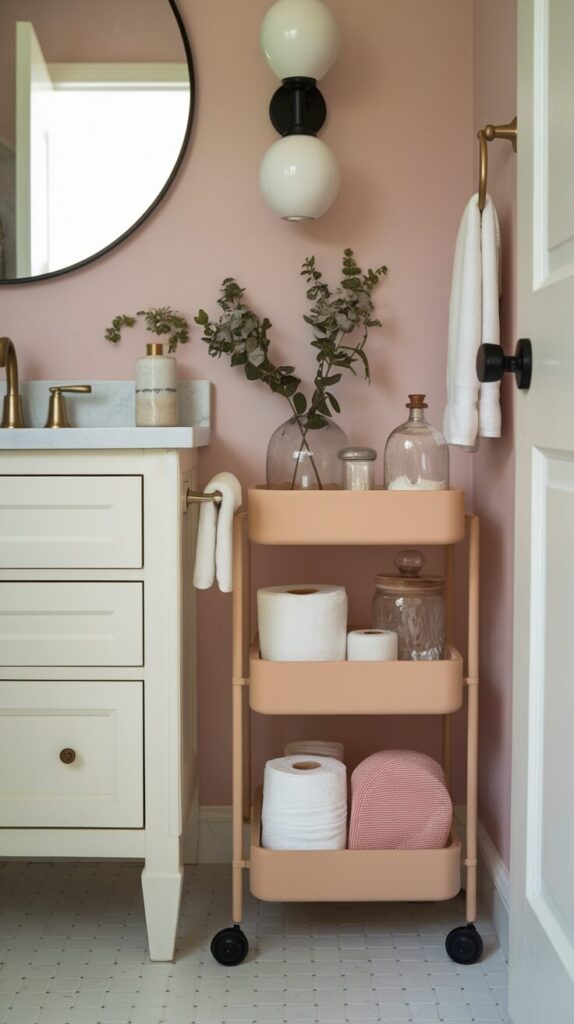
That weird gap between your vanity and the wall feels useless until you slide something into it. Slim rolling carts turn awkward inches into valuable storage. They roll out easily, which makes cleaning way less annoying.
I hesitated because carts felt temporary to me. Once I tried one, I wondered why I waited so long. The flexibility won me over instantly.
Why This Works
Rolling carts use narrow spaces that cabinets can’t. They add storage without permanent installation, which keeps things adaptable. You also gain easy access without digging.
How to Do It
- Measure the gap precisely before buying.
- Choose a cart with multiple tiers for versatility.
- Keep heavier items on the bottom for stability.
Style & Design Tips
Go neutral so the cart disappears visually. Avoid bright colors, which draw attention to the gap. Use bins to group similar items.
Pro Tip or Budget Hack
Office supply carts often cost less than bathroom-specific ones. They work just as well and usually roll smoother.
5. Under-Sink Pull-Out Organizers That Save Your Back
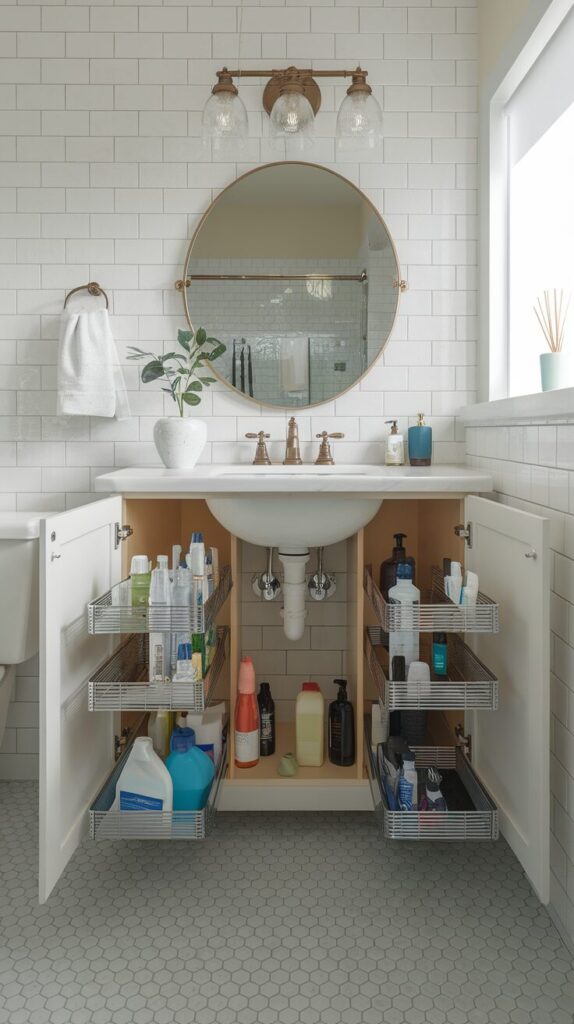
The under-sink cabinet feels like a black hole. You crouch, reach, and somehow still miss what you need. Pull-out organizers bring everything forward with zero drama.
I installed one after spilling cleaning supplies one too many times. The difference felt immediate and satisfying. My knees thanked me too.
Why This Works
Pull-out systems eliminate wasted depth. You access items without digging or stacking. That ease encourages you to keep the area organized.
How to Do It
- Measure around plumbing carefully.
- Choose adjustable units to fit pipes.
- Secure rails tightly for smooth sliding.
Style & Design Tips
Stick to wire or plastic that handles moisture well. Avoid wood without sealing, because humidity ruins it fast. Group items by purpose for clarity.
Pro Tip or Budget Hack
Use tension rods with hanging bins for a DIY version. It costs less and adapts easily.
6. Floating Shelves That Add Storage Without Bulk

Floating shelves feel lighter than cabinets. They store essentials while keeping the room open. When styled right, they look intentional instead of cluttered.
I love floating shelves for rental bathrooms. They give storage without heavy visual weight. Plus, they make the room feel styled without effort.
Why This Works
Floating shelves free up floor space and add vertical interest. They balance function and aesthetics beautifully. Your bathroom gains depth without feeling crowded.
How to Do It
- Install shelves at staggered heights.
- Anchor into studs or strong anchors.
- Limit shelf depth to avoid head bumps.
Style & Design Tips
Mix practical items with a little decor. Avoid overcrowding, because open shelves show everything. Keep colors cohesive.
Pro Tip or Budget Hack
IKEA shelves work great when installed properly. Swap the brackets for sturdier ones if needed.
7. Tiered Trays That Organize the Counter
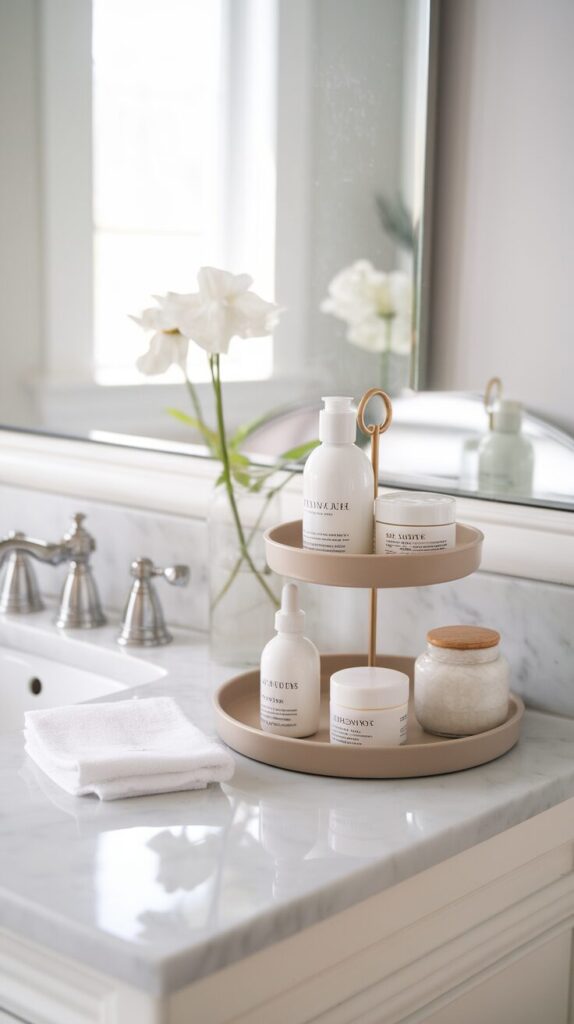
Sometimes you need items on the counter. Tiered trays organize them vertically so they feel intentional. They turn clutter into a display.
I added one for skincare, and my counter felt calmer instantly. It also made my routine smoother. Everything stayed visible but contained.
Why This Works
Vertical stacking uses height instead of width. Trays group items visually, which reduces chaos. Your counter feels styled instead of messy.
How to Do It
- Choose a tray with stable tiers.
- Place it near daily-use zones.
- Limit items to essentials only.
Style & Design Tips
Match tray materials to your decor vibe. Avoid mixing too many colors, which looks busy. Keep spacing intentional.
Pro Tip or Budget Hack
Use cake stands or thrifted trays stacked with glue. They cost less and look unique.
8. Door-Mounted Storage That Hides Everything
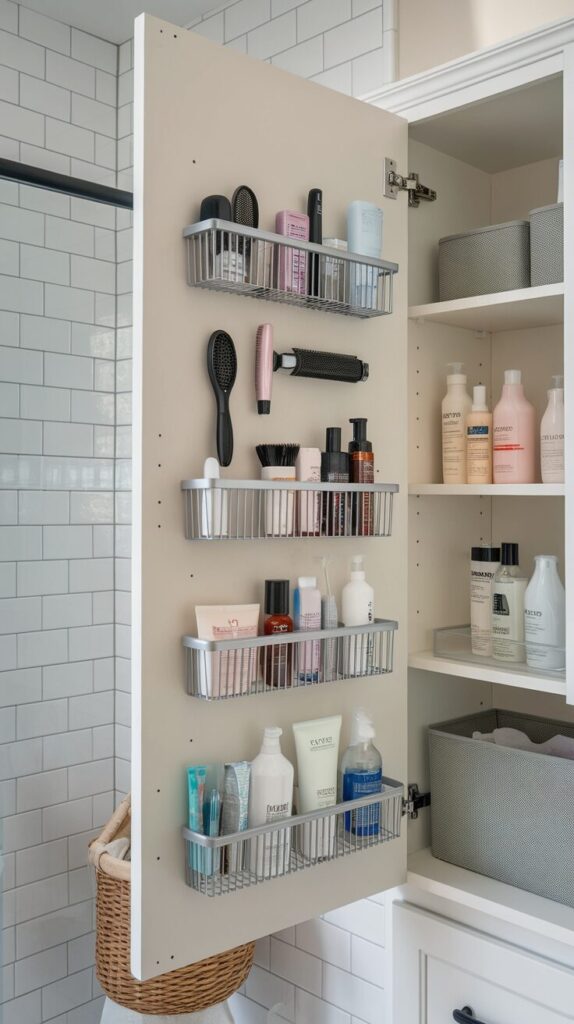
Cabinet doors hide untapped storage. Door-mounted racks keep items accessible without cluttering the room. They feel like secret storage.
I added one for hair tools, and it changed my mornings. Everything stayed hidden but easy to grab. That felt like a win.
Why This Works
Door storage uses space you already have. It keeps items off surfaces and out of sight. Your bathroom stays visually calm.
How to Do It
- Measure door thickness carefully.
- Use over-the-door hooks or mounted racks.
- Check clearance before closing.
Style & Design Tips
Choose slim designs to avoid bulk. Avoid overcrowding, which causes door issues. Keep similar items together.
Pro Tip or Budget Hack
Shoe organizers work surprisingly well. They adapt easily and cost very little.
9. Recessed Niches That Feel Built-In
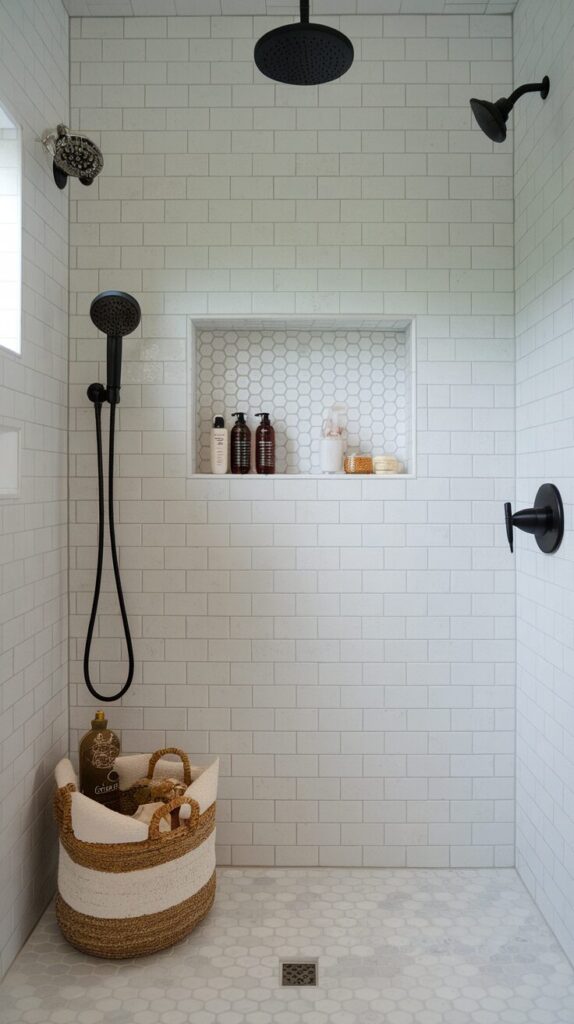
Recessed niches look custom and intentional. They store items without protruding into the room. That sleek look feels high-end.
I installed one during a remodel, and I loved it instantly. The clean lines made the bathroom feel bigger. Storage disappeared into the wall.
Why This Works
Recessed storage preserves floor and wall space. It integrates seamlessly into the structure. The room feels cleaner and more open.
How to Do It
- Plan niche placement during renovations.
- Frame between studs carefully.
- Use waterproof materials.
Style & Design Tips
Tile the niche to match or contrast subtly. Avoid tiny niches, which limit use. Keep proportions balanced.
Pro Tip or Budget Hack
Prefabricated niches save time and money. They install faster and still look polished.
10. Stackable Bins That Adapt Over Time

Bathrooms evolve constantly. Stackable bins adapt as your needs change. They feel flexible instead of fixed.
I use stackable bins under my sink, and I rearrange them often. That flexibility keeps things functional. Nothing feels permanent or restrictive.
Why This Works
Stackable storage grows with you. You add or remove layers easily. That adaptability prevents clutter buildup.
How to Do It
- Choose bins with secure stacking edges.
- Label bins clearly.
- Keep frequently used bins on top.
Style & Design Tips
Stick to one bin style for cohesion. Avoid mismatched sizes, which look messy. Neutral colors work best.
Pro Tip or Budget Hack
Dollar-store bins work fine for testing layouts. Upgrade later if needed.
11. Towel Ladders That Double as Decor

Towel bars feel boring sometimes. Towel ladders add vertical storage with style. They lean instead of drill.
I added one for guest towels, and everyone commented on it. It felt functional and decorative. That combo sold me.
Why This Works
Ladders use vertical space efficiently. They store towels without crowding walls. The room gains texture and warmth.
How to Do It
- Lean the ladder securely against the wall.
- Space towels evenly.
- Keep it away from splashes.
Style & Design Tips
Choose wood tones that match your vanity. Avoid overcrowding, which looks sloppy. Keep towels neatly folded.
Pro Tip or Budget Hack
DIY a ladder with dowels and rope. It costs less and looks custom.
12. Magnetic Strips for Small Metal Tools

Small tools disappear constantly. Magnetic strips keep them visible and accessible. They feel oddly satisfying to use.
I mounted one inside my cabinet door. Tweezers stopped vanishing. That alone justified the effort.
Why This Works
Magnets hold tools securely without containers. You see everything at once. That visibility prevents duplicates.
How to Do It
- Mount the strip securely.
- Test magnet strength.
- Arrange tools logically.
Style & Design Tips
Hide strips inside cabinets for a clean look. Avoid visible clutter, which distracts. Keep it simple.
Pro Tip or Budget Hack
Use knife magnetic strips. They work perfectly and cost less.
13. Clear Containers That Show Everything

Clear containers remove guesswork. You see what you have instantly. That clarity saves time.
I switched to clear bins for backups, and I stopped overbuying. That felt satisfying. My cabinet stayed organized longer.
Why This Works
Visibility creates awareness. You know when to restock. Clutter decreases naturally.
How to Do It
- Choose durable clear plastic.
- Label containers clearly.
- Group similar items.
Style & Design Tips
Keep containers uniform. Avoid mixing shapes, which looks chaotic. Clean regularly for clarity.
Pro Tip or Budget Hack
Reuse food containers after cleaning. They work just as well.
14. Corner Shelves That Use Forgotten Space

Corners get ignored constantly. Corner shelves reclaim that space. They feel clever and intentional.
I added one near my shower, and it worked perfectly. Bottles stayed contained. The corner felt useful.
Why This Works
Corners offer unused vertical storage. Shelves fit naturally without intrusion. The room feels more complete.
How to Do It
- Measure corner angles carefully.
- Install shelves level.
- Use waterproof materials.
Style & Design Tips
Match shelf finish to fixtures. Avoid bulky designs, which overwhelm. Keep items minimal.
Pro Tip or Budget Hack
Use corner spice racks. They adapt easily and cost less.
15. Hooks Everywhere They Make Sense

Hooks solve more problems than people realize. They store towels, robes, and bags instantly. They feel effortless.
I added hooks behind my door, and storage doubled. That simple change felt powerful. Sometimes basics win.
Why This Works
Hooks use vertical space efficiently. They keep items accessible. Installation stays quick and easy.
How to Do It
- Place hooks at reachable heights.
- Use strong adhesive or screws.
- Spread hooks evenly.
Style & Design Tips
Match hook finish to hardware. Avoid overcrowding, which looks messy. Keep spacing intentional.
Pro Tip or Budget Hack
Adhesive hooks work well for renters. Choose high-weight ratings for safety.
Bathroom Storage Strategy: Design for Function First, Then Style
Before you buy a single basket or shelf, step back and look at how you actually use your bathroom. Pay attention to what frustrates you daily, whether that’s crowded counters, messy drawers, or wasted vertical space. When you design storage around real habits instead of Pinterest trends, everything works better.
Start by zoning your bathroom into functional areas like sink, shower, toilet, and vanity. Assign storage based on how often you use items in each zone, keeping daily essentials within arm’s reach and backups tucked away. This strategy prevents clutter from creeping back in after one busy week.
Next, measure everything carefully. Measure cabinet depth, wall width, door clearance, and even plumbing layout before buying organizers. Accurate measurements save money and stop you from stacking unused bins in a corner.
Finally, prioritize flexibility. Choose adjustable shelves, stackable bins, and modular systems that adapt over time. Your routines will change, and your storage should change with them.
How to Plan Bathroom Storage Like a Pro
Take everything out of your cabinets and drawers before reorganizing. Sort items into categories like daily use, weekly use, backup stock, and rarely used tools. This process shows you what you actually need to store instead of guessing.
Be honest about duplicates. Toss expired products, donate unopened extras, and stop storing items you never touch. Less stuff automatically creates more space without spending a single dollar.
Create a reset routine. Spend five minutes once a week putting items back where they belong. Small consistent resets protect your system from turning into chaos again.
Common Mistakes to Avoid
Ignoring Vertical Space
Most bathrooms lack floor space, yet people still focus only on cabinets and countertops. When you ignore walls, doors, and corners, you waste valuable storage potential. Install shelves, hooks, or mounted baskets to take advantage of height.
Overcrowding Open Shelves
Open shelving looks beautiful online, but overcrowded shelves ruin the effect instantly. When you stack too many products together, the space feels busy and stressful. Keep open shelves minimal and group items in baskets for visual calm.
Buying Organizers Before Decluttering
Many people buy containers first and sort later. That habit locks clutter into a prettier box instead of solving the problem. Declutter completely before purchasing anything so you buy only what you truly need.
Choosing Style Over Durability
Bathrooms deal with humidity and temperature changes daily. Cheap wood, weak adhesives, and flimsy plastic warp quickly in that environment. Invest in moisture-resistant materials so your storage lasts longer.
Forgetting About Accessibility
Storage that looks good but feels inconvenient never survives daily routines. If you need to move three things to grab one item, the system will fail. Place frequently used products at eye level or within easy reach.
Small Bathroom vs. Large Bathroom Storage Priorities
Small bathrooms demand efficiency. You need vertical storage, slim carts, recessed niches, and door-mounted solutions to maximize every inch. Focus on light colors and open designs that prevent visual heaviness.
Large bathrooms require discipline. Extra space encourages overbuying and storing unnecessary items. Use zones and clear categories to prevent large vanities from turning into dumping grounds.
In both cases, balance accessibility with concealment. Keep everyday essentials visible but store backups out of sight. That balance keeps the room functional and calm.
Budget Planning for Smart Bathroom Storage
You don’t need a full renovation to upgrade storage. Start with low-cost improvements like hooks, drawer dividers, and stackable bins. Small upgrades often create the biggest impact.
Plan higher-cost upgrades strategically. Recessed niches, custom cabinetry, and built-in shelving require more investment, so install them only if you plan long-term use. Always compare DIY options before hiring out simple installations.
Track what you spend. When you set a realistic budget, you avoid impulse purchases that don’t fit your layout. Smart spending keeps the project focused and practical.
Maintenance: Keeping Your Bathroom Storage Organized Long-Term
An organized bathroom requires maintenance, not perfection. Wipe shelves regularly and check for expired products every few months. Clean systems stay functional longer.
Reassess your setup twice a year. Seasonal changes, new products, and lifestyle shifts can affect storage needs. Adjust bins, shelves, and zones accordingly instead of forcing outdated systems.
Commit to quick resets. A five-minute tidy-up at the end of the week keeps clutter from building. Consistency protects your hard work.
Frequently Asked Questions
How do I maximize storage in a very small bathroom?
Use vertical solutions like floating shelves, over-the-toilet storage, and wall hooks. Add slim rolling carts for narrow gaps and keep counters clear to create visual space.
What is the best way to organize under-sink storage with plumbing in the way?
Choose adjustable pull-out organizers or stackable bins that fit around pipes. Measure carefully before buying to avoid wasted space.
Should I use open shelves or closed cabinets in the bathroom?
Use open shelves for decorative and daily-use items, but rely on closed cabinets for backups and less attractive products. Balance both for function and style.
How often should I declutter bathroom storage?
Declutter every three to six months. Remove expired products and reassess what you actually use to keep the system efficient.
What materials work best for bathroom storage?
Choose moisture-resistant materials like metal, sealed wood, or durable plastic. Avoid untreated wood and low-quality adhesives in humid environments.
How do I prevent bathroom storage from getting messy again?
Create clear zones, label bins, and reset weekly. Keep frequently used items accessible and store extras separately to maintain order.
Final Thoughts
Bathroom storage doesn’t need to feel complicated or overwhelming. You don’t need to tackle everything at once to see real improvement. Pick one idea, try it, and let that small win build momentum.
I always start with the storage that annoys me most. Once that pain point disappears, the rest feels easier and even fun. You’ve got this, and your bathroom will thank you.