9 Budget-Friendly Kitchen Organization Ideas That Make Everything Easy to Find
A well-organized kitchen makes cooking and cleaning so much easier. But you don't need a major renovation or expensive custom cabinets to get there. With a few smart, budget-friendly tweaks, you can turn your kitchen into a space where everything has its place.
The key is to work with what you have and think creatively about storage. Small changes like adding shelf risers or using clear containers can make a big difference in how functional your kitchen feels.
These nine ideas are all about keeping things simple, affordable, and easy to maintain. They're designed for real homes and real budgets, so you can start organizing today without feeling overwhelmed.
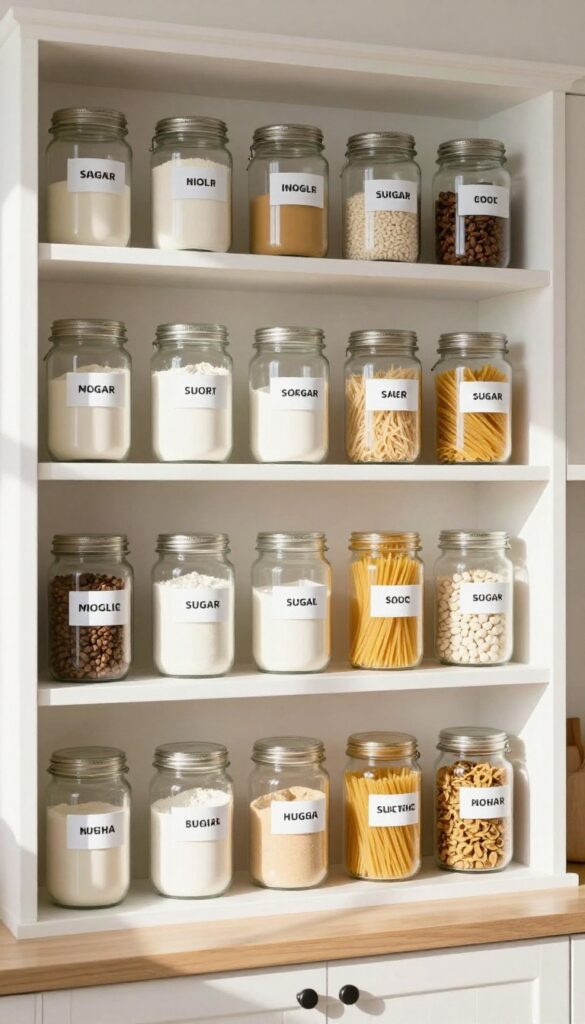
1. Use Clear Containers for Pantry Staples
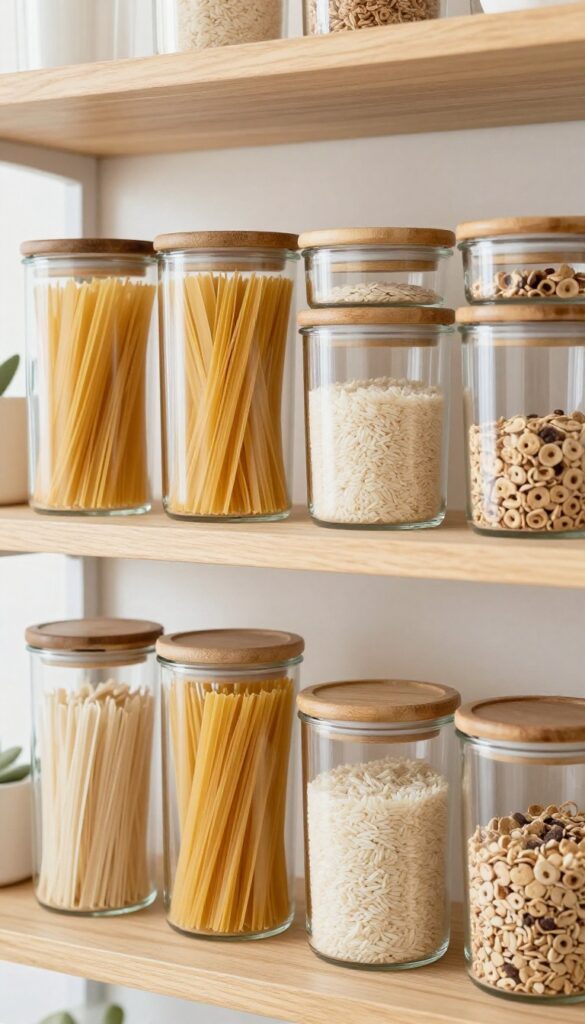
Pantries can quickly become a jumble of half-opened boxes and wrinkled bags. Switching to clear, airtight containers changes the entire look and feel of your shelves. It’s one of those small swaps that makes a big visual difference—suddenly everything looks intentional and organized, even if your budget is tight.
You don’t need expensive matching sets; thrifted jars or discount store finds work just as well.
Why It Works
Transparent containers let you see exactly how much pasta, rice, or cereal you have left, so you’ll never accidentally buy duplicates. Airtight seals keep food fresh longer, reducing waste and saving money over time. Plus, the uniform shapes stack neatly, making the most of every inch of shelf space.
Best For
This idea is ideal for renters who can’t install custom shelving but want a put-together pantry. It also works wonders in small kitchens where every cabinet counts—clear containers help you grab ingredients fast without rummaging.
Styling Tip
Stick to one or two container styles (like square glass jars with bamboo lids) for a cohesive look. Group similar items together—baking supplies on one shelf, grains on another—and label each jar with a simple chalk tag or sticker for extra polish.
2. Install Tension Rods Under the Sink
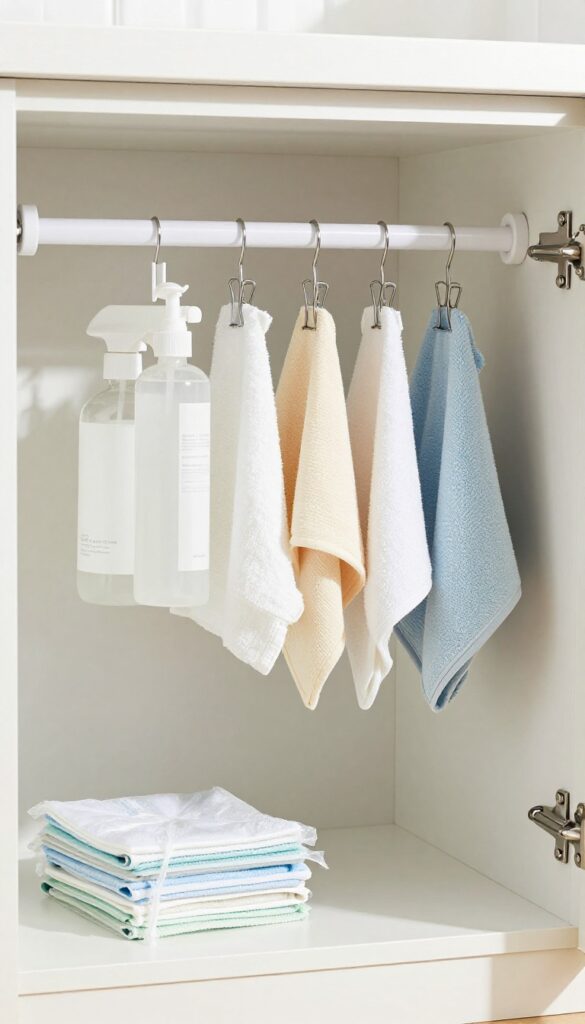
Under-sink cabinets are notorious for becoming chaotic black holes of cleaning supplies. A simple tension rod can change that without costing much or requiring any tools. By creating a hanging rail for spray bottles and cloths, you reclaim floor space and turn a messy cabinet into a tidy, grab-and-go station.
Why It Works
Tension rods are adjustable, removable, and require no drilling—perfect for renters or anyone who wants a low-commitment upgrade. They instantly add vertical storage to an area that usually relies on stacking, which means fewer tipped-over bottles and more room for bulky items like trash bags or extra sponges.
Best For
This hack is ideal for small kitchens where every inch of cabinet space counts. It also works wonders in shared households where multiple people need quick access to spray cleaners without digging through piles of stuff.
Styling Tip
Choose a stainless steel or white tension rod to match your hardware. Hang matching spray bottles (refillable ones look sleek) and clip microfiber cloths with mini binder clips for a cohesive, almost spa-like look under the sink.
3. Add Shelf Risers to Maximize Vertical Space
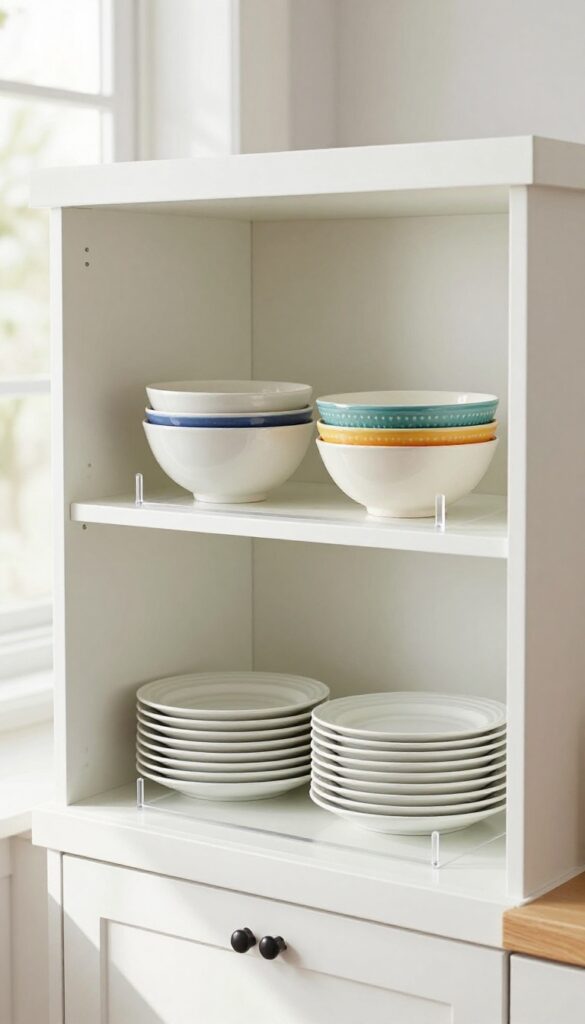
Deep cabinets can feel like a black hole where small items disappear. Shelf risers solve that by creating two usable layers on one shelf, so nothing gets buried. They're a budget-friendly trick that instantly doubles your storage without any renovation.
Why It Works
Shelf risers turn wasted vertical space into prime real estate. You can stack plates, bowls, or canned goods on two levels, making everything visible and easy to grab. No more digging through piles or forgetting what's in the back.
Best For
This is perfect for anyone with standard-depth cabinets or open shelving who wants to organize dishes, pantry items, or mugs. It's especially handy in rental kitchens where you can't modify the cabinetry.
Styling Tip
Stick with clear acrylic or wire risers for a clean look that doesn't compete with your dishes. For open shelves, choose bamboo or wood risers to add warmth. Group similar items together on each level—like all white plates on the bottom and colorful bowls up top.
4. Label Everything with a Simple System
Labels might seem like a small detail, but they can completely transform how your kitchen functions. Imagine opening a cabinet and instantly knowing where the flour, sugar, and pasta live—no more rummaging or guessing. A simple labeling system takes the mental load off and keeps your space looking tidy and intentional.
The best part? You don't need fancy supplies or a big budget to make it happen.
Why It Works
Labels create a visual map of your kitchen, so everyone in the household can find what they need and put things back in the right place. This consistency prevents clutter from building up over time and makes daily cooking feel smoother. Plus, when everything has a designated home, you're less likely to buy duplicates or let items go to waste.
Best For
This idea is perfect for families, roommates, or anyone who shares a kitchen with others. It's also great if you have a lot of dry goods stored in jars or bins and want to keep them organized without constant reminders. Even if you live alone, labeling helps maintain order when you're in a rush or meal prepping for the week.
Styling Tip
Stick to one label style for a cohesive look—black text on white labels feels clean and modern, while chalk labels add a rustic touch. Use a label maker for crisp results or write directly on glass jars with a chalk marker for easy updates. Group similar items together (like baking supplies or snacks) and label containers at eye level so they're easy to read at a glance.
5. Repurpose a Magazine Holder for Cutting Boards
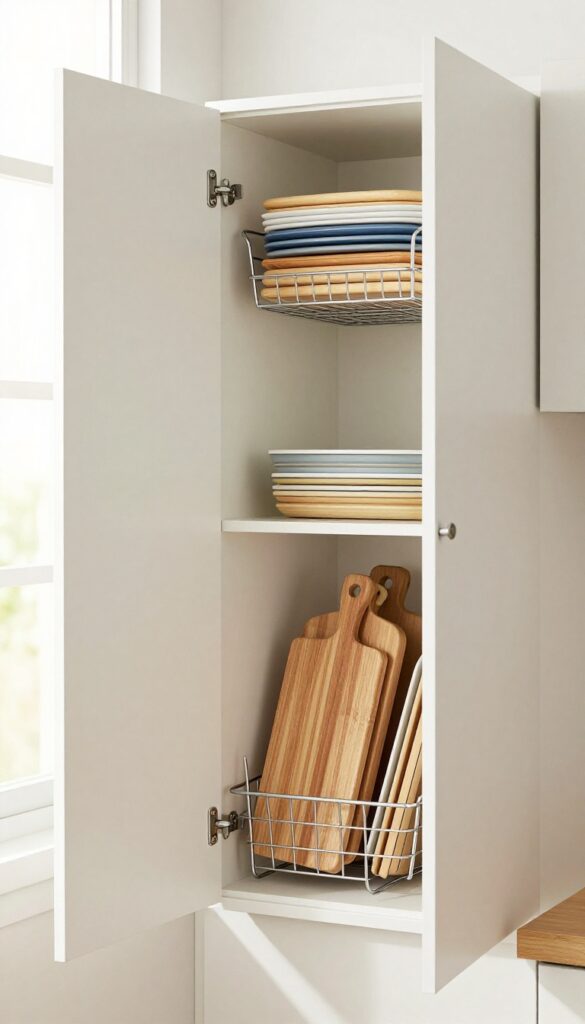
Cutting boards and baking sheets have a way of turning into a chaotic jumble inside deep cabinets. You pull one out, and the whole stack slides sideways. A simple magazine holder or file organizer changes that completely.
Stand them upright, and suddenly everything stays put—no more wrestling with clattering boards or digging through the pile to find the right size.
Why It Works
This trick uses vertical storage to tame horizontal clutter. By standing boards and sheets on edge, you stop them from slipping and sliding, which also protects their edges from wear. It’s a zero-cost solution if you already have a magazine holder lying around, or a very cheap one if you don’t.
Best For
Great for any kitchen where cabinet space is tight or deep cabinets become black holes. Especially handy if you own multiple cutting boards in different sizes or a collection of baking sheets.
Styling Tip
Choose a magazine holder that matches your kitchen’s vibe—wire for an industrial look, bamboo for warmth, or sleek acrylic for modern minimalism. Place it near your prep area so grabbing a board feels natural.
6. Use Drawer Dividers for Utensils and Gadgets
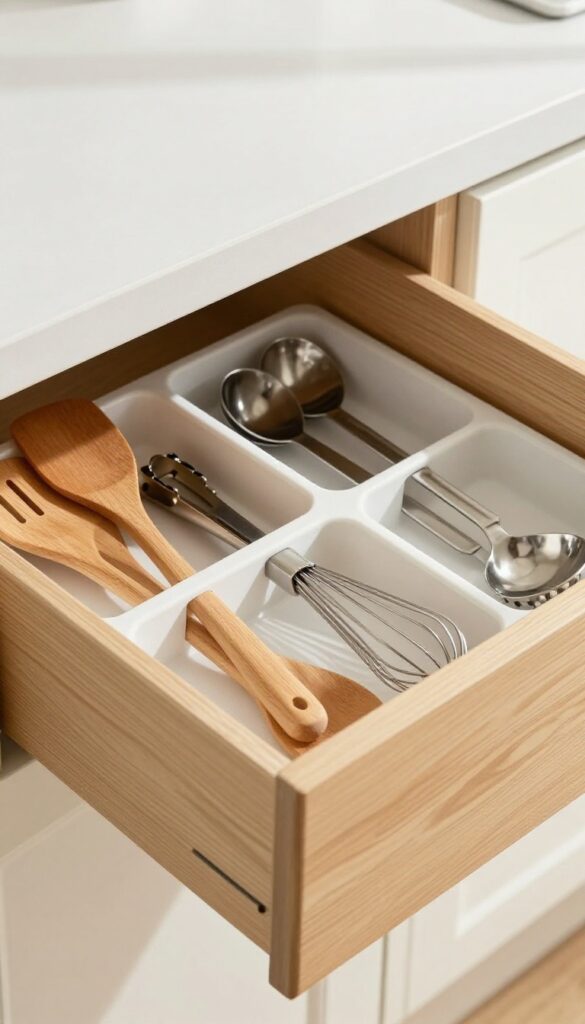
There is nothing worse than opening a kitchen drawer only to find a chaotic jumble of spatulas, whisks, and measuring spoons all tangled together. Drawer dividers are the simplest fix for this daily annoyance, turning messy drawers into neatly organized zones where every tool has its place. The best part?
You can achieve this on any budget—adjustable plastic dividers cost just a few dollars, or you can craft custom ones from cardboard or scrap wood for free.
Why It Works
Dividers prevent items from sliding around every time you open and close the drawer, so your utensils stay exactly where you put them. This saves time when cooking because you can grab what you need without digging or untangling. Plus, seeing everything laid out neatly makes your kitchen feel more orderly and pleasant to work in.
Best For
This idea is perfect for any kitchen drawer that holds small tools—especially the junk drawer that collects random gadgets, takeout chopsticks, and stray measuring cups. It works wonders in deep drawers where items tend to pile up, and it's a lifesaver for renters who can't install permanent storage solutions.
Styling Tip
For a cohesive look, choose dividers in a neutral color like white, beige, or light wood that blends with your drawer interior. If you're using DIY cardboard dividers, cover them with contact paper in a subtle pattern or solid color to make them feel intentional rather than makeshift. Group similar items together—all spatulas in one slot, measuring spoons in another—to keep the system intuitive.
7. Hang a Pegboard for Pots and Pans
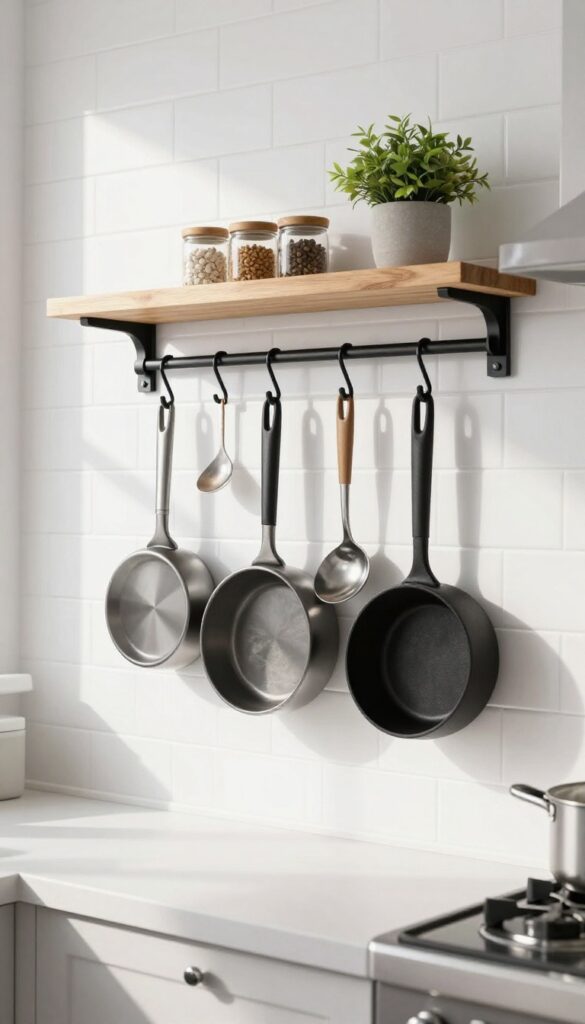
Empty wall space in a kitchen is precious real estate, and a pegboard turns it into a hardworking storage zone. This isn't your dad's workshop board—modern pegboards come in sleek metal or painted wood that blend right into your decor. Hanging your most-used pots and pans within arm's reach frees up cabinet space and adds a lived-in, industrial vibe that feels intentional, not cluttered.
Why It Works
Pegboards are endlessly customizable—you move hooks and shelves as your cookware collection changes, no drilling new holes. They keep heavy items visible and accessible, so you're not digging through stacked pans. And because the setup is so affordable (a board and a few hooks cost under $50), it's a budget-friendly way to solve storage without a renovation.
Best For
This works best in kitchens with a blank wall near the stove or prep area, especially if you have a collection of stainless steel or cast-iron cookware that looks good on display. It's also great for renters since pegboards can be mounted with minimal damage or even hung on adhesive strips if the load is light.
Styling Tip
Stick to one metal finish for hooks and shelves—black or brass keeps it cohesive. Arrange larger pans on the bottom hooks and smaller utensils above, leaving some negative space so it doesn't feel chaotic. Add a small shelf at the top for spices or a tiny plant to soften the look.
8. Store Spices on a Magnetic Strip
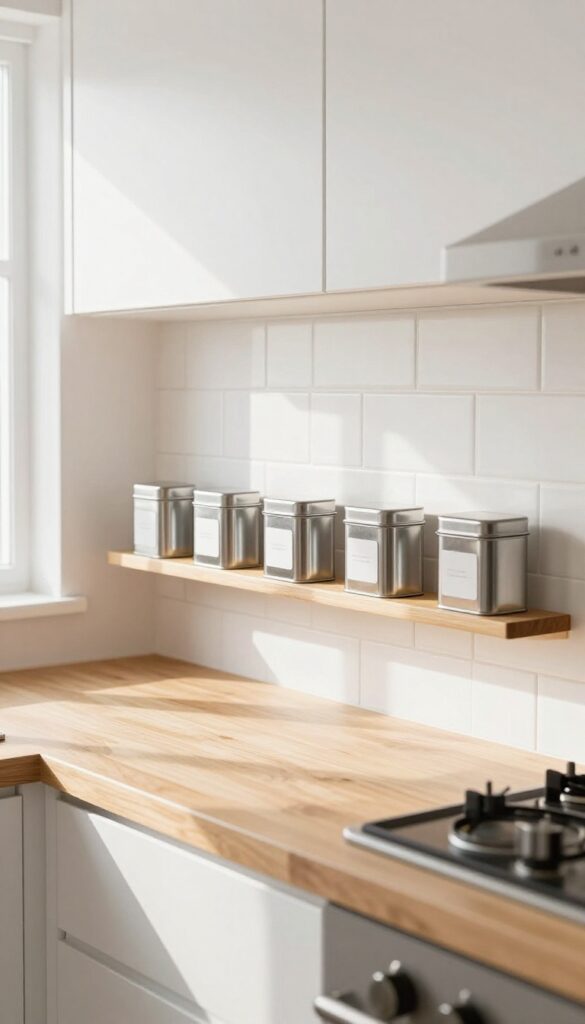
If you've ever rummaged through a cluttered drawer looking for cumin, only to knock over three other jars in the process, this one's for you. A magnetic strip mounted on the wall or inside a cabinet door gives your metal spice tins a designated home that's both visible and easy to reach. It's one of those clever kitchen tweaks that instantly makes you wonder why you didn't try it sooner.
Why It Works
Magnetic strips eliminate the need for bulky spice racks or overcrowded cabinets. By keeping tins out in the open (or neatly tucked inside a door), you save precious counter and drawer space. Plus, seeing all your spices at a glance means you'll actually use them more often—no more buying duplicates because you forgot what you already have.
Best For
This idea is perfect for small kitchens where every inch counts, or for anyone who cooks frequently and wants their most-used spices within arm's reach. It also works great in rental kitchens where you can't make permanent changes—just use adhesive magnetic strips that peel off without damage.
Styling Tip
- Stick with uniform metal tins for a clean, cohesive look. Label each tin with a simple white sticker or chalk label for easy identification. Mount the strip on the backsplash between the stove and countertop, or on the inside of a cabinet door near your prep area.
- If you want extra personality, choose strips in brushed brass or matte black to complement your hardware.
9. Use Baskets and Bins for Grouped Items
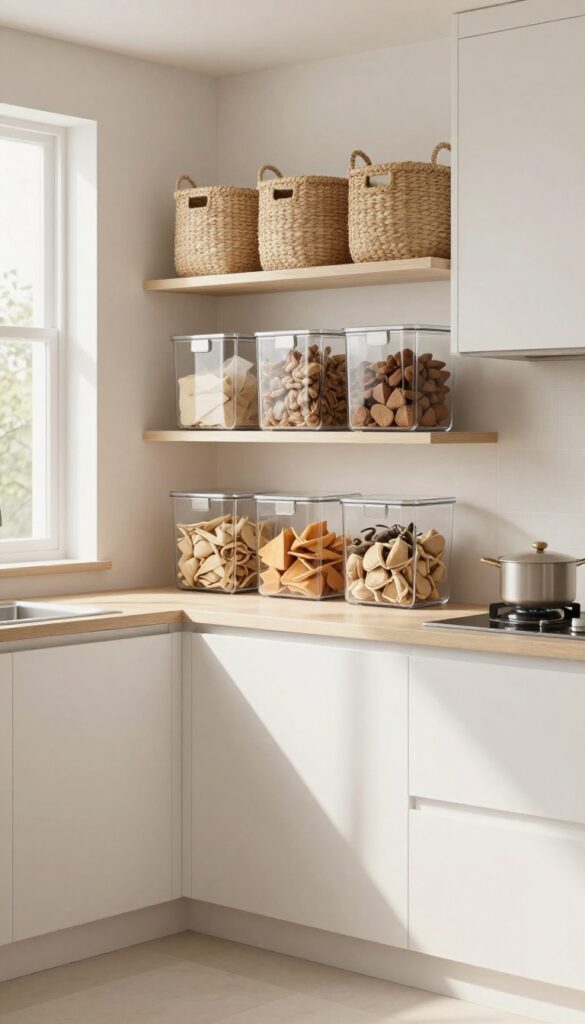
Open shelving looks great in theory, but in real life it can quickly turn into a cluttered mess. The secret to keeping it tidy without losing that airy, curated feel is to corral loose items into baskets and bins. Not only does this make your shelves look intentionally styled, but it also makes grabbing what you need a breeze—no more digging through a pile of snack bags to find the granola bars.
Why It Works
Grouping similar items together in containers instantly creates visual order. Your brain processes the shape of the basket or bin as one unit, so even a shelf packed with supplies feels calm and organized. Plus, it keeps small things from migrating around your kitchen and getting lost.
Best For
This trick is perfect for open shelving, pantry shelves, or even the top of your fridge. It works especially well in kitchens where you have a mix of dry goods, baking tools, or kids' snacks that need to stay accessible but out of sight.
Styling Tip
Mix materials for texture: try woven seagrass baskets for a natural, warm vibe alongside clear acrylic bins so you can see exactly what's inside. Stick to a consistent color palette—like all neutral tones or all white bins—to keep the look cohesive and intentional.
FAQ
What is the most budget-friendly way to organize a kitchen?
Start by decluttering and reusing what you already have. Clear jars, cardboard boxes covered in wrapping paper, and tension rods are all inexpensive ways to create order without spending much.
How can I organize my kitchen without buying anything?
Focus on decluttering first. Then repurpose items like shoeboxes for drawer dividers, mason jars for storage, and magazine holders for cutting boards. Group similar items together and label with masking tape.
What are the best kitchen organization ideas for small spaces?
Use vertical space with shelf risers, pegboards, and magnetic strips. Tension rods under the sink and over-the-door organizers also maximize storage without taking up counter or floor space.
How do I keep my kitchen organized long-term?
Maintain a system by putting things back where they belong after each use. Regularly purge expired items and adjust your organization as your needs change. Labels help everyone in the household stay consistent.
Can I organize my kitchen on a tight budget?
Absolutely. Many ideas cost little to nothing, like using tension rods, repurposing containers, and making your own dividers. Thrift stores and dollar stores are great sources for affordable baskets, jars, and bins.
Conclusion
Organizing your kitchen doesn't have to be expensive or complicated. With these nine budget-friendly ideas, you can create a space that feels calm, functional, and easy to navigate every day.
Start with one or two changes that feel manageable, and build from there. Small steps add up to a kitchen that works for you without costing a fortune.