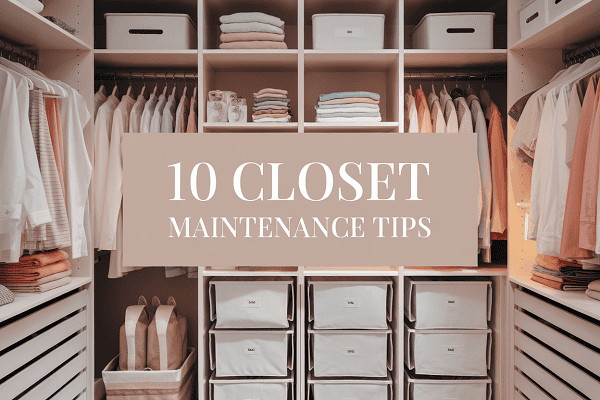
15 Bathroom Maintenance Tips That Save Money
Bathroom repair bills usually start with something small that looked harmless for way too long. A slow drip, a loose seal, or a little moisture near the base of the toilet can quietly turn into cabinet damage, mold cleanup, and a plumbing call that ruins the week.
Bathrooms cost more to repair than people expect because water spreads fast and hides well. It gets under flooring, behind trim, inside drywall, and around fixtures before anyone notices, which is exactly why “I’ll deal with it later” becomes an expensive sentence.
I treat bathroom maintenance like a money-saving habit, not a cleaning chore, because the goal is preventing damage before it gets a chance to settle in.
That one mindset shift changes everything, and it keeps the bathroom from becoming the room that always needs “one more repair.”
This guide focuses on the stuff that actually saves money: leaks, moisture, seals, drains, outlets, and the little warning signs most people miss. The point is simple—small checks now beat big repairs later, every single time.
Why Bathroom Maintenance Matters More Than You Think
Water damage rarely shows up where it starts, and that makes bathrooms tricky. A tiny leak under a sink can rot a cabinet base, soften subflooring, and stain nearby trim before the drip even looks serious.
Moisture also feeds mold, and mold loves bathrooms because steam, splashes, and poor airflow give it a head start. The CDC and EPA both stress moisture control, leak repair, and ventilation because mold prevention starts with keeping things dry, not just wiping surfaces once in a while. (US EPA)
Plumbing repairs cost enough on their own, but the real expense usually comes from what the leak damages around the pipe. Angi notes common plumbing leak work can range from small-service pricing into much bigger repair costs, and water damage restoration can climb fast once walls, floors, or cabinetry get involved. (Angi)
Bathroom maintenance also protects resale value because buyers notice stains, mold smells, cracked grout, and soft flooring immediately. A bathroom that looks dry, tight, and well cared for signals fewer future surprises, and that matters more than fancy decor nine times out of ten.
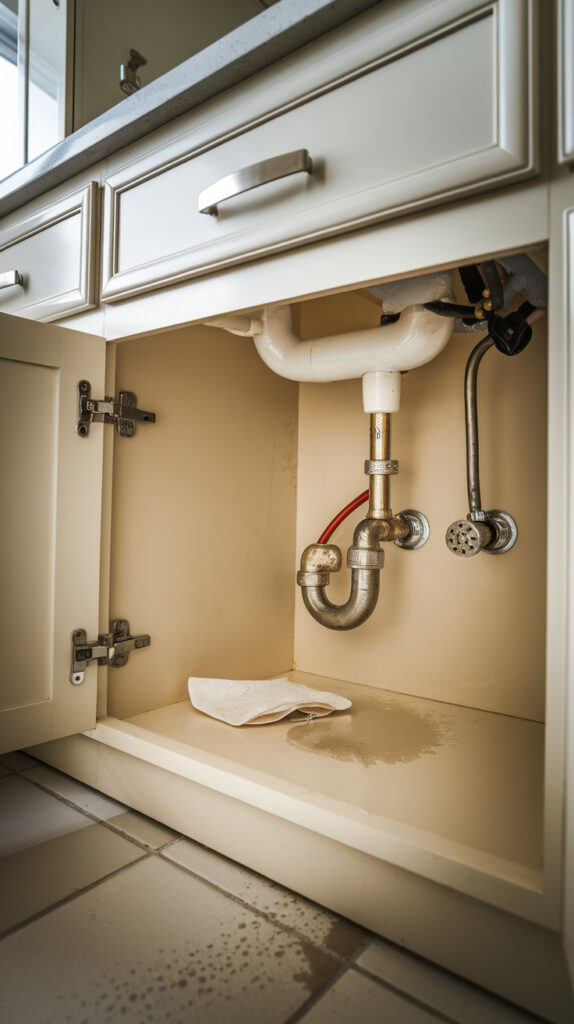
1. Check for Leaks Under the Sink Monthly
Why It Saves Money
Slow leaks under a bathroom sink ruin cabinets from the bottom up, and the damage hides behind stored bottles and cleaning stuff. I’ve seen perfectly decent vanities turn into mush just because a drip stayed hidden for a couple of months.
A monthly check costs nothing and catches the problem while it still looks like a small plumbing fix. That timing matters because replacing a vanity and repairing water damage costs a whole lot more than tightening a fitting or replacing a small part. (Angi)
How to Do It
Empty the cabinet first so you can actually see the plumbing and the floor panel.
- Use a flashlight to check the P-trap, shutoff valves, and supply lines.
- Run the faucet for 30–60 seconds and watch for drips at each connection.
- Wipe the pipes with a dry paper towel to catch moisture you can’t see.
- Feel the cabinet floor and side walls for dampness or soft spots.
- Check the back wall for staining, bubbling paint, or warped material.
Warning Signs to Watch
A musty smell under the sink usually shows up before visible puddles, and that smell is never random. Dark spots, swollen particleboard, peeling laminate, and rust on shutoff valves also point to a leak that has been hanging around.
The EPA’s leak guidance also reminds homeowners that small household leaks add up fast, both in water waste and repair risk. Even a “tiny” drip deserves attention because it won’t fix itself, no matter how optimistic anyone feels about it. (US EPA)
When to Call a Professional
Call a plumber if you see active dripping from corroded pipes, cracked fittings, or water lines you can’t safely tighten. I also call quickly when the cabinet floor feels soft, because that usually means the leak has been there longer than expected.
2. Reseal Caulking Around the Tub and Shower

Why It Saves Money
Cracked caulk looks cosmetic, but it acts like an open door for water. Once water slips behind the tub edge or shower wall, it starts damaging drywall, framing, and whatever sits below it.
This tip saves money because a tube of caulk costs very little compared to tile repair, wall repair, or mold cleanup. It’s one of those boring maintenance jobs that quietly prevents the big, dramatic repair nobody wants. (Angi)
How to Do It
Start by removing the old caulk completely so the new line can actually seal.
- Use a caulk remover tool or plastic scraper to lift old caulk without scratching surfaces.
- Clean the seam and let it dry fully before applying anything new.
- Apply bathroom-grade mildew-resistant silicone caulk in a smooth, steady line.
- Smooth the bead with a caulk tool or a gloved finger for full contact.
- Let it cure as directed before using the shower or tub.
Warning Signs to Watch
Gaps, peeling edges, black specks, and sections that feel brittle all mean the seal has failed. If water sits near the seam after every shower, it usually finds those weak spots faster than people think.
I also watch for soft drywall on the other side of the shower wall, because that can point to a sealing problem that already moved beyond the surface. That’s the moment where “just recaulk it” turns into “okay, now we’re opening a wall.”
When to Call a Professional
Call a pro if the old caulk comes off and you find soft backing material, mold behind the seam, or loose tile around the tub. You can handle normal resealing at home, but hidden damage needs a real inspection before you trap moisture under a fresh bead.
3. Clean the Exhaust Fan to Prevent Moisture Buildup
Why It Saves Money
A dirty exhaust fan can’t move enough air, and moisture stays trapped in the bathroom longer than it should. That extra humidity feeds mold, weakens paint, and encourages peeling around ceilings and trim.
Ventilation matters more than people give it credit for, especially in small bathrooms with hot showers. EPA and CDC guidance both point to humidity control and airflow as key mold prevention steps, so a working fan isn’t optional if you want to avoid moisture damage. (US EPA)
How to Do It
This job looks annoying, but it usually takes less than 15 minutes.
- Turn off power at the switch and let the fan stop fully.
- Remove the cover and vacuum dust from the grille and fan housing.
- Wipe the cover with mild soap and dry it before reinstalling.
- Use a narrow brush or vacuum attachment to clear dust around the motor area.
- Turn the fan on and confirm it sounds smooth, not strained or rattly.
Warning Signs to Watch
Steam lingering on mirrors and walls long after a shower usually means poor ventilation. A loud grinding sound, weak airflow, or dust caked on the grille also tells you the fan needs attention right away.
I also pay attention to ceiling corners above the shower, because that’s where moisture problems show up first. If paint starts spotting or darkening there, the fan probably isn’t keeping up.
When to Call a Professional
Call an electrician or HVAC pro if the fan hums but barely spins, trips breakers, or vents poorly even after cleaning. If the ductwork vents into an attic instead of outdoors, fix that fast because it creates a whole different moisture problem.
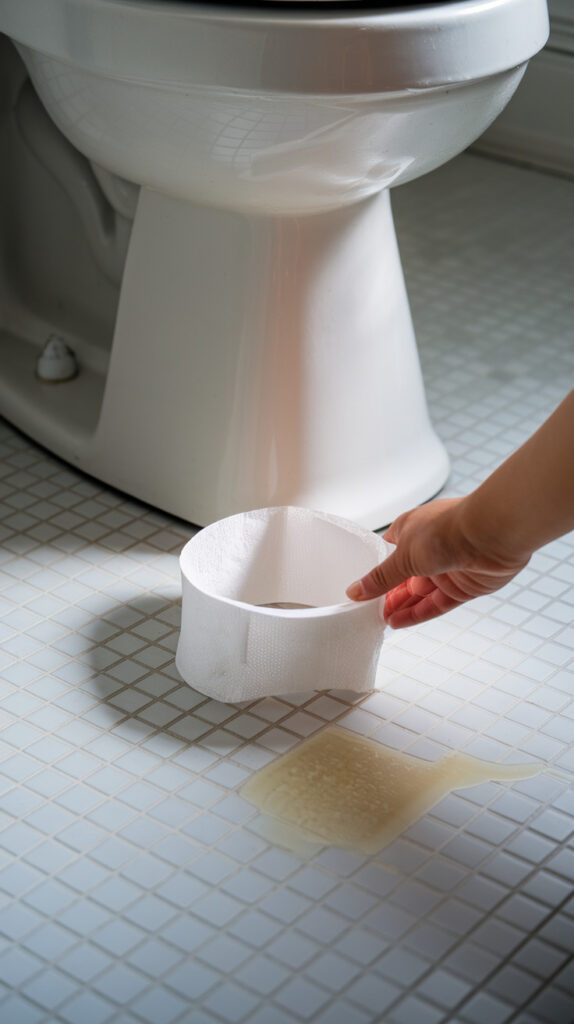
4. Inspect the Toilet Base for Water Seepage
Why It Saves Money
Toilet leaks at the base often go unnoticed because the water evaporates or hides under rugs. That little ring of moisture can rot flooring, loosen the toilet, and cause nasty subfloor damage before anyone realizes what happened.
This one saves serious money because subfloor repair and toilet reset work cost a lot more than catching a bad wax ring early. Toilet area damage also spreads fast since people keep using it while the leak keeps working overtime.
How to Do It
A quick inspection once a month takes almost no effort and catches trouble early.
- Check the floor around the toilet base for dampness or discoloration.
- Press gently near the base to see if the toilet rocks or shifts.
- Look for cracked caulk lines or a gap where moisture could escape.
- Dry the area, then place a paper towel around the base and flush once.
- Recheck the towel for moisture after a few minutes.
Warning Signs to Watch
A persistent odor near the toilet, soft flooring, or staining around the base usually means seepage. A toilet that rocks when someone sits on it also raises a red flag because movement can break the seal underneath.
People blame “bathroom smell” on anything except the toilet seal, and that guess gets expensive fast. If the floor feels spongy, skip the delay and get it looked at.
When to Call a Professional
Call a plumber if the base leaks after tightening visible bolts or if the toilet shifts noticeably. You’ll also want a pro if the floor already feels soft, because the toilet may need a reset and the subfloor may need repair too.
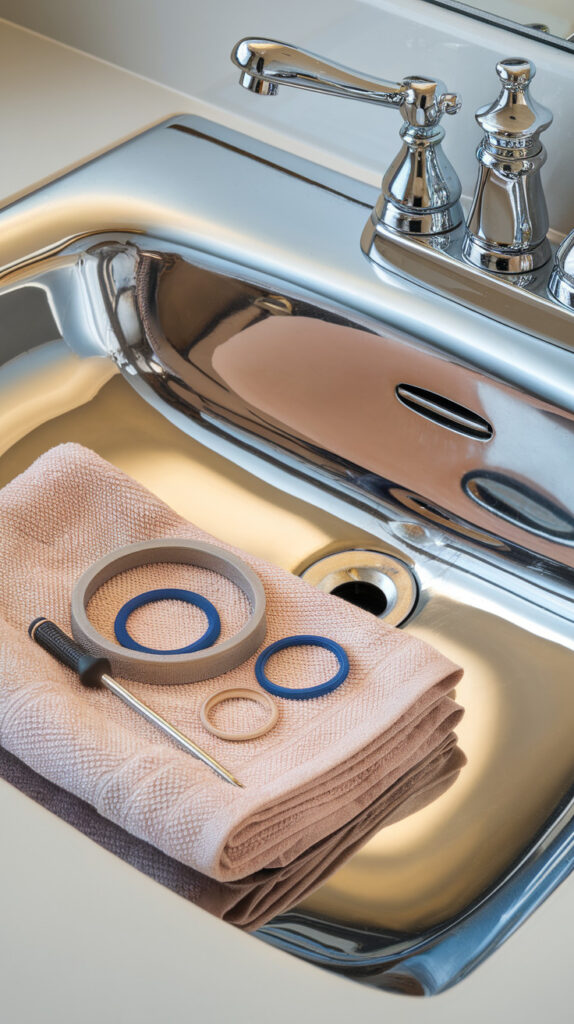
5. Replace Worn Faucet Washers Early
Why It Saves Money
A dripping faucet looks minor until you remember it runs all day and all night. EPA WaterSense notes household leaks waste a surprising amount of water, and worn washers or valves show up on that list all the time. (US EPA)
This tip saves money in two ways: lower water waste and less wear on the fixture itself. I fix faucet drips early because once internal parts wear down more, the repair gets fussier and sometimes pushes people into replacing the whole faucet.
How to Do It
Basic faucet repairs feel intimidating the first time, but the steps stay pretty manageable.
- Shut off water at the under-sink valves before touching the faucet.
- Plug the drain so tiny screws or parts don’t disappear.
- Remove the handle and inspect the washer, O-ring, or cartridge based on faucet type.
- Replace worn parts with matching sizes from the hardware store.
- Reassemble and test for smooth operation and no dripping.
Warning Signs to Watch
Dripping after a full shutoff, squeaking handles, and stiff turning usually point to worn internal parts. You might also see crusty mineral buildup around the spout, which can hide a slow drip that never fully stops.
I also watch for water pooling around the handle base because that suggests worn seals inside the faucet body. That leak damages the countertop over time, and that repair gets annoying in a hurry.
When to Call a Professional
Call a plumber if the shutoff valves under the sink don’t work, the faucet body cracks, or the fixture still leaks after replacing the right parts. Some older faucets also corrode internally, and forcing them apart can make the job worse.
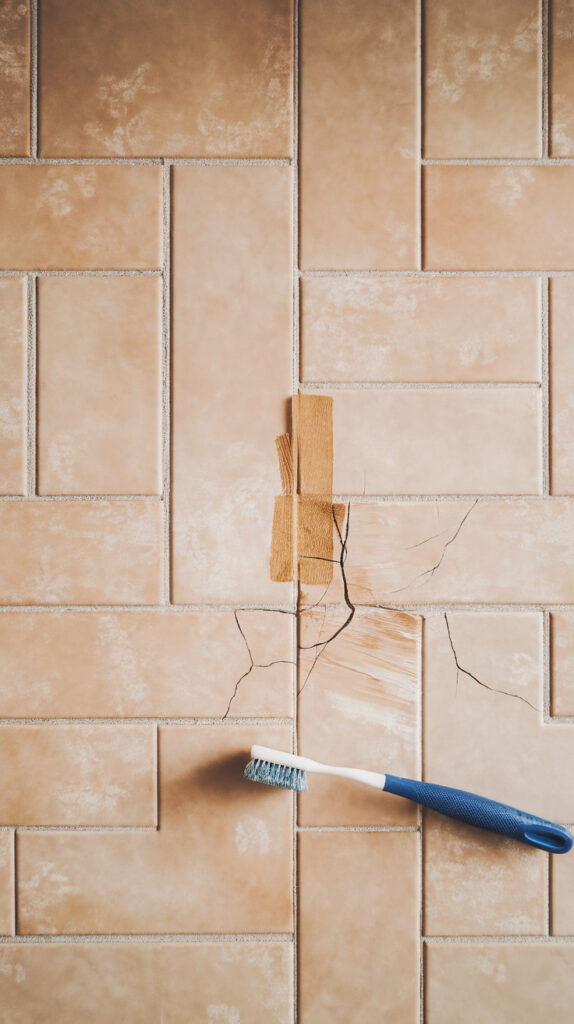
6. Check Grout Lines for Cracks
Why It Saves Money
Grout protects the spaces between tiles, but it also acts like a moisture barrier when it stays intact. Cracked grout lets water slip behind tile, and that hidden moisture causes loose tile, mold, and wall damage.
This tip matters because tile repairs and shower wall fixes get expensive fast, especially if water reaches the backing material. Angi’s tile repair and retiling cost ranges show how quickly a “small tile issue” can become a real budget hit. (Angi)
How to Do It
You don’t need a full renovation mindset here, just a simple inspection routine.
- Dry the tile area so cracks and gaps show clearly.
- Inspect grout lines closely around corners, niches, and the tub edge.
- Mark any cracked or missing spots with painter’s tape.
- Remove loose grout in damaged sections and apply fresh grout as needed.
- Seal the grout after curing if the product requires sealing.
Warning Signs to Watch
Hairline cracks, crumbling grout, darkened lines that never dry out, and loose tiles all signal trouble. If one tile sounds hollow when tapped, moisture may already have weakened the bond behind it.
A lot of people ignore grout because it “still looks mostly okay,” and that phrase usually ages badly. Water only needs a small opening, not a dramatic one.
When to Call a Professional
Call a tile pro if cracks keep returning, multiple tiles feel loose, or the wall behind the tile feels soft. Regrouting helps surface-level wear, but recurring cracks usually mean movement or moisture damage underneath.
7. Keep Drains Clear of Hair and Debris
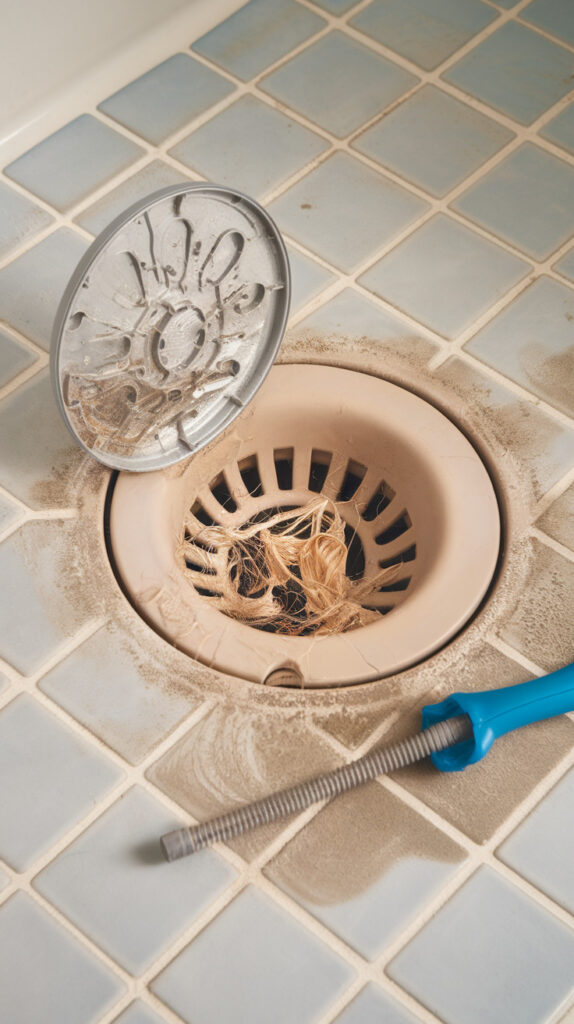
Why It Saves Money
Slow drains do more than annoy people during a shower. They keep water sitting where it shouldn’t, increase the chance of overflow, and tempt people to pour harsh chemical cleaners into pipes, which can cause damage over time.
This tip saves money because routine drain maintenance prevents emergency clogs and service calls. It also protects fixtures and finishes from standing water, especially around tubs and shower pans.
How to Do It
Drain care works best when it stays simple and consistent.
- Use a hair catcher in the shower or tub drain every day.
- Remove visible hair from the stopper or catcher weekly.
- Flush the drain with hot water regularly to move soap residue.
- Use a drain snake or zip tool for slow drains before they fully clog.
- Avoid dumping thick products, oils, or heavy residue down the sink.
Warning Signs to Watch
Gurgling sounds, water pooling around your feet, and slow draining after a normal shower all signal buildup. Bad smells from the sink or shower drain also show trapped debris breaking down inside the pipe.
I avoid chemical drain cleaners unless a plumber tells me otherwise because they can be rough on older pipes and seals. Mechanical cleaning usually solves the issue without creating another one.
When to Call a Professional
Call a plumber if more than one drain runs slow at the same time or if clogs keep coming back after you clear them. Recurring backups can point to a deeper line issue, and that’s not the place for guesswork.
8. Monitor Water Pressure
Why It Saves Money
High water pressure feels great for about five minutes, then it starts wearing out hoses, valves, and faucet parts faster than normal. Low pressure creates its own mess too, because people assume a fixture failed when the real issue sits elsewhere in the system.
Monitoring pressure saves money by protecting plumbing components and helping you catch hidden problems early. It also helps you avoid replacing fixtures that aren’t actually broken.
How to Do It
You can check this with a simple pressure gauge that screws onto a faucet or hose connection.
- Attach a water pressure gauge to a suitable connection point.
- Turn the water on fully and read the PSI on the gauge.
- Compare the reading with normal household ranges recommended by local plumbing guidance.
- Recheck after a few weeks if you suspect fluctuations.
- Note any big changes, especially after municipal work or valve adjustments.
Warning Signs to Watch
Banging pipes, faucets that splash aggressively, frequent leaks, and toilet fill valves wearing out quickly can point to high pressure. Weak shower flow across multiple fixtures can signal pressure problems too, especially if it changed suddenly.
I pay attention to sudden shifts because they usually mean something changed in the system, not in my imagination. Plumbing rarely gets dramatic without a reason.
When to Call a Professional
Call a plumber if pressure reads unusually high or low, or if you notice pressure swings during the day. A pro can check regulators, valves, and supply issues before pressure problems start chewing through parts.
9. Tighten Loose Fixtures
Why It Saves Money
Loose towel bars and handles feel cosmetic, but loose faucets, shower heads, and toilet hardware can turn into leaks and cracked surfaces. Movement wears out seals and mounting points, and then the repair stops being simple.
This tip saves money because tightening hardware early prevents broken anchors, chipped tile, and water seepage around fixtures. I treat “wiggle” like a warning sign, not a minor annoyance.
How to Do It
Most bathroom fixture tightening jobs need basic tools and five minutes.
- Check faucets, shower heads, toilet seat bolts, and mounted accessories for movement.
- Tighten screws and mounting hardware gently to avoid cracking finishes.
- Use the correct screwdriver or wrench so you don’t strip heads.
- Add fresh wall anchors if accessories keep loosening in drywall.
- Recheck after a week to confirm the fixture stays secure.
Warning Signs to Watch
A faucet that shifts when you turn it on, a shower head that drips from the joint, or a toilet seat that slides around all need attention. Tiny cracks around fixture bases also show stress from repeated movement.
Loose fixtures never get tighter on their own, and that’s the whole problem. The longer they move, the more damage they create behind the surface.
When to Call a Professional
Call a plumber if tightening a faucet or shower fixture doesn’t stop movement or leaking. If tile or vanity material has cracked around the mounting area, get a pro involved before the repair spreads.
10. Check for Hidden Mold in Corners
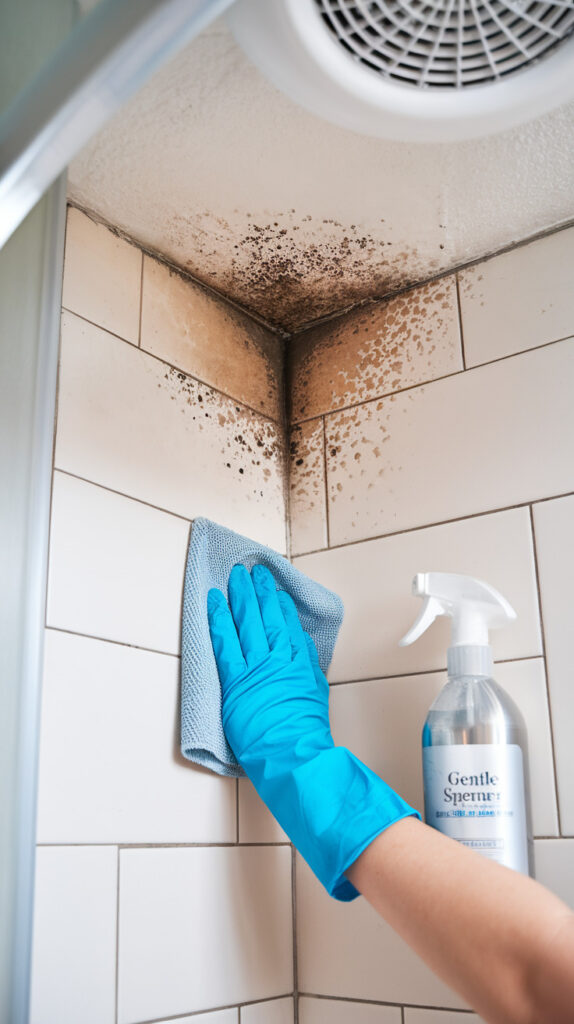
Why It Saves Money
Mold cleanup gets expensive fast when it spreads behind walls or under flooring. Bathroom corners, ceiling edges, and areas behind the toilet often hide the first signs, so a quick inspection can save a painful cleanup bill later.
EPA and CDC both emphasize that mold control starts with moisture control, and that part matters more than scrubbing alone. If moisture keeps returning, mold keeps returning too, and nobody wants that endless loop. (US EPA)
How to Do It
A flashlight and a few minutes each month make a big difference here.
- Inspect corners near the shower, tub, ceiling, and baseboards.
- Check behind the toilet and behind bathroom storage where airflow stays poor.
- Look for dark spots, staining, peeling paint, or fuzzy growth.
- Wipe small surface spots and monitor whether they return quickly.
- Fix the moisture source immediately if you find recurring mold.
Warning Signs to Watch
Musty smells, repeated spotting on painted walls, and condensation that lingers all point to hidden moisture. Paint bubbling or drywall tape lines showing through can also signal dampness behind the surface.
Painting over mold never solves the problem, and it usually makes the next repair messier. If a spot comes back after cleaning, treat that as a moisture problem first.
When to Call a Professional
Call a remediation or restoration pro if mold keeps returning, covers a larger area, or appears behind tile or drywall. Professional mold remediation costs can range widely depending on size and location, which makes early action way cheaper than waiting. (Angi)
11. Maintain Shower Door Seals
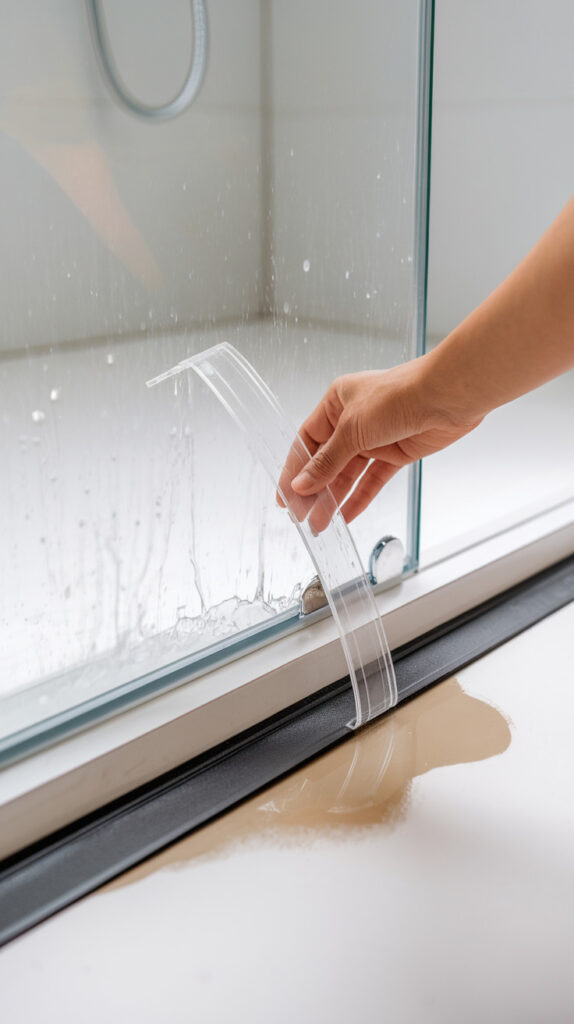
Why It Saves Money
Worn shower door sweeps and seals let water escape onto the floor, and repeated splash-out damages flooring and trim over time. People usually blame “messy showers” when the real issue sits right on the bottom edge of the door.
This tip saves money because replacing a seal costs little, but repairing floor damage and moisture stains costs a lot more. It also cuts down on slippery floors, which helps for safety too.
How to Do It
Shower door seal maintenance is easier than it looks once you check the right spots.
- Inspect the bottom sweep and side seals for cracks, gaps, or stiffness.
- Close the door and look for visible gaps where water can escape.
- Clean soap scum from the seal so it sits flush against surfaces.
- Replace worn seals with the correct size and style for your door.
- Test with a quick shower and check the floor perimeter afterward.
Warning Signs to Watch
Water on the floor near the shower edge, a brittle seal, or a door that no longer closes snugly all suggest seal failure. Mineral buildup on the track can also push the door out of alignment and create leaks.
I always check this after noticing “random” puddles, because random puddles in a bathroom almost never exist. There’s always a reason.
When to Call a Professional
Call a glass or bath-door pro if the door sits crooked, the hinges sag, or the frame pulls away from the wall. Seal replacement helps only when the door itself still aligns correctly.
12. Inspect Water Heater Connection Lines
Why It Saves Money
Bathroom damage sometimes starts outside the bathroom, especially when a nearby water heater connection line fails. A leaking supply line can send water across floors and into walls before anyone notices, and then the repair snowballs.
This tip saves money because connection lines and fittings often show warning signs before they fail completely. A quick look at corrosion, drips, or moisture around the heater can prevent major water damage restoration costs. (Angi)
How to Do It
This works best as a visual check unless you have plumbing experience.
- Look at hot and cold connection points for rust, white buildup, or moisture.
- Check the floor around the water heater for dampness or staining.
- Inspect flexible lines for kinks, bulges, or worn outer coverings.
- Confirm the shutoff valve turns smoothly and isn’t seized.
- Note the heater age and schedule replacement planning if it’s older.
Warning Signs to Watch
Drips at fittings, corrosion on threaded joints, and water trails down the tank or lines need fast attention. Rumbling sounds or inconsistent hot water can also signal maintenance issues that deserve a closer look.
A lot of people wait until the heater fails dramatically, which feels exciting in the worst possible way. Small signs usually show up first if someone checks once in a while.
When to Call a Professional
Call a plumber immediately if you see active leaking, heavy corrosion, or bulging connection lines. Don’t mess with gas or electrical components unless you know exactly what you’re doing, because this is one area where DIY confidence can backfire.
13. Clean Overflow Drains
Why It Saves Money
Overflow drains in sinks and tubs collect soap scum, grime, and moisture, and then they start smelling awful. When they clog up, drainage slows and the fixture can hold water longer than it should, which increases staining and moisture exposure.
This tip saves money because it prevents odors, keeps drainage working properly, and reduces buildup that can contribute to clogs. It also helps people avoid unnecessary “deep clean” products that don’t fix the real problem.
How to Do It
Overflow drains are easy to forget, so I put them on the same schedule as drain checks.
- Locate the overflow opening near the top of the sink or tub basin.
- Use a small brush or flexible cleaning tool to remove buildup gently.
- Flush with warm water to rinse loosened residue.
- Clean around the opening with mild cleaner to remove grime film.
- Repeat regularly so buildup never gets thick.
Warning Signs to Watch
A sour smell near the sink or tub, slower draining, or visible grime inside the overflow opening means it’s overdue. If water backs up and drains sluggishly even after basic cleaning, buildup may sit deeper in the drain line.
People scrub the sink bowl until it shines and then ignore the overflow hole completely, which makes no sense once the smell starts. That little opening causes a lot of “mystery” odor complaints.
When to Call a Professional
Call a plumber if cleaning the overflow opening doesn’t improve drainage or odor. A deeper clog in the branch line may need proper tools, and forcing it can scratch fixtures or worsen the blockage.
14. Prevent Hard Water Buildup
Why It Saves Money
Hard water buildup clogs aerators, damages shower heads, stains fixtures, and shortens the life of valves over time. It also makes faucets and shower doors look older than they are, which pushes people toward replacements they didn’t really need.
This tip saves money because regular descaling keeps fixtures working longer and helps seals close properly. I’d rather soak and clean a shower head than buy a new one because mineral crust slowly strangled the flow.
How to Do It
Consistency beats aggressive scrubbing every single time here.
- Remove and clean faucet aerators on a regular schedule.
- Soak shower heads or aerators in vinegar to dissolve mineral buildup.
- Wipe fixtures dry after use to reduce spotting and scale formation.
- Clean glass and tile near spray zones before buildup hardens.
- Consider a water treatment option if buildup returns very quickly.
Warning Signs to Watch
White crust, chalky residue, weak spray patterns, and handles that feel stiff all point to mineral buildup. You may also notice water spots that stop wiping away with normal cleaning.
Hard water damage creeps up slowly, so people get used to “bad flow” without realizing it. Then a seal fails, a faucet drips, and the repair bill shows up right on schedule.
When to Call a Professional
Call a plumber if fixtures keep clogging, pressure drops in one area repeatedly, or mineral buildup affects multiple appliances. A pro can check water quality and suggest a long-term fix instead of endless cleanup.
15. Test GFCI Outlets Regularly
Why It Saves Money
Bathroom outlets sit close to water, so GFCI protection matters for safety and for preventing damage from electrical faults. A failed GFCI can leave you with a dead outlet, nuisance trips, or a bigger electrical problem if it goes unnoticed.
This tip saves money because catching a failing outlet early usually means a simple electrical service call instead of a bigger troubleshooting job later. NFPA and CPSC guidance both emphasize regular testing, with monthly checks commonly recommended. (nfpa.org)
How to Do It
Testing a GFCI takes about one minute and needs zero special tools.
- Plug in a small night light or device to confirm the outlet has power.
- Press the “TEST” button on the GFCI outlet.
- Confirm the device shuts off, which shows the GFCI tripped correctly.
- Press the “RESET” button to restore power.
- Repeat for each GFCI outlet in the bathroom.
Warning Signs to Watch
If the outlet won’t reset, doesn’t trip when tested, or trips randomly with normal use, something needs attention. Warm outlet covers, buzzing sounds, or discoloration also mean stop using it and deal with it quickly.
Electrical issues don’t improve with patience, and bathrooms add water to the equation, which is not a fun combo. I never put these off.
When to Call a Professional
Call an electrician if the GFCI fails the test, trips repeatedly, or controls other outlets that also lose power unexpectedly. Electrical troubleshooting gets complicated fast, and this is the right place to let a pro handle it.
How Much These Problems Can Cost If Ignored
Bathroom maintenance feels optional until repair prices enter the chat, and then suddenly everyone cares. The exact numbers vary by location and materials, but the pattern stays the same: delays cost more than prevention.
Water damage restoration alone can run from roughly the low hundreds into the thousands, with common averages around the mid-thousands depending on severity and the type of water involved. Angi and HomeAdvisor both show how quickly costs rise when moisture spreads beyond the original leak. (Angi)
Mold remediation can range from a few hundred dollars for small, simple areas to several thousand when mold gets behind walls, tile, or fixtures. Angi and This Old House both show bathroom mold can become expensive fast, especially once hidden moisture and repairs enter the picture. (Angi)
Vanity replacement, tile repair, and emergency plumbing visits add another layer of cost that stacks on top of the original issue. Angi’s cost data shows vanity installs often land around four figures, tile labor and material costs vary widely, and even small plumbing jobs can become pricey once they move beyond a quick fix. (Angi)
Simple Bathroom Maintenance Schedule
A bathroom maintenance routine works best when it stays realistic, because no one follows a giant checklist forever. I use a simple monthly, quarterly, and yearly rhythm so the work feels automatic instead of overwhelming.
Monthly tasks should include checking under-sink leaks, inspecting the toilet base, clearing visible hair from drains, and doing a quick mold-and-corner scan. Add a GFCI test and a fast look at shower door seals, and you’ve covered most of the expensive problems before they grow.
Quarterly, check grout and caulk more closely, clean the exhaust fan, descale aerators and shower heads, and inspect fixture tightness. This is also a good time to check water pressure if anything has felt “off” lately, because pressure issues show up in patterns.
Yearly, refresh caulk or sealant where needed, inspect water heater connection lines carefully, and review any recurring moisture spots you noticed during the year. That once-a-year reset keeps your bathroom from drifting into repair mode, and it saves a lot of money without turning maintenance into a full-time hobby.
Mistakes That Lead to Expensive Repairs
The biggest bathroom maintenance mistake is ignoring small leaks because they seem harmless. EPA leak guidance makes this point pretty clearly, and real life proves it every day when tiny drips turn into cabinet rot, flooring damage, and mold. (US EPA)
Another common mistake is using harsh chemical drain cleaners over and over instead of removing hair and buildup physically. Those products can damage older plumbing and seals, and they rarely solve the actual cause when a clog keeps coming back.
People also paint over mold, recaulk over wet surfaces, or delay resealing because the bathroom still “looks fine.” Moisture control matters more than cosmetics, and EPA/CDC guidance keeps repeating that for a reason—wet materials create repeat problems no matter how clean they look. (US EPA)
Blocking ventilation causes a ton of trouble too, especially when the exhaust fan is dirty or barely used. Steam lingers, humidity climbs, and mold gets the exact conditions it wants, which means a cheap fan-cleaning habit could have prevented the repair bill.
Frequently Asked Questions
How often should I reseal bathroom caulk?
Most bathrooms need a caulk check a few times per year, and many need touch-ups or resealing every 1–2 years depending on use, humidity, and cleaning habits. I don’t rely on the calendar alone, though, because cracked, peeling, or moldy caulk needs replacement right away even if it was “recently done,” and waiting just gives water more time to sneak behind the tub or shower.
What is the most common cause of bathroom damage?
Moisture causes most bathroom damage, and leaks, poor ventilation, and failed seals usually create that moisture. A slow drip or recurring steam problem might look minor on the surface, but once water gets into drywall, subflooring, or cabinetry, the repair costs jump fast and the job gets messy.
Can small leaks really cause mold?
Yes, small leaks can absolutely cause mold because mold only needs moisture and time, not a dramatic flood. EPA and CDC guidance both focus on moisture control and fixing leaks quickly for exactly this reason, and bathrooms give mold ideal conditions when humidity stays high or surfaces stay damp. (US EPA)
How do I know if my toilet is leaking?
Check for moisture or staining around the toilet base, a musty smell, or a toilet that rocks when pressure shifts onto it. You can also dry the floor and place paper towels around the base before flushing, because fresh moisture on the towel usually confirms seepage that needs attention.
How much does mold removal cost?
Costs vary by location and the size of the affected area, but small bathroom mold jobs may cost a few hundred dollars while hidden or larger remediation work can run into the thousands. Angi and This Old House both show wide ranges depending on whether mold sits on the surface or behind walls, tile, or fixtures, which is why early cleanup and moisture control save so much money. (Angi)
Is bathroom maintenance worth it in rentals?
Yes, and honestly it might matter even more in rentals because small problems can turn into disputes, damage claims, or downtime fast. Even if a landlord handles major repairs, regular checks for leaks, moisture, and ventilation help you catch issues early, document them clearly, and avoid living with mold, odors, or damaged fixtures while everyone argues about responsibility.
Final Thoughts
Bathroom maintenance saves money because it catches problems while they still look boring. That sounds simple, but boring problems cost a lot less than emergency ones, and that difference adds up fast over a year.
A five-minute leak check, a quick fan cleaning, or a fresh line of caulk can prevent thousands in water damage, mold cleanup, and fixture replacement. I’d take that trade every time, and I don’t even need to think twice about it.
Keep the routine simple, stay consistent, and fix small issues when they show up. That habit protects the bathroom, the budget, and your sanity, which feels like a pretty solid deal.