15 Living Room Maintenance Tips to Follow
Small maintenance habits keep a living room comfortable, clean, and expensive-looking far longer than occasional deep cleaning ever will. Most people handle visible mess fast, but they ignore the slow damage that builds under cushions, behind furniture, and around windows.
That gap causes the usual problems: dusty fabric, stale air, flattened cushions, scratched wood, and clutter that somehow returns overnight.
I treat living room maintenance like basic home upkeep, not a weekend cleaning mood, because tiny routines save real money later.
Cleaning removes mess, but maintenance protects what the room costs to own. This guide covers practical habits that keep furniture, rugs, air quality, and safety in good shape without turning the whole thing into a full-time job.

You’ll get a clear list of what to do, why it matters, how often to handle it, and the mistakes that quietly make things worse. I also added seasonal checklists, safety tips, budget-friendly ideas, and FAQs so the routine actually sticks.
Why Regular Living Room Maintenance Matters
Living rooms collect more wear than people admit because everything happens there at once. People sit, snack, nap, work, host guests, charge devices, and drag in dust from every room, so the space takes a beating even when it looks “fine” on the surface.
Regular maintenance extends the life of furniture because fabric, wood, and padding break down faster when dirt and moisture stay trapped. Dust acts like grit, sunlight fades finishes, and uneven cushion use creates sagging that no fancy throw blanket can hide.
It also improves indoor air quality in a very noticeable way, especially in homes with pets, kids, or heavy curtain use. Vacuuming upholstery, cleaning vents, and controlling moisture cuts down on allergens, stale smells, and that weird stuffy feeling that builds up by the end of the week.
Maintenance also prevents mold, pests, and small repair issues from turning into annoying projects. A quick window check, rug inspection, or cord cleanup can stop water stains, frayed wiring, or pest hiding spots before they become expensive.
The money part matters too, and honestly, this is where most people change their habits. A few low-effort routines cost almost nothing, while replacing a rug, repairing a sofa frame, or buying new blinds because the old ones got grimy and brittle costs way more than it should.
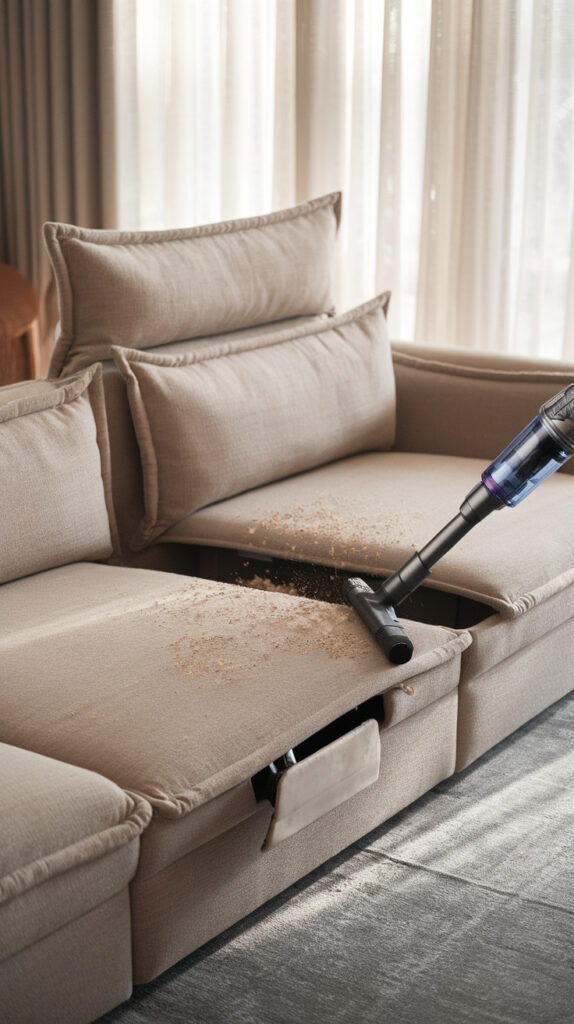
1. Vacuum Upholstery and Cushions Weekly
What to Do
Sofas and chairs trap dust, crumbs, pet hair, and skin particles even when the room looks clean from across the room. I vacuum upholstery every week because soft furniture holds more dirt than coffee tables, and it starts looking tired fast when dust settles into the fabric.
Most people vacuum the seat surface and call it done, but the hidden spots matter more. Dust and crumbs collect under cushions and along seams, and those areas cause odors and fabric wear if they stay ignored.
Why It Matters
Fabric fibers break down faster when grit rubs into them every day. Dust also carries allergens, so regular vacuuming helps people breathe easier and keeps the room from feeling stale.
This habit also protects cushion shape and color. Clean fabric stays brighter longer, and cushions keep their support better when dirt does not build up in the padding.
How to Do It Properly
- Use an upholstery attachment instead of the main floor head so you don’t pull or rough up the fabric.
- Remove all loose cushions first and vacuum the seat base, cushion tops, sides, and the creases where debris hides.
- Run the crevice tool along seams, piping, and armrest edges because pet hair and dust pack into those tight lines.
- Vacuum both sides of reversible cushions so they wear evenly and stay fresher.
- Finish with a quick pass over the backrest and under the sofa front edge where crumbs love to disappear.
How Often
Handle this once a week in most homes, and go twice a week if pets use the couch like they pay rent. A bi-weekly routine works in low-use rooms, but weekly keeps buildup low and makes the job much easier.
Common Mistake to Avoid
Skipping under the cushions ruins the whole point because that area collects the heaviest debris. Surface-only vacuuming makes the sofa look clean while the hidden mess keeps causing smells and wear.
2. Rotate and Fluff Sofa Cushions

What to Do
Cushions lose shape when the same spots take pressure every day, which happens in almost every home. I rotate and fluff sofa cushions regularly because one “favorite seat” can flatten a nice couch way faster than people expect.
This habit takes only a few minutes, but it changes how the entire sofa looks. Even a solid sofa starts looking old when one cushion sags and another looks puffy.
Why It Matters
Rotation spreads body weight and friction across all cushions, so they wear at a similar rate. Fluffing also helps fiberfill and foam recover, which keeps the sofa comfortable and prevents permanent dents.
It also protects the sofa’s appearance for guests and daily use. Balanced cushions make the room look cleaner and more put together, even before anyone touches a duster.
How to Do It Properly
- Swap left, center, and right seat cushions if the sofa design allows it.
- Flip reversible cushions so both sides wear evenly and keep their shape longer.
- Stand each cushion on its edge and give it a few firm pats on the sides to redistribute filling.
- Press and lift flattened corners by hand to bring back the cushion shape.
- Smooth the fabric cover after fluffing so wrinkles do not settle into the upholstery.
How Often
Do this weekly if the sofa gets heavy daily use, especially in family homes. Every two weeks works for lighter use, but monthly usually feels too late once flattening starts.
Common Mistake to Avoid
Leaving cushions in the same spot for months creates uneven sagging that fluffing cannot fix later. People usually notice the problem only when the couch starts looking lopsided, and by then the foam already loses support.
3. Dust and Clean Light Fixtures
What to Do
Light fixtures collect dust faster than most surfaces because warm air moves upward and leaves particles behind. Ceiling lights, floor lamp shades, and table lamps all need regular dusting if you want the room to stay bright and clean-looking.
I always include fixtures in living room maintenance because dusty lights make the whole room feel dim and dull. Clean lighting changes the space immediately without buying anything new.
Why It Matters
Dust on bulbs and shades reduces light output, so the room looks darker even when every light stays on. Built-up dust also creates a musty smell over time, especially on fabric lamp shades.
Dirty fixtures can also become a safety issue if debris gathers near hot bulbs or loose fittings. Clean fixtures make it easier to spot cracks, exposed wiring, or loose screws before they cause trouble.
How to Do It Properly
- Turn off the light and let bulbs cool fully before cleaning anything.
- Use a microfiber cloth or duster on lamp bases, cords, and shades to lift dust instead of spreading it.
- Wipe glass or metal parts with a lightly damp cloth, then dry them right away to avoid streaks.
- Remove detachable shades when possible and clean them gently based on the material type.
- Check bulb tightness and fixture stability while you clean so you catch loose parts early.
How Often
Dust fixtures weekly or every two weeks, depending on how quickly your room collects dust. Deep clean shades and glass parts once a month to keep lighting clear and bright.
Common Mistake to Avoid
Cleaning fixtures while the bulb stays hot leads to burns and cracked bulbs, which feels avoidable because it is. People also forget lamp shades, and those fabric shades hold dust like crazy.
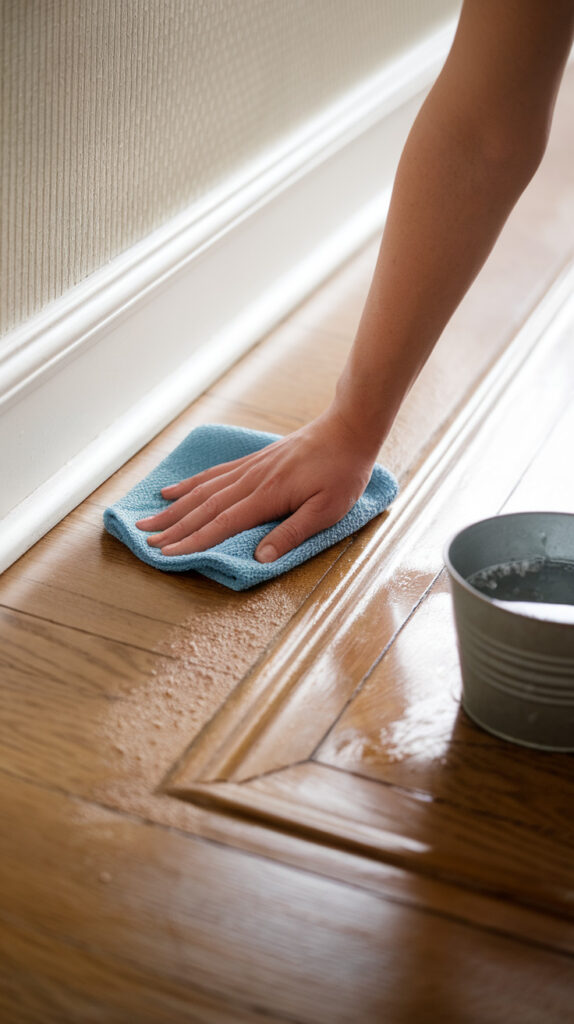
4. Wipe Down Baseboards and Trim
What to Do
Baseboards and trim quietly collect dust, scuffs, and pet hair, then make the entire room look neglected even when floors shine. I wipe them down often because clean trim makes the room look finished, and the difference shows more than people think.
These surfaces sit low, so they catch everything from vacuum blowback to shoe marks. You do not need a deep scrub every week, but regular attention keeps grime from turning sticky.
Why It Matters
Dusty baseboards worsen air quality because foot traffic pushes that dust back into the room. Grime also stains painted trim over time, and older marks become much harder to remove if they sit for months.
Regular wiping helps you spot small issues early, like peeling paint, moisture stains, or pest droppings near corners. That quick check prevents minor problems from turning into a bigger repair job later.
How to Do It Properly
- Start with a dry microfiber cloth or vacuum brush to remove loose dust before wiping.
- Use a damp cloth with mild soap for painted trim and wring it out well so water does not drip.
- Work in sections so you do not miss corners, behind furniture edges, or doorway trim.
- Use a soft eraser sponge gently on scuffs, but test first to protect the paint finish.
- Dry the trim with a clean cloth so moisture does not sit along the edge.
How Often
Wipe baseboards every two to four weeks in most homes, and weekly if pets shed heavily. A quick dust pass during floor cleaning helps keep buildup low between deeper wipes.
Common Mistake to Avoid
Using too much water near trim causes paint damage and can seep into gaps. People also skip the areas behind sofas and media stands, and those hidden spots collect the worst buildup.
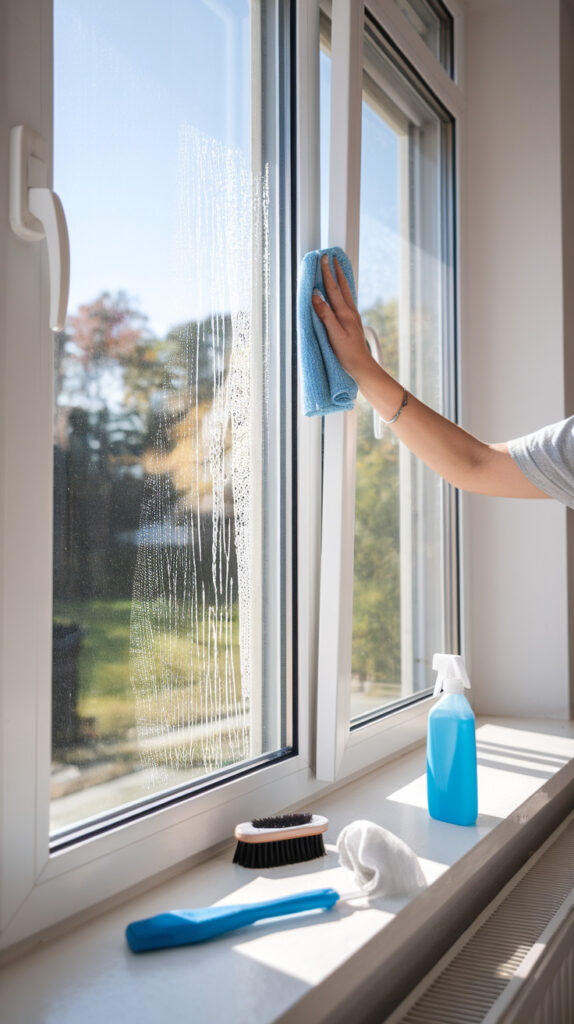
5. Clean and Inspect Windows
What to Do
Living room windows need more than a quick glass wipe because they affect light, airflow, and moisture control. I clean the glass and inspect the frames, tracks, and seals together because maintenance works best when you handle the whole window system.
Dirty windows block natural light and make the room feel tired, even on bright days. Hidden dirt in tracks also causes sticking, drafts, and moisture problems that creep up slowly.
Why It Matters
Clean windows improve the room’s look right away, but inspection matters even more. Small seal cracks, condensation, or frame damage can lead to mold, wood swelling, and higher energy costs if nobody catches them early.
Windows also bring in outdoor dust and moisture, so maintenance helps control what enters the space. A clean, well-sealed window supports better air quality and keeps furniture safer from excess humidity.
How to Do It Properly
- Dust the window frame, sill, and tracks before using any liquid cleaner.
- Clean glass with a microfiber cloth and a streak-free cleaner or a simple vinegar-water mix.
- Wipe window tracks with a damp cloth or soft brush to remove packed dirt.
- Check seals and caulking for cracks, gaps, or peeling sections.
- Look for condensation patterns, discoloration, or soft spots around the frame that suggest moisture issues.
How Often
Clean interior glass monthly and inspect frames and tracks at the same time. Do a more careful check each season, especially during humid or rainy months.
Common Mistake to Avoid
Cleaning only the glass misses the actual maintenance part of the job. People ignore tracks and seals, then wonder why the window sticks, smells musty, or leaks during rain.
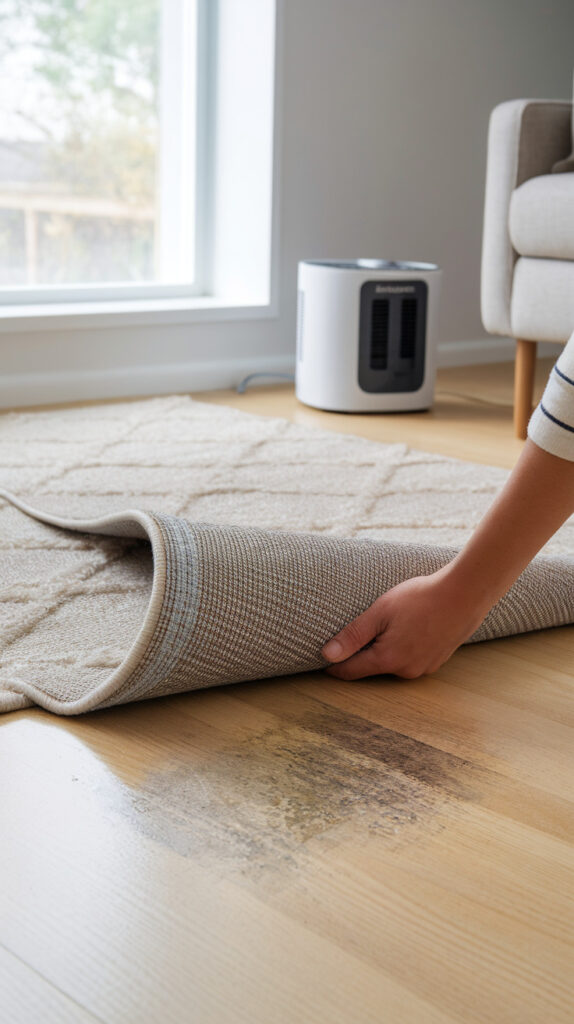
6. Check for Signs of Moisture or Mold
What to Do
Moisture problems start quietly in living rooms, especially near windows, exterior walls, rugs, and plant corners. I check those spots regularly because early mold signs look small, but they spread fast and create a bigger cleanup issue than anyone wants.
This step does not take long, and it saves headaches. A quick look and sniff around problem areas can catch trouble before it damages furniture or walls.
Why It Matters
Mold and moisture damage furniture, rugs, paint, and air quality all at once. They also create odors that people try to cover with sprays, which never fixes the actual problem.
Moisture can also attract pests and weaken wood trim or flooring over time. Early detection keeps the repair simple, while delayed action usually means replacing materials.
How to Do It Properly
- Check around windows, curtain edges, and sills for condensation, dark spots, or peeling paint.
- Lift rug corners occasionally and inspect the floor underneath for dampness or discoloration.
- Look behind large furniture placed against exterior walls because trapped air encourages moisture buildup.
- Smell the room near corners and fabric areas for musty odors that linger after cleaning.
- Use a dehumidifier or improve airflow quickly if you notice repeated dampness.
How Often
Do a fast moisture check weekly during humid seasons and at least twice a month the rest of the year. Inspect more often after heavy rain, leaks, or AC problems.
Common Mistake to Avoid
Covering musty smells with candles or sprays wastes time and lets mold spread. People also leave furniture pressed tightly against walls, which blocks airflow and creates hidden damp zones.
7. Organize and Declutter Surfaces
What to Do
Clutter builds up on coffee tables, side tables, TV stands, and shelves faster than almost any other living room problem. I keep surfaces organized because clutter attracts more clutter, and the room starts feeling messy even when everything technically looks “clean.”
Maintenance means controlling what stays in the room, not just wiping around random piles. A simple reset routine keeps the space usable and makes regular cleaning way easier.
Why It Matters
Clutter traps dust, slows cleaning, and makes it harder to notice stains, damage, or misplaced items. It also stresses people out more than they admit, and a crowded living room never feels restful.
Organized surfaces protect décor and furniture finishes too. Fewer items moving around means fewer scratches, rings, and accidental spills.
How to Do It Properly
- Clear all surfaces completely before putting anything back so you can wipe and inspect them.
- Group items by type, such as remotes, candles, books, or chargers, and assign each group a home.
- Use a small tray or basket for daily-use items to prevent random piles.
- Keep only a few decorative pieces out and store extras instead of stacking everything together.
- End each day with a two-minute surface reset so clutter does not snowball.
How Often
Do a quick reset daily and a full surface declutter once a week. Monthly reviews help remove items that drifted into the room and never belonged there.
Common Mistake to Avoid
Buying more storage bins without reducing visible clutter usually makes the room feel busier, not cleaner. People also keep “temporary” piles on side tables for weeks, and those piles become permanent.
8. Inspect Electrical Outlets and Cords
What to Do
Living rooms often become charging stations, TV hubs, and lamp zones all at once, so cords pile up fast. I inspect outlets and cords regularly because this area mixes clutter and safety, and a messy setup can become risky before anyone notices.
Maintenance here means more than hiding wires. You need to check condition, placement, and load so everything works safely.
Why It Matters
Damaged cords, loose plugs, and overloaded outlets can cause shocks, device damage, or fire hazards. Dust around power strips also creates extra heat risk, which people ignore because the cords sit behind furniture.
A clean, organized cord setup also improves airflow and makes cleaning easier. You can vacuum and wipe around the area without yanking a cable or unplugging half the room.
How to Do It Properly
- Unplug devices and inspect cords for frays, bends, cracks, or chew marks.
- Check outlets and power strips for discoloration, heat, or loose connections.
- Use cord clips or sleeves to bundle cables neatly without pinching them.
- Keep cords off high-traffic walkways to prevent tripping and stress on plugs.
- Leave space around power strips and avoid covering them with rugs, blankets, or furniture.
How Often
Inspect cords and outlets once a month, and do a quick visual check during weekly cleaning. Recheck immediately after moving furniture or adding new electronics.
Common Mistake to Avoid
Daisy-chaining power strips looks convenient and creates a real hazard. People also shove cords behind the sofa without checking if the plugs bend sharply or heat up.
9. Clean Area Rugs Properly
What to Do
Area rugs handle heavy foot traffic, dust, food crumbs, and pet hair, so they need real maintenance instead of occasional vacuuming only. I treat rug care as a core living room habit because a dirty rug affects the whole room’s smell and air quality.
Rugs also hide wear until it gets bad. By the time a rug looks dirty on top, dirt usually sits deep in the fibers and along the edges.
Why It Matters
Regular rug care protects fibers from breakdown caused by grit and friction. It also reduces allergens and odors, which helps the room feel fresher without constant sprays.
Proper rug maintenance protects the floor underneath too. Dust and trapped moisture under a rug can scratch hardwood or stain flooring if nobody checks it.
How to Do It Properly
- Vacuum both sides of the rug when possible, especially for lighter or removable rugs.
- Use the correct vacuum setting so you do not damage delicate fibers or fringe.
- Spot clean spills immediately with a clean cloth and a fabric-safe cleaner.
- Rotate the rug every few months to even out sun exposure and foot traffic wear.
- Lift and inspect underneath for dust, grit, or moisture before putting it back down.
How Often
Vacuum weekly in high-traffic living rooms and twice weekly if pets shed a lot. Spot clean immediately, and deep clean every six to twelve months depending on use.
Common Mistake to Avoid
Scrubbing a spill aggressively drives the stain deeper and frays the rug fibers. People also ignore the rug pad and underside, which causes odor and floor damage over time.
10. Polish Wooden Furniture
What to Do
Wood furniture loses its finish slowly when dust, sunlight, and spills stay on the surface. I clean and polish wood pieces regularly because coffee tables and side tables take constant abuse from cups, décor, and people dropping everything on them.
This step does not require fancy products, and overdoing it actually causes problems. A simple routine keeps wood looking rich without creating residue.
Why It Matters
Dust scratches wood when people slide items across the surface, and moisture leaves rings or warping if it sits too long. Regular polishing also helps preserve the finish and keeps wood from looking dry and faded.
It also helps you notice loose joints, wobbling legs, or chipped edges early. That matters because a quick fix now beats replacing a table later.
How to Do It Properly
- Dust first with a dry microfiber cloth so you do not rub grit into the finish.
- Clean sticky spots with a lightly damp cloth and dry them immediately.
- Use a wood-safe polish sparingly and apply it with a soft cloth following the grain.
- Buff the surface after polishing so it looks smooth, not greasy.
- Use coasters and trays to reduce future water rings and scratches.
How Often
Dust wood furniture weekly and polish every one to three months depending on use and finish type. High-use coffee tables often need more frequent attention than display pieces.
Common Mistake to Avoid
Using too much polish leaves buildup that attracts more dust and dulls the finish. People also spray product directly on wood, which can pool in seams and damage the surface.
11. Test Smoke Detectors
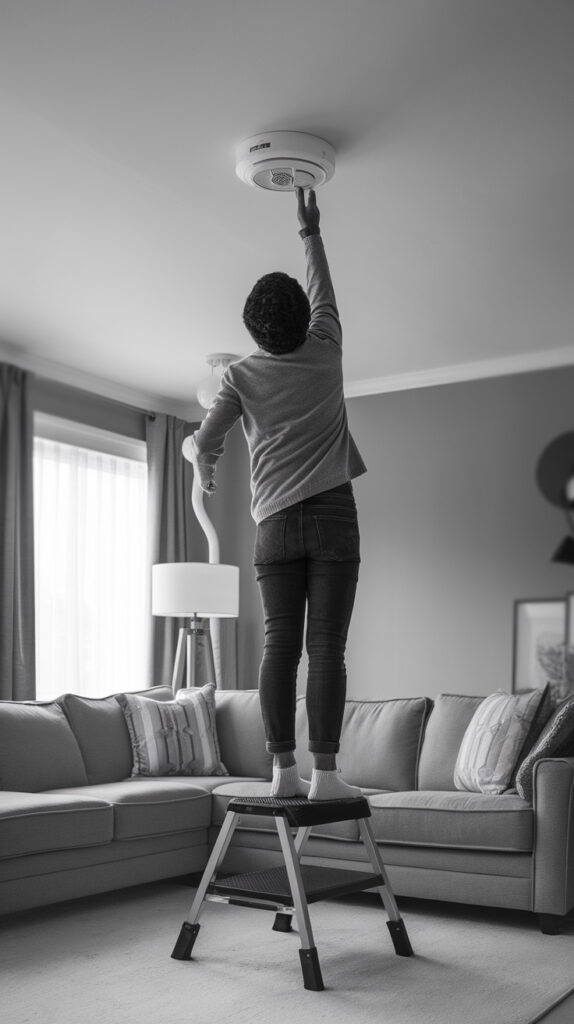
What to Do
Smoke detector checks belong in living room maintenance because many detectors sit near shared spaces and hallways connected to the room. I include this on my home routine list because safety habits work better when they live inside normal maintenance, not some random mental note.
Testing takes about a minute and gives a lot of peace of mind. A silent detector helps nobody, no matter how clean the room looks.
Why It Matters
Smoke detectors protect the room, the furniture, and most importantly the people in the home. Dead batteries and sensor issues happen quietly, so regular testing keeps the system reliable.
This task also supports a more organized safety routine overall. When you test detectors regularly, you notice battery dates, device age, and replacement needs before an emergency forces the issue.
How to Do It Properly
- Press the test button on each nearby detector until the alarm sounds clearly.
- Replace batteries right away if the sound feels weak or the unit chirps.
- Wipe the detector exterior gently to remove dust that can affect sensors.
- Check the manufacture date and replace the unit if it exceeds the recommended lifespan.
- Keep a simple note on your phone for the last test date so you stay consistent.
How Often
Test smoke detectors once a month and replace batteries at least once a year, or sooner if needed. I like tying this to a monthly living room reset so it never slips.
Common Mistake to Avoid
Waiting for the detector to chirp before changing batteries creates unnecessary risk and usually happens at the worst hour possible. People also forget older detectors expire, and old units stop working reliably even with fresh batteries.
12. Deep Clean Curtains or Blinds
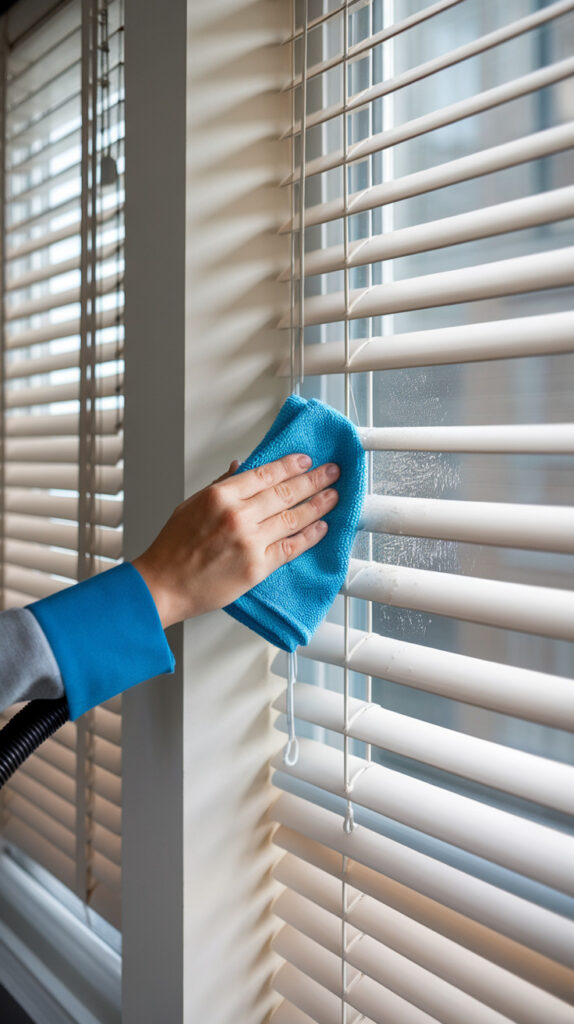
What to Do
Window coverings collect dust, cooking residue, and outdoor grime all year, and they spread that dust back into the room every time they move. I deep clean curtains or blinds on schedule because they affect air quality and make the room look dingy when they get neglected.
This task feels annoying, I know, but it changes the room fast. Clean curtains brighten the space, and clean blinds stop that powdery dust line from returning every day.
Why It Matters
Curtains and blinds act like filters, so they trap particles that later circulate through the room. Deep cleaning reduces allergens, odors, and dust buildup on nearby furniture.
Regular care also prevents staining and material breakdown from sunlight and moisture. Fabric stays fresher, and blinds last longer when dust does not harden on the slats.
How to Do It Properly
- Vacuum curtains with a brush attachment before washing or steaming them.
- Check care labels and wash fabric curtains on the correct setting, then dry as directed.
- Dust blinds with a microfiber cloth, then wipe each slat with a damp cloth and dry it.
- Clean curtain rods and blind hardware while everything is down.
- Rehang coverings fully dry to prevent mildew and wrinkles.
How Often
Dust blinds or vacuum curtains every two weeks, and deep clean them every three to six months. Homes near busy roads or with pets may need more frequent cleaning.
Common Mistake to Avoid
Skipping the care label on curtains can shrink or ruin the fabric fast. People also clean only the front of blinds, while the back side keeps dropping dust into the room.
13. Inspect Walls for Scuffs and Damage
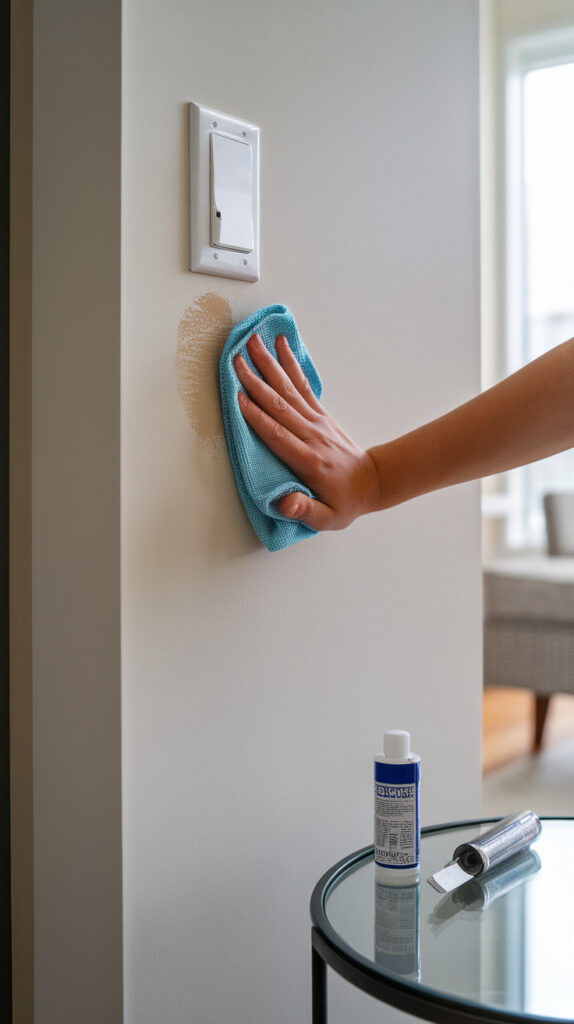
What to Do
Walls take more damage than people notice because furniture rubs them, hands touch corners, and small marks blend into the paint. I check living room walls regularly because scuffs and cracks stay easy to fix early and look awful once they pile up.
This tip also helps if you want the room to stay guest-ready without major repainting. A few small touch-ups keep walls looking fresh for months.
Why It Matters
Scuffs, nail pops, and hairline cracks can signal simple wear, but some marks point to moisture or structural movement. Regular checks help you separate harmless cosmetic issues from problems that need attention.
Clean, well-kept walls also improve the room’s overall look more than new décor sometimes does. Fresh walls make furniture and lighting look better, while marked-up walls drag down the whole space.
How to Do It Properly
- Walk the room slowly and inspect walls in natural light and lamp light.
- Wipe scuffs gently with a damp microfiber cloth or a mild eraser sponge.
- Check corners and behind furniture for dents, peeling paint, or hidden stains.
- Patch tiny nail holes or chips with filler and touch up paint when needed.
- Photograph recurring cracks or stains so you can track changes over time.
How Often
Do a visual wall check once a month and clean scuffs as soon as you notice them. Touch-up work usually fits well into a quarterly maintenance day.
Common Mistake to Avoid
Scrubbing painted walls too hard removes paint sheen and makes a bigger visible patch. People also ignore small stains near windows, and those spots often signal moisture issues.
14. Maintain Indoor Plants
What to Do
Indoor plants improve a living room fast, but neglected plants create mess, gnats, and moisture problems. I keep plant care inside my living room routine because healthy plants support the space, while struggling plants drag it down and make the room look chaotic.
Plant maintenance means more than watering. You need to check leaves, soil, drainage, and placement so the plants stay healthy without damaging furniture.
Why It Matters
Healthy plants improve the room’s look and can support a fresher feel, but overwatered plants attract pests and cause moldy smells. Dripping pots and wet saucers also stain wood floors and tables.
Regular plant care helps you catch yellowing leaves, root issues, and insect activity early. That saves the plant and protects the rest of the room from moisture and pest spread.
How to Do It Properly
- Check soil moisture before watering instead of watering on autopilot.
- Remove dead leaves and wipe dusty leaves so the plants stay clean and healthy.
- Empty saucers after watering so roots do not sit in water.
- Rotate pots every few weeks so growth stays even and plants do not lean.
- Use trays or plant stands to protect floors and furniture from moisture marks.
How Often
Check plants once or twice a week, depending on the type and season. Do a fuller plant cleanup and inspection monthly for pruning, wiping, and pest checks.
Common Mistake to Avoid
Overwatering causes more plant problems than underwatering in most living rooms. People also place plants too close to curtains or walls, which blocks airflow and encourages mildew.
15. Refresh Air Quality and Ventilation
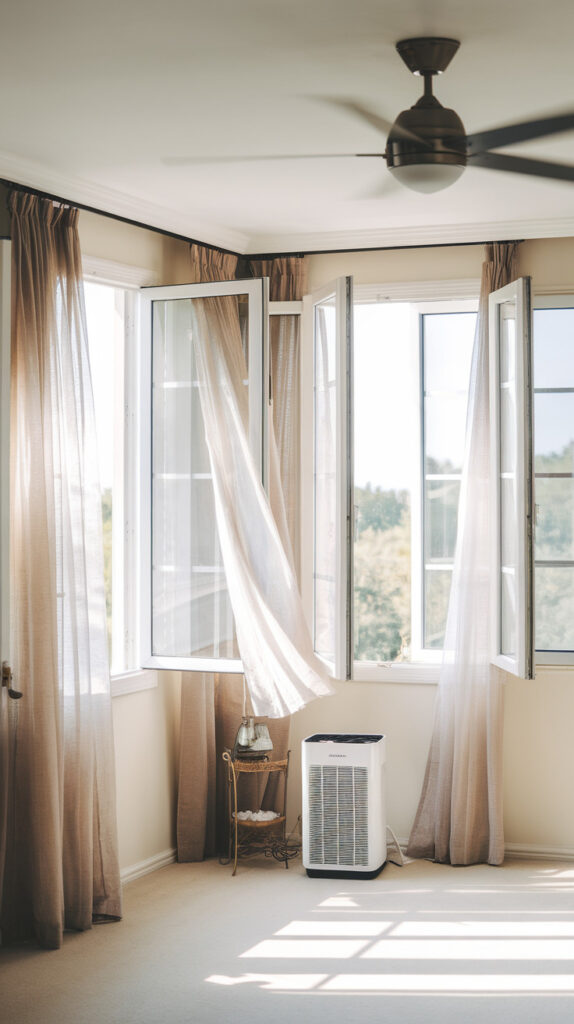
What to Do
A living room can look spotless and still smell stale if air does not circulate well. I refresh air quality on purpose because ventilation, dust control, and odor prevention matter just as much as surface cleaning.
This habit ties all the other maintenance work together. Clean fabric, rugs, and surfaces help a lot, but the room still needs fresh airflow to stay comfortable.
Why It Matters
Good ventilation reduces odors, moisture, and airborne dust that settle back onto furniture. It also helps prevent mold and keeps the room from feeling heavy, especially in humid weather.
Air quality affects comfort more than people realize during daily use. A fresh room feels cleaner, and guests notice it immediately even if they cannot explain why.
How to Do It Properly
- Open windows when weather allows to create cross-ventilation for at least a short period.
- Run ceiling fans or standing fans to keep air moving through the room.
- Replace HVAC filters on schedule so dust does not recirculate into the living room.
- Use a dehumidifier during humid months if the room feels damp or smells musty.
- Clean soft surfaces regularly so odors and dust do not keep returning.
How Often
Use airflow and ventilation daily when possible, even for a short window. Check filters monthly and replace them based on system guidance and dust levels.
Common Mistake to Avoid
Relying on air fresheners instead of fixing airflow only masks the issue. People also forget HVAC filters, and dirty filters undo a lot of cleaning effort.
Seasonal Living Room Maintenance Checklist
Seasonal maintenance keeps the room stable because different months create different problems. Dust, humidity, sunlight, and heating use all change through the year, so a simple cycle works better than one generic routine.
I like splitting it into monthly, quarterly, and yearly tasks because that keeps the list realistic. Nobody wants a giant “deep clean day” that eats an entire weekend and still misses important stuff.
Monthly
Handle visible maintenance and quick inspections every month so buildup never gets out of control. Vacuum upholstery, rotate cushions, dust lights, wipe tables, check cords, and test smoke detectors during the same session.
Add a window and moisture check to the monthly list, especially around humid weather. This timing also works well for wall scuffs, plant checks, and a quick declutter reset on shelves and surfaces.
Quarterly
Quarterly tasks target the spots that stay hidden during weekly cleaning. Deep clean curtains or blinds, move furniture to vacuum behind it, inspect baseboards and trim closely, and lift area rugs to clean underneath.
This also gives a good time to polish wood furniture and review room layout for wear patterns. Rotating a rug, shifting a lamp, or moving a plant can reduce sun fade and traffic damage without spending a dollar.
Yearly
Yearly maintenance focuses on long-term protection and repair planning. Deep clean rugs professionally if needed, inspect paint and caulking, review detector replacement dates, and check furniture joints for tightening or repair.
I also recommend a full living room audit once a year where you remove everything unnecessary and reset the space. That one session helps the room feel new again, and it stops slow clutter creep before it takes over.
Safety Tips for Living Room Maintenance
Safety gets ignored in home maintenance articles way too often, and that makes no sense because the living room holds electricity, glass, cords, and cleaning products in one place. A safe routine protects the room and keeps simple maintenance from turning into accidents.
Start with outlets and power strips because they create the biggest hidden risk in many homes. Avoid overloading outlets, skip daisy-chaining power strips, and keep cords away from rugs, heaters, and traffic paths so heat and wear do not build up.
Use ladders or step stools carefully when cleaning light fixtures, curtains, or upper trim. Place the ladder on a flat surface, avoid leaning too far sideways, and keep one hand steady because quick reaches cause falls faster than people expect.
Handle cleaning products with a little common sense and a little restraint. Use mild products when possible, keep bottles labeled, avoid mixing chemicals, and store cleaners away from kids and pets after every use.
Moisture prevention also counts as safety, not just cleanliness. Dry spills quickly, watch for mold near windows, and keep plant trays from overflowing because slippery floors and hidden damp spots create bigger problems later.
If kids or pets use the room heavily, build the routine around them instead of around ideal conditions. Secure cords, choose low-toxicity cleaners, anchor unstable furniture, and avoid leaving tools or products out during maintenance.
Low-Cost Ways to Maintain Your Living Room
Living room maintenance does not need expensive products, matching storage bins, or one of those giant “home reset” shopping hauls. Consistency beats gear every single time, and basic supplies handle most of the work just fine.
A microfiber cloth, a vacuum with attachments, mild soap, and a soft brush cover the majority of maintenance tasks. I also keep a simple vinegar-water mix for glass and a small basket for clutter control, and that setup handles more than people think.
DIY cleaners work well when you use them correctly and keep them gentle. Mild dish soap and water clean trim, tables, and some surfaces safely, while a basic vinegar mix helps with windows and light grime on glass.
Preventive care saves the most money because it delays replacement. Rotating cushions, using coasters, spot cleaning rugs fast, and wiping moisture from window sills cost almost nothing and protect furniture that costs a lot.
Rearranging also works better than replacing when a room starts looking tired. Move lamps for better light, rotate décor, shift seating to reduce wear spots, and edit clutter before buying new furniture that the room probably does not need.
Spot cleaning beats full replacement in most cases, especially for rugs, upholstery, and painted walls. The faster you handle a stain or scuff, the less likely it becomes a permanent problem, and that simple habit keeps the room looking fresh on a tight budget.
Frequently Asked Questions
How often should I deep clean my living room?
Deep cleaning your living room every three months works well for most homes, and that schedule keeps buildup from getting out of hand. Weekly and monthly maintenance still matters more, though, because deep cleaning alone cannot prevent cushion wear, dust buildup, or clutter creep.
Homes with pets, kids, or high foot traffic usually need deeper cleaning more often, especially for rugs, upholstery, and window coverings. I usually tell people to keep the quarterly deep clean schedule, then add small weekly routines so the big clean feels manageable instead of brutal.
What is the fastest way to maintain a living room?
The fastest method uses a short routine that hits the highest-impact areas first: surfaces, cushions, floors, and airflow. A 10- to 15-minute reset can cover decluttering, fluffing cushions, wiping tables, quick vacuuming, and opening windows for fresh air.
Speed comes from routine, not rushing. If everything has a place and you handle small messes daily, the room stays stable and you avoid those long cleanup sessions that eat your evening.
How do I keep a living room dust-free?
No living room stays completely dust-free, so the real goal is low-dust and easy-to-maintain. Vacuum upholstery and rugs regularly, dust top surfaces and light fixtures, clean window coverings, and replace HVAC filters on schedule.
You also need to reduce dust sources and circulation problems. Declutter crowded surfaces, keep windows and sills clean, and improve ventilation so dust does not settle and recirculate over and over again.
How can I make old furniture look new?
Start with maintenance before replacement because old furniture often looks worse than it actually is. Clean upholstery or polish wood properly, tighten loose hardware, rotate cushions, and remove stains or dust buildup that dulls the finish.
Small changes create a big upgrade too. New cushion inserts, a proper fabric clean, or a fresh wood polish can make older pieces look surprisingly good, and honestly, many “worn out” items just need better care.
What causes living room odors?
Living room odors usually come from soft surfaces, trapped moisture, poor airflow, or hidden dirt. Rugs, upholstery, curtains, pet areas, and under-furniture dust all hold smells, and air fresheners only cover them for a little while.
Moisture around windows, plant pots, or damp rugs also causes musty odors fast. Fix the source first by cleaning fabrics, improving airflow, checking for damp spots, and maintaining the room regularly so the smell does not keep coming back.
Final Thoughts
Living room maintenance works best when it runs on simple routines, not random bursts of motivation. Small jobs done consistently protect furniture, improve air quality, and keep the room comfortable without draining time or money.
This list gives you a full system, so you can stop guessing and start maintaining the space with purpose. If you keep the weekly habits tight and the seasonal checklist realistic, your living room stays in good shape year-round and looks cared for without trying too hard.