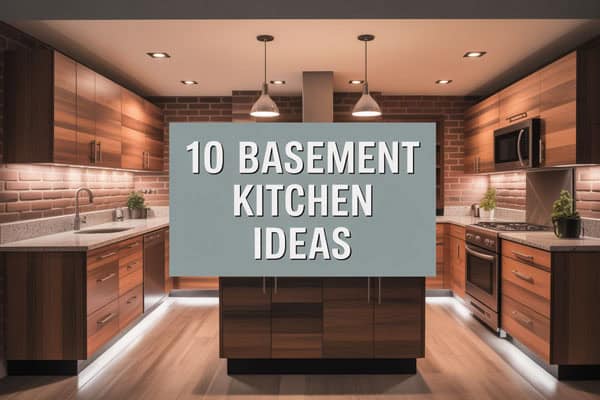
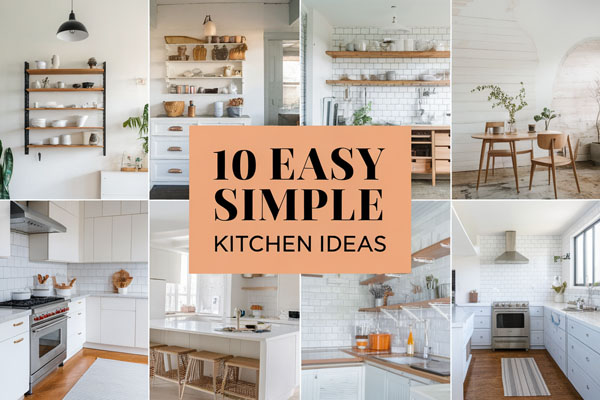
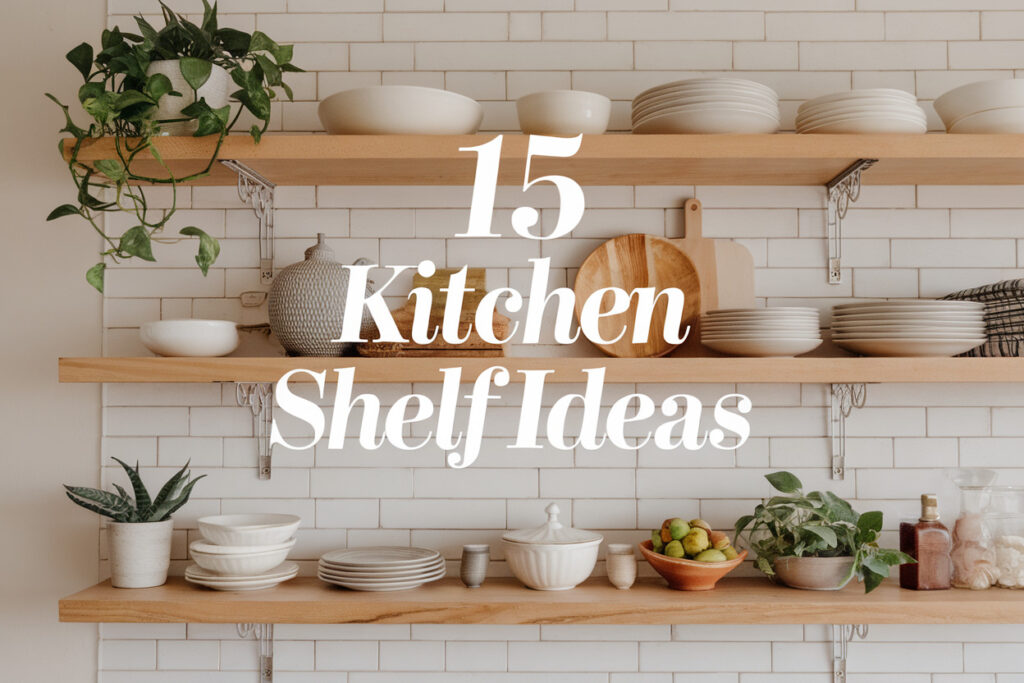
15 Kitchen Shelf Ideas to Maximize Small Kitchens
My kitchen used to feel tight, awkward, and slightly annoying every time I cooked. I kept blaming the size, but the real problem came from how I stored things. Once I stopped fighting the walls and started using them smarter, everything changed fast.
Small kitchens rarely fail because of square footage alone. They struggle because most of us try to cram cabinet-style storage into spaces that simply cannot handle bulky furniture. Shelves fix that problem by opening up the room visually while still giving you practical storage.
I started noticing how professional kitchens use vertical space everywhere. Walls hold tools, spices, dishes, and ingredients instead of letting everything crowd the counter. That idea works just as well in a home kitchen, especially when every inch matters.
The moment you install a few well-placed shelves, the kitchen starts breathing again. Counters clear up, cabinets stop overflowing, and cooking feels smoother. Instead of digging through stacks of bowls or hunting for spices, everything sits right where you need it.
The best part about shelf storage comes from its flexibility. You can build simple wood shelves, install floating ones, use slim ledges, or even add rolling shelf units depending on your layout. A small kitchen suddenly becomes customizable instead of restrictive.
If your kitchen feels cluttered no matter how often you clean it, shelves can fix that. Not the boring, builder-grade kind, but shelves that work hard and still look good. Let me walk you through ideas I’ve tested, loved, and sometimes messed up so you don’t have to.
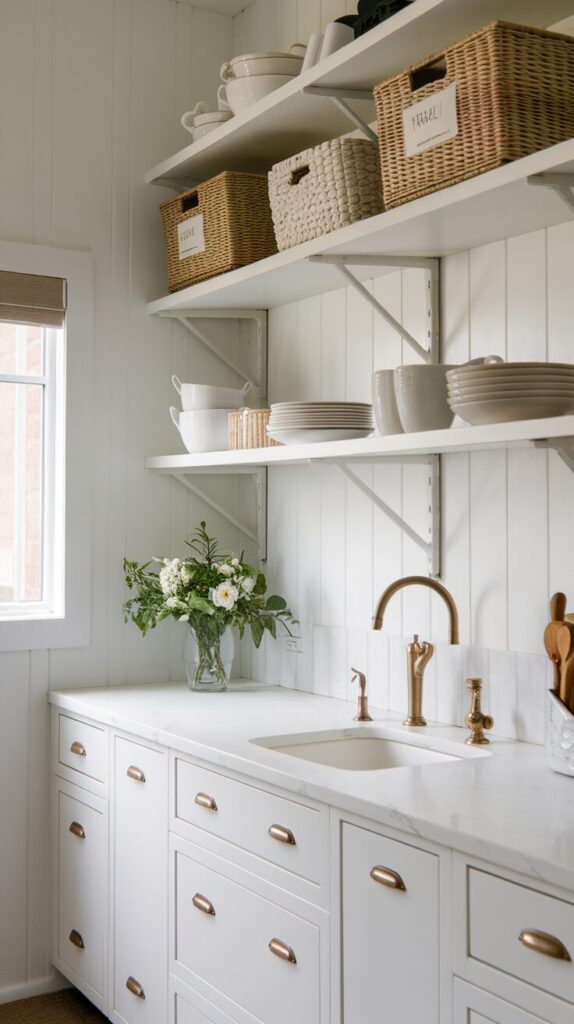
1. Open Wall Shelves Above the Counter
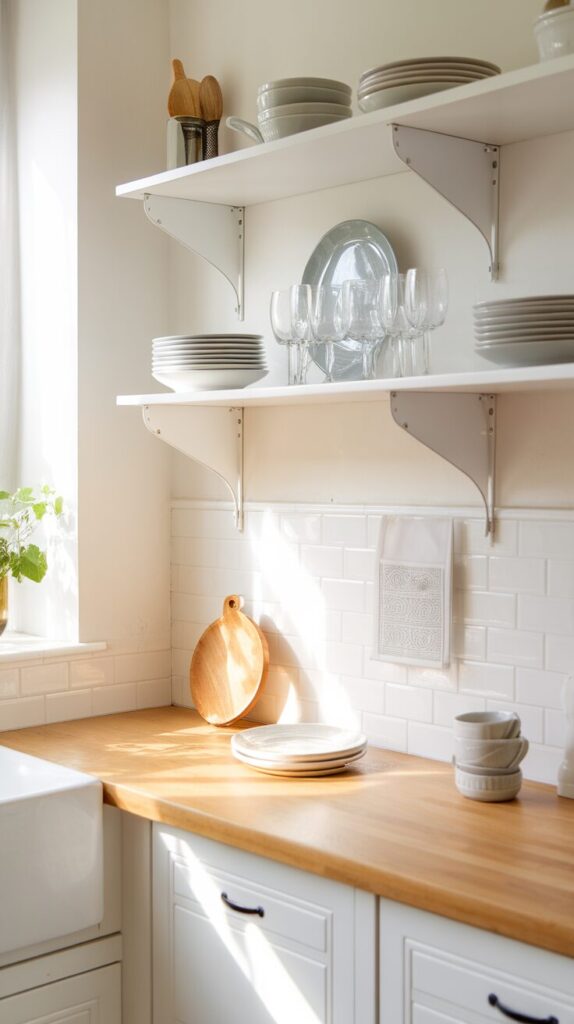
I used to think open shelves felt risky because clutter shows instantly. Then I tried them above my prep counter and realized they solved more problems than they created. You gain easy access, visual breathing room, and a surprisingly cozy vibe.
Open wall shelves replace bulky upper cabinets and make a small kitchen feel lighter. You see everything at a glance, which saves time during cooking and cleaning. IMO, they also make the space feel more personal instead of cookie-cutter.
Why This Works
Upper cabinets eat visual space and block light in tight kitchens. Open shelves keep the wall feeling open while still holding daily essentials. Your eyes move upward instead of stopping at a heavy cabinet line.
How to Do It
- Install shelves 18–20 inches above the counter for easy reach
- Use sturdy brackets or floating supports rated for weight
- Keep everyday dishes and glassware on the lowest shelf
Style & Design Tips
Stick to neutral dish colors so the shelves don’t look chaotic. Mix in one or two decorative pieces, but avoid overdoing it. Consistency matters more than quantity when styling open shelves.
Pro Tip or Budget Hack
If custom shelves feel pricey, use solid wood boards from a hardware store and simple brackets. Paint or stain them yourself for a custom look that costs way less.
2. Corner Floating Shelves That Use Dead Space

Corners love to waste space like it’s their job. I ignored mine for years until I added floating shelves and instantly felt silly for waiting so long. That awkward corner suddenly turned useful and kind of charming.
Corner floating shelves wrap around unused angles and create storage where cabinets won’t fit. They work especially well for spices, mugs, or small plants. FYI, corners hold more than you think when you layer shelves properly.
Why This Works
Corners often stay empty because cabinets feel bulky there. Floating shelves fit snugly and keep the space open. They turn dead zones into functional storage without blocking movement.
How to Do It
- Measure the corner carefully before cutting shelves
- Install shelves starting lower and stacking upward evenly
- Keep lighter items on upper shelves
Style & Design Tips
Use curved or angled shelf edges for a softer look. Keep items grouped by type to avoid visual chaos. Negative space matters, so don’t fill every inch.
Pro Tip or Budget Hack
Use triangular shelf kits instead of custom cuts if you want faster installation. They cost less and save serious time.
3. Over-the-Sink Shelving for Extra Storage

I once laughed at over-the-sink shelves until I tried one. That space sat empty while I struggled for storage elsewhere. Now I use it daily and wish I installed it sooner.
Over-the-sink shelves sit above the faucet and hold lightweight items. They work great for dish soap, plants, or drying racks. This idea uses vertical space you normally ignore.
Why This Works
The sink area already handles moisture and activity. Adding shelves above keeps essentials close without cluttering counters. You gain storage without stealing wall space elsewhere.
How to Do It
- Choose rust-resistant materials like metal or sealed wood
- Install shelves high enough to avoid splashing
- Keep frequently used items within arm’s reach
Style & Design Tips
Use slim shelves so the area doesn’t feel crowded. Stick with matching containers for a clean look. Less depth equals more visual comfort here.
Pro Tip or Budget Hack
Use adjustable tension rod shelving if drilling isn’t an option. It installs quickly and works great in rentals.
4. Skinny Shelves Between Cabinets and Appliances

That weird gap next to your fridge isn’t useless. I thought mine stayed too narrow for anything until I added skinny shelves and felt like a genius. Suddenly, I had storage without sacrificing floor space.
Skinny shelves fit between appliances and cabinets perfectly. They hold spices, oils, and pantry items. These shelves feel custom even when they aren’t.
Why This Works
Narrow gaps usually go unused because nothing standard fits. Custom-width shelves solve that problem cleanly. You gain vertical storage without widening your kitchen layout.
How to Do It
- Measure the gap precisely before buying materials
- Install shelves from floor to cabinet height
- Use lip edges to prevent items from falling
Style & Design Tips
Stick to clear jars for a streamlined look. Avoid mixing random packaging. Uniform containers make skinny shelves look intentional.
Pro Tip or Budget Hack
Repurpose a slim rolling cart and remove the wheels. Secure it in place for instant shelving on a budget.
5. Ceiling-High Shelves for Rarely Used Items
I resisted ceiling-high shelves because I feared ladders. Then I realized I barely use holiday dishes anyway. High shelves solved storage issues without crowding daily space.
Ceiling-high shelves work best for items you use occasionally. They draw the eye upward and make the room feel taller. This trick works wonders in small kitchens with low storage.
Why This Works
Vertical storage maximizes every inch of wall height. You keep daily items accessible while storing extras above. Your kitchen feels organized instead of overstuffed.
How to Do It
- Install shelves close to the ceiling
- Store lightweight, rarely used items
- Keep a small step stool nearby
Style & Design Tips
Use baskets or matching bins to hide clutter. Avoid mixing colors up high. Clean lines keep tall shelves from feeling heavy.
Pro Tip or Budget Hack
Use leftover cabinet boards or plywood cut to size. Paint them the same color as the wall to blend seamlessly.
6. Shelf Rails for Plates and Cutting Boards
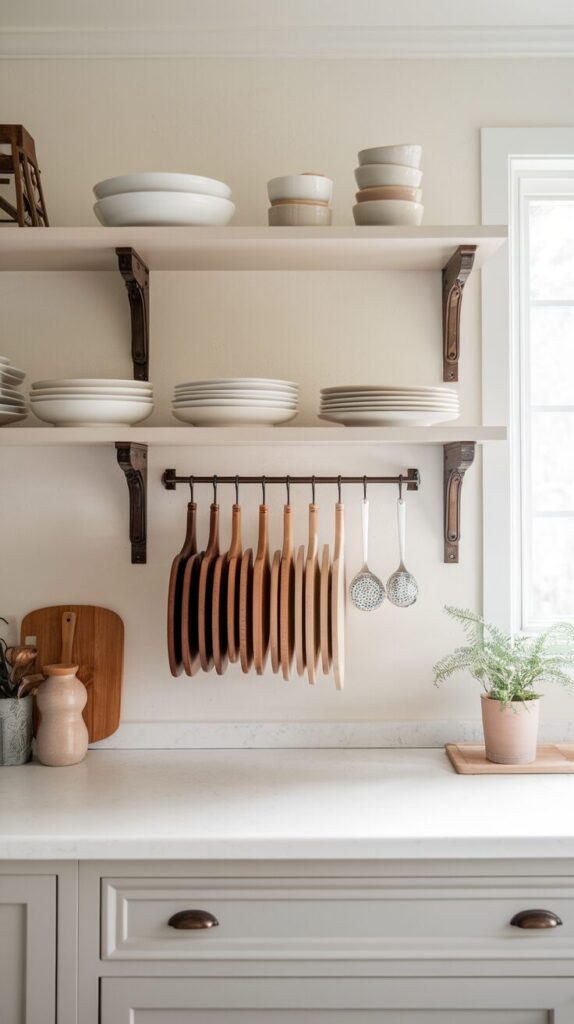
I used to stack cutting boards until they fell like dominoes. Shelf rails fixed that instantly and made my kitchen feel calmer. Everything finally stayed upright and visible.
Shelf rails hold plates, boards, and trays vertically. They work great on open shelves or walls. This idea keeps flat items organized and easy to grab.
Why This Works
Vertical storage reduces stacking chaos. You see each item clearly without digging. This setup also protects delicate edges.
How to Do It
- Install metal or wooden rails securely
- Space rails evenly for item thickness
- Place rails near prep areas
Style & Design Tips
Stick to similar plate colors for a cohesive look. Avoid overcrowding rails. Breathing room keeps shelves stylish.
Pro Tip or Budget Hack
Use simple dowels instead of store-bought rails. They cost less and look custom when painted.
7. Open Pantry Shelves Instead of a Closet

Pantry closets sound great until they eat floor space. I swapped mine for open shelves and never looked back. The kitchen felt bigger instantly.
Open pantry shelves store dry goods without bulky doors. They keep everything visible and easy to access. This setup works especially well in narrow kitchens.
Why This Works
Closed pantries hide clutter but steal space. Open shelves encourage organization. You see what you own and waste less food.
How to Do It
- Install shelves floor to ceiling
- Use airtight containers for staples
- Label everything clearly
Style & Design Tips
Stick to neutral containers and labels. Avoid mixing packaging styles. Consistency equals calm in open pantries.
Pro Tip or Budget Hack
Reuse glass jars instead of buying new containers. They look great and cost nothing.
8. Shelf Ledges for Spices and Oils
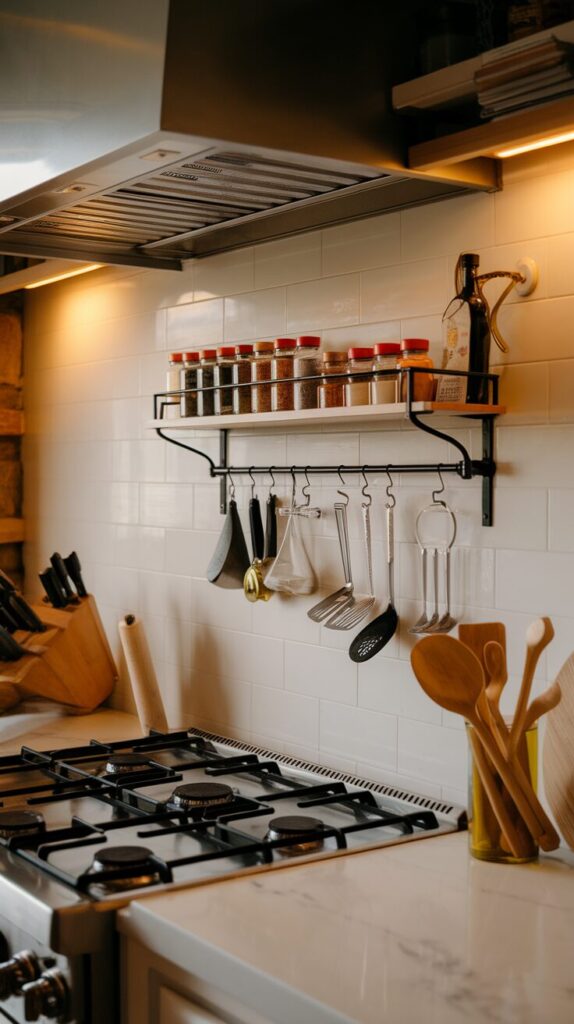
Spice drawers feel fancy, but shelf ledges feel smarter. I installed mine near the stove and cook faster now. Everything stays visible and within reach.
Shelf ledges hold spices and oils securely. They take minimal space and prevent tipping. This idea works great for cooks who hate digging.
Why This Works
Ledges keep items shallow and organized. You avoid deep shelves that hide things. Cooking becomes smoother and less frustrating.
How to Do It
- Install ledges at eye level
- Use matching jars for spices
- Keep oils closer to prep areas
Style & Design Tips
Avoid cluttering ledges with decor. Keep them functional. Form follows function in cooking zones.
Pro Tip or Budget Hack
Use picture ledges from home stores. They cost less and work perfectly for spices.
9. Shelves Inside Cabinet Doors

I discovered this trick after running out of shelf space. Cabinet doors felt useless until I added slim shelves inside them. Suddenly, storage doubled.
Interior door shelves hold spices, wraps, or small tools. They hide clutter while staying accessible. This idea works great in tiny kitchens.
Why This Works
Cabinet doors waste vertical space. Adding shelves maximizes storage without changing layout. Everything stays hidden but organized.
How to Do It
- Measure door depth carefully
- Install slim shelves securely
- Keep lightweight items only
Style & Design Tips
Stick to matching containers. Avoid overloading shelves. Balance prevents sagging and mess.
Pro Tip or Budget Hack
Use adhesive-mounted shelves for renters. They install easily and remove cleanly.
10. Window-Framed Shelving for Light and Storage
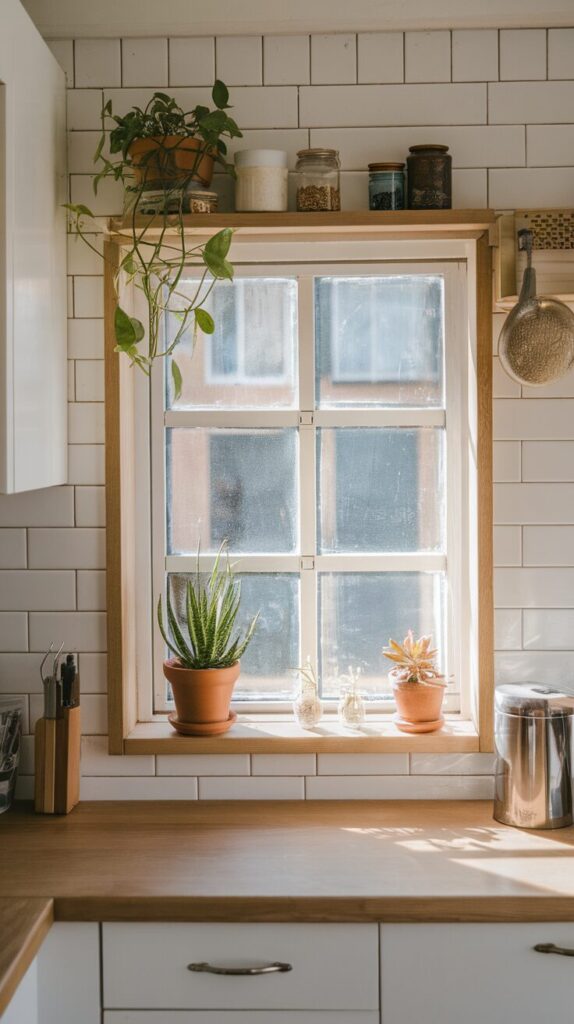
I hesitated to block my kitchen window until I tried framing it with shelves. Light still flowed, and storage improved instantly. It felt like a smart compromise.
Window-framed shelves sit beside or above windows. They hold plants, mugs, or jars. This idea blends storage with natural light.
Why This Works
You keep windows unobstructed while adding storage. The shelves feel integrated instead of intrusive. Light balances the added structure.
How to Do It
- Install shelves around window trim
- Keep shelves shallow
- Use lightweight items only
Style & Design Tips
Add greenery for freshness. Avoid heavy colors. Light materials keep the area airy.
Pro Tip or Budget Hack
Use tension rods with baskets for a no-drill option. It works surprisingly well.
11. Ladder-Style Leaning Shelves
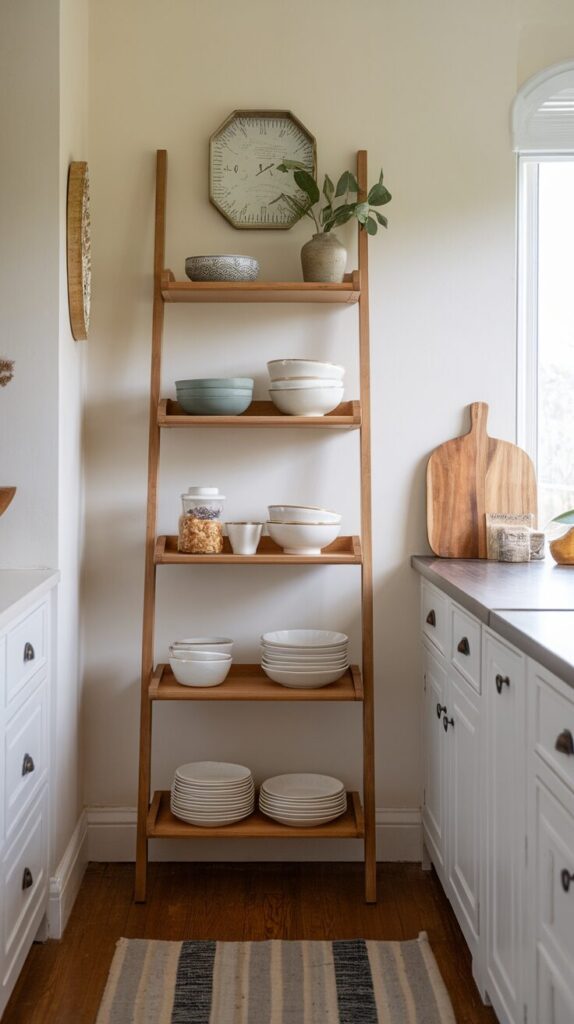
I bought a ladder shelf on impulse and didn’t regret it. It added storage without drilling holes. The kitchen gained personality instantly.
Ladder shelves lean against walls and hold lightweight items. They work great for rentals. This idea adds vertical storage with minimal commitment.
Why This Works
Leaning shelves avoid permanent installation. They feel casual and flexible. You can move them easily when needed.
How to Do It
- Place shelf against a sturdy wall
- Anchor top if needed for safety
- Store lighter items on upper tiers
Style & Design Tips
Mix decor and function carefully. Avoid cluttering every rung. Negative space keeps it stylish.
Pro Tip or Budget Hack
Check thrift stores for ladder shelves. A quick paint job refreshes them instantly.
12. Under-Cabinet Open Shelving

Under-cabinet shelves surprised me with how useful they felt. I expected clutter but got convenience instead. Everything stayed close without crowding counters.
These shelves sit below upper cabinets. They hold mugs, spices, or small tools. This idea maximizes space you rarely use.
Why This Works
Under-cabinet areas often stay empty. Adding shelves keeps items accessible. Counters stay clearer.
How to Do It
- Install slim shelves under cabinets
- Keep items lightweight
- Avoid blocking lighting
Style & Design Tips
Stick to matching items. Avoid visual clutter. Simplicity keeps it functional.
Pro Tip or Budget Hack
Use hanging baskets instead of shelves. They cost less and install easily.
13. Rolling Shelf Units That Tuck Away
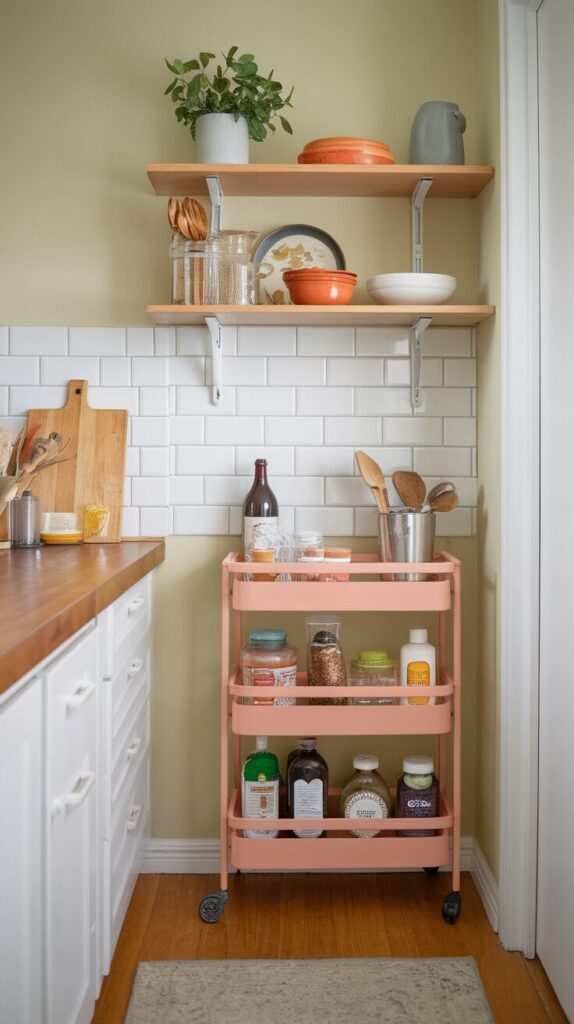
I love furniture that moves. Rolling shelves tuck away when not needed. They add flexibility without commitment.
Rolling shelf units store pantry items or appliances. They fit under counters or beside fridges. This idea works great in tiny kitchens.
Why This Works
Mobility adds flexibility. You store items without permanent changes. Space adapts to your needs.
How to Do It
- Choose slim rolling shelves
- Keep heavier items on bottom
- Lock wheels when parked
Style & Design Tips
Stick to neutral finishes. Avoid mismatched bins. Clean lines matter in small spaces.
Pro Tip or Budget Hack
Use a bathroom cart instead of kitchen-specific units. They cost less and work the same.
14. Built-In Shelf Nooks
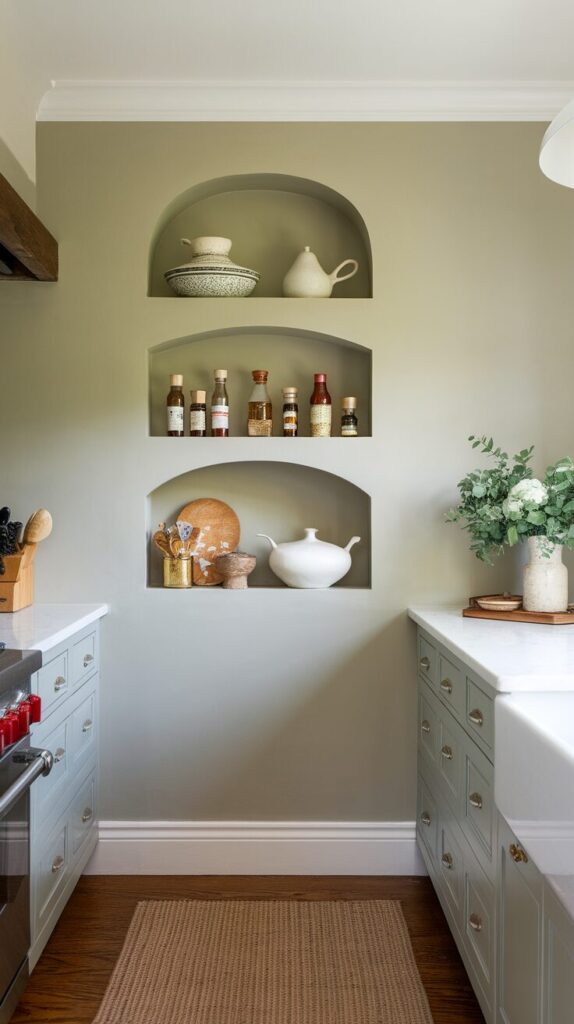
I once uncovered a wall nook during a renovation. Turning it into shelves felt like winning storage lottery. Built-ins always feel intentional.
Shelf nooks fit into walls or between studs. They hold spices, decor, or cookbooks. This idea adds storage without protruding.
Why This Works
Built-ins don’t eat floor or wall space. They feel seamless and custom. Storage stays subtle.
How to Do It
- Identify unused wall cavities
- Frame shelves securely
- Finish edges cleanly
Style & Design Tips
Paint shelves to match walls. Avoid heavy decor. Subtlety keeps them elegant.
Pro Tip or Budget Hack
Fake built-ins using shallow wall-mounted shelves. Paint blends them into the wall.
15. Multi-Level Shelves for Layered Storage

Flat shelves limit storage. Multi-level shelves changed that for me. I finally used vertical space efficiently.
Multi-level shelves stack items in layers. They work great for cabinets or counters. This idea maximizes depth and height together.
Why This Works
Layering prevents stacking chaos. You see items clearly. Storage feels intentional.
How to Do It
- Use shelf risers or tiered organizers
- Group similar items together
- Avoid overcrowding
Style & Design Tips
Stick to uniform materials. Avoid mixing too many heights. Balance keeps it neat.
Pro Tip or Budget Hack
DIY risers using wood scraps. Paint them to match your shelves.
Small Kitchen Shelf Strategy: The Smart Space Foundation
Before you install a single shelf, you need a plan. Small kitchens punish random decisions fast, and I learned that the hard way after drilling holes in the wrong spots. A simple strategy saves money, time, and wall repairs.
Start by identifying your true problem zones. Look at where clutter piles up daily, not where you think storage looks bad. Focus on friction points like overcrowded counters, stacked plates, or messy spice areas.
Measure everything before buying materials. I never eyeball shelf width anymore because one inch off can ruin the flow. Precision keeps your kitchen feeling intentional instead of improvised.
Think in vertical layers, not horizontal rows. Small kitchens grow upward, not outward. When you use height correctly, the entire room feels larger and more organized.
Create zones for cooking, prep, cleaning, and storage. Shelves should support movement, not interrupt it. Every shelf must earn its spot by solving a real problem.
Finally, balance open and closed storage wisely. Too many open shelves create visual stress, while too many cabinets create heaviness. Smart kitchens mix both for function and calm.
Common Mistakes to Avoid with Kitchen Shelving
Most small kitchen shelf failures happen because people rush. I rushed once and ended up reinstalling everything two weeks later. You can skip that headache.
Installing shelves too high ranks as the most common mistake. If you need a chair every time you cook, the shelf placement fails. Keep daily-use items within natural reach.
Overloading open shelves creates instant clutter. Small kitchens cannot absorb visual chaos. Limit each shelf to intentional, functional items.
Ignoring weight capacity causes sagging shelves and damaged walls. Always check bracket ratings before installation. Safety matters more than aesthetics.
Mixing too many colors and containers makes shelves look messy fast. Stick to consistent materials and tones. Uniformity creates calm even in tight spaces.
Forgetting lighting creates shadowy storage areas. Add under-shelf lighting or place shelves near natural light when possible. Good lighting makes small kitchens feel bigger.
How to Balance Style and Storage in Small Kitchens
Storage alone does not fix a cramped kitchen. You must design shelves that feel cohesive with the rest of the room. Function should never fight style.
Choose one dominant material for your shelving system. Wood, metal, or painted MDF each create a different mood, but mixing all three often looks chaotic. Consistency keeps the space grounded.
Limit decorative items to 20–30% of shelf space. I follow this rule strictly because decor multiplies quickly in small areas. Leave breathing room so the kitchen feels open.
Use vertical symmetry when possible. Even spacing between shelves keeps the wall visually balanced. Clean lines help small kitchens feel structured and calm.
Keep frequently used items lower and decorative or seasonal items higher. This placement improves flow naturally. Smart positioning prevents constant rearranging.
Safety and Installation Considerations
Shelf safety matters more than aesthetics. A falling shelf ruins more than your mood. Install everything properly the first time.
Locate wall studs before drilling. Stud-mounted shelves support significantly more weight than drywall anchors alone. Use anchors only for lightweight items.
Distribute weight evenly across the shelf surface. Concentrated weight in one corner increases stress on brackets. Balanced loads extend shelf life.
Keep shelves away from heat sources like stovetops unless materials handle heat well. Warped wood and melted finishes create unnecessary problems. Always check clearance around cooking areas.
If you rent, choose removable options like tension rods, adhesive mounts, or leaning units. Protecting walls protects your security deposit.
Maintenance Tips for Long-Lasting Shelves
Shelves need maintenance just like cabinets. Dust and grease build up faster than you think, especially near cooking zones. Regular upkeep keeps everything fresh.
Wipe open shelves weekly with a damp cloth. Grease residue accumulates quietly and dulls finishes over time. Clean surfaces protect materials.
Check brackets and screws every few months. Tighten anything that loosens from vibration or daily use. Preventative checks stop long-term damage.
Rotate stored items occasionally. Rearranging prevents uneven weight stress. It also forces you to declutter naturally.
Refinish wooden shelves every few years if needed. A quick sanding and sealing extends their life significantly. Small maintenance habits protect your investment.
Frequently Asked Questions
Are open shelves practical for everyday kitchens?
Yes, open shelves work well if you keep them organized and limit clutter. They improve access and make small kitchens feel lighter.
How much weight can floating shelves hold?
Weight capacity depends on materials and bracket type. Stud-mounted floating shelves typically hold much more than drywall-anchored versions.
Should I remove upper cabinets in a small kitchen?
You can remove some upper cabinets to create visual space, but balance open and closed storage carefully. Too much openness can create clutter.
What shelf depth works best in small kitchens?
Shallow shelves between 8–12 inches work best. Deeper shelves often hide items and crowd the wall visually.
How do I keep open shelves from looking messy?
Use matching containers, limit decor, and avoid overfilling shelves. Consistency and negative space make the biggest difference.
Can I add shelves without drilling holes?
Yes, you can use tension rods, adhesive-mounted shelves, or leaning ladder units. These options work especially well in rentals.
Final Thoughts
Small kitchens don’t need miracles, just smarter shelves. You don’t need every idea here to see improvement. Try one shelf change and watch how your space shifts.
Start with the area that annoys you most. Fix that first and build from there. Once shelves start working for you, your kitchen finally feels easy.