15 Outdoor Christmas Decor Ideas for a Festive Front Yard
A bare front yard can go from forgettable to festive in a single afternoon. The trick isn't buying everything at once. It's picking a few ideas that work with the space you already have.
Most of these projects use what's already on your porch or in the garage, plus a quick trip to the store. Some take ten minutes. Others are a fun weekend project if you want to go bigger.
Start with the ideas that frame your entry, then layer in lights and greenery. By the end, your yard will look like it belongs on a holiday card, without the stress or the giant bill.
1. Light the Walkway With Staggered Lanterns

A dark path is the fastest way to make a decorated yard feel unfinished. Guests shouldn't have to feel their way to your door just because the sun clocks out early in December. Staggered lanterns solve that without turning your walkway into an airport runway.
A few warm lights placed at uneven intervals do more than a straight row of matching fixtures ever could.
The magic here is in the spacing. Line lanterns up like soldiers and the path reads as a chore. Space them unevenly, with some close together and others farther apart, and the walk starts to feel intentional and a little charming.
You don't need a big budget, either. Battery-powered options mean no cords to trip over, no outlet hunting, and no electrician. Set them out in the afternoon, and they'll carry the glow through the evening.
Pick A Style That Fits Your Yard
Paper luminaries suit a cottage-style front yard, while metal lanterns with flameless candles lean a bit more traditional. Rustic wood or tin versions work well if your porch already has that cabin feel. Mix two styles if you want, but keep the light color consistent.
Warm white ties everything together, while cool white can look a little clinical against holiday greenery.
Space Them Like You Mean It
Skip the ruler. Instead, walk your path and drop a lantern wherever the spacing feels natural, then step back and check it from the street. A good rule is to cluster two or three near the door and near the street, then let the middle stretch breathe.
That gives the eye a rhythm instead of a metronome.
Keep Them Safe And Steady
Battery-powered lanterns avoid cords entirely, which matters once snow or ice shows up. If you go with real candles, keep them inside glass and well away from anything that can catch. Weigh down lightweight luminaries with a little sand or gravel.
A gust of wind shouldn't send your glow tumbling into the shrubs.
2. Dress the Front Door With a Layered Wreath
Your front door does more decorating work than any other spot out front, and a wreath is the easiest way to make it count. A store-bought wreath looks fine, but a layered one built from mixed greenery, berries, and a simple ribbon looks like you hired someone. The good news is you can put one together in about twenty minutes with a glue gun and a few stems from the craft store.
The goal is depth. One flat ring of the same green reads as a green donut from the street. Mixing textures and heights gives it that full, expensive look that photographs well and holds up through December.
Start with a plain grapevine or wire wreath base, then build outward. Work in small clusters instead of laying stems flat around the ring. That single habit separates a homemade wreath from a professional one.
Hang it at eye level, not up near the top of the door. Most people mount wreaths too high, where the details disappear from the sidewalk. Center it so the middle of the wreath sits roughly at your own eye height when you stand on the step.
Keep the ribbon simple. A wide burlap or velvet bow in one color beats a busy patterned one every time.
Pick Greenery With Contrast
Combine at least three types of greenery so the wreath has texture. Cedar, pine, and eucalyptus work well together, and faux versions hold up if you want to reuse it next year. Tuck in a few sprigs of something darker or lighter than the rest to break up the pattern.
If you use fresh greens, soak the stems overnight before building. They'll stay green longer on a covered porch and won't drop needles the first week.
Add Berries And A Ribbon
Red berries give the wreath its pop of color, but cluster them in threes rather than scattering them evenly. Odd numbers look natural, and even spacing looks like a craft kit. For the ribbon, loop a wide piece behind the top of the wreath and let the tails fall about a foot.
Wire-edged ribbon holds its shape in wind and cold, which matters more than most people expect.
Hang It So It Reads From The Street
Use a wreath hanger that fits over the top of the door, or a suction cup hook on glass. Check the placement from the sidewalk before you commit. If you can't make out the berries from the curb, move it down or make the bow bigger.
A small battery-powered clip light aimed at the wreath makes it glow after dark without any wiring. That little touch makes the whole entry feel finished.
3. Wrap Porch Columns in Garland
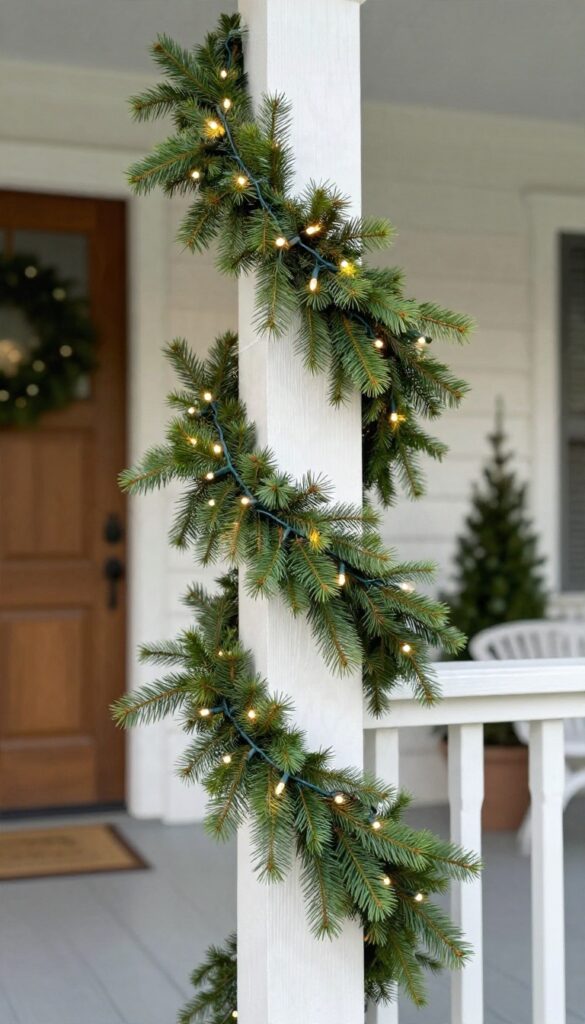
Porch columns are basically free real estate for holiday decorating, and most people walk right past them. Wrapping one in garland turns a plain post into something that looks intentional and expensive. The best part is you don't need a ladder or a drill, just a little patience and a bag of zip ties.
A loose spiral reads better than a tight coil. Give the garland room to drape and sag a bit so it looks natural instead of shrink-wrapped. Lit garland does double duty here, adding warm glow right where people walk up to your door.
Start at the bottom of the column and work your way up. Anchor the first end with a zip tie, then let the garland spiral around the post at a relaxed angle. Aim for a gap of roughly a foot between each wrap so the column still shows through.
Don't pull it tight. A little slack is what makes it look like it grew there rather than got strapped on. Fluff the branches as you go, especially if the garland came out of a compressed box.
Zip Ties Do The Heavy Lifting
Clear or green zip ties blend right in and hold far better than hooks or tape. Loop one around the garland and the column every couple of feet, then snip the tails flush. For railings, the same trick works, just space the ties closer since the garland has less to grip.
If you're renting or hate the idea of anything permanent, zip ties are your friend. They come off in seconds in January and leave zero marks.
Hide The Battery Packs
Lit garland usually runs on battery packs, and those ugly little boxes can wreck the look. Tuck them behind the post where nobody walking up will see them. A small clear command hook or another zip tie keeps them from swinging in the wind.
Check that the pack is reachable before you commit. You don't want to unwrap the whole column just to flip a switch or swap batteries mid-season.
Make It Last Through The Weather
Outdoor-rated garland holds up far better than the indoor stuff, so check the label before you buy. If your porch gets hit by rain or snow, angle the spiral slightly downward so water runs off instead of pooling in the branches. A quick fluff and re-tie after the first big storm keeps everything looking sharp.
It's a two-minute job that saves the whole display.
4. Fill Urns and Planters With Evergreen Branches
Your summer planters are probably still sitting by the door, looking a little sad. Instead of hauling them to the garage, give them a second life with clipped evergreens. It's one of the quickest ways to make your entry feel intentional and festive.
The best part? You don't need a florist. A few branches from the yard or a $10 bundle from the hardware store can transform even the most basic pot.
And when you add a little height and a pop of color, it reads as a deliberate design choice, not an afterthought.
Start by clearing out any spent annuals and loose soil. You want a clean base so the branches sit upright and don't rot. If your planter is deep, fill the bottom third with empty plastic bottles or packing peanuts to save on soil and keep the weight down.
Next, gather your greens. Pine, cedar, and magnolia are the classic trio for a reason: they hold up well in cold weather and offer different textures. Pine gives you long needles, cedar adds a soft feathery look, and magnolia brings those glossy leaves and big impact.
Clip branches in varying lengths so you can build layers. Stick the thickest, longest branches in the center first, pushing them deep into the soil. Then work outward with shorter pieces, angling them to spill over the rim.
Don't be afraid to mix directions—a little wildness looks natural. Once the base is full, tuck in accents like birch logs, red ornaments, or berry picks for height and color. Water the soil lightly every week or so to keep the greens from drying out, especially if your entry gets direct sun.
If you live in a mild climate, mist the branches occasionally. And if you want to reuse the arrangement next year, consider using artificial evergreens as a base and mixing in fresh clippings for scent and realism.
Prep Your Planters
Empty out old soil and plant debris, then check drainage holes. If the pot is heavy, add a layer of lightweight filler before adding fresh soil. This keeps the arrangement stable without making it impossible to move.
Layer Your Greens
Start with the largest branches in the center, then add medium and small pieces around the edges. Mix pine, cedar, and magnolia for contrast in color and texture. Angle some branches outward so they drape naturally over the rim.
Add Height And Color
Push in birch logs, red ornaments, or berry picks for a festive touch. Place taller elements toward the back to create a sense of depth. A few shiny ornaments catch the light and make the whole arrangement pop.
Keep It Fresh
Water the soil sparingly—just enough to keep it slightly moist. Avoid soaking, which can cause rot. In mild climates, mist the greens every few days.
Replace any dried-out branches as needed to keep it looking fresh.
5. Hang Oversized Ornaments From Trees

Bare winter branches can look a little stark, but they're actually the perfect scaffolding for a playful holiday display. Hanging oversized ornaments from your trees turns them into a colorful, eye-catching feature that draws the eye up and adds instant cheer. The best part?
You don't need to damage a single branch—just a little fishing line and shatterproof ornaments will do the trick.
Start by choosing a tree with strong, horizontal branches that can handle the weight without sagging. Evergreens work well, but deciduous trees with a good spread of branches are just as effective, especially when they're bare. Pick ornaments that are weather-resistant and shatterproof—plastic or metal options in bright reds, greens, golds, and silvers will pop against the natural backdrop.
Aim for a mix of sizes, with a few really large ones (think 6 to 8 inches) as focal points and smaller ones to fill in. Tie a loop of fishing line around the ornament's cap, then secure the other end to a branch. Fishing line is nearly invisible, so the ornaments look like they're floating.
Space them out so they don't clump, and vary the heights to create a cascading effect. If you're hanging them high, use a step ladder and make sure the line is tied securely—you don't want them swinging into each other on a windy day.
Pick The Right Tree And Ornaments
Not every tree is up for the job. Look for one with sturdy branches that won't droop under the weight of larger ornaments. Avoid trees with thin, flexible branches that might snap in the wind.
For ornaments, stick to shatterproof materials like plastic or metal. Glass might look pretty, but it's a hazard if it falls. Choose a color scheme that complements your house and other decorations—classic red and green, icy blue and silver, or even a bold mix of brights.
Hang Them Securely With Fishing Line
Fishing line is the secret to making ornaments appear to float. Use a strong weight—20-pound test or higher—and tie a secure knot around the ornament's cap. Loop the other end over a branch and tie it off tightly.
Leave a little slack so the ornament can sway gently, but not so much that it bangs against the trunk. Check each one after hanging to make sure it's secure, and re-tie any that feel loose.
Arrange For Maximum Impact
Cluster a few large ornaments near the center of the tree and scatter smaller ones toward the edges. This creates depth and makes the display look full from a distance. If your tree is near a window or porch, hang a few ornaments at eye level so they're visible from inside.
And don't forget to stand back and check the overall look—sometimes stepping back helps you spot gaps or overcrowded spots.
6. Create a Simple Lighted Archway

An archway does something no string of lights on its own can do: it tells the eye exactly where to go. Set one over your walkway and suddenly the whole yard has a focal point, with your front door as the star at the end of the path. The good news is you don't need a welder or a big budget.
Pre-lit arches pop up in stores every November, and a DIY version made from PVC pipe costs about the same as a nice dinner out. Either route gets you the same payoff: a glowing frame that makes the entry feel intentional.
Pick your spot before you buy anything. The arch should straddle the walkway a few feet in front of the door, close enough to feel connected to the porch but far enough that guests walk through it. Measure the width of your path and the height you want at the center, then write those numbers down.
Half the frustration people have with arches comes from guessing at the size in the store aisle.
Go Pre-lit If You Want Zero Fuss
Pre-lit arches are the shortcut, and there's no shame in taking it. Most snap together in a few minutes and fold flat for storage, which matters more than people admit once January rolls around. Check two things before you buy.
First, make sure the frame is rated for outdoor use, since some cheaper models are indoor-only. Second, look at how the lights attach. Wired-in bulbs last longer than the flimsy battery strands on budget versions, and you won't be swapping batteries in the cold.
Stake the feet down if your yard gets wind. A couple of ground stakes or sandbags at the base keep the whole thing upright through a storm.
Build A Pvc Frame That Lasts
A DIY arch starts with PVC pipe, a few fittings, and a little patience. Grab lengths of half-inch or three-quarter-inch pipe, two elbow fittings for the top corners, and a pair of T-fittings if you want a crossbar. Cut the pipe to your measurements and dry-fit everything before you glue.
Once the shape looks right, wrap the frame in lights. Start at one base and work upward in a tight spiral, keeping the strands snug so they don't sag. Zip ties every foot or so hold everything in place.
Spray the finished frame with a coat of dark green or black paint before wrapping. It hides the white pipe and makes the lights look like they're floating.
Anchor It And Hide The Cord
An arch that tips over in the first gust of wind ruins the effect fast. Push the legs a few inches into the soil, or slide them over rebar stakes driven into the ground. For a hard surface like concrete, use weighted bases filled with sand.
Run the extension cord along the edge of the walkway rather than across it, and tuck it under mulch or a thin layer of snow where you can. A cord cover or a strip of artificial garland disguises the rest. Plug everything into a timer set for dusk to midnight.
You'll save energy and skip the nightly ritual of running outside in slippers.
7. Add a Festive Doormat and Boot Tray
Guests notice the ground before they notice anything else, mostly because that's where they're looking while they wipe their feet. A good doormat and a spot for wet boots handle that first impression and solve a real problem at the same time. It's a small upgrade that keeps your entry from turning into a muddy mess all season.
The doormat does the greeting, and the boot tray does the cleanup. Together they make the entry feel intentional instead of like an afterthought. You don't need to spend much to pull this off, and it works whether your porch is grand or barely there.
Pick A Mat That Can Take Winter
Cozy fabric mats look great in photos but soak up slush and stay soggy for days. Go with coir, rubber, or a weatherproof synthetic that sheds water and grips the shoe. A dark color hides salt stains and road grit better than a pale one.
Size matters more than people think. A mat that's too small catches nothing, so measure your doorway and go a few inches wider on each side. Layer a decorative mat on top of a plain rubber base if you want the look without sacrificing function.
Set Up A Tray That Actually Works
A shallow boot tray near the door catches drips before they reach your floor or porch boards. Look for one with raised edges and a lip deep enough to hold melting snow. Metal and heavy-duty plastic hold up best through freeze-and-thaw cycles.
Place it just inside the door or right beside it under a small overhang. Add a couple of river stones or a grate insert so boots drain instead of sitting in a puddle. Empty it every few days so it doesn't turn into a science experiment.
Make It Look Like Decor, Not Utility
A plain tray can read as purely practical, so dress it up a little. Tuck in a small evergreen sprig, a battery candle, or a pair of rolled-up wool socks in holiday colors. A ribbon around the tray's edge ties it into the rest of your porch.
Keep the doormat seasonal but simple, like a plaid pattern or a single snowflake. Too much pattern competes with your wreath and lights. The goal is a tidy, welcoming corner that looks deliberate without shouting.
8. String Lights Along the Roofline

A roofline outlined in warm white is the closest thing to a cheat code in outdoor decorating. It traces the shape of your house so the whole thing reads as one tidy picture from the street, even if the yard below is still a work in progress. The good news is you don't need a ladder marathon or a pro crew.
Clips, a long strand, and an hour of daylight will get you most of the way there.
The appeal is simple: a clean line up top makes everything else look deliberate. Once the eaves glow, your wreath, your planters, and your porch all feel like they belong to the same house. Work in daylight and keep the strand off the ground until you're ready to hang it.
Tangles are the number one reason this project turns into a headache.
Pick The Right Clips
Skip nails and staples. Gutter clips and shingle tabs hold the wire without poking holes in anything, and they come off clean in January. Match the clip to your surface.
Gutter clips snap over the edge, while shingle tabs slide under a course and grip tight. Grab a pack of each if your roof has both.
Space The Bulbs For A Clean Line
Warm white strands with bulbs spaced a few inches apart give you that crisp outline. Too far apart and it looks sparse from the curb; too close and you're paying for bulbs you can't see. Measure your run before you buy.
Add a little extra for corners and the trip down to the outlet, then pick up a strand with a bit of slack.
Keep It Safe And Simple
Use outdoor-rated strands and a timer so the lights come on without you thinking about it. Plug into a GFCI outlet and keep connections off the wet ground. Don't overload one circuit.
If you're running several strands, check the wattage on the box and split the load across outlets when you can.
9. Set Out a Vintage Sled Display
An old wooden sled leaning against the porch wall does more for a front yard than most brand-new decorations. It reads as history, like something that's been part of the holidays for decades. The best part is you probably don't need to buy anything fancy to pull it off.
A sled propped at a slight angle, with a wreath or a plaid blanket draped over the runners, gives the eye a focal point without blocking your walkway. It's simple, it's nostalgic, and it looks intentional. Set it up once and it holds its charm all season.
The trick with a sled display is restraint. You want it to look like it landed there naturally, not like a store window. A few well-placed extras go a long way, and the sled itself does most of the heavy lifting.
Find The Right Sled
A true vintage wooden sled is the gold standard, but you don't have to hunt one down at an antique mall. Check the garage, a relative's basement, or a local flea market. Even a modern wooden sled with a classic shape works fine once it's styled.
Skip the plastic sleds with bright graphics. They fight the nostalgic look you're going for. If the wood is scuffed or the paint is chipped, leave it.
That wear is exactly what makes it feel authentic.
Dress It Up Without Overdoing It
Drape a chunky knit blanket or a plaid throw over the seat and let one end trail toward the ground. Tuck a small wreath against the handlebars or hang it from the top rung. A single strand of battery-powered fairy lights wrapped around the frame adds a warm glow after dark.
Keep the palette tight. Red, green, and natural wood tones always work. Resist the urge to pile on ornaments and ribbons, because a cluttered sled loses the clean, old-fashioned feel that makes it charming.
Lean It Somewhere Sturdy
Prop the sled against the porch wall, a railing, or the side of the steps so it sits at a gentle angle. Make sure the base is on solid ground so a gust of wind doesn't send it sliding. If your porch is exposed, tuck it closer to the house for a little protection.
For a bigger statement, lean two sleds side by side at slightly different angles. Vary the blankets and wreaths so they don't look like a matching set. A pair frames an entry nicely without needing much else around them.
Keep It Looking Good All Season
Wood and wet weather don't always get along, so bring the sled in during heavy rain or snow if it's a piece you care about. A quick coat of clear sealant before you set it out protects the finish without changing the look. Check the display every week or so.
Straighten the blanket, fluff the wreath, and swap in fresh battery packs for the lights. Small adjustments keep it looking deliberate instead of forgotten.
10. Build a Snowman From Repurposed Items

A snowman that never melts sounds like a magic trick, but you can pull it off with stuff you were probably going to toss. Old tires, plastic buckets, and chipped pots all stack into a sturdy figure that shrugs off rain, wind, and the occasional warm spell. The best part?
You get a one-of-a-kind decoration without spending much at all.
The trick is picking items that stack well and hold paint. Tires are the classic choice because they're heavy and won't tip, but buckets and pots work just as nicely if you weigh them down. Once you have your stack, a little paint and a few accessories turn it into a snowman that looks intentional, not like a pile of junk.
Pick Your Stackables
Three tires make a big, bold snowman that's perfect for a lawn. Two or three plastic buckets in graduated sizes give you a smaller, lighter version that's easy to move. Terracotta or plastic pots stacked upside down create a charming, rustic look.
Whatever you choose, make sure the bottom piece is the widest so the whole thing stays stable.
Paint It White And Weatherproof
Give everything a good scrub and let it dry completely. Then spray or brush on a coat of white exterior paint—something made for plastic or rubber so it sticks. Two light coats beat one heavy one.
Once dry, add a face with black paint or stick-on vinyl. A scarf and a hat cover the seams and add personality.
Anchor It Against The Wind
Even a heavy tire snowman can topple in a gust, so set it up smart. Put a sandbag or a few bricks inside the bottom piece before you stack. If you're using buckets, drill a small hole in the bottom and stake it to the ground.
A spot against a porch wall or fence gives extra protection and looks cozy.
11. Use Window Candles for Cozy Curb Appeal
Window candles are the quiet overachievers of outdoor decorating. They don't shout for attention like inflatables or chase lights, but they give your house a warm, lived-in look that reads from the end of the block. The best part is how little effort they take.
You plug them in, set them on the sill, and suddenly every front window glows like someone's home and happy about it. Symmetry does the rest of the work for you.
A row of lit windows gives your facade a rhythm. The eye picks it up instantly and reads it as intentional, even if you did the whole thing in fifteen minutes. That's the magic of repetition.
Electric candles also solve the darkness problem in a way spotlights can't. They don't blast light onto the yard. They sit inside the glass and glow softly outward, which feels calm instead of harsh.
Pick The Right Candles
Go with electric or battery-powered candles made for windows, not real wax. Look for warm white bulbs around 2700K, since cooler tones read as office lighting from the street. A built-in timer saves you from crawling behind the curtains every night.
Get The Spacing Even
Match the height of each candle across your windows so the row looks level from the curb. Center one in each pane, or space them evenly if a window is wide. Small suction-cup clips or a dab of mounting putty keep them from tipping.
Hide The Cords
Run cords down the inside of the window frame and tuck them behind curtains or trim. If outlets are scarce, go battery-powered and skip the mess entirely. A cheap timer plug handles the on-and-off so you don't have to think about it.
12. Scatter Lit Deer or Critter Silhouettes

A single lit deer standing dead center on the lawn looks like a store display. A small herd spread across the yard at different angles looks like a scene. The difference is placement, not price.
Pre-lit deer and other critter silhouettes are some of the easiest decorations to get right. They come mostly assembled, they glow on their own, and you can move them around until the arrangement feels right. The only real trick is resisting the urge to line them up like soldiers.
Start by deciding where the herd should live. You want them visible from the street but not blocking the walkway or crowding the porch steps. A gentle diagonal across the lawn usually reads better than a straight row, because it pulls the eye from the curb toward the front door.
Once you have a rough zone, set the deer down without staking anything yet. Step back to the sidewalk and look. Move one or two pieces, look again, and repeat until the group feels loose and natural.
Only then do you commit with stakes or weights.
Mix The Poses And Sizes
A herd of identical deer facing the same direction will always look a little stiff. If you're buying new, grab a mix of standing, grazing, and head-up poses. If you already own a few, angle them differently so one looks toward the house and another faces the street.
Size variety helps too. A larger deer near the front and a couple of smaller ones further back creates depth. You don't need a big collection to pull this off.
Three or four pieces placed with intention beat eight lined up in a row.
Keep The Cords Out Of Sight
Most pre-lit deer come with short cords, which means you'll need an extension cord or two. Run them along the foundation, tuck them behind shrubs, or bury them just under a light layer of mulch. A cord cutting straight across the lawn ruins the effect faster than anything else.
Group deer that share an outlet so you're not dragging separate cords in every direction. A single outdoor power strip hidden behind a bush handles the whole herd and makes setup and takedown much quicker.
Anchor Them Against Wind
Lightweight deer love to tip over on a windy night. Use the ground stakes that come with them, and add a sandbag or a couple of bricks on the base if your yard gets gusty. For hard ground or frozen soil, a small stake driven at an angle near the feet works better than fighting the included hardware.
Check the herd after the first big storm of the season. A quick adjustment now saves you from chasing a glowing reindeer down the street in January.
13. Hang a Mailbox Swag

Your mailbox sits right where everyone slows down, whether they're walking the dog or pulling into their own driveway. That makes it one of the most-seen spots in your whole front yard, and it usually gets zero decoration. A small greenery swag fixes that in about ten minutes.
The beauty of a mailbox swag is that it's small, so it reads as a thoughtful detail instead of a big production. You don't need a ladder, an extension cord, or a free weekend. Just a short piece of greenery, a bow, and a way to tie it on.
It also plays well with whatever else you've got going on out front. If your yard is already busy with lights and inflatables, this adds polish without adding clutter. If your yard is minimal, it gives the mailbox a reason to exist beyond holding bills.
What You'll Need
Grab a pre-made swag from the craft store, or build one from a few sprigs of faux pine, cedar, and a bit of eucalyptus. Real greenery works too, but expect it to dry out after a couple of weeks outdoors. Add a weatherproof bow in a color that ties into your other decor, plus a couple of zip ties or floral wire.
If your mailbox is metal, skip anything that scratches the paint and use soft ties instead.
Attaching It So It Stays Put
Center the swag on the front of the post, just below the box, and secure it at the top with a zip tie pulled snug. Fluff the greenery outward so it fans a little to each side. Attach the bow at the top of the swag and trim the tails so they hang evenly.
Give the whole thing a gentle tug to make sure wind won't spin it sideways by morning.
Making It Last Through The Season
Faux greenery handles rain, snow, and sun without fading much, which is why most people go that route. If you use real branches, mist them occasionally and plan to swap them out after a few weeks. Check the ties once a month, since cold weather can make plastic brittle and knots loosen.
A quick tighten takes seconds and keeps the swag looking intentional all winter.
14. Frame the Garage With Mini Trees
The garage door takes up a huge chunk of most front facades, and it usually sits dark and blank while the rest of the house gets all the attention. Mini trees on either side fix that fast. They add height, symmetry, and a soft green edge that makes the whole front feel intentional.
You don't need big trees for this. Small potted evergreens or cone-shaped trees in the two- to four-foot range do the job, and they're easy to move, water, and store. The goal is balance: one cluster on each side of the door so your eye reads the garage as framed rather than ignored.
Keep the clusters close to the trim so they don't block the driveway or trip anyone walking up. A little breathing room between the trees and the door looks cleaner than cramming them against the frame.
Pick A Matching Pair
Choose two trees of the same height and shape so the sides mirror each other. Real potted evergreens look great but need water, while faux cone trees stay green all season with zero fuss. Either works, as long as both sides match.
Vary The Heights
Instead of two identical trees per side, try one taller tree with a shorter one in front. That staggered look reads more natural than a flat row and hides the pots better. Three trees per side in descending heights is a nice upgrade if you have the room.
Anchor The Pots
Bare pots can look unfinished, so tuck them into something. A wooden crate, a galvanized bucket, or a wrap of burlap dresses them up in minutes. Add a string of lights around each pot for a warm glow at the base of the door.
15. Add a Cozy Seating Nook on the Porch
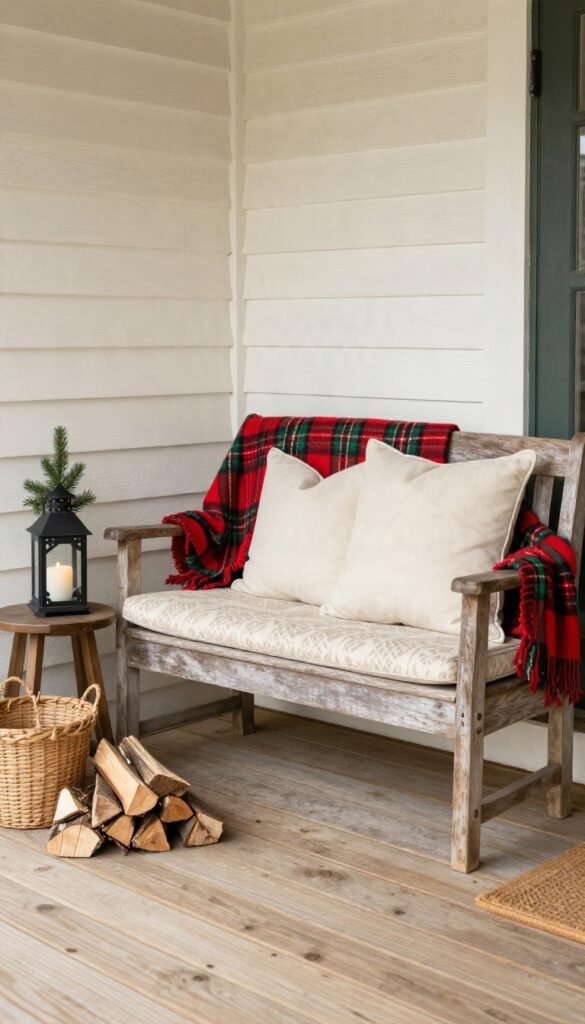
A porch bench with nothing on it looks like it's waiting for a bus. Toss on a plaid blanket and a couple of pillows, and suddenly it's the kind of spot that makes people slow down and smile. This is one of the easiest wins on the list, and it works even if nobody actually sits down.
The goal is simple: make the porch look lived-in and warm, like someone just got up to grab a mug of cocoa. You don't need new furniture. You just need a little layering.
Start With What You Already Have
Any bench, chair, or even a sturdy crate can become a seating nook. Wipe it down, then drape a blanket over the back or arm. Fold it so the pattern shows, and don't worry about making it perfect.
A little messiness reads as cozy.
Pick A Blanket That Can Handle The Weather
Wool, acrylic, or a sturdy outdoor fabric works best. Cotton gets damp and stays damp. Plaid is a classic for a reason, but any warm color or simple pattern will do.
If you're worried about rain, bring the blanket in at night or use a water-resistant throw.
Add Pillows For Instant Softness
Two pillows are plenty. Mix sizes or textures—one solid, one patterned—so it looks collected, not matchy. Outdoor pillows are worth it if your porch gets wet, but regular pillows work fine if you bring them inside during storms.
Finish With A Small Side Table Or Basket
A little table or a basket next to the bench gives the nook a purpose. Set a lantern or a potted evergreen on top, and it feels like a real spot to sit. Even a stack of firewood nearby adds to the vibe.
FAQ
How early should I put up outdoor Christmas decorations?
Most people start the weekend after Thanksgiving, but there's no rule. If you use weather-safe lights and greenery, putting things up in mid-November is fine and gives you more time to enjoy them.
How do I keep outdoor decorations from blowing away?
Weigh down planters with rocks or sand, stake inflatables and silhouettes into the ground, and use zip ties or clips on garlands and lights. Skip anything lightweight that can't be secured.
Are real evergreen branches okay outside?
Yes, and they look great in planters and wreaths. They'll dry out over a few weeks, so keep them out of direct sun and mist them occasionally if you want them to last longer.
What's the easiest way to hang lights without damaging the house?
Use adhesive clips rated for outdoor use or light-hanging hooks that slide under siding. Avoid nails and staples, which can crack siding and leave marks.
How do I make a small front yard look festive without clutter?
Pick two or three focal points, like the door and the walkway, and keep the rest simple. Fewer, larger decorations usually look better than a yard packed with small ones.
Conclusion
A front yard doesn't need to look like a catalog page to feel festive. Pick the ideas that match your space, your budget, and how much ladder time you're up for, then let the rest go. Two or three strong touches usually read better than a yard packed with decorations.
Start with whatever draws the eye first, like the walkway or the door, and build from there. Add pieces as the season goes and swap things out if the mood strikes.