9 Christmas Chandelier Decor Ideas for a Festive Glow
A chandelier already owns the ceiling, so dressing it for Christmas gives you a glowing centerpiece without touching the tree or mantel. Guests look up the moment they walk in, and that warm overhead sparkle sets the tone for the whole room.
Most of these ideas take an afternoon and lean on garland, ornaments, ribbon, and a string of battery lights you probably already own. You can go lush with fresh greenery or keep it sleek with metallics, depending on your space and energy.
Below are nine ways to make that fixture feel like December, from five-minute touches to weekend projects.
1. Drape an Evergreen Garland for Instant Cheer

Greenery is the fastest way to make a chandelier read as Christmas. A soft pine garland wrapped around the arms brings in that fresh, woodsy scent and a natural texture that plays beautifully against warm bulbs. It also happens to be one of the most forgiving decorations you can attempt, since garland hides a lot of imperfection.
Start with a garland that matches the scale of your fixture. A chandelier with thin metal arms looks best with a slim faux pine or cedar strand, while a chunkier fixture can handle a fuller, fluffier garland. Real greenery smells wonderful but dries out and drops needles, so keep fresh boughs for short events and go faux for the whole season.
Wrap slowly and loosely. You want the garland to follow the curve of each arm rather than choke it, so let a little of the metal or crystal show through. Secure the ends with floral wire or small zip ties in a matching color, then tuck the tie points under the greenery so nothing shows.
Keep The Weight In Check
Garland plus ornaments plus lights adds up fast, and a heavy chandelier can sag or strain its mounting. Weigh your garland in your hand before you commit, and favor lightweight faux stems over dense, damp real boughs. If the fixture starts to droop, pull back on extras and let the greenery do the work on its own.
Always turn the power off at the breaker before you climb up and start wrapping.
Add Berries And Pinecones For Texture
A plain green wrap is lovely, but a few accents make it feel finished. Tuck in small clusters of faux red berries, tiny pinecones, or frosted sprigs at a few points around the arms. Keep the accents sparse and uneven, since a natural look comes from a little randomness rather than perfect symmetry.
Blend In A Few Lights
Battery-operated fairy lights wound through the garland give you a soft glow even when the chandelier is off. Choose warm white on a thin copper wire so the strand disappears into the greenery. Hide the battery pack near the ceiling canopy or zip-tie it to the chain where no one will see it.
2. Hang Ornaments at Varying Heights
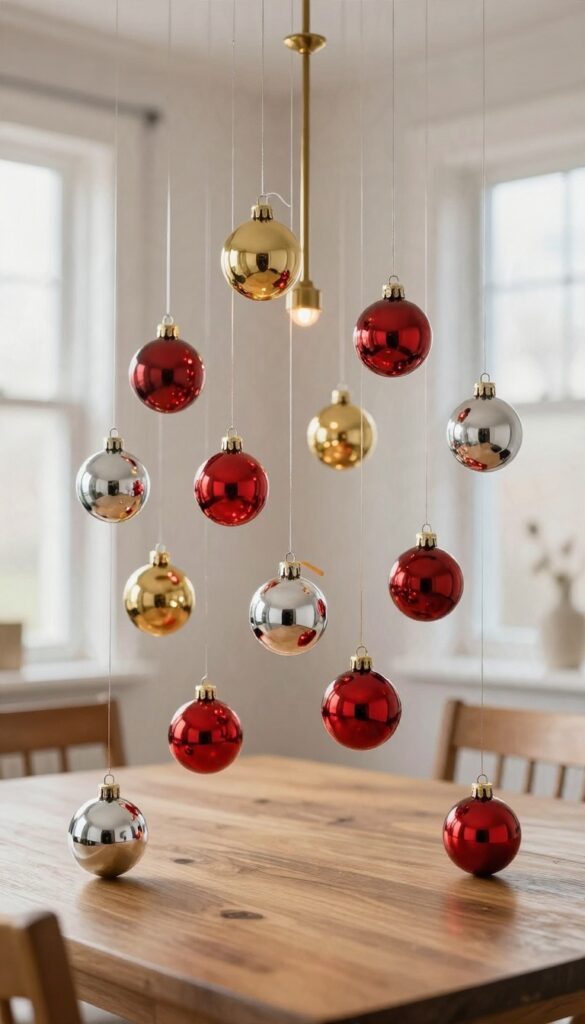
Ornaments don't have to sit on branches to look like they belong. Tie a few to your chandelier at different lengths and they seem to float in midair, drifting just above the table. The trick is uneven placement, so the eye keeps moving and the light keeps catching something new.
Clear fishing line does most of the work here because it disappears against the glow. Ribbon works too if you want the ties to be part of the look. Either way, the goal is ornaments that hang free and spin a little when the heat from the bulbs nudges them.
Pick A Mix That Plays With Light
Shiny glass and mirrored finishes throw the brightest reflections, so start there. Add a few matte or velvet pieces to keep it from turning into a disco ball. Mixing warm golds with cool silvers and one or two deep reds gives you contrast without a color scheme that feels forced.
Size matters less than variety. A couple of oversized baubles anchor the arrangement, and smaller ones fill the gaps between them. If your chandelier is delicate, lean toward lighter ornaments so the arms don't sag.
Get The Lengths Right
Cut your line in a few different lengths, roughly six to fourteen inches, and hang the longest ones near the center. Shorter strands work better toward the outer arms so nothing blocks the bulbs. Step back after every few ornaments.
You want a loose, scattered look, not a neat curtain. If two pieces end up at the same height, shorten one and move on.
Keep It Secure And Safe
Loop the line around the chandelier frame, not the bulb sockets, and tie a small double knot. A dot of clear tape or a tiny crimp bead keeps knots from slipping. Skip this idea entirely if your fixture hangs low over a walkway or a dining table people lean across.
Keep ornaments at least a foot above head height, and check the ties once a week since heat and dry winter air can loosen them.
3. Add Battery-Operated Fairy Lights

Battery-operated fairy lights solve the one problem chandelier decorating usually creates: how to get power up there without an electrician or a cord dangling down the wall. A strand of warm white LEDs wound through the frame gives you that soft, magical glow people notice the second they look up. The battery packs are small enough to tuck into the branches or zip-tie to the chain, so nothing shows from below.
You get all the sparkle of a lit chandelier with zero wiring hassle, and you can switch the whole thing on from a step stool in about two seconds.
The trick is working with the shape of your fixture instead of fighting it. Most chandeliers have arms, a central column, or a ring you can follow, and the lights look best when they trace those lines rather than getting bunched in one spot. Warm white is the safe bet for a cozy Christmas feel, though a soft champagne or amber strand can look lovely on brass and gold fixtures.
Save the cool white and multicolor options for a kids' room or a playful porch setup.
Winding The Strand So It Looks Intentional
Start at the top near the chain and work your way down, wrapping the wire loosely around each arm in a gentle spiral. Keep the spacing even, roughly a hand-width between loops, so the glow reads as deliberate rather than clumped. Leave a little slack between sections so the wire doesn't pull tight and look like a straight line.
When you reach the end of a strand, tuck the tail behind a branch or curl it around the central column instead of letting it hang.
Hiding The Battery Packs
Small battery boxes disappear fast if you place them where the eye doesn't travel. The top of the central column, the inside of a curved arm, or the chain above the canopy all work well. Use a small zip tie, a bit of floral wire, or even a clear adhesive strip to hold the pack in place.
Point the switch toward the bottom so you can reach it without pulling the whole strand loose. If your fixture has a fabric shade or a wide bowl, the pack can simply rest inside it. Just make sure it isn't sitting against a hot bulb.
Timer And Remote Tips
Many battery strands now come with a built-in timer, which is a small upgrade that makes a big difference. Set it to come on around dusk and shut off six hours later, and your chandelier glows on its own every evening. A remote is handy if the fixture hangs high, since you won't have to climb up to switch it.
Keep the remote in a drawer near the room so it doesn't wander off during the holidays.
Making The Glow Last Through December
Fresh batteries in early December will usually carry you through the season, especially on a timer setting. Keep a spare set of the right size in a kitchen drawer so you're not hunting for them on Christmas Eve. Check the wire every week or so, since heat from the bulbs and the weight of ornaments can shift things.
A quick re-tuck here and there keeps the whole setup looking tidy.
4. Create a Ribbon and Bow Statement

Ribbon might be the most underrated chandelier decoration. It's lightweight, comes in every color and pattern, and you can wrap it around almost any part of the fixture without worrying about scratches or weight. A wide velvet or plaid ribbon tied around the arms and finished with a generous bow at the center gives you an instant holiday look.
The best part? It adds color and elegance without blocking a single bulb, so the room stays as bright as ever.
The trick is to treat the ribbon like a decorative accent, not a full-on wrap. You want it to drape and loop in a way that feels intentional but not fussy. Start by choosing a ribbon that complements your existing decor—velvet for a rich, cozy feel, or plaid for a classic Christmas look.
Then, decide where the ribbon will sit: around each arm, across the central column, or both. A little planning goes a long way, but you don't need to overthink it. The goal is a relaxed, festive touch that still lets the chandelier shine.
Pick The Right Ribbon
Wide ribbon works best for a statement bow—think 2 to 3 inches. Velvet gives a soft, luxurious vibe, while plaid or tartan adds a traditional holiday feel. If your chandelier is dark metal, a lighter ribbon will pop; on a light fixture, deeper colors create contrast.
You'll need about 2 to 3 yards per arm if you're wrapping, plus extra for the bow. Wired ribbon is easier to shape and holds its form, which is helpful when you're working overhead.
Wrap And Tie Without The Fuss
Start by cutting ribbon lengths for each arm. Wrap a piece around the arm near the base, securing it with a small dot of hot glue or a twist tie on the back side so it doesn't show. Then, bring all the ends toward the center and gather them into a big bow.
Use a zip tie or floral wire to hold the bow's center tight, then fluff the loops. Don't worry about perfection—a slightly loose, organic bow looks more natural. If your chandelier has a chain, you can also weave ribbon through a few links for extra flair.
Keep It Safe And Simple
Ribbon is flammable, so keep it away from bulbs and any heat sources. LED bulbs are a safer bet than incandescent if you're decorating closely. Also, avoid overloading the chandelier—ribbon is light, but a massive bow could unbalance a delicate fixture.
Check that the ribbon is secure and won't slip, especially if the chandelier is in a high-traffic area. And if you're using a ladder, make sure it's stable and have someone spot you. A few minutes of prep keeps the project fun and safe.
5. Incorporate Fresh Greenery and Flowers

Fresh greenery brings a chandelier to life in a way faux garland just can't match. The scent alone earns it a spot on this list, and the texture softens all that metal and glass overhead. Tuck in a few sprigs of cedar, eucalyptus, or even a couple of red roses, and the fixture starts to feel like a garden got dressed for the holidays.
The trick is keeping it simple and secure. You're not building a full wreath up there, just adding small touches that catch the light and draw the eye upward. A little floral wire and an occasional misting keep everything looking fresh through the season.
Choosing Greenery That Holds Up
Cedar and eucalyptus are the workhorses here. Both hold their shape for weeks and smell great without overwhelming the room. Cedar gives you that classic Christmas scent, while eucalyptus adds a soft, silvery look that pairs well with almost any color scheme.
If you want a little color, small sprigs of holly or a few berries work nicely mixed in. Just keep the pieces small. Big branches get heavy and droop, and they can block the light you're trying to show off.
Securing Sprigs Without Damage
Floral wire is your best friend for this. Wrap a short piece around the stem of each sprig, then twist it onto the chandelier's arms or chain. Thin wire hides easily and won't scratch most finishes.
Skip the tape and clips if you can. They show, and they can leave sticky residue. If your chandelier has a fabric shade or delicate crystals, go gentle and test one spot first before committing.
Keeping It Fresh All Season
A light mist every couple of days keeps greenery from drying out and dropping needles. Use a spray bottle on the finest setting and mist from a distance so you don't soak the fixture or the bulbs. Fresh flowers like roses need a bit more care.
Trim the stems short, wrap the ends in a damp paper towel, and hide the wrap behind the greenery. Swap them out every week or so, and they'll stay looking lovely through the holidays.
6. Use Decorative Snowflakes and Icicles

Snowflakes and icicles turn a chandelier into a little slice of winter, and they do it without a single pine needle. Hang a few from the arms and let the light do the rest. The effect reads frosty and bright, which balances out all the red and green happening elsewhere in the room.
The trick is mixing sizes so it looks collected rather than bought in one pack. Big flakes near the center, smaller ones toward the edges, and icicles filling the gaps in between. Let them catch the bulbs and you get a shimmer that shifts as people move around the table below.
Pick Your Material
Paper snowflakes are the budget hero here. Cut them yourself or grab a pack of laser-cut versions, then hang them with clear fishing line so they seem to float. Acrylic and glass options cost more but throw light around in a way paper can't, and they hold up year after year if you store them flat.
If the chandelier is over a dining table, keep anything fragile high enough that a reaching guest won't knock it. Acrylic is the safer bet in busy rooms, especially with kids or a dog who likes to jump.
Mix Sizes And Lengths
Variety keeps this from looking like a craft store display. Hang a few large flakes at different heights, then tuck small ones closer to the frame. Icicles work best in clusters of three or four, staggered so the tips land at uneven points.
A good rule: keep the longest piece at least a foot above eye level when seated. That way the sparkle stays in view without anyone ducking around it.
Make It Shimmer
Position the flakes where the bulbs hit them directly, and they'll glow on their own. A light dusting of clear glitter or a pearl finish on the edges adds extra bounce, though plain white and silver already read plenty festive. For a softer look, use frosted or matte pieces and let the warm bulb light do the work.
Either way, skip anything that blocks the bulbs too heavily, or you'll lose the glow you started with.
7. Go Minimal with Metallic Accents

Not every chandelier wants to be buried in greenery. If yours has a shape you actually love — a sculptural brass frame, a cluster of glass globes, a clean modern ring — the best thing you can do is let it breathe. A few metallic touches give it a holiday nod without hiding the reason you bought it in the first place.
This is the approach for people who want December in the room but not a full winter wonderland. It reads as intentional and calm, and it takes about ten minutes. Sparse is the whole point here, so resist the urge to keep adding.
Metallic accents work because they catch the light the chandelier is already throwing. Gold, brass, copper, and brushed silver all pick up that glow and bounce it around the room. The trick is matching the metal to the fixture, or choosing one that deliberately contrasts.
Keep the count low. A handful of pieces is plenty, and the empty space between them is doing as much work as the ornaments themselves.
Pick A Metal That Talks To Your Fixture
Look at the chandelier's finish before you buy anything. Brass and gold frames look best with warm metallics, while chrome, nickel, and black fixtures pair naturally with silver and pewter. A copper fixture can handle either, which makes it the easy one.
If your chandelier is mostly glass or crystal, you have free rein. Gold beads add warmth, silver ornaments keep it icy and clean. Either way, stick to one metal so the look stays deliberate instead of accidental.
Hang A Few Ornaments And Stop
Clip three to five small metallic ornaments onto the arms or frame, spacing them out so they don't cluster. Small is key — oversized baubles will overwhelm a minimal look. Lightweight shatterproof ones are safest up high and won't drag on delicate arms.
Use ornament hooks or clear fishing line so nothing distracting shows. Step back and check the balance from the doorway, since that's the angle guests actually see.
Try A Single Strand Of Gold Beads
One strand of beads draped loosely along the frame gives you sparkle without clutter. Let it swag naturally rather than wrapping it tight, and don't loop it around every arm. A gentle drape reads as elegant; a full wrap starts to look like tinsel.
Battery-powered beaded strands work too if you want a little glow, but plain metallic beads are enough on their own. The chandelier's own bulbs do the lighting.
Leave The Rest Of The Fixture Alone
Skip the garland, the ribbon, and the picks. The whole appeal of this look is restraint, and every extra element chips away at it. If it feels too bare at first, live with it for a day before adding anything.
Clean the fixture while you're up there, too. Dusty glass and dull metal kill the sparkle faster than any missing decoration.
8. Suspend a Wreath from the Chandelier

A wreath floating in the middle of your chandelier might be the simplest upgrade on this list, and it still gets the most compliments. It hangs right where everyone's eyes land when they sit down to eat, so you get maximum holiday payoff for about five minutes of work. The trick is keeping it light and centered.
A small wreath won't fight the chandelier for attention, and it won't throw the fixture off balance either. Think of it as a little green halo above the table rather than a full-on installation.
Grab a ribbon, twine, or even a strip of fabric and loop it through the top of a small wreath. Tie the other end to the chandelier's center, usually around the chain or the main stem, and let it drop so the wreath hangs just below the arms. That's the whole project.
It works over a dining table because the wreath becomes a soft focal point without blocking anyone's view across the table. You still see your guests, the food, and the room, but there's a bit of Christmas hovering above it all.
Pick The Right Size Wreath
Go smaller than you think. A wreath that's roughly a third of the chandelier's width tends to look balanced, while anything wider starts to look like a second fixture. Mini wreaths, the kind meant for doors or candles, are ideal here.
If your chandelier is large and open, you can size up a little, but keep it clearly smaller than the fixture itself.
Tie It Securely Without Damage
Use a soft ribbon or twine rather than wire, which can scratch metal finishes. Loop it around a sturdy part of the frame, not a delicate arm or a bulb socket. Double-knot it and trim the ends, or leave a little tail hanging for a relaxed look.
If the wreath is heavier than expected, add a second tie point for stability.
Dress The Wreath To Match The Room
A plain evergreen wreath keeps things classic, but you can add a few small ornaments, a sprig of berries, or a slim velvet bow. Keep the embellishments light so the wreath doesn't spin or tilt. Match the ribbon to your table linens or your tree for a pulled-together feel.
Battery-powered mini lights tucked into the wreath are optional, but they do make the whole thing glow from below.
9. Mix in Family Heirlooms and Sentimental Pieces
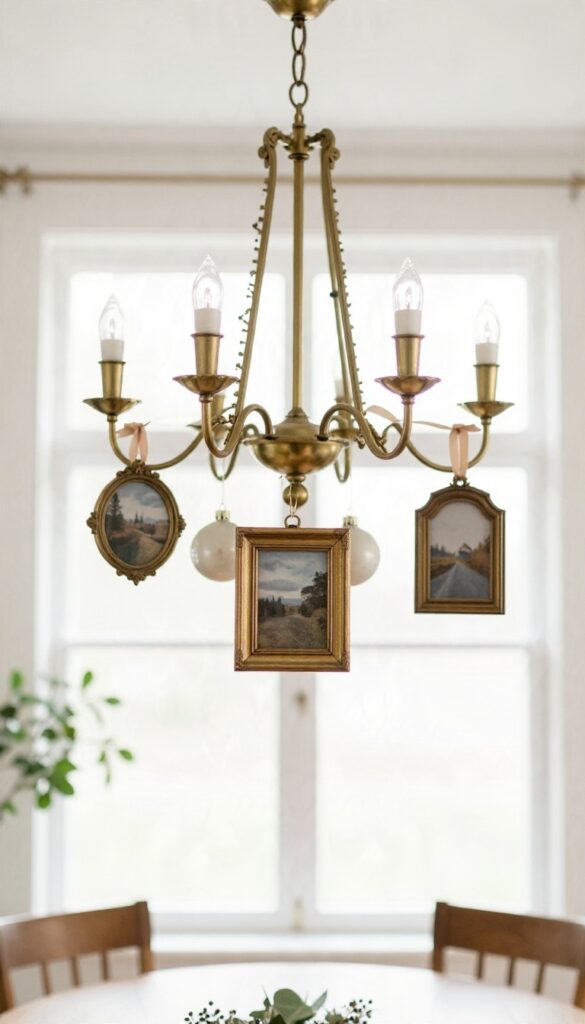
Some ornaments carry more weight than others, and a chandelier is a great place to let them shine. Instead of burying Grandma's glass baubles in the back of the tree, hang them where everyone can see them. A few keepsakes mixed into your regular decorations turn a pretty light fixture into something that actually means something.
You don't need a full set of heirlooms to pull this off. Even one or two sentimental pieces make a difference, especially when they're framed by simpler decorations around them. The trick is to treat these items as the stars and let everything else play a supporting role.
Keep the rest of the chandelier fairly quiet so the meaningful pieces get the attention they deserve. Start by gathering anything that has a story. Old ornaments from your childhood, a ribbon from a wedding, a tiny photo of a grandparent at Christmas, or a trinket from a trip.
Lay them out and see what works together before you start hanging anything. This saves you from a lot of up-and-down on the ladder.
Hanging Keepsakes Without Damaging Them
Vintage ornaments can be fragile, so skip the wire hooks that scratch the finish. Use soft ribbon loops or clear plastic ornament hangers instead. Tie them loosely so the piece can move a little without swinging into the metal arms of the chandelier.
For framed photos, go small and light. A tiny frame with a ribbon loop works better than anything heavy, and it won't pull the fixture off balance. If you're worried about heat, keep paper and photos a few inches away from the bulbs.
Most chandelier bulbs stay fairly cool, but it's worth checking before you commit.
Making It Feel Intentional, Not Cluttered
Space your sentimental pieces out instead of clustering them all in one spot. Give each one a little breathing room so the eye can land on it. A good rule is one keepsake for every three or four regular ornaments.
Repeat a color or material to tie things together. If your heirlooms are mostly gold and glass, lean into that with matching ribbon or a few extra gold baubles. That way the mix looks deliberate rather than like a box of random memories got dumped on the fixture.
Adding A Story To The Glow
Write a tiny tag for each piece and tuck it behind the ornament so it's readable from below. A name, a year, or a few words like "Grandma's, 1962" turns decoration into conversation. Guests notice these details more than you'd expect.
If you have kids, let them pick one keepsake each to hang. It gives them ownership of the display and makes the chandelier feel like a family project. Rotate the pieces each year so different memories get their moment in the light.
FAQ
Is it safe to decorate a chandelier?
Yes, as long as you use lightweight decorations and avoid covering the bulbs or wiring. Always turn off the power before hanging anything, and use battery-operated lights instead of plug-in strands.
How do I keep decorations from damaging my chandelier?
Use soft ties like ribbon or fishing line instead of wire, and avoid hanging heavy items. Distribute weight evenly and check that the fixture remains secure.
Can I use real candles on a chandelier?
It's not recommended unless your chandelier is designed for candles and you never leave them unattended. Battery-operated candles are a safer alternative that still give a warm glow.
How do I clean my chandelier after the holidays?
Dust with a microfiber cloth or use a gentle glass cleaner on the bulbs and crystals. Remove all decorations carefully and store them in a safe place for next year.
What if my chandelier is low-hanging?
Keep decorations close to the frame and avoid long dangling items that could obstruct walkways. Consider using smaller ornaments or a simple garland wrap.
Conclusion
A chandelier gives you a natural focal point, so a little decoration goes a long way. Try two or three ideas that match your fixture and your energy level, then stop there. You don't need to redo the whole room to make it feel festive.
Start with something simple like ribbon, greenery, or a few ornaments, and add more only if it still feels right. Step back, check the glow, and adjust as the season goes. A chandelier that looks warm from across the room is the whole goal, and it's easy to pull off.