9 Orange Garland DIY Ideas for a Cozy Christmas Home
You bought a bag of oranges for a holiday recipe, and now half of them are sitting on the counter looking sad. Before they go soft, slice them up and turn them into garland.
Dried orange slices bring warm color, a soft citrus smell, and a handmade feel that store-bought decor just can't match. The best part is how little you need.
Oranges, a sharp knife, a low oven, and some twine get you most of the way there. From there, you can keep it simple or dress it up with cinnamon sticks, cranberries, or dried greenery.
1. The Classic Dried Orange Slice Garland

Start here if you've never dried citrus before. Plain orange slices on twine give you the warm, homemade look with almost no fuss, and you can dress them up later once you get the hang of it. This is the version that smells like Christmas morning and costs about as much as a bag of oranges.
Get the drying right and the rest is basically threading beads.
The trick with this garland is patience during drying. Rushed slices turn brown or stay gummy, and gummy slices are the ones that go moldy in storage. Take your time and you'll have slices that hold their color and last for seasons.
Slice Them Even
Use a sharp knife and cut slices about 1/4 inch thick. Aim for consistency rather than perfection, since uneven slices dry at different speeds and the thin ones scorch. Discard the two end pieces, or dry them separately.
They're mostly pith and rind and never look as good on the garland. A mandoline helps if you have one, but a steady hand works fine.
Dry Low And Slow
Lay slices on a parchment-lined baking sheet and bake at 200°F for two to three hours, flipping halfway through. They're done when they feel leathery and dry, not sticky. Leave the oven door cracked slightly to let moisture escape.
For an even result, rotate the pan once or twice and pull out any slices that finish early. A dehydrator at 135°F works just as well if you own one.
String And Hang
Let the slices cool completely, then thread them onto twine with a needle or by poking holes with a skewer. Space them a few inches apart and tie a small knot on either side of each slice so they stay put. Hang the garland somewhere dry and away from direct heat.
To store it, wrap it loosely in paper and keep it in a cool, dry spot. Skip the plastic bag, which traps moisture and invites mold.
2. Cranberry and Orange Garland for a Traditional Look

Red and orange together practically spell Christmas, and this garland leans into that pairing without trying too hard. You'll thread dried orange slices alongside fresh cranberries on a simple length of twine, and the result looks like something you'd pay too much for at a craft fair. The best part is how forgiving it is.
Cranberries are cheap this time of year, and if you've already dried a batch of oranges, you're most of the way there. It's a good project to hand off to a kid or to work through while a movie plays in the background.
A traditional garland lives or dies on rhythm, so think about spacing before you start stringing. You want the eye to move along it, not stop at one crowded spot. Once you get a feel for the pattern, the whole thing comes together fast.
What You'll Need
Gather dried orange slices, a bag of fresh cranberries, and sturdy twine or jute. Skip thin string here, since cranberries are heavier than they look and you don't want the garland sagging. A large needle helps, but a toothpick and a little patience work fine too.
Keep a bowl of cranberries nearby so you're not reaching across the table every few seconds.
Stringing The Pattern
Start with a knot at one end, then alternate one orange slice and three or four cranberries. That little cluster of red between each orange gives the garland its classic look. Leave a small gap of bare twine every so often so the garland drapes naturally instead of bunching up.
Tie a loop at the other end for hanging, and you're done.
Keeping It Fresh
Fresh cranberries hold up for a week or two indoors before they start to wrinkle. If you want it to last the whole season, use dried cranberries instead, or plan to swap out the berries partway through December. Hang it away from direct heat and it'll stay looking good longer.
A spot above a doorway or along a mantel works well.
3. Cinnamon Stick Orange Garland That Smells Amazing

Cinnamon sticks turn a plain orange garland into something you can smell from across the room. Thread them between the slices and you get warm spice layered over citrus, plus a rougher texture that breaks up all those round shapes. It's a small addition that changes the whole feel of the garland.
The trick is spacing and a little friction. Cinnamon sticks are smooth and heavy, so they like to slide down the twine and bunch up in one spot. A few simple habits keep everything where you put it.
Start with dried orange slices and whole cinnamon sticks, the kind that come in a bag at the grocery store. Break any sticks longer than about three inches so they don't overpower the slices. You want them to read as accents, not the main event.
Thread one stick for every two or three orange slices. That ratio keeps the citrus as the star while the cinnamon adds scent and a bit of dark contrast. If your sticks are thin, go closer to one per two slices.
Spacing That Looks Intentional
Leave a small gap on each side of every cinnamon stick instead of packing it tight against the oranges. Those little gaps let the garland drape naturally and keep the sticks from clumping together when you hang it. Aim for a rhythm you can repeat: orange, orange, cinnamon, orange, orange, cinnamon.
Once you settle on a pattern, the whole garland looks deliberate rather than random.
Keep The Sticks From Sliding
Tie a small knot in the twine right below each cinnamon stick, then thread the next orange slice snug against it. The knot acts as a stopper and costs you nothing but a few extra seconds per stick. Another option is a tiny dab of hot glue on the twine where the stick sits.
Let it cool completely before you hang the garland, and keep the glue off the orange slices so it stays invisible.
Getting The Most Scent
Fresh cinnamon sticks smell strongest in the first week or two, then fade as the surface dries. Snap one stick in half before threading it to expose the inner bark and release more fragrance. If the garland starts to lose its scent, rub the sticks gently with a fine sandpaper or a drop of cinnamon oil.
A light refresh brings it right back without redoing the whole thing.
4. Whole Dried Orange and Bay Leaf Garland

Whole dried oranges give you a chunkier, more rustic look than slices, and bay leaves add a deep green that makes the orange pop. This garland has real presence, so it holds its own on a doorway or draped across open shelving. It's also sturdier than slice garlands, which makes it a good pick for spots where people brush past.
The process is simple: dry whole oranges low and slow, then string them with bay leaves and a few spacer beads if you like. The result is a full, textured garland that feels like something you'd find at a craft fair. It takes a bit more oven time than slices, but the hands-on work is minimal.
Drying Whole Oranges Without Fuss
Slice oranges into thick rounds—about half an inch—and dry them at 200°F for 3 to 4 hours, flipping halfway. For whole oranges, pierce the skin a few times and dry them at 200°F for 6 to 8 hours, until they feel light and hollow. A dehydrator works too if you have one; set it to 135°F and let them go overnight.
Stringing For A Full, Even Look
Use jute twine or cotton string and a large needle. Alternate whole dried oranges with clusters of 3 to 5 bay leaves, and add a wooden bead or cinnamon stick between each orange if you want extra texture. Tie a knot at each end and leave a loop for hanging.
Where This Garland Works Best
This garland shines on doorways, mantels, and open shelving where its bulk and rustic texture can be seen. It's heavier than slice garlands, so use small nails or adhesive hooks rated for a bit of weight. Avoid hanging it where it'll get bumped or exposed to moisture.
5. Orange and Evergreen Garland for the Mantel

The mantel is the one spot in the house where a garland really earns its keep. It frames the stockings, catches the firelight, and gives the whole room a focal point without much effort. Layering dried orange slices into evergreen makes it feel fuller and more interesting than greenery alone.
You can use fresh evergreen for that pine scent or faux greenery you'll reuse for years. Either way, the oranges add a warm glow that plain branches can't pull off. The trick is attaching them so they actually stay put through the season.
Start with a base garland that's a little longer than your mantel so the ends can drape down the sides. Fluff the branches first and give them a gentle shape before you add anything. Then work in the oranges in small clusters rather than spacing them evenly.
Grouping two or three slices together looks more natural and keeps the eye moving along the garland.
Choosing Your Base Garland
Fresh cedar or pine smells incredible but dries out over a few weeks and drops needles. Faux evergreen holds its shape all season and won't shed, which makes it the easier pick for a busy December. If you go fresh, give it a light mist of water every few days to keep it looking alive.
Either base works fine, so pick based on how much upkeep you want.
How To Attach Slices So They Stay Put
The simplest method is floral wire. Cut a short piece, thread it through the hole in each dried slice, and twist it tightly around a branch stem. Tuck the twisted end behind the greenery so it disappears.
For a cleaner look, hot glue a small loop of twine to the back of each slice and tie it on. Wire holds up better over a long season, but glue is faster if you're in a hurry.
Building The Layered Look
Add your oranges first, then weave in a second, thinner strand of greenery or twine to break up the pattern. A few cinnamon sticks or pinecones tucked into the clusters give it extra texture. Step back every few feet to check the balance.
You want the oranges to feel scattered, not lined up like a row of buttons.
6. Citrus Garland with Twine and Wooden Beads
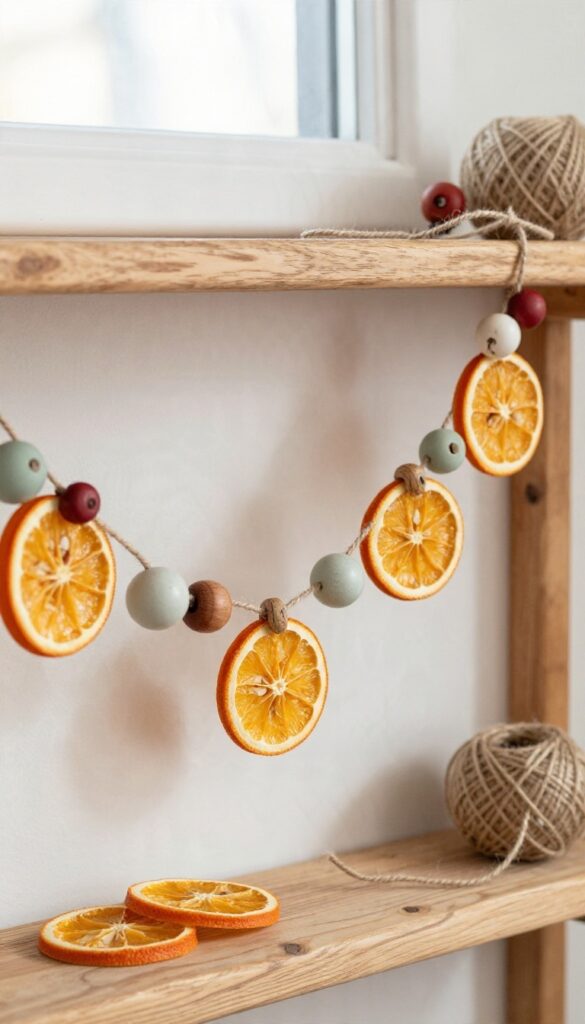
Wooden beads and chunky twine do a lot of quiet work here. They break up the orange slices, add texture, and push the whole thing toward that relaxed farmhouse look without much effort. The assembly is about as simple as garland gets, and the beads are where you can play around with paint if you want a custom color.
You'll need dried orange slices, a ball of chunky twine or jute, and wooden beads in a couple of sizes. Grab a large-eye needle or just tape the twine end tight to thread it through. Cut your twine longer than you think you need, since beads and slices eat up length fast.
Lay everything out on the floor first. A loose pattern like two beads, one orange slice, three beads keeps it from looking too uniform. Once you like the arrangement, thread it in order and tie a loop at each end for hanging.
Threading Without The Fuss
A blunt needle or a bit of tape on the twine tip makes threading beads way less annoying. Push the needle through the dried orange slice near the rind so it doesn't tear through the middle. Leave a few inches of bare twine at each end so you have room to tie loops.
Painting The Beads
Plain wood looks great, but a few painted beads add a nice pop. Try a soft white, sage green, or a deep red to tie into the oranges. Paint them before threading so you're not wrestling with a half-finished garland.
A light sanding on the edges gives them a worn, handmade feel.
Spacing And Length
For a standard mantel, plan on about six to eight feet. Space beads closer together near the ends and let the oranges breathe in the middle. If you want it to drape in soft swags, leave a little slack between clusters rather than pulling it tight.
7. Star Anise and Orange Garland for a Spiced Theme
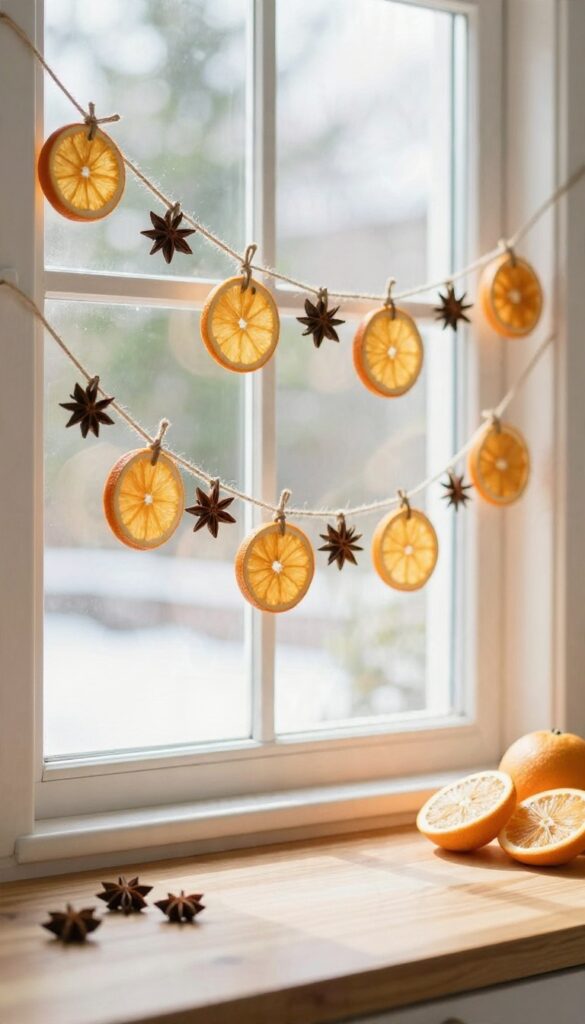
Star anise brings a warm, almost licorice-like scent that pairs beautifully with dried citrus. It's the kind of garland that makes a kitchen window or dining room feel instantly cozier. The little star shapes also add texture and a slightly exotic touch without any extra effort.
You'll need dried orange slices, whole star anise, and twine or thin jute. A hot glue gun helps, but you can also thread everything with a needle if you prefer. The process is simple: alternate orange slices with star anise, spacing them a few inches apart.
Tie small knots to hold each piece in place, or glue the star anise directly onto the orange slices for a cleaner look. The result is a garland that smells as good as it looks. Hang it where the scent can drift, like above a sink or across a dining room window.
It's lightweight, so a few small nails or adhesive hooks will hold it fine.
Choosing And Prepping Your Star Anise
Whole star anise is easy to find in the spice aisle or online. Look for pieces with intact points and a strong aroma. If you're using a needle and twine, make sure the star anise has a small hole drilled through the center, or use a sturdy needle to pierce it carefully.
Gluing is faster and avoids cracking the brittle stars.
Threading And Spacing Tips
Start with a loop at one end for hanging. Thread an orange slice, then a star anise, then another orange slice, leaving about two inches of twine between each. Vary the pattern slightly—sometimes two oranges in a row, sometimes a star anise alone—to keep it from looking too uniform.
Knot each piece snugly so nothing slides.
Where This Garland Works Best
Kitchen windows and dining room buffets are natural spots because the scent mingles with cooking smells. You can also drape a short strand over a tiered tray or across a shelf. Avoid damp areas like above a stove, where steam can soften the oranges.
8. Mini Orange Garland for Small Spaces

Not every home has room for a six-foot swag of citrus across the mantel. Tiny apartments, dorm rooms, and even that narrow strip above the kitchen sink deserve a little holiday warmth too. A mini orange garland solves that problem without forcing you to rearrange furniture or give up counter space.
The trick is scaling everything down. Smaller slices, finer string, and shorter lengths keep the garland looking intentional instead of like a big garland that shrank in the wash. Once you get the proportions right, these little strands work almost anywhere.
You still dry your oranges the same way, but you slice them thinner and pick smaller fruit when you can. Mandarins, clementines, and small navel oranges give you rounds that read as dainty rather than chunky. A mini garland should feel light, so resist the urge to load it up with heavy extras.
Think of it as jewelry for your space rather than a statement piece. A short strand draped over a mirror corner or looped along a bookshelf edge adds color without crowding anything. The smaller scale also means you can make several from one batch of oranges, which is handy if you want to spread the cozy around.
Slice Size And Drying Time
Cut your oranges about an eighth of an inch thick for minis. Thinner slices dry faster and curl slightly at the edges, which gives them a delicate look that suits small spaces. Keep your oven low, around 200 degrees Fahrenheit, and check them after an hour and a half.
Mini slices can go from perfectly dry to scorched quickly, so flip them every 30 minutes and pull any that are already crisp. Let them cool completely before stringing so they don't crack.
Choosing A Finer String
Skip the jute twine you'd use on a full-size garland and reach for something thinner. Bakers twine, embroidery floss, or thin cotton cord all work well and keep the strand from overwhelming the tiny slices. A needle helps here.
Thread the cord through a large-eye needle and push it through the dried slices near the top edge so they hang straight. Leave a small knot between each slice to keep them from sliding into a clump.
Where Mini Garlands Actually Work
Small trees are the obvious spot, and a mini garland wraps a tabletop tree nicely without hiding the branches. Beyond that, try draping one over the corner of a mirror, along the front edge of a shelf, or across a window frame. You can also loop a short strand around a lamp base or hang one over a doorway that's too narrow for anything bigger.
Command hooks or small nails hold these lightweight garlands fine, and you won't need to patch big holes afterward.
9. No-Oven Orange Garland Using a Dehydrator or Air Drying

Your oven doesn't have to be the star of this project. A dehydrator or plain old air does the job just as well, and both come with their own perks. Air drying costs nothing and fills a room with that slow citrus scent while it works.
A dehydrator gets you there faster and more evenly, which matters if you're making a long garland. Either way, the goal is the same: dry slices that feel like thin, leathery chips and hold their color without going brown or moldy.
Pick your method based on how much time and counter space you can spare. Both give you slices sturdy enough to string without snapping.
Dehydrator Timing And Settings
Set your dehydrator to about 135°F and lay the slices in a single layer, not touching. Thin slices (around 1/8 inch) take roughly 6 to 10 hours, while thicker ones can push past 12. Flip them once around the halfway mark so both sides dry evenly.
Rotate trays if your machine runs hotter in the back. When they're done, the slices should snap cleanly at the edge and feel dry, not tacky, in the center.
Air Drying On A Rack
No dehydrator? Spread slices on a wire cooling rack set over a baking sheet, then leave them somewhere warm, dry, and out of direct sun. A spot near a heater or a sunny window works well.
Expect 3 to 5 days depending on humidity. Flip them daily and rotate the tray so nothing sticks. If your kitchen runs humid, this method can stall out.
A small fan pointed at the rack keeps air moving and speeds things along.
Troubleshooting And Knowing When They're Done
Brown edges mean your heat is too high or the slices are too thin. Lower the temp and cut a little thicker next time. Sticky centers are the most common problem.
If a slice bends without cracking, it needs more time, and any moisture left inside will invite mold once it's on the garland. Cool a test slice completely before judging it, since warm slices feel softer than they really are. Once cool, they should be firm and crisp.
Store dried slices in an airtight jar until you're ready to string them.
FAQ
How do I dry orange slices for garland?
Slice oranges about 1/4 inch thick, blot them dry, and bake at 200°F for 2 to 3 hours, flipping halfway. They're ready when they feel leathery and slightly stiff, not brittle.
How long does a dried orange garland last?
Stored dry and away from humidity, a dried orange garland can last a full season and often into the next year. Keep it out of damp spots and check for mold before reusing.
Can I make orange garland without an oven?
Yes. A dehydrator works well at around 135°F for 6 to 10 hours, and air drying works in a warm, dry room with good airflow, though it takes several days.
How do I keep orange slices from cracking?
Slice evenly, don't bake too hot, and flip the slices during drying. Thinner slices crack more easily, so aim for consistent thickness.
What string works best for an orange garland?
Jute twine and cotton string are the most popular choices. Use a needle or a small skewer to poke holes, and double the string for heavier garlands.
Conclusion
Orange garlands bring warmth to a room without much fuss, and the nine ideas here give you plenty of ways to use them. Start with one spot that bugs you, like a bare mantel or a plain doorway, and try the idea that fits it best. You don't need to dry a whole orchard or redo every room.
Pick two or three projects that match your space and your patience, then let the rest wait until next year. A single strand of dried oranges can carry a whole corner on its own.