How to Clean Shower Head Buildup in 10 Simple Steps
A weak, clogged shower head can turn your morning rinse into a frustrating drizzle. Mineral deposits and grime sneak in over time, cutting water pressure and messing with the spray pattern. The good news?
You don't need a plumber or harsh chemicals to fix it. With a few household staples and a little patience, you can restore that steady, satisfying flow. This guide walks you through ten straightforward steps that tackle even stubborn buildup without damaging your fixture.
Each step is practical and easy to fit into your weekend cleaning routine. Whether you're dealing with hard water stains or just want to prevent future clogs, these tips will save you time and effort.
1. Identify the Type of Buildup
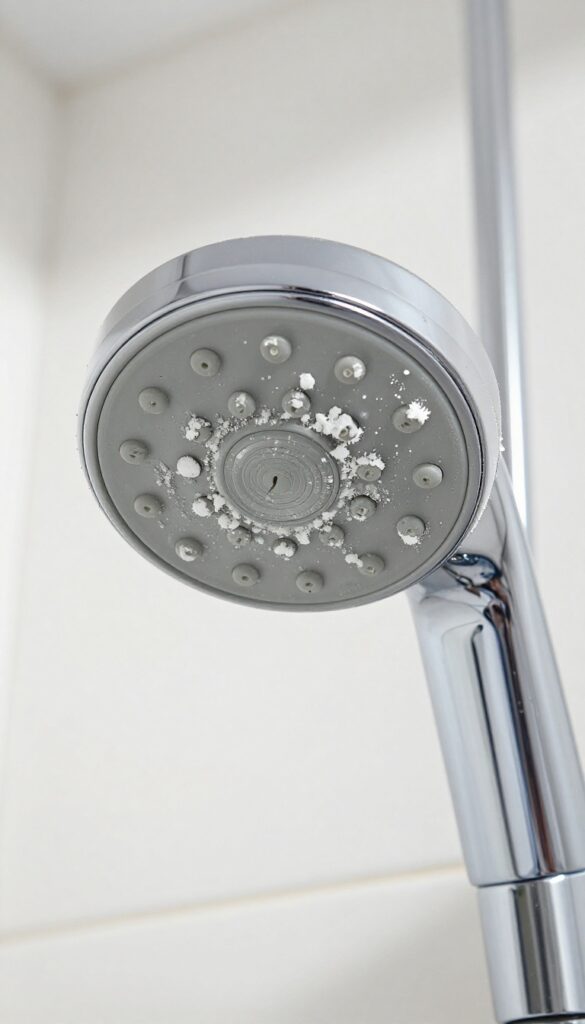
Before you grab any cleaner, take a close look at what's coating your shower head. The right approach depends on whether you're dealing with white, chalky limescale or crusty, brown rust and sediment. Mixing up the two can waste your time or even damage the finish.
Identifying the buildup correctly saves you effort and protects your fixture. Limescale is common in hard water areas and looks like a white, flaky crust. Rust or sediment usually appears as orange, brown, or reddish stains and feels more gritty.
A quick visual check and a gentle scrape with a fingernail can tell you which one you're dealing with.
Check The Color And Texture
White or off-white buildup that feels powdery or chalky is almost always limescale. It forms when calcium and magnesium in hard water dry on the surface. Brown, orange, or reddish deposits that feel rough or gritty are typically rust from old pipes or sediment from your water heater.
Look At The Water Flow
If the spray is uneven with some holes completely blocked, limescale is likely the culprit. Rust and sediment tend to cause a general drop in pressure without specific blocked holes. Turn the shower on and watch the pattern—it gives you a clue about what's inside.
Consider Your Water Source
If you're on municipal hard water, limescale is almost guaranteed. Well water or older homes with metal pipes lean toward rust and sediment. Knowing your water source helps you anticipate future buildup and choose the best cleaning method.
2. Remove the Shower Head
Now that you've assessed the buildup, it's time to get your hands dirty. Removing the shower head is usually straightforward, but the method depends on your fixture type. Don't worry—you won't need any fancy tools.
Unscrew By Hand Or Use A Wrench
Start by unscrewing the shower head from the arm. Most heads twist off counterclockwise by hand. If it's stuck, wrap a cloth around the nut to protect the finish, then use a wrench for extra leverage.
Turn gently to avoid cracking plastic parts.
Soak Metal Heads In Vinegar
Once removed, place the head in a bowl of white vinegar. Let it soak for at least 30 minutes—longer if buildup is heavy. Vinegar dissolves mineral deposits without harsh scrubbing.
Rinse thoroughly with water afterward.
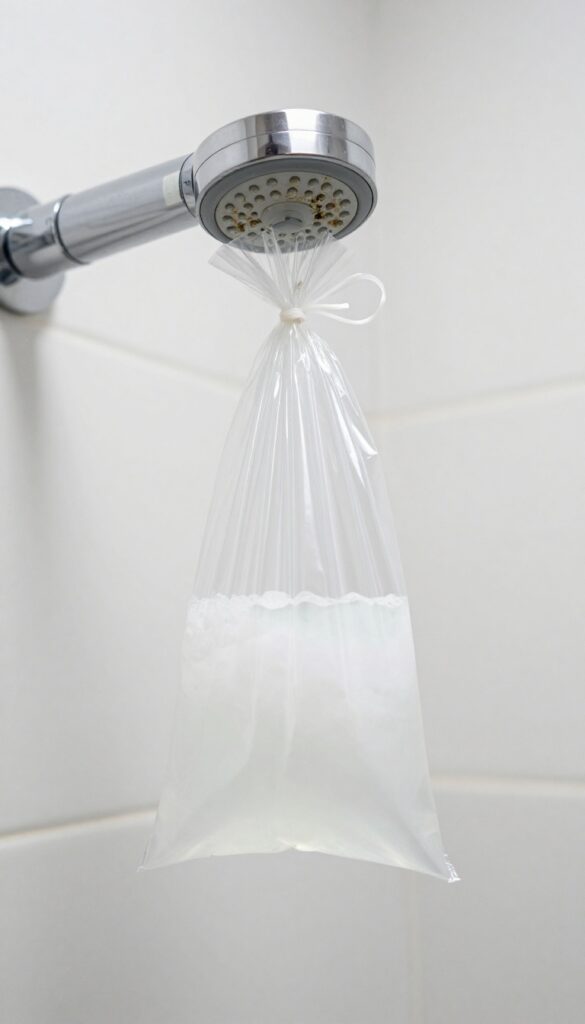
Bag Method For Fixed Heads
If your shower head is fixed and can't be removed, fill a plastic bag with vinegar and secure it around the head with a rubber band or zip tie. Let it soak for an hour, then remove the bag and run the water for a few minutes to flush out loosened debris.
3. Soak in White Vinegar
White vinegar is a powerhouse when it comes to dissolving limescale and mineral deposits. Its mild acidity breaks down the calcium carbonate that builds up in your shower head's nozzles, restoring water flow without scrubbing. This step is simple, affordable, and works on most metal and plastic fixtures.
For the soak, you'll need a plastic bag or a bowl large enough to submerge the shower head. Fill it with enough white vinegar to cover the head completely. If your shower head is fixed, you can tie a bag of vinegar around it with a rubber band.
Let it soak for at least 30 minutes—overnight is even better for heavy buildup. After soaking, remove the shower head and run water through it for a minute to flush out loosened debris.
Why Vinegar Works
Vinegar's acetic acid reacts with alkaline mineral deposits, turning them into soluble compounds that rinse away easily. This natural approach is safe for most finishes, though it's best to avoid prolonged soaking on brass or gold-plated fixtures—check the manufacturer's guidelines first.
Soaking Tips For Best Results
For a thorough clean, ensure the entire shower head is submerged. If using a bag, secure it tightly to prevent leaks. Warm the vinegar slightly (not boiling) to speed up the reaction.
After soaking, use an old toothbrush to gently scrub any remaining residue from the nozzles.
What If Vinegar Isn't Enough?
For extremely stubborn buildup, try a 50/50 mix of vinegar and baking soda. The fizzing action helps dislodge deposits. Alternatively, commercial descaling products designed for coffee makers or kettles can be used, but vinegar is usually just as effective and much cheaper.
4. Scrub with an Old Toothbrush

Soaking loosens the big deposits, but some stubborn specks will still cling to the nozzles. That's where a simple scrub comes in. A soft toothbrush is perfect for this job—it's gentle enough to avoid scratching the finish but firm enough to dislodge grime.
For those tiny holes that a brush can't reach, a toothpick or pin works wonders.
After soaking, give each nozzle a gentle scrub with an old toothbrush. Focus on the openings where water comes out, as that's where buildup tends to accumulate. For really stubborn spots, use a toothpick or pin to carefully poke into the holes and break up the deposit.
Be gentle to avoid damaging the rubber or metal. Rinse the shower head with warm water afterward to wash away any loosened debris.
Best Brush Technique
Use a clean, soft-bristled toothbrush that you no longer need for your teeth. Dip it in a bit of white vinegar or a mild cleaning solution to help dissolve any remaining minerals. Scrub in a circular motion around each nozzle, applying light pressure.
This method works well for both fixed and handheld shower heads.
Reaching Tight Spots
If your shower head has very small or deep-set nozzles, a toothpick or a fine pin is your best friend. Insert the tip gently into each hole and twist slightly to dislodge any hidden deposits. Avoid using metal tools that could scratch the surface.
After clearing each hole, rinse with water to flush out the debris.
5. Use Baking Soda Paste for Tough Stains
Sometimes vinegar alone doesn't cut it. Stubborn white spots or crusty rings may need a little extra muscle. That's where baking soda steps in.
It's gentle enough not to scratch chrome or brass but abrasive enough to lift mineral deposits that have bonded to the surface.
Baking soda paste is a simple, non-toxic spot treatment for problem areas. It works best after you've already soaked the head and loosened the main buildup. Apply it directly to the remaining stains, let it sit, and then scrub with a soft brush or toothbrush.
The paste clings to vertical surfaces better than liquid cleaners, so it stays put while it works.
How To Make The Paste
Mix three parts baking soda with one part water in a small bowl. Stir until it forms a thick, spreadable paste. If it's too runny, add more baking soda.
If it's too dry, add a few more drops of water. The consistency should be like toothpaste.
Application Tips
Use your fingers or a soft cloth to apply the paste directly onto the stained areas. Focus on the nozzle holes and any crusty rings around the base. Press it in gently so it makes good contact.
Let it sit for 15 minutes—don't let it dry out completely. If you see it cracking, spritz a little water on top.
Scrubbing And Rinsing
After 15 minutes, take an old toothbrush or a soft nylon brush and scrub the paste in circular motions. Pay extra attention to each nozzle opening. Rinse thoroughly with warm water.
If any residue remains, wipe it off with a damp cloth. Your shower head should now be free of those stubborn white deposits.
6. Clean the Shower Head Screen
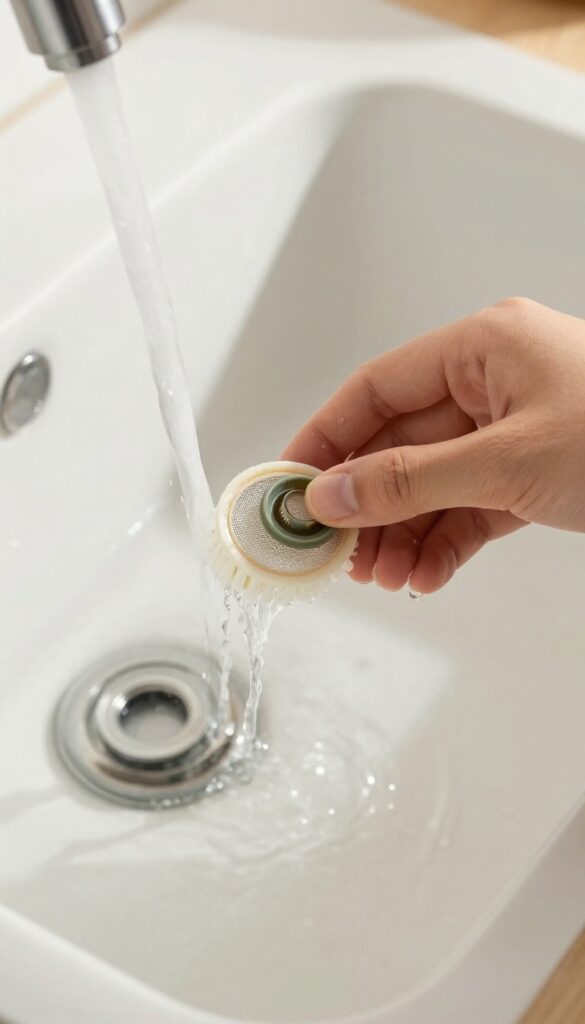
Behind that satisfying spray, a small screen and rubber washer work hard to filter out grit. Over time, they trap enough debris to choke your water flow. Cleaning them is a quick win that often gets overlooked.
Removing the screen and washer is simple once the shower head is off. Rinse them under warm water to dislodge loose particles. A soft brush or old toothbrush helps scrub away stubborn grime without tearing the rubber.
Locate And Remove The Screen
Most shower heads have a small mesh screen or a rubber washer inside the neck where it attaches to the pipe. Use your fingers or needle-nose pliers to gently pull it out. If it's stuck, a little twist usually frees it.
Rinse And Scrub
Hold the screen under running water and brush both sides with a soft toothbrush. Pay attention to the edges where gunk hides. For the rubber washer, a quick rinse and gentle rub with your fingers is enough.
Reassemble Carefully
Once clean, pop the screen and washer back into place. Make sure they sit flat and snug—any misalignment can cause leaks or uneven spray. Hand-tighten the shower head onto the pipe to avoid cracking the fixture.
7. Rinse Thoroughly
After all that soaking and scrubbing, the last thing you want is leftover vinegar or baking soda residue clogging things up again. A good rinse clears away any lingering particles and ensures your shower head is ready to deliver clean, strong water flow. It's a simple step, but skipping it can leave a sour smell or even cause new buildup down the line.
Use Warm Running Water
Turn on the faucet or shower and let warm water run through the shower head for a full minute. Warm water helps flush out any dissolved minerals and leftover cleaning solution more effectively than cold water. If your shower head is detachable, hold it under a running tap for a more thorough rinse.
Shake Out Excess Water
After rinsing, give the shower head a few firm shakes to dislodge any water trapped inside the nozzles or the neck. This prevents drips and helps the fixture dry faster. For handheld models, point the head downward and shake until no more water comes out.
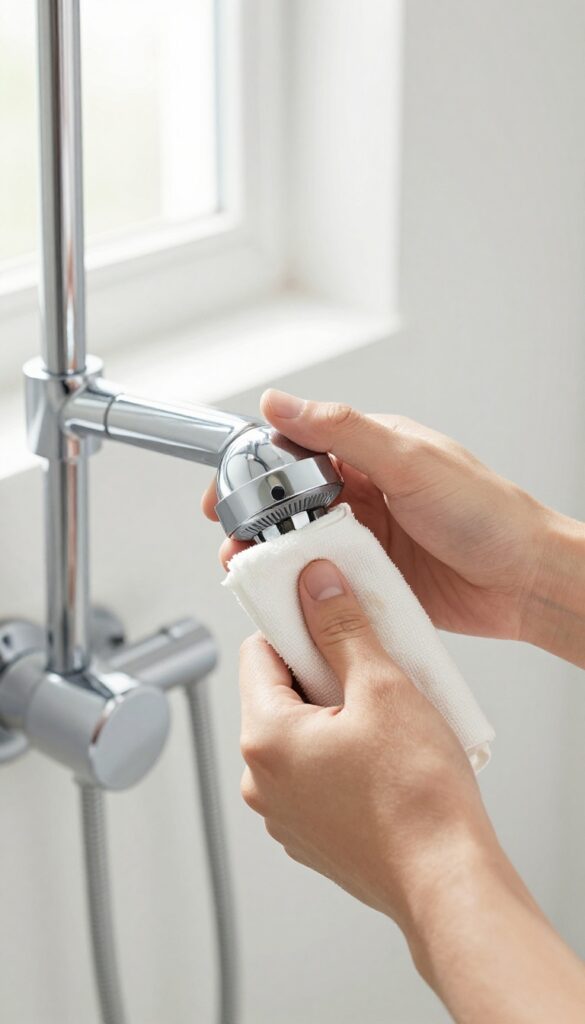
Wipe Down The Exterior
Use a clean, dry microfiber cloth to wipe the outside of the shower head. This removes any remaining moisture and prevents water spots from forming. Pay extra attention to the nozzles and any crevices where residue might hide.
8. Reassemble and Reattach

You've cleaned every nook and cranny—now it's time to put things back together. Reassembling your shower head correctly ensures it works like new and doesn't leak. This step is straightforward, but a little care goes a long way.
Check The Washer And Screen
Before you reattach the shower head, inspect the rubber washer and any small screen inside the connection. If they're worn, cracked, or clogged, replace them. A damaged washer is a common cause of drips after reassembly.
Hand-tighten Only
Screw the shower head onto the pipe by hand until it's snug. Avoid using a wrench or pliers—overtightening can strip the threads or crack the fixture. If you need a little extra grip, wrap a cloth around the connection and turn gently.
Test For Leaks
Turn on the water and check for drips around the joint. If you see a leak, tighten the connection a quarter-turn more by hand. Still leaking?
Remove the head and double-check the washer is seated properly.
9. Run Water to Flush Out Debris
After all that soaking and scrubbing, there's still loose gunk hiding inside the shower head. Running water through it for a minute clears out those particles so they don't settle back onto the nozzles. It's a quick step that makes a big difference in performance.
Turn the water on full blast and let it run for about 60 seconds. You'll likely see a burst of cloudy or discolored water at first—that's the loosened mineral bits and cleaning residue getting washed away. Let it flow until the water runs clear.
While it's running, check for any drips or leaks around the connection points. If you spot a leak, tighten the shower head gently with a cloth-covered wrench or by hand. Over-tightening can crack the fixture, so snug is enough.
Why Flushing Matters
Even after scrubbing, small debris can lodge inside the head's internal channels. Flushing pushes everything out, preventing future clogs and uneven spray. It also rinses away any leftover vinegar or cleaner that could cause a smell.
How To Check For Leaks
With the water running, run your hand along the connection between the shower arm and the head. If you feel moisture or see drips, the seal may be loose or worn. Tighten the nut a quarter turn at a time until the leak stops.
If it persists, the rubber washer inside might need replacing.
When To Repeat The Flush
If your water is especially hard, a quick monthly flush helps maintain flow. No need to disassemble—just run the water hot for a minute with the head in place. It's a simple habit that extends the time between deep cleans.
10. Prevent Future Buildup
You've put in the work to get your shower head sparkling clean—now keep it that way. A few simple habits can stop mineral deposits from building up again, saving you from another deep-cleaning session anytime soon.
Wipe It Down After Every Shower
A quick wipe with a microfiber cloth or squeegee after each use removes water droplets before they dry and leave mineral spots. It takes just seconds but makes a huge difference in preventing scale from forming.
Install A Water Softener
If you have hard water, a whole-house water softener tackles the root cause by removing calcium and magnesium. For a budget-friendly option, a shower head filter can reduce mineral buildup and also improve water quality for your skin and hair.
Monthly Vinegar Soaks
Even with preventive measures, a monthly soak in white vinegar keeps your shower head in top shape. Just fill a plastic bag with vinegar, secure it around the head with a rubber band, and let it sit for 30 minutes. Rinse and you're done.
FAQ
How often should I clean my shower head?
Every 3-6 months, or more often if you have hard water. Monthly vinegar soaks can prevent heavy buildup.
Can I use bleach instead of vinegar?
Bleach is not recommended—it can damage metal finishes and is harsh on rubber parts. Vinegar is safer and just as effective.
What if my shower head is plastic?
Plastic shower heads can be soaked in vinegar, but limit soaking to 30 minutes to avoid damage. Rinse thoroughly.
Why is my water pressure still low after cleaning?
There may be buildup inside the pipe or a clogged water softener. Check the supply line or consult a plumber.
Can I clean a fixed shower head without removing it?
Yes—fill a plastic bag with vinegar, tie it around the shower head, and let it soak for an hour. Then scrub and rinse.
Conclusion
Once you clear that buildup, your shower head will feel like new — better pressure, cleaner water, and a fresher bathroom experience. Make descaling a monthly habit to keep mineral deposits from returning.
A quick vinegar soak or a wipe with a descaler is all it takes. Your morning shower will thank you.