11 Living Room Wall Moulding Ideas to Add Elegant Trim
Wall moulding has a way of making a room feel finished—like the last piece of a puzzle clicking into place. But it doesn't have to look formal or museum-like. With the right approach, moulding can add warmth and character to your living room, making it feel both polished and inviting.
Think of trim as a tool for framing your space, not just decorating it. Whether you're working with a small apartment or a spacious family room, there's a moulding style that fits your vibe.
The key is choosing a look that feels natural and lived-in, not overly fussy. In this list, you'll find 11 ideas that range from classic to unexpected.
1. Classic Wainscoting with a Warm Paint Wash
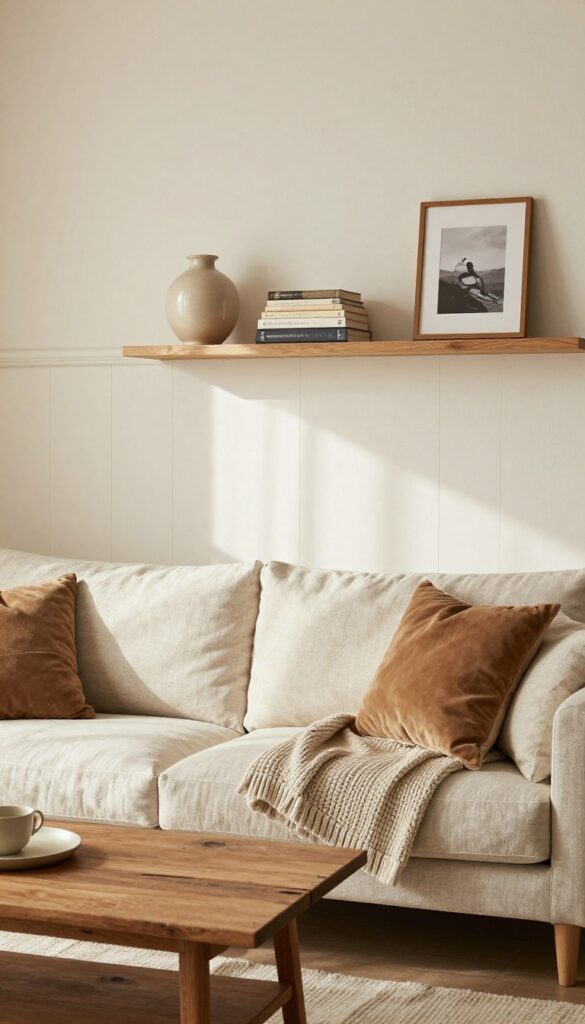
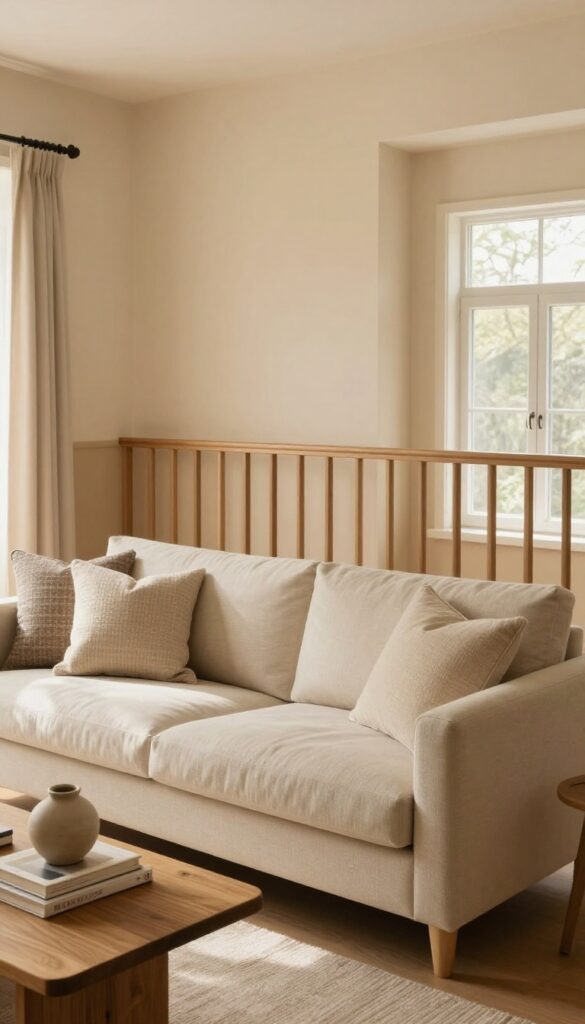
Wainscoting doesn't have to feel formal or stiff. By swapping crisp white for a soft, hand-brushed paint finish, you can turn this classic trim into something warm and inviting. The key is choosing a warm off-white or pale beige that catches the light differently throughout the day.
This subtle shift makes the walls feel textured and cozy, perfect for a living room where you actually want to relax.
This approach keeps the timeless structure of wainscoting but softens its formality. The hand-brushed finish adds a gentle, imperfect quality that feels more like a beloved heirloom than a brand-new renovation. Pair it with wooden furniture, linen sofas, and chunky knit throws to reinforce that lived-in look.
The result is a space that feels polished without being precious—ideal for families or anyone who wants their home to feel welcoming.
Best Colors
Stick with warm neutrals like cream, oatmeal, or a very pale greige with yellow undertones. Avoid stark white or cool grays—they'll work against the cozy vibe you're going for. Test samples on your wall and observe them at different times of day to see how the warmth shifts.
Texture Mix
Balance the smooth painted wainscoting with rougher textures elsewhere. Think a chunky wool rug, velvet cushions, or a reclaimed wood coffee table. This contrast keeps the room from feeling flat and adds visual interest that feels natural, not staged.
Finishing Touch
Add a picture ledge or a small shelf above the wainscoting to display a few personal items—a ceramic vase, a stack of books, or a framed photo. This breaks up the wall and makes the trim feel like part of your story, not just a decorative afterthought.
2. Picture Frame Moulding in Soft Earth Tones
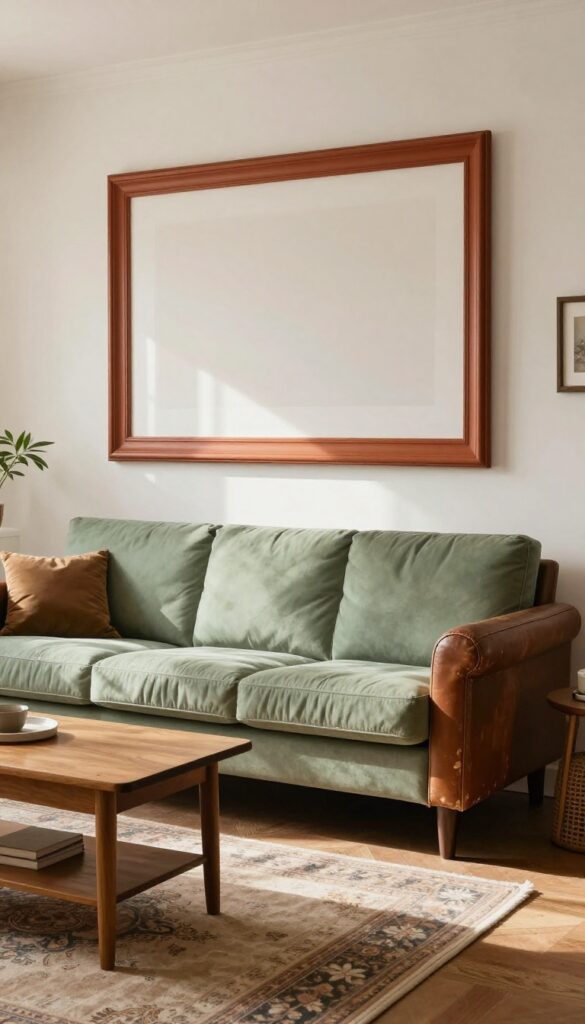
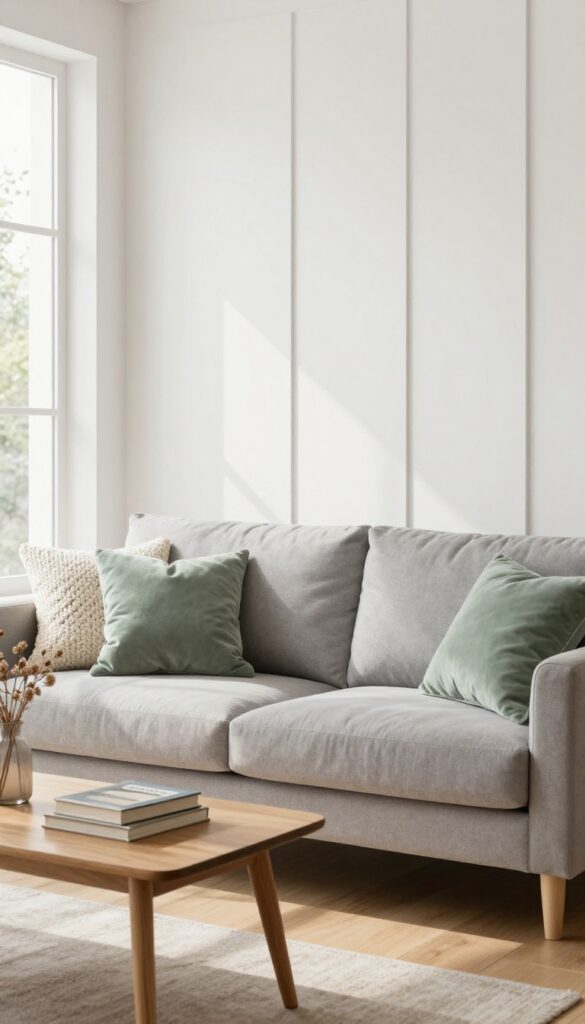
Picture frame moulding is one of those details that instantly makes a room feel more custom and intentional, but it doesn't have to scream formal. By choosing soft earth tones like muted terracotta or sage green, you get that architectural interest without the stuffiness. The panels create a subtle rhythm on the wall, and when you paint them in warm, grounded shades, the whole room feels cozy and collected.
It's a look that works beautifully in living rooms where you want character without clutter.
Start by mapping out rectangular panels on your main wall—usually the one behind the sofa or a console. Use thin MDF or wood trim to create the frames, spacing them evenly for a balanced look. The width of the trim matters: too thick and it feels heavy, too thin and it gets lost.
Aim for something around 1.5 to 2 inches. Once the trim is up, caulk the seams and paint everything the same soft earth tone. This keeps the wall feeling unified rather than busy.
Style the room with a mix of vintage and modern pieces to play up the lived-in vibe. A worn leather armchair, a sleek brass floor lamp, and a linen sofa in a neutral cream all work together. Add a few ceramic vases in complementary earthy glazes and a woven rug to tie it all together.
The moulding frames act like built-in art, so you don't need to overload the walls with extra decor. Let the architecture do the talking.
Best Colors
Stick with muted, dusty versions of earth tones—think faded terracotta, sage green with a bit of gray, or a warm clay beige. These colors feel soothing and pair well with natural wood tones and soft whites. Avoid anything too bright or saturated, as that can make the moulding feel heavy instead of elegant.
Layout Tip
- For a standard 8-foot wall, place the bottom of the panels about 24 inches from the floor and leave 4 to 6 inches between each panel. Keep the top edge at least 6 inches from the ceiling. This creates a classic proportion that works in most living rooms.
- If your room has low ceilings, consider running the panels all the way to the floor for a taller look.
Finishing Touch
Once the paint dries, add a few small picture lights above the panels to cast a warm glow. This highlights the texture of the trim and makes the wall feel like a gallery. Use dimmable bulbs so you can adjust the mood from bright and airy to soft and intimate.
3. Board and Batten with a Built-In Shelf
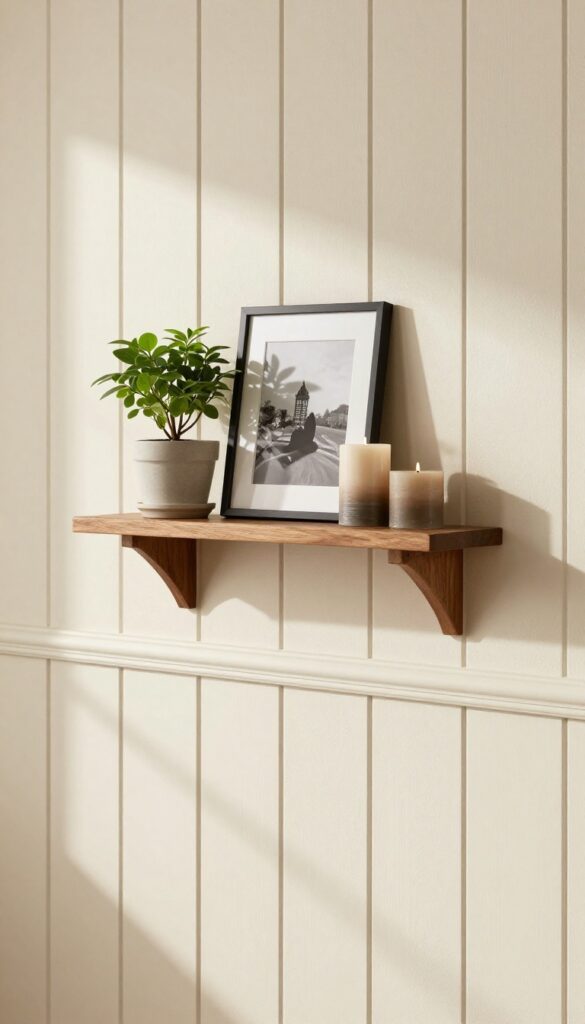
Board and batten is a classic wall treatment, but adding a narrow floating shelf at the top gives it a fresh, functional twist. This setup creates a built-in look that feels intentional and polished, while the shelf offers a perfect spot to display small decor pieces. Warm wood tones on the shelf keep the whole thing grounded and cozy, making it ideal for a living room that feels lived-in rather than stiff.
The combination of vertical battens and a floating shelf adds architectural interest without overwhelming the room. The battens draw the eye upward, making ceilings feel higher, while the shelf breaks the vertical lines just enough to create a natural display area. Paint the battens and wall the same soft neutral—like a warm greige or creamy white—to keep the look seamless.
Then let the shelf pop with a natural wood finish, like oak or walnut, to bring warmth and texture. Style the shelf with small plants, framed photos, or a few candles in earthy tones. Keep it sparse to avoid clutter; the beauty is in the clean lines.
Best Colors
Stick with warm neutrals for the wall and battens—think creamy off-white, warm gray, or a soft beige. These tones let the wood shelf stand out without competing. For a cozier vibe, try a muted sage green or dusty blush on the wall, paired with a light wood shelf.
Layout Tip
Install the shelf about 6 to 8 inches below the ceiling to keep the proportions balanced. Space the battens 12 to 16 inches apart for a traditional look, or go wider for a more modern feel. The shelf should be narrow—4 to 6 inches deep—so it doesn't protrude too much.
Shelf Styling Tip
Layer items in odd numbers and vary heights. A small trailing plant on one end, a stack of books in the middle, and a ceramic vase on the other side creates visual rhythm. Avoid overcrowding; leave some breathing room between objects.
4. Geometric Diamond Pattern for a Modern Twist
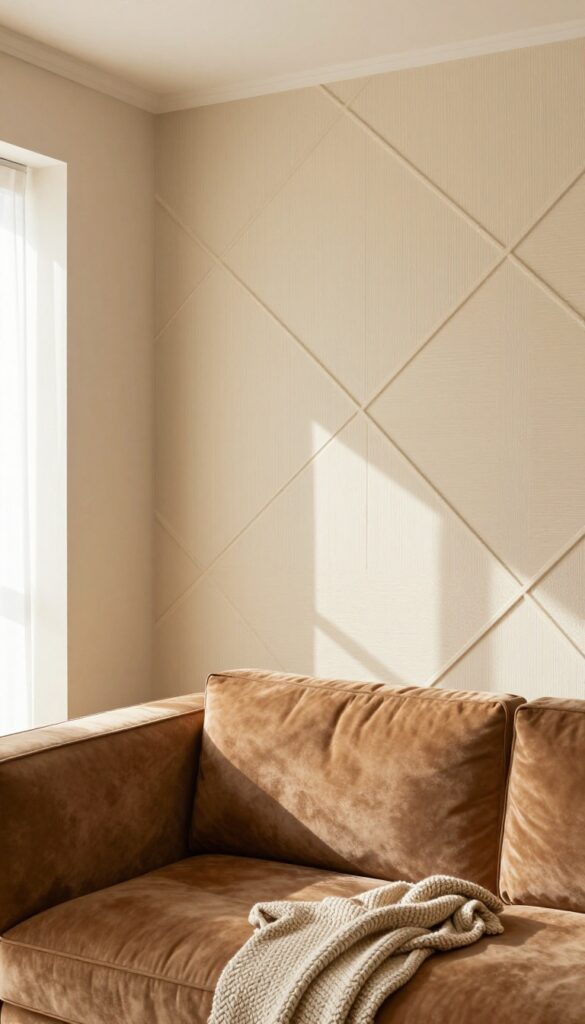
If straight lines feel a little too predictable, a geometric diamond pattern is a fun way to shake things up without going overboard. By arranging thin strips of moulding into diamond shapes on a focal wall, you get a look that's both structured and playful. The key is keeping it subtle—paint the inside of each diamond just a shade darker than the wall, so the pattern reads more like texture than a bold graphic.
It's a perfect middle ground for anyone who wants something interesting but still warm and inviting.
This approach works especially well in living rooms where you want a modern feel without sacrificing coziness. The diamonds add visual rhythm and a handmade quality that feels personal, not mass-produced. Plus, because the contrast is low, it doesn't overwhelm the space—it just gives the wall a quiet, sophisticated depth.
Best Colors
Stick with warm neutrals like soft beige, warm gray, or creamy white for the base wall, then choose a slightly deeper version of the same hue for the diamond interiors. Think warm taupe on a pale greige background. This keeps the effect gentle and inviting, not stark.
Layout Tip
Plan your diamond grid on paper first, spacing them evenly across the wall. A good rule of thumb is to leave about 4 to 6 inches between each diamond. Start from the center of the wall and work outward so the pattern stays symmetrical.
Finishing Touch
Add a slim picture light or a warm sconce above the diamond wall to cast soft shadows that emphasize the depth. Pair with a chunky knit throw and a velvet sofa in a complementary warm tone to complete the cozy, lived-in vibe.
5. Chair Rail with Two-Tone Warm Neutrals
A chair rail is one of those classic moldings that instantly adds structure to a room, but it doesn't have to feel formal or stuffy. By pairing it with a two-tone paint scheme in warm neutrals, you get a look that's both polished and cozy. The lower half gets a deeper, richer shade—think caramel, dusty rose, or even a warm terracotta—while the upper half stays light and airy.
This contrast defines the space visually without making it feel heavy, and it's a surprisingly easy way to add architectural interest without a full renovation.
This approach works especially well in living rooms that want a grounded, lived-in feel. The darker lower half anchors the room and makes it feel intimate, while the lighter upper half keeps things open and bright. It's also a great trick for rooms that feel a bit top-heavy or lack a natural focal point.
The chair rail itself doesn't have to be elaborate—a simple, clean profile is all you need. Paint it the same color as the lower wall to let it blend in, or go with a crisp white for a bit more definition. Either way, the result is a room that feels thoughtfully layered without being fussy.
Best Colors For A Warm Two-tone
- Stick with warm neutrals that have a bit of depth. For the lower half, try a caramel latte, dusty rose, or a soft terracotta. The upper half should be a lighter version of the same family—think warm cream, pale beige, or a soft blush.
- The key is to keep the undertones consistent so the two halves feel like they belong together. Avoid cool grays or stark whites, which can clash with the warm vibe.
Where To Place The Chair Rail
- Standard chair rail height is around 32 to 36 inches from the floor, but don't be afraid to adjust it based on your room's proportions. In a room with lower ceilings, placing it a bit lower (around 30 inches) can make the walls feel taller. In a room with high ceilings, you can go up to 40 inches.
- The goal is to create a balanced division that feels intentional, not arbitrary.
Finishing Touch: Styling The Lower Half
- The darker lower wall is a natural backdrop for furniture and decor. Lean a mirror or a piece of art against it, or place a low console table with a lamp and a stack of books. The contrast will make those pieces pop.
- If you have wainscoting or beadboard below the chair rail, even better—it adds texture and makes the room feel even more custom.
6. Floor-to-Ceiling Vertical Panels for Height
If your living room feels a bit squat or boxy, vertical paneling is a clever architectural fix that doesn’t require a renovation. Running slim, tall panels from the floor all the way up to the ceiling tricks the eye into seeing more height, making the whole space feel airier. The look is classic but not fussy—think cozy library or English country house, not a formal palace.
Finish them in a warm matte white or soft gray to keep the room feeling inviting rather than stark.
Vertical paneling works best when the panels are narrow—about 4 to 6 inches wide—and spaced evenly across the wall. You can use MDF boards or pre-made paneling strips, which are budget-friendly and easy to install with adhesive and a nail gun. Paint them the same color as the wall for a seamless, built-in look, or go slightly lighter for subtle contrast.
In a warm and cozy living room, pair these panels with soft textiles like a chunky knit throw or velvet cushions to balance the structure with comfort.
Best Colors
Stick with warm whites (like Benjamin Moore White Dove or Sherwin Williams Alabaster) or light greiges with a hint of warmth. Avoid cool grays or stark whites—they can make the room feel clinical. If you want a bolder look, try a pale sage green or dusty blue for a soft, lived-in feel.
Layout Tip
Install panels on the main wall behind the sofa or the TV wall to create a focal point. Keep the spacing consistent—about 2 to 3 inches between each panel—and stop the panels about an inch from the ceiling to avoid a cramped look. If your ceiling height is under 8 feet, run the panels all the way to the ceiling without a chair rail.
Finishing Touch
Add a slim floating shelf at the top of the panels to display a few framed photos or small plants. This breaks up the vertical lines and adds a cozy, collected feel. Use warm wood tones for the shelf to tie in with other natural elements in the room.
7. Rustic Shiplap with a Whitewash Finish

Shiplap has become a staple in modern farmhouse design, but it doesn't have to feel coastal or overly rustic. By choosing wider planks and applying a whitewash that lets the natural wood grain peek through, you get a textured wall treatment that feels warm and lived-in. The key is balance: the whitewash softens the wood's intensity, keeping the room from feeling too cabin-like, while the visible grain adds organic depth.
This approach works beautifully in living rooms where you want a cozy, inviting backdrop without going full barn door.
For this look, opt for pine or cedar planks at least six inches wide. The wider boards emphasize the horizontal lines and make the room feel broader. Apply a diluted white paint or a white stain, then wipe it back so the wood's knots and grain remain visible.
The result is a subtle, weathered finish that pairs well with neutral furnishings and soft textiles. It's especially effective on an accent wall behind a sofa or a fireplace, where the texture can really shine without overwhelming the space.
Best Colors And Materials
- Stick with warm whites and off-whites for the whitewash—think creamy shades rather than stark bright white. The wood should be raw or lightly sanded before applying the wash. Pine is affordable and takes whitewash well, while cedar offers more pronounced grain.
- Avoid pressure-treated lumber, as it can resist the wash unevenly.
Styling And Texture Mix
- Balance the rustic wall with smooth, soft elements. A linen sofa, chunky knit throw, and a wool rug keep the room cozy without competing. Add a few black metal accents—like a floor lamp or picture frames—to ground the warmth.
- Plants with broad leaves, like a fiddle leaf fig, introduce another layer of organic texture.
Lighting Tip
Use warm, dimmable lighting to enhance the whitewashed wood's glow. Sconces mounted directly on the shiplap create pools of light that highlight the grain and shadow lines. Avoid cool white bulbs, which can make the finish look flat or gray.
8. Moulding Accent Wall Behind the Sofa
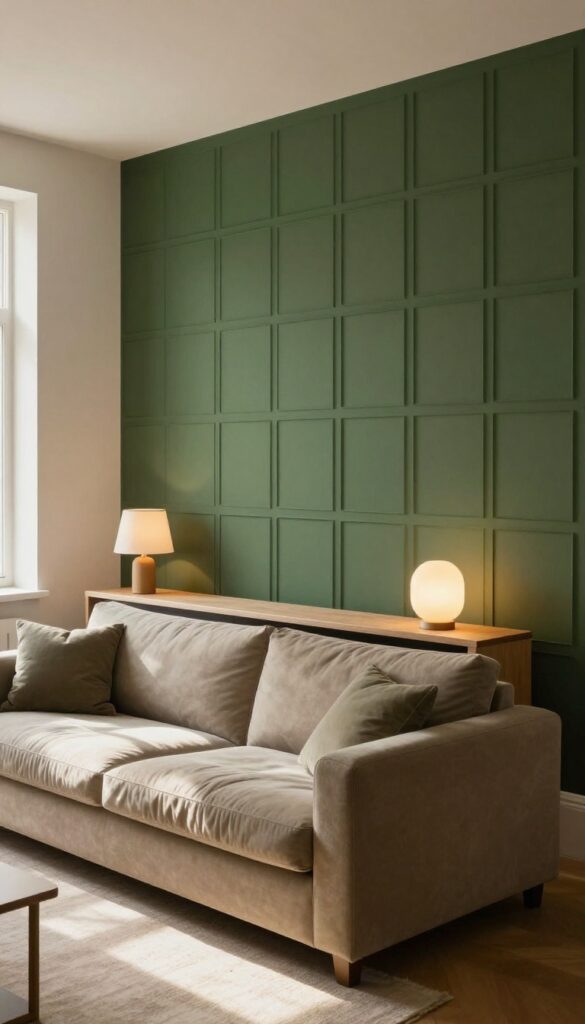
There’s something instantly grounding about an accent wall made with moulding, especially when it sits right behind your sofa. It frames the seating area and gives the room a built-in sense of purpose. By painting the moulding wall a shade darker than the rest of the room, you create a cozy nook that feels intentional and warm.
A long console table with soft lamps completes the look, making it perfect for evenings spent reading or chatting.
Pick the wall behind your main sofa and map out a grid of moulding squares—nothing too fussy, just even rectangles or squares that fill the space nicely. Use simple MDF strips for a budget-friendly option. Paint the moulding and the wall the same deeper hue, like a warm charcoal, olive green, or muted navy, while keeping the other walls lighter.
This contrast makes the sofa area feel like its own little room within the room. Slide a slim console table against the wall and top it with table lamps for a soft glow that bounces off the painted surface. The result is a living room that feels both polished and lived-in.
Best Colors
- Stick with warm, earthy tones for that cozy feel. Think deep taupe, terracotta, or a rich olive green. If you prefer neutrals, a warm charcoal or a dark greige works beautifully.
- The key is to choose a color that makes the wall feel like a soft backdrop, not a loud statement.
Lighting Tip
Place a pair of table lamps on the console table, one on each end, to create balanced, ambient lighting. Use warm-toned bulbs (2700K–3000K) to enhance the cozy mood. The light will reflect off the darker wall, making the room feel intimate and inviting.
Finishing Touch
Add a few personal objects on the console—a stack of books, a ceramic vase, or a small framed photo. Keep it simple so the moulding stays the star. A trailing plant like pothos on one end adds a soft, organic contrast to the clean lines of the grid.
9. Arched Moulding Details for Softness
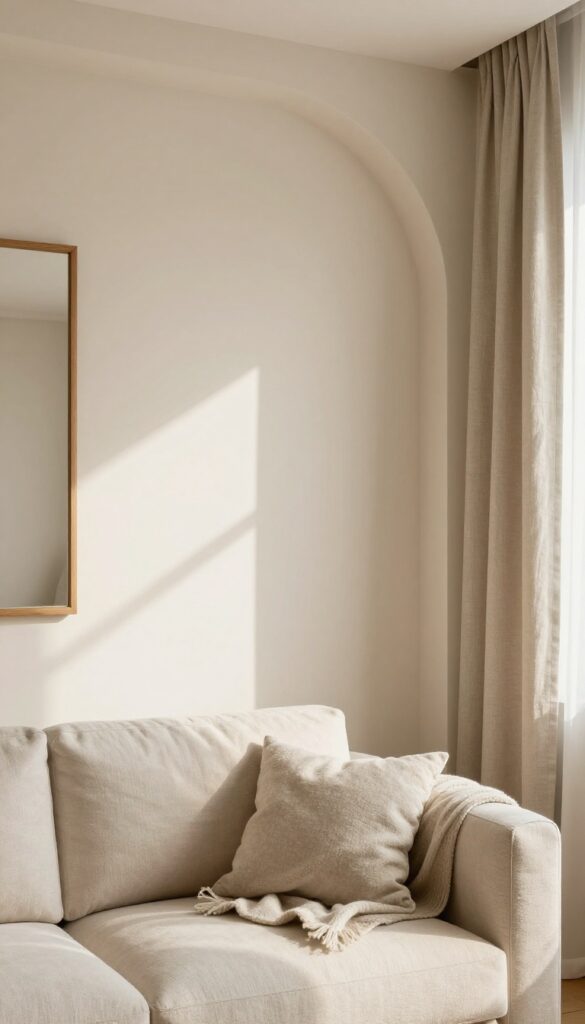
Arches are having a serious moment in interior design, and for good reason. They bring a gentle, organic feel that softens the straight lines of furniture and architecture. Using flexible moulding strips, you can create arched shapes on your walls—either as a single statement arch or a repeating row of arches.
This detail adds architectural interest without overwhelming the room, especially when kept in a muted tone that blends with the wall color. It’s an easy way to introduce a touch of warmth and elegance that feels both timeless and fresh.
Arched moulding is a subtle yet impactful way to bring softness into a living room. Unlike sharp corners or rigid panels, arches echo natural forms and create a calming rhythm. They work beautifully above a sofa, around a mirror, or as a series along a hallway wall.
The key is to keep the color quiet—think off-white, pale beige, or a soft gray—so the shape speaks for itself. This detail pairs especially well with cozy textures like linen curtains, wool throws, and wood furniture, reinforcing that warm, lived-in feel.
Best Colors For A Calm Effect
- To keep the arches feeling soft and integrated, choose a color that’s just a shade or two away from your wall color. A warm white or light taupe works wonders. If you want a bit more contrast, go for a muted clay or dusty blue, but keep it low saturation.
- The goal is to let the shape be the star, not the color.
Layout Tip: Single Vs. Repeated Arches
- A single large arch behind a sofa or console table creates a focal point that anchors the room. For a more playful look, try a row of smaller arches along a feature wall or above a bookshelf. Space them evenly for a rhythmic pattern that draws the eye.
- In a narrow room, a vertical series of arches can make the ceiling feel higher.
Finishing Touch: Add Warmth With Texture
- Once the moulding is up, soften the look even more with layered textures. Hang a woven macrame piece inside an arch, or place a chunky knit throw on a nearby chair. A floor lamp with a fabric shade nearby adds a warm glow that highlights the curves.
- This keeps the space from feeling too formal or precious.
10. Mixed Materials: Wood Trim with Fabric Inserts
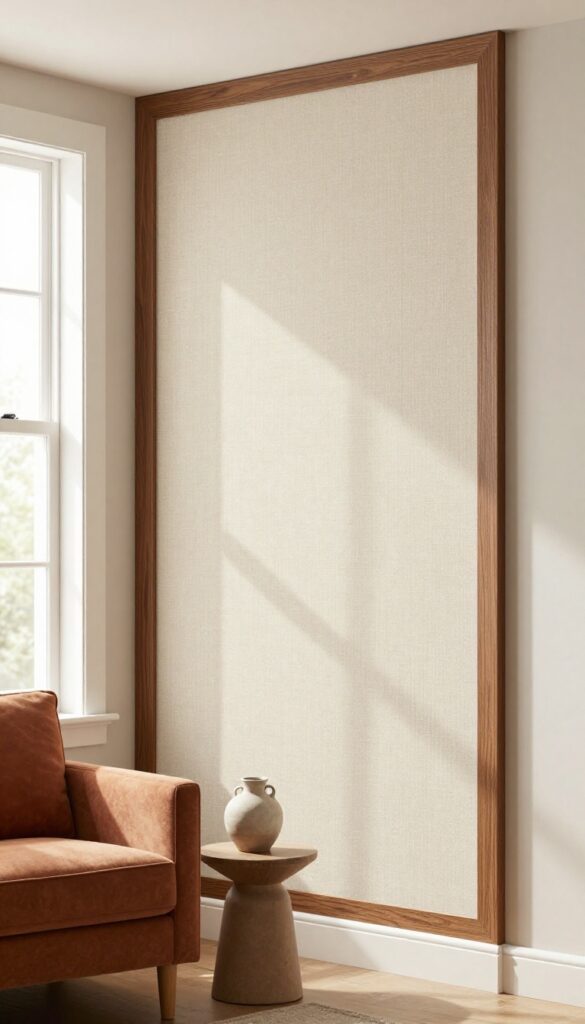
Walls don’t have to be all one thing. By combining wood moulding with soft fabric panels, you get a look that’s both refined and cozy. The contrast between the crisp trim and the plush fabric adds depth and warmth, plus it helps absorb sound—perfect for a busy living room.
Stick with earthy tones like terracotta, oatmeal, or olive to keep the space feeling grounded and welcoming.
This idea works best on a single accent wall or as a wainscoting treatment. The fabric inserts sit flush within the moulding frames, creating a tailored, upholstered effect. It’s a great way to introduce pattern or texture without overwhelming the room.
For a warm and lived-in feel, choose linen or velvet in muted, natural shades.
Best Fabric Choices
- Linen offers a relaxed, breathable texture that softens the room. Velvet adds a touch of luxury and deeper color saturation. For a budget-friendly option, try cotton canvas or even a textured weave.
- Stick to warm neutrals or earthy hues to align with the cozy atmosphere.
Installation Tips
You’ll need to build a frame with wood moulding, then attach fabric-covered panels inside each section. Use a staple gun to secure the fabric to a plywood or MDF backing, then fit the panel into the frame. Leave a small gap between the fabric and the moulding for a clean, professional look.
Finishing Touch
Add a thin strip of trim or a bead of caulk where the fabric meets the wood to hide any raw edges. Paint the moulding the same color as the wall for a seamless look, or go a shade darker for contrast. Either way, the fabric will become the star.
11. Simple Baseboard Upgrade with a Lip Detail
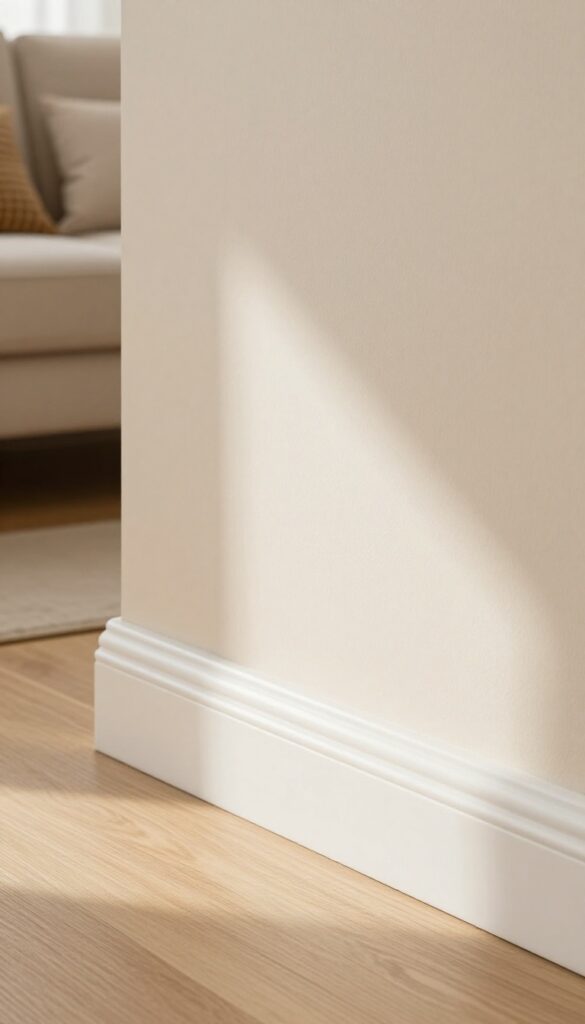
You don't need ornate crown molding to make a statement. Sometimes the quietest details make the biggest impact. Swapping out basic baseboards for taller ones with a subtle lip or step detail adds a touch of architectural interest without overwhelming the room.
It's one of those upgrades that feels intentional and polished, yet still relaxed and approachable.
This idea is all about understated elegance. By choosing baseboards that are slightly taller than standard—say 5 to 7 inches—and painting them the same color as the wall, you create a seamless, continuous look that tricks the eye into seeing higher ceilings. The small lip or step detail catches light softly, adding a gentle shadow line that gives the room depth.
It's a perfect choice if you love a clean, modern aesthetic but want a hint of traditional charm. This upgrade works beautifully in living rooms, hallways, and even bedrooms, especially when paired with simple wall colors like warm white, soft beige, or light greige.
Best Colors
- For a truly seamless effect, paint the baseboards the same color as the walls. This keeps the focus on the room's furnishings and natural light. If you want a bit more contrast, choose a white that's just a shade lighter or darker than the wall color—like a warm off-white against a creamy wall.
- Avoid stark white unless your walls are also bright white, as it can feel too harsh in a cozy setting.
Installation Tip
When installing taller baseboards, make sure the lip detail faces outward and is positioned about an inch from the top. This creates a clean ledge that's easy to dust and adds a subtle architectural line. Use a miter saw for crisp corners, and fill nail holes with wood filler before painting for a flawless finish.
Finishing Touch
Pair these baseboards with simple, unadorned door casings for a cohesive look. Add a soft, textured rug and a few cozy throw pillows to keep the room feeling warm and lived-in. The baseboard detail will quietly anchor the space without competing for attention.
FAQ
Is wall moulding expensive to install?
It can vary. DIY-friendly options like stick-on moulding or simple batten strips are budget-friendly. Hiring a pro for custom work costs more, but even small upgrades like taller baseboards make a big impact without breaking the bank.
Can I add moulding to a rental apartment?
Yes, look for removable or peel-and-stick moulding options. They go on easily and come off without damaging walls. Just make sure to clean the surface well before applying.
What color should I paint my moulding?
For a warm, cozy look, choose off-whites, soft beiges, or muted earth tones. Painting moulding the same color as the wall creates a subtle texture, while a slightly darker shade adds contrast.
Does moulding work in small living rooms?
Absolutely. Vertical panels or simple picture frame moulding can make a small room feel taller and more structured. Just keep the design simple and use light colors to avoid overwhelming the space.
How do I clean wall moulding?
Dust regularly with a soft cloth or duster. For deeper cleaning, use a slightly damp cloth with mild soap. Avoid harsh chemicals that can damage the paint or finish.
Conclusion
Wall moulding doesn't have to be reserved for formal spaces. With the right style and finish, it can make your living room feel more put-together while still being a place where you actually want to relax. Whether you go for a full wall treatment or a simple trim upgrade, these ideas are meant to feel achievable and personal.
The best part is that moulding ages beautifully. As your decor evolves, the trim will continue to anchor the room with quiet elegance.