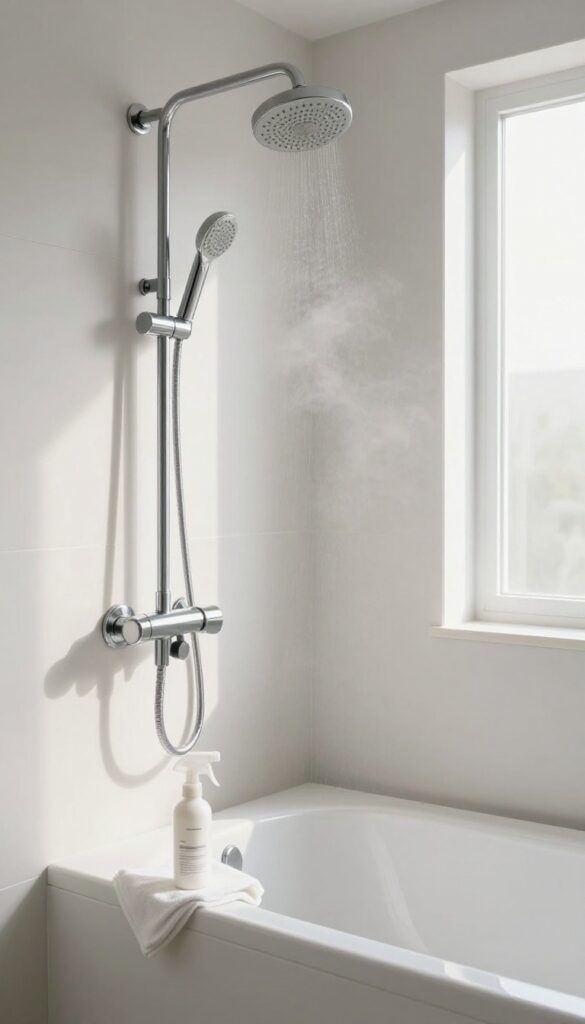
How to Clean Your Shower Head in 10 Simple Home Steps
A clogged shower head doesn't just look unsightly—it can turn your morning rinse into a weak, uneven drizzle. Hard water minerals and sediment build up over time, blocking those tiny nozzles and reducing water pressure. The good news?
You don't need harsh chemicals or a plumber to fix it. Most shower heads can be restored with items you already have in your kitchen, like white vinegar and baking soda. A little regular maintenance goes a long way in keeping the water flowing strong and your bathroom feeling clean.
In this guide, we'll walk through 10 practical steps to deep clean your shower head. Each method is simple, effective, and safe for common shower head materials.
1. Remove and Soak in White Vinegar
White vinegar is a powerhouse when it comes to breaking down hard water deposits. Its mild acidity dissolves calcium and lime scale without damaging metal or plastic. This method works for most detachable shower heads, whether handheld or overhead.
All you need is a plastic bag, some vinegar, and a rubber band or twist tie.
Start by unscrewing the shower head from the arm. If it's stuck, wrap a cloth around the connection to protect the finish and use pliers to gently loosen it. For handheld models, simply disconnect the hose.
Once removed, fill a plastic bag with enough white vinegar to fully submerge the head. Secure the bag around the shower head with a rubber band or twist tie so it stays immersed. Let it soak for at least 30 minutes—longer for heavy buildup, up to overnight.
After soaking, remove the bag, rinse the shower head thoroughly with warm water, and reattach it. Run the water for a minute to flush out any loosened debris.
Why Vinegar Works Best
Vinegar's acetic acid reacts with alkaline mineral deposits, turning them into soluble compounds that rinse away easily. It's cheap, non-toxic, and safe for chrome, brass, stainless steel, and plastic finishes. Unlike harsh chemical descalers, vinegar won't harm rubber gaskets or O-rings inside the shower head.
Soaking Tips For Stubborn Buildup
If your shower head hasn't been cleaned in months, extend the soak to 2–3 hours or even overnight. For extra stubborn deposits, warm the vinegar slightly (not boiling) before soaking—heat speeds up the reaction. You can also add a tablespoon of baking soda to the vinegar for gentle fizzing action, but be prepared for more bubbles.
What If The Shower Head Doesn't Detach?
For fixed or hard-to-remove heads, fill a plastic bag with vinegar and secure it over the head so the nozzles are submerged. Use duct tape or a rubber band to hold it in place. Let it soak for an hour, then remove the bag and run hot water through the head for a few minutes to flush out dissolved minerals.
2. Scrub Nozzles with an Old Toothbrush
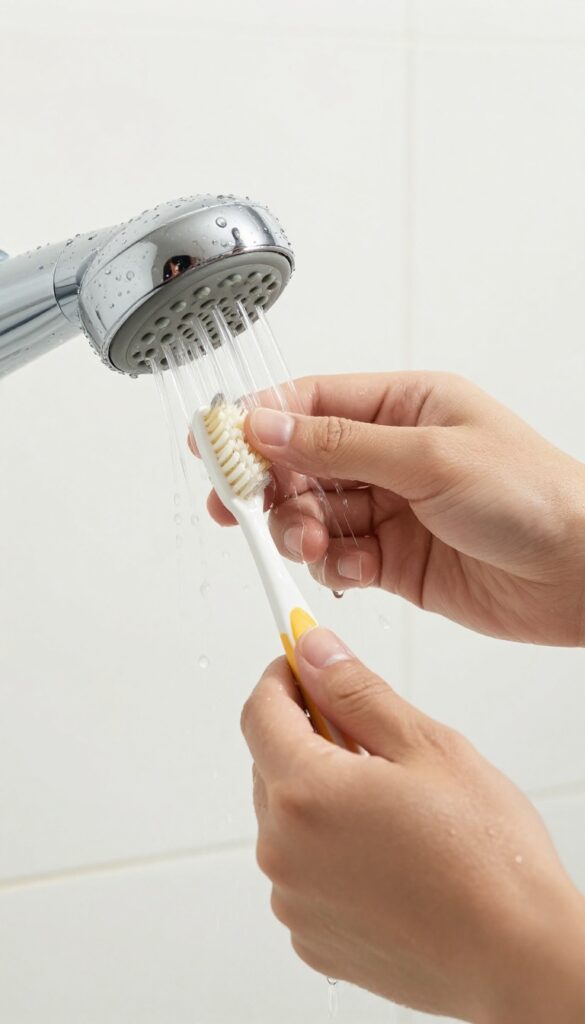
Once your shower head has soaked long enough, it's time for some hands-on work. The vinegar soak loosens most mineral deposits, but a bit of gentle scrubbing ensures every nozzle is completely clear. Grab an old toothbrush—it's the perfect tool for this job because its bristles are soft enough to avoid scratching metal or plastic, yet firm enough to dislodge stubborn grit.
After soaking, remove the shower head from the bag or bucket and rinse it under warm water. Take your toothbrush and gently scrub each nozzle in a circular motion. Pay extra attention to any openings that still look clogged.
If you notice stubborn spots, dip the toothbrush in a bit of white vinegar or a paste of baking soda and water for extra cleaning power. Rinse thoroughly when done.
Why A Toothbrush Works Best
A toothbrush's small head and soft bristles let you reach each nozzle individually without damaging the finish. Unlike abrasive scrubbers, it won't leave scratches on chrome, brass, or plastic surfaces. Plus, it's easy to maneuver into tight spaces around the shower head's face.
What To Do With Stubborn Clogs
If a nozzle remains blocked after scrubbing, use a toothpick or a pin to gently poke through the opening. Be careful not to push debris deeper inside. Follow up with another quick scrub and rinse.
For heavy buildup, repeat the vinegar soak for another 30 minutes before scrubbing again.
3. Flush with Warm Water
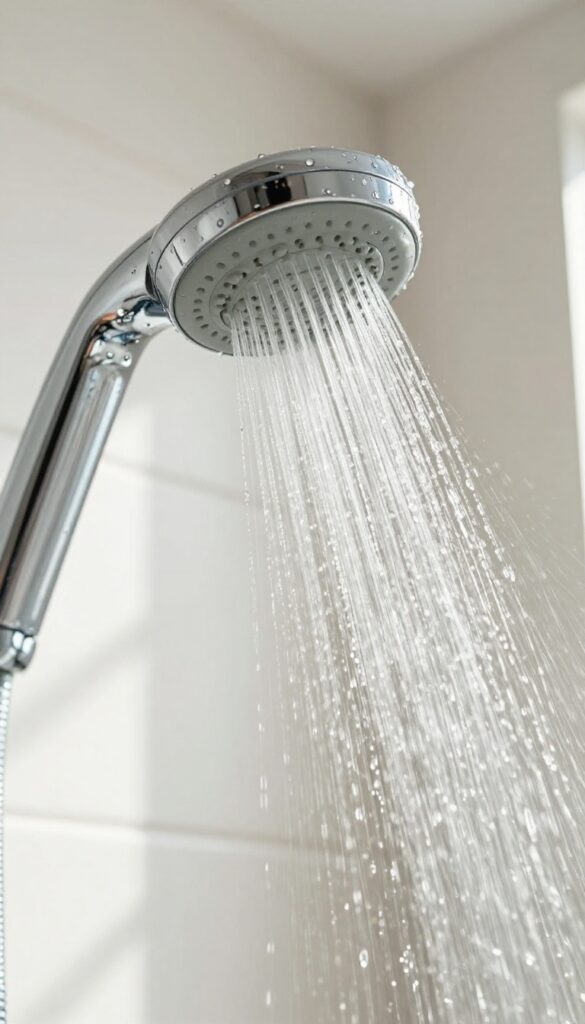
After the vinegar soak, your shower head needs a good rinse to wash away all that loosened gunk and any lingering vinegar smell. Warm water works best because it helps clear out debris without shocking the metal or plastic parts. This step is quick but essential—skipping it could leave residue that dulls the finish or clogs the nozzles again.
Once you've scrubbed the shower head and removed any stubborn deposits, it's time to flush the entire unit with warm water. This ensures every internal passage is clear and the vinegar taste is gone before your next shower.
Run Warm Water Through The Head
Hold the shower head under a stream of warm—not hot—running water. Let it flow through the face and the attachment end for at least a minute. Rotate the head to make sure water reaches all angles.
If you have a handheld model, simply turn it on and let warm water run through it for a minute or two.
Check For Remaining Debris
While rinsing, look for any particles still clinging to the nozzles. Use your fingers or a soft brush to gently dislodge them. If you see a steady, even stream of water from all nozzles, you're in good shape.
If some are still blocked, repeat the vinegar soak or use a pin to clear them before the final rinse.
4. Use Baking Soda Paste for Stubborn Spots

Sometimes a vinegar soak alone isn't enough to tackle those crusty white deposits that refuse to budge. That's where baking soda steps in. Its gentle abrasiveness makes it perfect for scrubbing away tough mineral buildup without scratching the finish.
This method works especially well for shower heads with intricate designs or hard-to-reach nozzles.
Make The Paste
In a small bowl, mix three parts baking soda with one part water. Stir until it forms a thick, spreadable paste. Adjust the ratio if needed—you want it to cling to vertical surfaces without dripping.
For extra cleaning power, add a teaspoon of white vinegar to the mix; the fizzing action helps lift grime.
Apply And Let It Sit
Using an old toothbrush or your fingers, apply the paste generously to the stubborn spots on the shower head. Focus on the nozzles where buildup is heaviest. Let the paste sit for 15 minutes.
During this time, the baking soda works to break down the minerals, making them easier to remove.
Scrub And Rinse
After the wait, scrub the shower head with a soft-bristled brush or toothbrush. Pay extra attention to each nozzle, using a circular motion to dislodge any remaining deposits. Rinse thoroughly with warm water, either under a faucet or by running the shower.
Wipe dry with a clean cloth to prevent water spots.
5. Clean the Shower Head Arm Threads
The threaded connection where your shower head meets the pipe is easy to overlook, but it's a prime spot for rust, grime, and mineral buildup. If that seal isn't clean and tight, you might get leaks or a wobbly shower head. A quick wipe-down during your deep clean keeps everything secure and extends the life of your fixture.
Before reattaching your shower head, take a moment to inspect and clean the arm threads. This simple step prevents future leaks and ensures a snug fit. Use a cloth or small brush to remove any visible debris, then apply a light coat of plumber's grease or silicone lubricant to protect against corrosion and make future removal easier.
What You'll Need
Grab a clean microfiber cloth, an old toothbrush or small nylon brush, white vinegar or a mild cleaner, and optionally some plumber's grease or silicone lubricant. These are all you need to get the threads spotless.
Step-by-step Cleaning
First, remove the shower head completely. Wrap the cloth around the threaded pipe and wipe away any loose dirt. For stubborn mineral deposits, dip the toothbrush in vinegar and scrub the threads gently.
Rinse with water and dry thoroughly. If you see rust spots, use a rust remover suitable for your pipe material.
Why Lubrication Matters
Applying a thin layer of plumber's grease or silicone lubricant to the threads before reattaching the shower head helps prevent seizing and makes future removal a breeze. It also creates a better seal, reducing the chance of drips. Just a small dab is enough—don't overdo it.
6. Soak in Lemon Juice for Extra Freshness
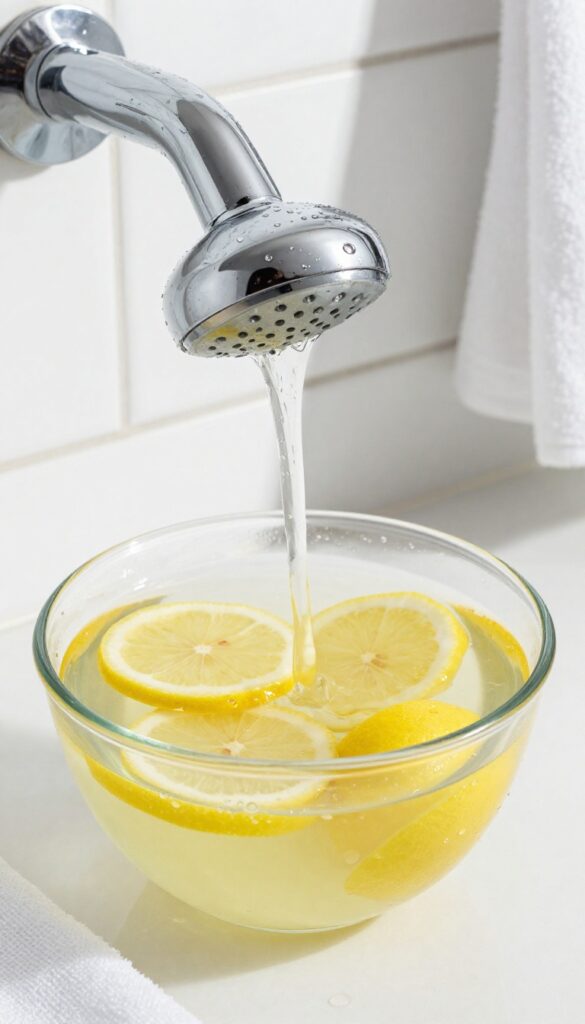
If the smell of vinegar makes you wrinkle your nose, lemon juice is a fantastic alternative. It's just as effective at cutting through mineral deposits and leaves behind a bright, clean scent that lingers in your bathroom. Plus, the citric acid in lemons works wonders on stubborn limescale without any harsh fumes.
Lemon juice is a natural acid that dissolves calcium and other hard water minerals, making it perfect for shower head maintenance. It's gentle enough for most finishes, including chrome and brushed nickel, and leaves no chemical residue. For best results, use fresh-squeezed or bottled 100% lemon juice—avoid the sweetened stuff meant for cocktails.
Why Lemon Juice Works So Well
Citric acid is a chelating agent, meaning it binds to minerals like calcium and magnesium, breaking them down so they rinse away easily. Unlike vinegar, lemon juice adds a pleasant fragrance, so you won't have to air out your bathroom afterward. It's also safe for rubber gaskets and plastic parts, as long as you don't soak them for too long.
How To Do The Lemon Soak
Start by removing the shower head and placing it in a plastic bag or container. Pour enough lemon juice to fully submerge the head, then seal the bag or cover the container. Let it soak for at least 30 minutes—up to an hour for heavy buildup.
For an extra boost, warm the lemon juice slightly (not boiling) to speed up the reaction. After soaking, scrub the nozzles with an old toothbrush and rinse thoroughly with water.
When To Use Lemon Instead Of Vinegar
Lemon juice is ideal if you have a sensitive nose or prefer a natural citrus scent. It's also a good choice for shower heads with brass or copper accents, as vinegar can sometimes dull these metals. Stick with lemon for routine monthly cleanings, and save the vinegar for deep descaling every few months.
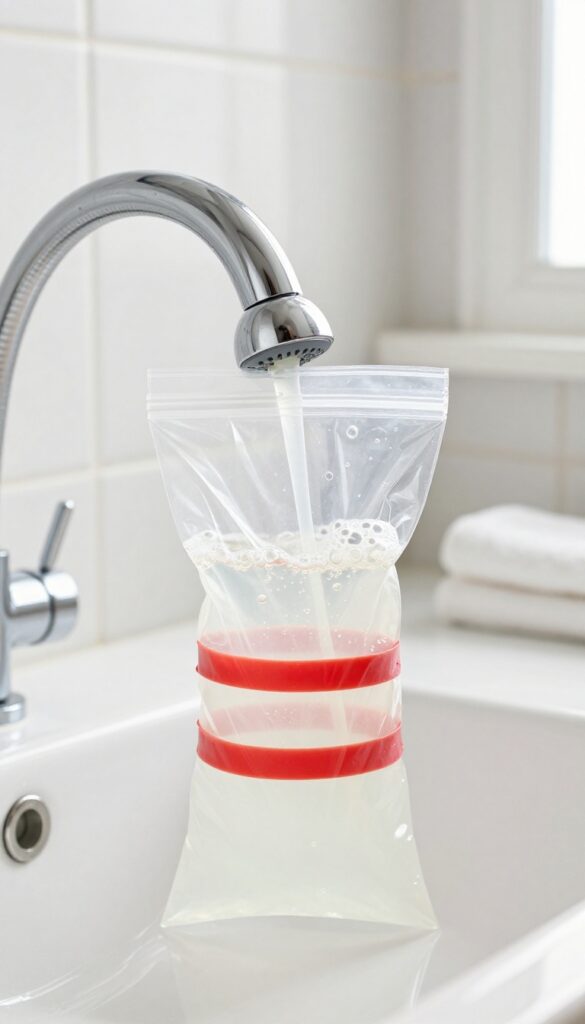
7. Try a Plastic Bag Soak for Fixed Heads
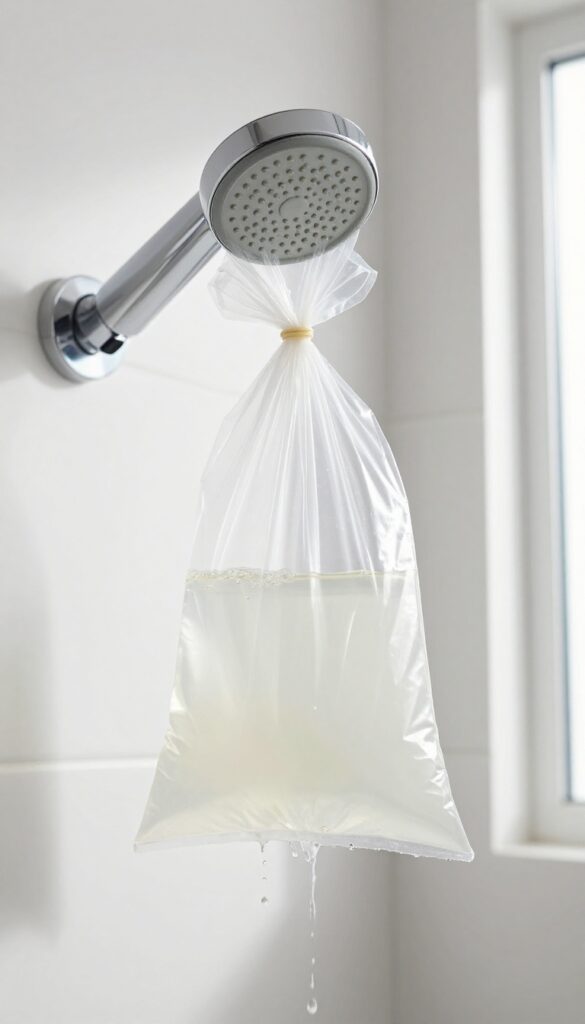
Not all shower heads are detachable, but that doesn't mean you can't give them a deep soak. If your shower head is fixed in place, a simple plastic bag trick works wonders. All you need is a sturdy bag, some vinegar, and a rubber band or zip tie to hold it in place.
This method lets the vinegar work its magic on the mineral deposits without any disassembly.
This is one of the easiest ways to clean a fixed shower head because it requires no tools and very little effort. The vinegar breaks down calcium and lime scale while you sleep, so by morning your shower head is ready to rinse clean. Just be sure to use a bag that won't leak and check that the shower head is fully submerged in the vinegar for the best results.
What You'll Need
Gather a large resealable plastic bag (like a gallon freezer bag), white vinegar, a rubber band or strong zip tie, and a towel to catch drips. If you don't have vinegar, lemon juice works as a substitute. For extra stubborn buildup, you can add a tablespoon of baking soda to the vinegar just before sealing the bag.
Step-by-step Soak
Fill the bag about halfway with vinegar. Carefully lift the bag over the shower head so the nozzles are submerged. Secure the bag tightly around the neck of the shower head with a rubber band or zip tie to prevent leaks.
Let it soak for at least 4 hours, but overnight is ideal. If your shower head is large, you may need to use two bags or a larger trash bag.
After The Soak
Remove the bag carefully to avoid spilling leftover vinegar. Run the shower for a few minutes with hot water to flush out any loosened debris and residual vinegar. Wipe the shower head with a damp cloth to remove any remaining gunk.
If some deposits remain, repeat the soak or follow up with a toothbrush scrub.
8. Use a Pin or Needle to Clear Clogged Holes
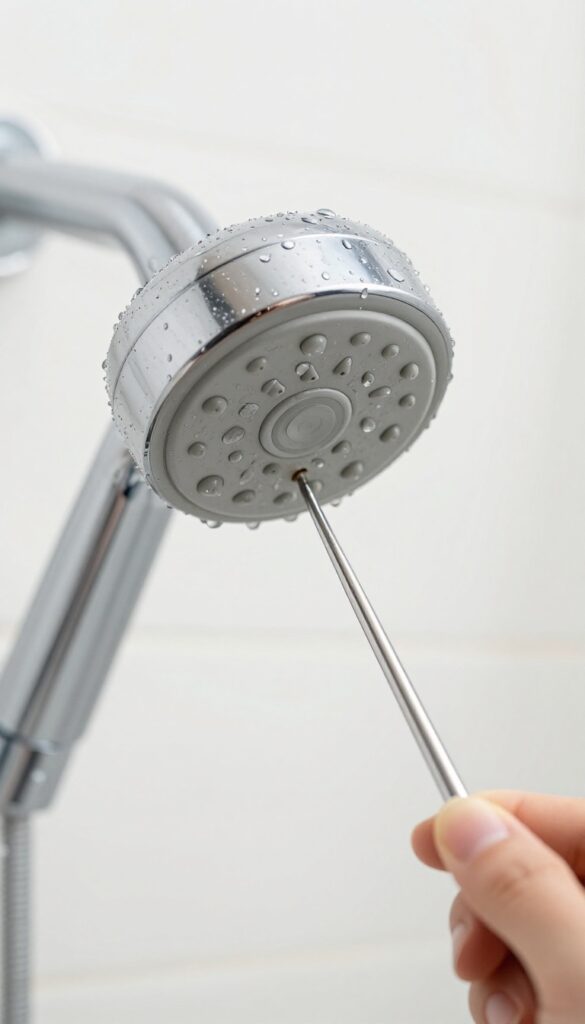
Even after a good soak, some nozzles might still be blocked by stubborn mineral deposits. That's when you need to get hands-on. A simple pin or needle can work wonders on those individual clogged holes, restoring full water flow without any harsh chemicals.
For the most stubborn blockages, a manual approach is your best bet. Grab a sewing pin, safety pin, or a fine needle—anything thin enough to fit into the nozzle openings. Gently poke each clogged hole to break up the mineral crust.
Be careful not to scratch the finish; a gentle twisting motion can help dislodge deposits without damaging the metal or plastic. After you've cleared the holes, run the water for a few seconds to flush out the debris. This step is especially satisfying when you see a strong, even spray return to every nozzle.
Why Pins Work Better Than Brushes
Soft brushes can't always reach deep into tiny nozzle openings, and stiff bristles might scratch the surface. A pin or needle is precise and fits into even the smallest holes, allowing you to target the blockage directly. Plus, it's a zero-cost tool you already have at home.
Avoid Damaging The Nozzles
Use a light touch. If you meet resistance, don't force the pin—soak the shower head again or try a descaling solution first. For rubber nozzles, you can gently rub them with a soft toothbrush instead of poking, which can tear the rubber.
When To Combine With A Vinegar Soak
For best results, do the pin-clearing step after a vinegar soak. The soak softens the mineral buildup, making it easier to break apart. If you try poking before soaking, you might just compact the deposits deeper into the nozzle.
9. Wipe Down with a Microfiber Cloth
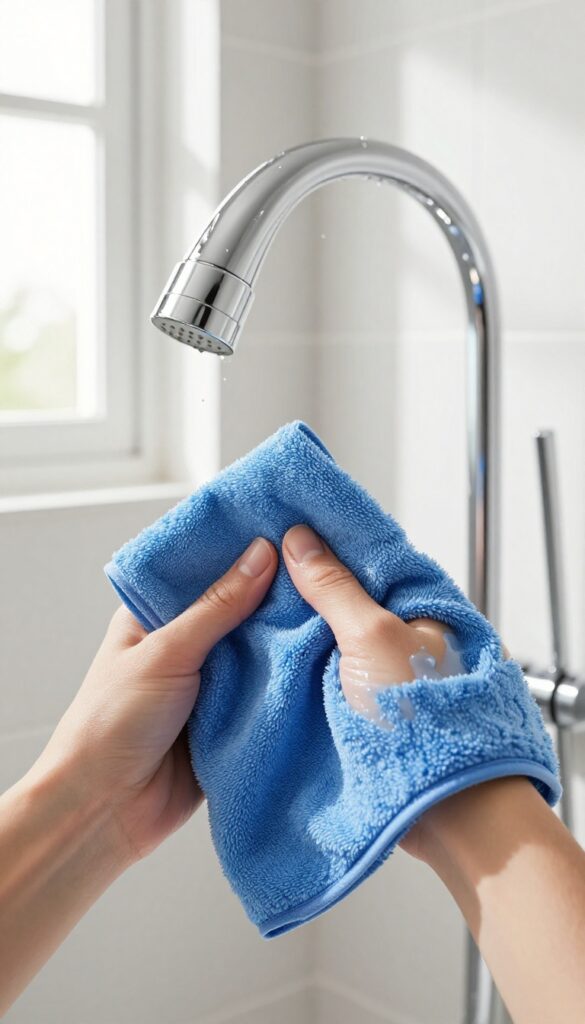
Once you've soaked and scrubbed away the grime, a simple polish makes all the difference. A dry microfiber cloth lifts any remaining residue and buffs the surface to a streak-free shine. This final step also helps prevent new water spots from forming, so your shower head stays cleaner longer.
Why Microfiber Works Best
Microfiber cloths have ultra-fine fibers that trap dust, mineral dust, and moisture without scratching. Unlike paper towels or cotton rags, they don't leave lint behind. They also absorb oils and residues that can dull the finish, giving you a mirror-like gleam.
How To Polish Properly
Start with a completely dry shower head. Use a clean, dry microfiber cloth and wipe in one direction—from top to bottom or left to right—to avoid smearing. For chrome or stainless steel, a gentle circular motion can enhance the shine.
Don't forget the neck and any hard-to-reach areas.
Maintaining The Shine Between Cleanings
Keep a microfiber cloth in your bathroom and give the shower head a quick wipe after each use. This takes only a few seconds and dramatically reduces mineral buildup. Over time, you'll notice fewer spots and less frequent deep cleaning needed.
10. Establish a Monthly Maintenance Routine
You've put in the work to get your shower head sparkling clean. Now the trick is keeping it that way without having to repeat the whole deep-cleaning process every few weeks. A simple maintenance routine prevents mineral buildup from getting out of hand and keeps water pressure strong year-round.
The best part? It only takes a few minutes each week and one longer soak per month.
Weekly Wipe-down
Once a week, take a few seconds to wipe down the shower head with a damp cloth or sponge. If you notice any water spots or soap scum, a quick spray of daily shower cleaner or a vinegar-water solution (1: 1 ratio) does the trick. This simple habit prevents minerals from hardening on the surface and clogging the nozzles.
Monthly Vinegar Soak
Once a month, give your shower head a vinegar soak—even if it doesn't look dirty. Fill a plastic bag with white vinegar, secure it around the head with a rubber band or zip tie, and let it sit for 30 minutes to an hour. This dissolves any invisible buildup before it becomes a problem.
For chrome or nickel fixtures, rinse thoroughly afterward to avoid any vinegar damage.
Check For Leaks And Tighten Connections
During your monthly soak, take a moment to inspect the connection between the shower head and the pipe. If you see any drips, tighten the fitting by hand or with a wrench (using a cloth to protect the finish). A small leak can waste water and lead to mineral deposits around the threads.
FAQ
How often should I clean my shower head?
Aim for a deep clean every 1-3 months, depending on your water hardness. Wipe it down weekly to reduce buildup.
Can I use bleach instead of vinegar?
Bleach is not recommended as it can damage finishes and is harsh on rubber nozzles. Vinegar is safer and effective.
Will vinegar damage my shower head finish?
Diluted white vinegar is safe for most finishes, but avoid prolonged soaking on brass or nickel. Rinse thoroughly after.
What if my shower head is still clogged after cleaning?
Try a longer soak or use a descaling product. If the problem persists, mineral deposits may have permanently damaged the head.
Can I clean a handheld shower head the same way?
Yes, handheld shower heads can be detached and soaked in vinegar just like fixed ones. Follow the same steps.
Conclusion
Now your shower head is flowing like new, free of mineral deposits and grime. Making this a quick monthly habit keeps water pressure strong and prevents buildup from returning.
Your showers will feel more refreshing, and you'll extend the life of your fixture. Stick with it, and you'll enjoy a cleaner, more efficient bathroom with minimal effort.