23 Home Cleaning Hacks for Easier Busy Week Chores
Busy weeks don't leave much time for deep cleaning, but a few clever hacks can keep your home looking great with minimal effort. These 23 tips target the dirtiest spots and most tedious tasks, turning chores into quick wins.
From microwave steam cleaning to sock-powered blind dusting, each trick is designed to save you time and frustration. Ready to make your cleaning routine faster and more effective?
Let's dive in.
1. Use a Lint Roller for Lampshades and Fabric Shades
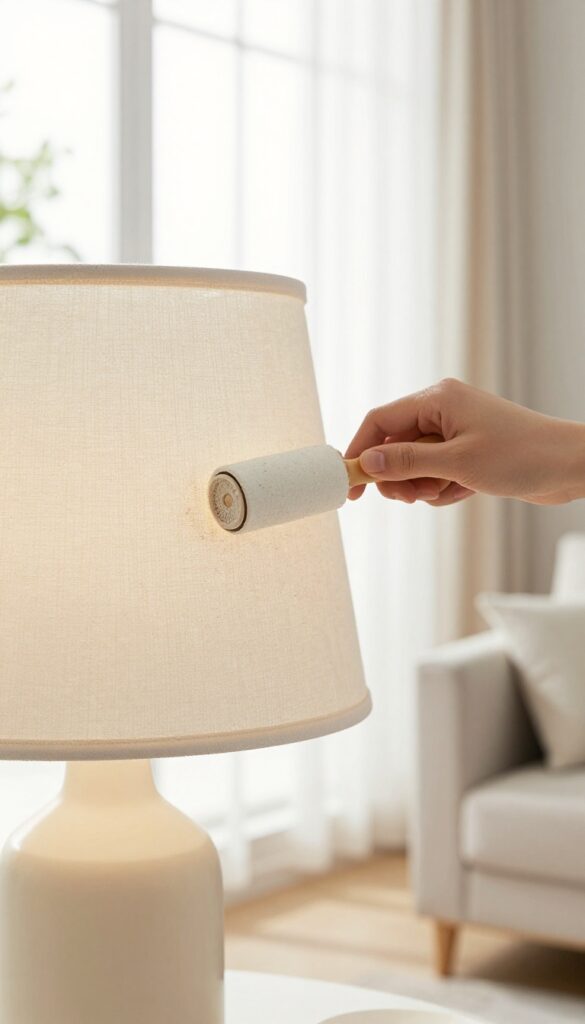
Lampshades and fabric shades are dust magnets, but washing or wiping them can be a hassle. A lint roller offers a quick, no-muss solution that takes just seconds. Simply roll it over the surface, and the sticky sheets grab dust, pet hair, and lint without damaging the fabric.
No need to remove the shade or get it wet.
This trick works on most fabric, paper, and even some plastic lampshades. It's especially handy for pleated or textured shades where dust hides in crevices. Keep a lint roller in your cleaning caddy or near your lamps for a quick weekly touch-up.
Why Lint Rollers Work So Well
Lint rollers are designed to lift fine particles from fabric without pushing them deeper. The adhesive sheets are strong enough to grab dust but gentle on delicate materials. Unlike feather dusters, which scatter dust into the air, the roller traps it, making your cleaning more effective and less messy.
Best Types Of Lampshades For This Hack
This method works best on fabric shades, including linen, cotton, and polyester blends. It's also safe for paper shades and some textured plastic. Avoid using it on very delicate silk or antique shades, as the adhesive might pull at loose fibers.
Always test a small hidden area first.
Pro Tips For Maximum Efficiency
Use a fresh sheet for each shade to avoid redepositing dirt. For heavily soiled shades, start with a dry microfiber cloth to remove loose dust, then finish with the roller. You can also use the roller on lampshade trims, pull chains, and even the bulb (when cool and off) to keep everything dust-free.
2. Clean Your Microwave with a Bowl of Lemon Water
Microwaves get messy fast, especially during busy weeks when reheating leftovers and quick meals are the norm. But scrubbing dried-on splatters is no fun. This hack uses steam power to loosen grime in minutes, so you can wipe it all away with zero elbow grease.
Fill a microwave-safe bowl with water, add a few lemon slices, and microwave on high for 3 minutes. Let it sit for 2 more minutes without opening the door. The steam softens stuck-on food, and the lemon leaves a fresh scent.
Then just wipe the interior with a damp cloth or sponge. For stubborn spots, dip your cloth in the lemon water for extra cleaning power.
Why Lemon Water Works So Well
Steam is the real hero here. It condenses on the walls and ceiling, rehydrating dried food particles so they slide off easily. The lemon adds a natural degreasing boost and neutralizes odors, leaving your microwave smelling clean without harsh chemicals.
Tips For Best Results
Use a bowl that's at least 2 cups capacity to generate enough steam. If you don't have lemons, substitute with vinegar or a few drops of essential oil. For extra stubborn buildup, add a tablespoon of baking soda to the water.
Always use a pot holder when removing the bowl—it'll be hot.
When To Use This Hack
This is perfect for a quick midweek refresh or after cooking something that splattered a lot. Do it once a week to prevent buildup. It's also a great way to freshen up the microwave before guests come over.
3. Dust Blinds with a Pair of Socks
Blinds collect dust faster than almost any other surface in your home. Running a cloth over each slat one by one is tedious, but there's a faster way that uses something you already have in your drawer. Grab two clean socks and turn a boring chore into a quick win.
Why Socks Work So Well
The soft cotton or microfiber material grabs dust instead of pushing it around. Using both hands at once lets you clean two slats simultaneously, cutting the time in half. Plus, you can easily wash the socks afterward and reuse them.
The Right Way To Do It
Slide a sock over each hand and spray them lightly with dusting spray or a mix of water and vinegar. Start at the top of the blinds and run your fingers along each slat from one end to the other. Work your way down, and you'll be done in minutes.
Pro Tips For Best Results
Use old socks with no holes for maximum coverage. If your blinds are very dirty, rinse the socks and re-spray as needed. For horizontal blinds, pinch each slat between your thumb and fingers for a thorough clean on both sides at once.
4. Use a Squeegee to Remove Pet Hair from Carpets
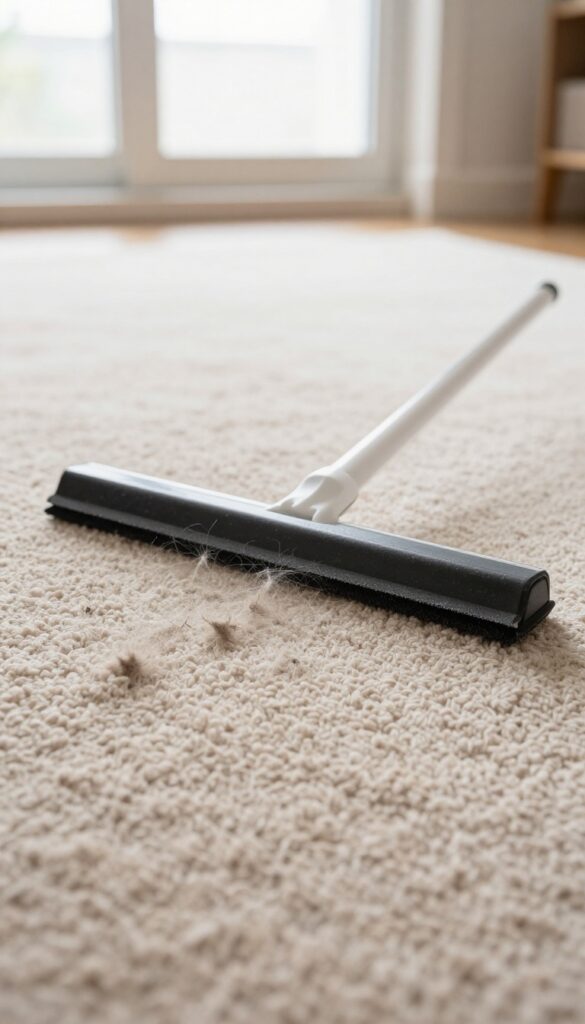
Pet hair on carpets can feel like a losing battle, especially when you're short on time. Vacuuming alone often misses the deeply embedded strands, leaving you with a less-than-fresh look. A simple rubber squeegee can change that, turning a tedious task into a quick, satisfying win.
The rubber edge of a squeegee creates static electricity that lifts pet hair from carpet fibers. Unlike a vacuum, it grabs hair that's woven deep into the pile. You'll see clumps form almost instantly, making collection a breeze.
Why A Squeegee Works Better
Squeegees aren't just for windows. The rubber blade creates friction that pulls hair loose and bunches it together. This method is especially effective on low-pile carpets and area rugs where hair tends to cling.
How To Do It Right
Start at one end of the carpet and drag the squeegee toward you in long, even strokes. Work in sections, overlapping each pass. You'll see hair gather into neat piles.
Use your hand or a dustpan to collect the clumps, then vacuum up any remaining debris.
Pro Tips For Best Results
Dampen the squeegee slightly for extra static. If you have multiple pets, do this every few days to keep hair from building up. For stubborn spots, go over the area twice in opposite directions.
5. Keep a Trash Bag in the Bottom of Each Bin
Ever walk into the kitchen with a full trash bag only to realize you're out of liners? That small frustration can derail your whole cleaning flow. The fix is almost too simple: stash a spare bag at the bottom of every bin before you put a new one in.
This trick turns trash duty into a seamless, no-think task. When you lift out the full bag, the next liner is already waiting at the bottom. No hunting for the box, no wrestling with a roll that's stuck together.
Just grab, open, and drop in place.
How To Set It Up
After you've taken out the full bag and wiped down the bin, place one fresh liner flat at the bottom. Then install the new bag as usual. That's it.
For taller bins, you can fold the spare bag neatly so it doesn't bunch up.
Where It Works Best
This hack is perfect for kitchen trash cans, bathroom bins, and office wastebaskets. Anywhere you change bags regularly, the spare liner saves you a trip to the pantry. It's also great for outdoor bins if you keep them in a garage or shed.
Pro Tip For Bulk Buyers
If you buy trash bags in bulk, keep a small stash of liners inside the bottom of each bin. Rotate them when you restock so you never run out. For scented bags, the spare liner can also help keep the bin smelling fresh between changes.
6. Clean Shower Doors with a Rain-X Treatment
Glass shower doors look great when they're clean, but keeping them that way is a constant battle against hard water spots and soap scum. A simple treatment with Rain-X, the same product you use on car windshields, can change that. It creates a hydrophobic barrier that makes water bead up and roll off, taking dirt and residue with it.
After application, you'll spend way less time scrubbing and wiping down the glass.
Rain-X is designed to repel water, and it works just as well on shower doors as it does on car windows. The treatment fills microscopic pores in the glass, creating a slick surface that water can't cling to. Soap scum and mineral deposits have a harder time bonding, so they rinse away more easily.
A single application can last for weeks, depending on how often you shower. This hack is especially useful for busy households where daily cleaning isn't realistic.
How To Apply Rain-x To Shower Doors
Start with a completely clean, dry glass surface. Clean the door thoroughly with a glass cleaner or vinegar solution to remove any existing grime or soap scum. Apply Rain-X to a soft, lint-free cloth—not directly onto the glass—and rub it in using circular motions.
Let it haze over for a minute or two, then buff it off with a clean dry cloth until the glass is clear. For best results, avoid getting Rain-X on metal or plastic parts, as it can leave a residue.
Maintenance And Reapplication Tips
After treatment, you can simply rinse the door with water after each shower and use a squeegee to speed up drying. This keeps the glass spot-free with minimal effort. Reapply Rain-X every two to four weeks, or when you notice water starting to cling again.
If you have hard water, you might need to reapply more frequently. Always make sure the glass is clean before reapplying, or you'll seal in existing grime.
7. Use Dryer Sheets to Dust Baseboards
Baseboards are one of those surfaces you don't notice until they're coated in dust. But getting down on hands and knees with a rag feels like a workout you didn't sign up for. Dryer sheets offer a clever shortcut: they attract dust like a magnet and reduce static cling, so dust stays on the sheet instead of floating back onto the baseboard.
Grab a used dryer sheet from the laundry—it still has plenty of dust-attracting power. Run it along the top edge and face of your baseboards. The sheet picks up dust quickly, and the fabric softener leaves a thin residue that repels future dust for a few days.
Plus, your room will smell fresh without any extra effort.
Why Dryer Sheets Work
Dryer sheets are coated with fabric softener, which contains cationic surfactants that reduce static electricity. Dust particles are often held in place by static charge, so the sheet neutralizes that charge and lifts dust away. The softener also leaves a faint waxy layer that makes surfaces less sticky for dust.
Best Technique For Spotless Results
For best results, use a slightly damp dryer sheet—it grabs dust even better. Start at one end of the room and work your way around, flipping the sheet to a clean side as needed. Don't press too hard; a light glide is enough.
For stubborn grime, add a tiny bit of water to the sheet.
When To Avoid This Hack
Avoid using dryer sheets on painted surfaces that are chipping or peeling, as the chemicals might lift more paint. Also, skip this trick on unfinished wood or surfaces that could be stained by the softener. Stick to sealed or painted baseboards for best results.
8. Make a DIY All-Purpose Cleaner with Vinegar and Dish Soap
Store-bought cleaners can be expensive and loaded with chemicals you don't really need. A simple mix of vinegar, water, and dish soap handles most everyday messes without the harsh stuff. This homemade solution cuts through grease, kills bacteria, and leaves surfaces streak-free.
This cleaner works on countertops, sinks, stovetops, and even bathroom surfaces. It's safe for most sealed surfaces but avoid using it on marble or granite, as vinegar can etch them. Always test a small spot first.
What You'll Need
Grab a spray bottle, white vinegar, water, and a few drops of dish soap. The dish soap helps break down grease, while the vinegar disinfects and deodorizes. Use a 1: 1 ratio of vinegar to water for general cleaning.
How To Mix And Use
Fill the bottle halfway with vinegar, then top off with water. Add about 5 drops of dish soap—too much will create excess suds. Shake gently, then spray on surfaces and wipe with a microfiber cloth.
For tough grime, let it sit for a minute before wiping.
Storage And Shelf Life
Store the mixture in a cool, dark place. It stays effective for about a month. If you add essential oils for fragrance, shake well before each use.
Label the bottle to avoid confusion with other sprays.
9. Clean Your Garbage Disposal with Ice Cubes and Salt
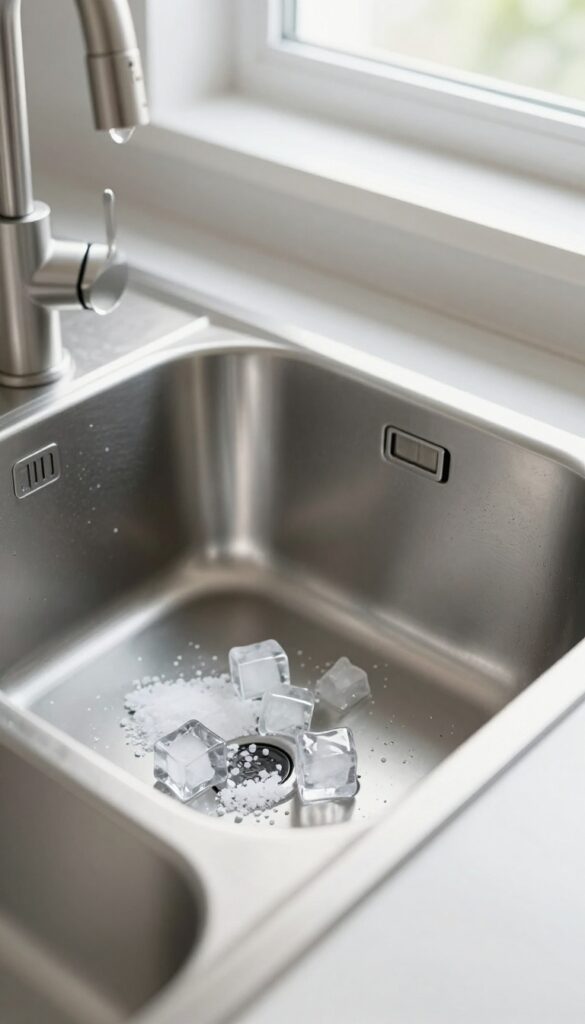
Your garbage disposal works hard, but it can get smelly and dull over time. Instead of harsh chemicals, try this simple trick using ice cubes and salt. It’s quick, effective, and you probably already have the ingredients in your kitchen.
Why Ice And Salt Work
Ice cubes help dislodge stuck-on food particles and grease buildup. The salt acts as an abrasive scrubber, cleaning the blades and inner walls without damaging them. When you run cold water, the ice also sharpens the blades by knocking off dull edges.
How To Do It
Drop a handful of ice cubes into the disposal, then add a tablespoon of coarse salt (like kosher or rock salt). Turn on the cold water and run the disposal for about 30 seconds. The grinding noise is normal—it means the ice and salt are doing their job.
Extra Tips For Freshness
For extra deodorizing, toss in a few lemon or orange peels after the ice treatment. Avoid using bleach or chemical drain cleaners, as they can damage the disposal. Do this once a week to keep your disposal running smoothly and smelling fresh.
10. Use a Pillowcase to Clean Ceiling Fan Blades
Ceiling fans collect dust fast, and cleaning them usually means dust falling everywhere. A simple pillowcase trick changes that. Slip an old pillowcase over each blade, then slide it off—dust stays trapped inside the fabric instead of raining down on your furniture or floor.
It's quick, mess-free, and uses something you already have.
This hack works because the pillowcase acts like a dust trap. The fabric grabs the dust as you pull it off, so nothing escapes. No need for a ladder with a wet rag or a duster that just redistributes dirt.
Just one pillowcase can handle all the blades on a standard fan. If the blades are very dirty, spray a little all-purpose cleaner inside the pillowcase first for extra cleaning power.
Why It Works So Well
The pillowcase's fabric creates friction that lifts dust off the blade surface. As you slide it off, the dust gets trapped in the fibers and stays inside. Compare that to a feather duster, which just kicks dust into the air, or a wet cloth that can leave streaks.
This method is dry, contained, and takes seconds per blade.
Step-by-step In 30 Seconds
Grab a clean pillowcase. Slide it over one fan blade until the blade tip touches the closed end of the case. Gently pull the case back toward you, letting the dust collect inside.
Repeat for each blade. Shake the case outside or toss it in the laundry when done. No mess, no fuss.
Pro Tips For Best Results
Use an old pillowcase you don't mind getting dusty. If your fan blades are really grimy, lightly dampen a microfiber cloth and wipe them first, then follow up with the pillowcase trick. For high ceilings, use a step stool or extendable pole with a pillowcase attached via rubber bands—same concept, longer reach.
11. Wipe Down Sink and Counter While Brushing Teeth
Mornings are rushed, but there's a two-minute window that often goes to waste: brushing your teeth. Instead of staring at yourself in the mirror, put that time to work. Keep a microfiber cloth by the sink, and while your toothpaste does its job, give the counter and faucet a quick wipe.
It's a tiny habit that keeps your bathroom looking fresh without adding a single chore to your to-do list.
This hack turns a mandatory daily routine into a mini-cleaning session. The key is having the cloth within arm's reach and using it consistently. After a few days, it becomes automatic, and you'll notice your sink stays noticeably cleaner.
Why It Works So Well
Toothpaste needs about two minutes to work, and that's exactly the amount of time it takes to wipe down the sink and counter. You're not adding extra time—you're just using the time you already have. Plus, a quick daily wipe prevents grime from building up, so you avoid needing a deep scrub later.
What You Need
A designated microfiber cloth that lives by the sink. Microfiber picks up dust and toothpaste splatters without leaving streaks. Keep it clean by tossing it in the laundry after a few uses.
You can also use an old washcloth in a pinch.
Make It A Family Habit
Get everyone in the household on board. Place a cloth by each sink and remind family members to give the counter a quick wipe while brushing. It turns a solo task into a shared effort, and the bathroom stays presentable with zero extra planning.
12. Use a Toothbrush for Grout and Tight Spaces
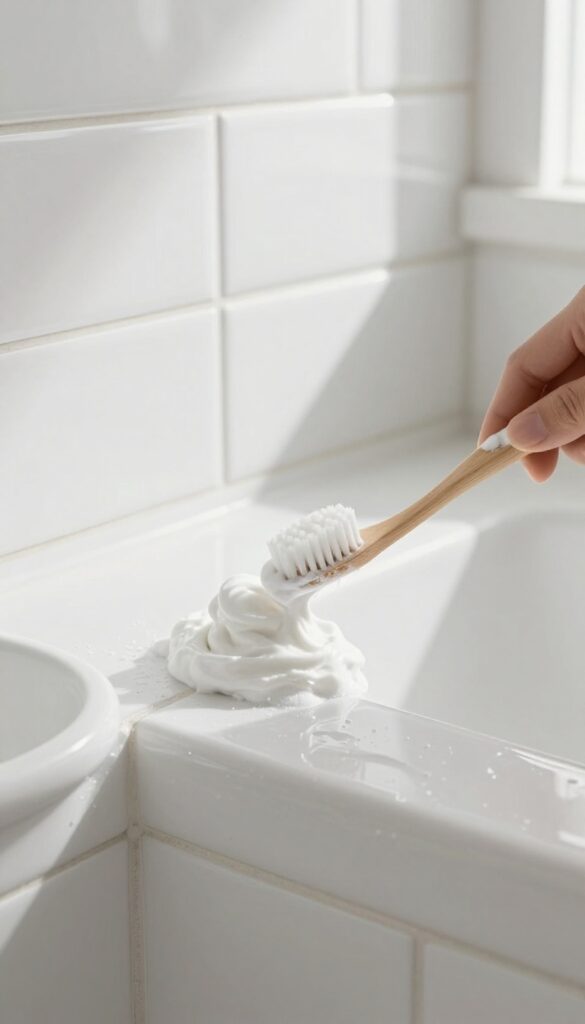
Grout lines and tight crevices around faucets are magnets for grime, but they're too narrow for most cleaning tools. An old toothbrush is the perfect size to scrub these areas without splashing or missing spots. Pair it with a simple baking soda paste, and you'll lift dirt that sponges and sprays leave behind.
Mix baking soda with a little water to form a thick paste. Dip the toothbrush into the paste and scrub grout lines, tile edges, and the base of faucets. Let the paste sit for a few minutes before rinsing for extra stubborn stains.
The bristles reach deep into grooves, making this method far more effective than wiping with a cloth.
Why A Toothbrush Works Best
Toothbrushes have small, firm bristles that fit into narrow spaces like grout lines, around sink drains, and along shower tracks. Unlike larger brushes, they let you apply pressure exactly where it's needed without scrubbing adjacent surfaces. Plus, the handle gives you good control for detailed work.
How To Make The Baking Soda Paste
Combine three parts baking soda with one part water in a small bowl. Stir until it forms a spreadable paste. For extra whitening power, add a splash of hydrogen peroxide or lemon juice.
Apply the paste directly onto the grout or dip the toothbrush into the paste as you go.
Other Tight Spots To Tackle
Use the same toothbrush and paste around stove knobs, oven door hinges, window tracks, and the edges of light switch plates. It's also great for cleaning the small crevices in kitchen sink strainers and around the base of toilet handles. These spots often get overlooked but collect surprising amounts of grime.
13. Freshen Carpets with Baking Soda and Essential Oils
Carpets trap odors, dust, and pet dander, especially in high-traffic areas. Store-bought carpet powders can be pricey and full of synthetic fragrances. A simple mix of baking soda and essential oils works just as well, costs pennies, and smells amazing.
Why It Works
Baking soda is a natural deodorizer that absorbs odors instead of just covering them up. When you sprinkle it on carpets, it pulls out trapped smells from pet accidents, cooking, or everyday living. Adding a few drops of essential oil gives a light, lasting scent without harsh chemicals.
How To Make And Apply
In a small bowl, mix 1 cup of baking soda with 10–15 drops of your favorite essential oil (lavender, lemon, or tea tree are great choices). Stir well to break up clumps. Sprinkle the mixture evenly over your carpet, focusing on high-traffic areas or spots that smell.
Let it sit for at least 15 minutes—longer if you have time. Then vacuum thoroughly.
Tips For Best Results
For extra freshness, let the powder sit overnight before vacuuming. Test a small hidden area first to make sure the oil doesn't stain. Avoid using too much oil, as it can leave a residue.
You can also add a pinch of cornstarch to help absorb moisture if your carpet is damp.
14. Clean Your Oven Grate with Ammonia in a Bag
Oven grates get caked with baked-on grease that scrubbing barely touches. Ammonia cuts through that grime without elbow grease—just let it work overnight. This method is cheap, simple, and surprisingly effective.
Remove the oven grate and place it inside a large, heavy-duty trash bag. Pour about 1/4 cup of household ammonia into the bag, then seal it tightly. Let the bag sit overnight (at least 8 hours) in a well-ventilated area or outside.
The ammonia fumes will loosen the grease and carbon deposits. In the morning, take the grate out (wear gloves and avoid inhaling fumes) and rinse it thoroughly with water. Scrub any remaining residue with a brush if needed.
The grate will look nearly new.
Why Ammonia Works So Well
Ammonia is a powerful degreaser that breaks down baked-on fats and oils. The sealed bag traps the fumes, creating a concentrated environment that softens even the toughest grime. It's a set-it-and-forget-it solution that requires minimal effort.
Safety Tips For Using Ammonia
Always work in a well-ventilated area and wear rubber gloves to protect your skin. Never mix ammonia with bleach or other cleaners—it creates toxic fumes. Keep the bag sealed and away from children and pets.
After rinsing, wash the grate with dish soap and water to remove any ammonia residue.
What If The Grate Is Extra Dirty?
For heavily soiled grates, let the bag sit for a full 24 hours. You can also add a second application if needed. Some people place the bag in direct sunlight to boost the chemical reaction.
A final scrub with a nylon brush will handle any stubborn spots.
15. Use a Paintbrush to Clean Window Tracks
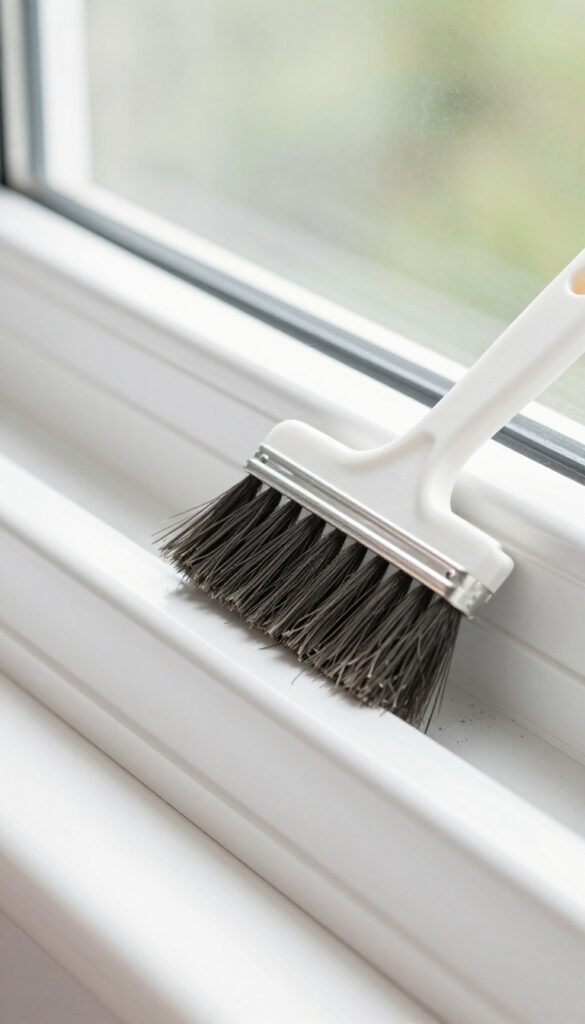
Window tracks collect a surprising amount of grime, and they're a pain to clean with standard tools. A stiff paintbrush, though, fits perfectly into those narrow grooves and dislodges dirt without scratching the surface. Pair it with a vacuum crevice tool, and you'll have spotless tracks in minutes.
Why A Paintbrush Works Best
The bristles of a stiff paintbrush are firm enough to sweep out caked-on dust and debris but soft enough not to damage the track's finish. Unlike cotton swabs or toothbrushes, a paintbrush covers more area in fewer strokes and reaches the corners where dirt hides.
Step-by-step: Clean Tracks Fast
Start by dry-brushing the track to loosen loose dirt. Sweep from one end to the other, angling the brush to get into the crevices. Then, follow up with a vacuum crevice tool to suck up everything you've dislodged.
For stubborn grime, dip the brush in a little soapy water and repeat.
Pro Tip: Keep A Dedicated Brush
Assign an old paintbrush specifically for cleaning tasks. Store it with your cleaning supplies so it's always ready. You'll find yourself using it on baseboards, vents, and even keyboard keys.
16. Keep a Cleaning Caddy for Each Floor
Running up and down stairs for a spray bottle or a rag wastes time and energy. A cleaning caddy for each floor solves that problem instantly. Stock each one with the essentials you need for that level, and you'll never have to backtrack mid-chore again.
A dedicated caddy turns cleaning into a grab-and-go task. You'll save minutes every session, and those minutes add up fast during a busy week. Plus, having a caddy per floor means you can customize supplies for each area—like extra degreaser for the kitchen caddy or a dusting spray for the living room one.
What To Put In Each Caddy
Every caddy should have a microfiber cloth, an all-purpose cleaner, a glass cleaner, and a scrub brush. Add floor-specific items: a small broom and dustpan for hard floors, or a lint roller for pet-hair-heavy areas. Keep it minimal—overstuffing defeats the purpose.
Where To Store Them
Tuck the caddy under a sink, in a hall closet, or behind a piece of furniture on that floor. The key is visibility and easy access. If you have to dig for it, you'll lose momentum.
A clear bin or open-top caddy works best so you can see what's inside.
Weekly Refill Routine
Pick one day a week to check each caddy and restock anything that ran low. This takes five minutes and prevents the frustration of grabbing a nearly empty bottle mid-clean. Keep backup supplies in a central spot so refilling is quick.
17. Clean Your Dishwasher with a Cup of Vinegar
Your dishwasher works hard every day, but it also needs a little TLC. Over time, grease, soap scum, and hard water minerals build up inside, leading to odors and less effective cleaning. A simple cup of white vinegar can reset your machine without harsh chemicals.
Why Vinegar Works
White vinegar is mildly acidic, which helps dissolve mineral deposits and cut through grease. It also neutralizes odors naturally. Running a hot cycle with vinegar clears out gunk from the filter, spray arms, and interior walls.
Step-by-step Process
Start by removing any large food debris from the filter. Place a dishwasher-safe cup filled with white vinegar on the top rack. Run a normal cycle with hot water.
That's it—no scrubbing needed. For extra freshness, sprinkle baking soda on the bottom before the rinse cycle.
How Often To Do It
Aim to clean your dishwasher once a month. If you have hard water or notice a musty smell, increase to every two weeks. Regular maintenance keeps your dishes spotless and extends the life of the appliance.
18. Use a Microfiber Mop for Walls and Ceilings
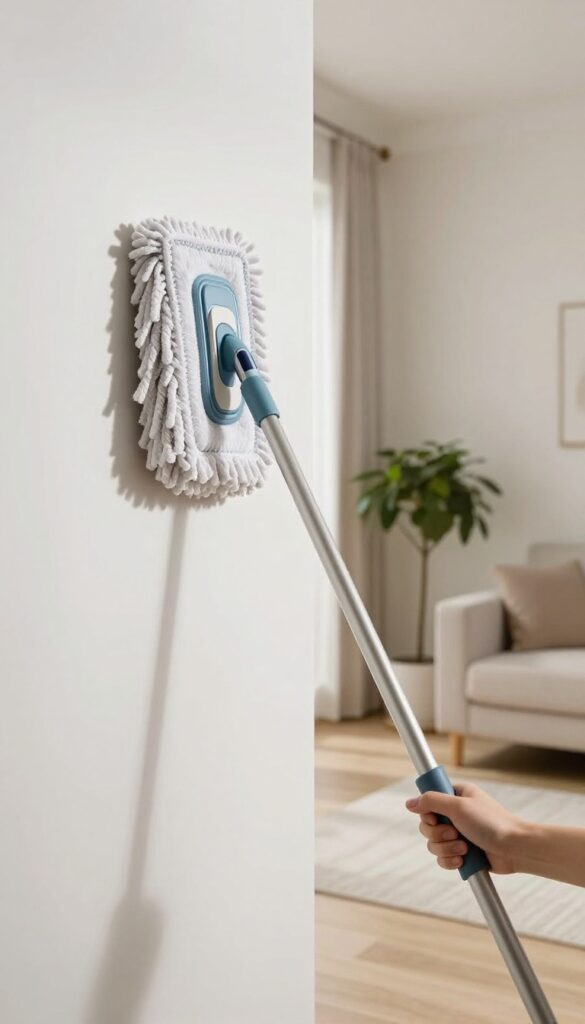
Walls and ceilings are often neglected during weekly cleaning because they're awkward to reach. But a microfiber mop makes quick work of dust, cobwebs, and smudges without requiring a ladder or stretching. Simply attach a clean dry pad and glide it over surfaces for a fresh look in minutes.
Why It Works So Well
Microfiber pads trap dust and allergens rather than pushing them around. The flat mop head covers large areas fast, and the long handle lets you reach corners and high spots safely. No need for chemical sprays—dry dusting is often enough.
How To Do It Right
Start with a dry microfiber pad to capture loose dust and cobwebs. Work from top to bottom, using light pressure. For sticky spots or fingerprints, lightly dampen the pad with water or a gentle cleaner.
Rinse or swap pads between rooms to avoid spreading dirt.
Pro Tips For Best Results
Use a dedicated mop head for walls to keep it free of floor grime. Wash pads after each use to maintain their static charge. For textured ceilings, a soft-bristle brush attachment on your vacuum works better, but the mop is perfect for smooth ceilings and painted walls.
19. Deodorize Mattresses with Baking Soda
Mattresses absorb sweat, dead skin cells, and spills over time, leading to musty odors that can affect your sleep quality. A simple baking soda treatment can neutralize these smells without harsh chemicals. This hack takes minimal effort but makes a big difference in freshness.
Why Baking Soda Works So Well
Baking soda is a natural deodorizer because it absorbs odors rather than just masking them. Its fine particles penetrate deep into mattress fibers, pulling out trapped smells and moisture. Plus, it's safe for all mattress types, including memory foam and latex.
How To Apply It Properly
Strip the bed and remove all bedding. Sprinkle a generous, even layer of baking soda over the entire mattress surface. Let it sit for at least an hour—longer is better for stubborn odors.
Then vacuum thoroughly using the upholstery attachment to remove every trace.
When And How Often To Do This
Aim to deodorize your mattress every three to four months. If you have pets, allergies, or eat in bed, consider doing it monthly. For an extra freshness boost, add a few drops of essential oil (like lavender or tea tree) to the baking soda before sprinkling.
20. Clean Your Coffee Maker with Vinegar

Your coffee maker works hard every morning, but mineral deposits from water can build up inside, affecting both performance and taste. A simple vinegar flush restores it to like-new condition without harsh chemicals. This quick maintenance task takes less than an hour and keeps your coffee tasting fresh.
Why Vinegar Works
White vinegar is mildly acidic, which dissolves calcium and limescale buildup that accumulates in coffee makers over time. It's a natural, non-toxic cleaner that's safe for your machine and your health. Plus, it's cheap and always in the pantry.
Step-by-step Descaling
Fill the water reservoir with equal parts white vinegar and water. Run a full brew cycle without coffee grounds. Let it sit for 15 minutes after the cycle to let the vinegar work on stubborn deposits.
Then, run two full cycles with plain water to rinse away any vinegar taste.
How Often To Do This
Aim to descale every 1-3 months, depending on your water hardness. If you notice slower brewing or a strange taste, it's time for a vinegar flush. Regular descaling extends your coffee maker's life and ensures every cup tastes great.
21. Use a Lint Roller for Couch Crumbs
Couch cushions are magnets for crumbs, pet hair, and dust. Instead of pulling out the vacuum for a quick tidy-up, grab a lint roller. It picks up debris in seconds and leaves your sofa looking fresh without any setup or noise.
A lint roller is perfect for spot-cleaning between deep vacuum sessions. It's especially handy after snacking on the couch or when guests are about to arrive. Keep one in a side table drawer so you can grab it instantly.
Why It Works So Well
Lint rollers use adhesive sheets that trap particles on contact. Unlike a vacuum, they don't blow dust around or require plugging in. They're also gentle on fabric, so you won't damage delicate upholstery.
Where Else To Use It
Don't stop at the couch. Roll it over lampshades, car seats, and even your computer keyboard. It's a versatile tool for picking up dust and debris from any fabric or hard surface.
Pro Tips For Best Results
For maximum pickup, roll in one direction and overlap each pass. Replace the sheet as soon as it loses stickiness. If you're out of refills, a piece of packing tape wrapped around your hand works as a DIY version.
22. Keep Microfiber Cloths Color-Coded by Room
Grabbing the wrong rag can spread germs from the bathroom to the kitchen counter in seconds. A simple color-coding system eliminates that risk and speeds up your cleaning flow. Assign one color per room, and you'll never second-guess which cloth to use.
Choose Your Color Scheme
Pick three or four distinct colors that are easy to remember. For example, blue for bathrooms, green for kitchen, yellow for living areas, and red for dusting. Stick to the same system every time you buy new cloths so it becomes automatic.
Store Them Separately
Keep each color in a different spot or container. Use small baskets or stackable bins labeled by room. Or hang them on separate hooks inside a cleaning caddy.
When you're done, toss them in a mesh laundry bag sorted by color for easy washing.
Wash And Replace Smartly
Wash microfiber cloths separately from other laundry to avoid lint transfer. Use warm water and no fabric softener—it ruins their absorbency. Replace any cloth that starts to smell musty or leaves streaks.
A fresh set every few months keeps your color system working.
23. Set a 10-Minute Timer for a Quick Tidy
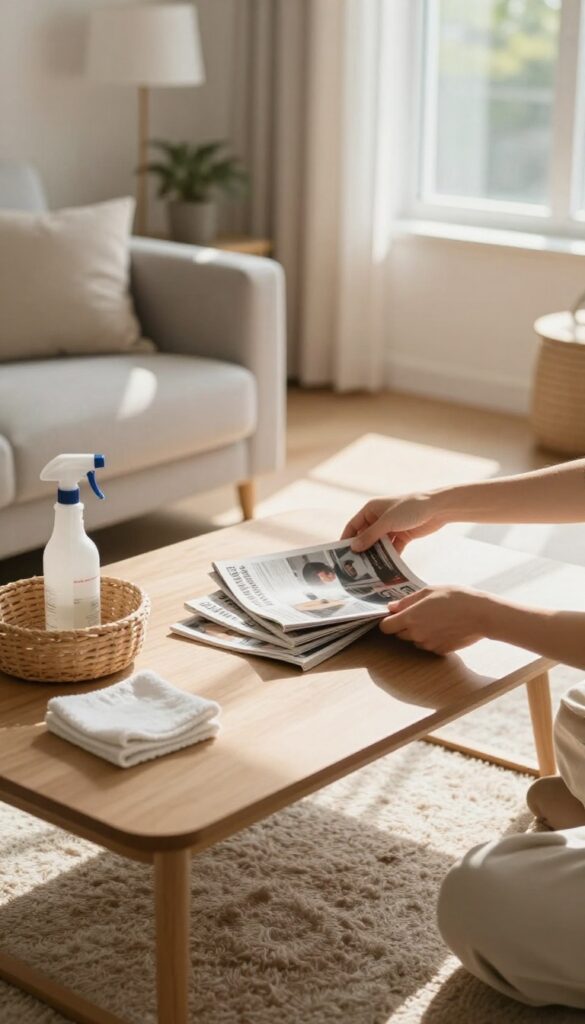
When your to-do list is overflowing, even a quick clean can feel overwhelming. But what if you only had to commit to ten minutes? Setting a timer shifts your focus from the size of the mess to the challenge of beating the clock.
You'll be amazed at how much you can accomplish in such a short burst of focused effort.
This hack is all about momentum. Grab a laundry basket for items that belong in other rooms, a microfiber cloth for dusting, and a spray cleaner. Start the timer and work as fast as you can: toss clutter into the basket, wipe down visible surfaces, fluff pillows, and straighten rugs.
When the timer goes off, stop—even if you're not done. The goal is consistency, not perfection. Over time, these mini-tidying sessions prevent messes from piling up, making your home look presentable with minimal daily effort.
Why 10 Minutes Works
Short bursts of cleaning are less daunting than a full hour. The time limit creates a sense of urgency that keeps you from getting sidetracked. Plus, you're more likely to start a ten-minute task than a deep clean, so you actually do it more often.
What To Tackle First
Focus on high-visibility areas: the living room coffee table, kitchen counters, and entryway. Clear surfaces make the whole room look cleaner. Save detailed tasks like vacuuming under furniture for longer sessions.
Make It A Habit
Try doing this at the same time each day, like right before dinner or after the kids go to bed. Pair it with a podcast or upbeat music to make it feel less like a chore. Soon, it'll become an automatic part of your routine.
FAQ
How often should I clean my microwave with lemon water?
Once a week is enough to keep it fresh and prevent stubborn stains.
Can I use Rain-X on any shower door?
Yes, but test on a small area first. It works best on glass, not plastic.
Is vinegar safe for all countertops?
Avoid vinegar on natural stone like granite or marble. Use a pH-neutral cleaner instead.
How long should I let baking soda sit on carpets?
At least 15 minutes, but longer is better for odor removal. Overnight works great.
Can I use the same microfiber cloth for multiple rooms?
It's best to use separate cloths to avoid spreading germs. Color-coding helps.
Conclusion
These 23 hacks prove that keeping a clean home doesn't require hours of scrubbing—just smarter, quicker strategies. Pick the ones that fit your biggest pain points, whether it's tackling microwave splatters or speeding up bathroom wipe-downs.
A little consistency goes a long way. Start with two or three changes this week, and you'll notice how much easier busy evenings feel when your space works with you, not against you.