15 Gallery Wall Ideas Living Room Corners Can Display
That empty corner in your living room? It's begging for a gallery wall. But not just any gallery wall—one that pulls double duty by adding storage and warmth.
Corners often get overlooked, yet they offer prime real estate for a curated display that feels intentional and inviting. Whether you're working with a tiny nook or a spacious corner, these 15 ideas prove that a gallery wall can be both beautiful and functional. Each concept leans into a storage-smart approach, so you can showcase your favorite pieces without sacrificing practicality.
Ready to turn that blank corner into a cozy conversation starter? Let's dive in.
1. Floating Shelf Gallery with Baskets
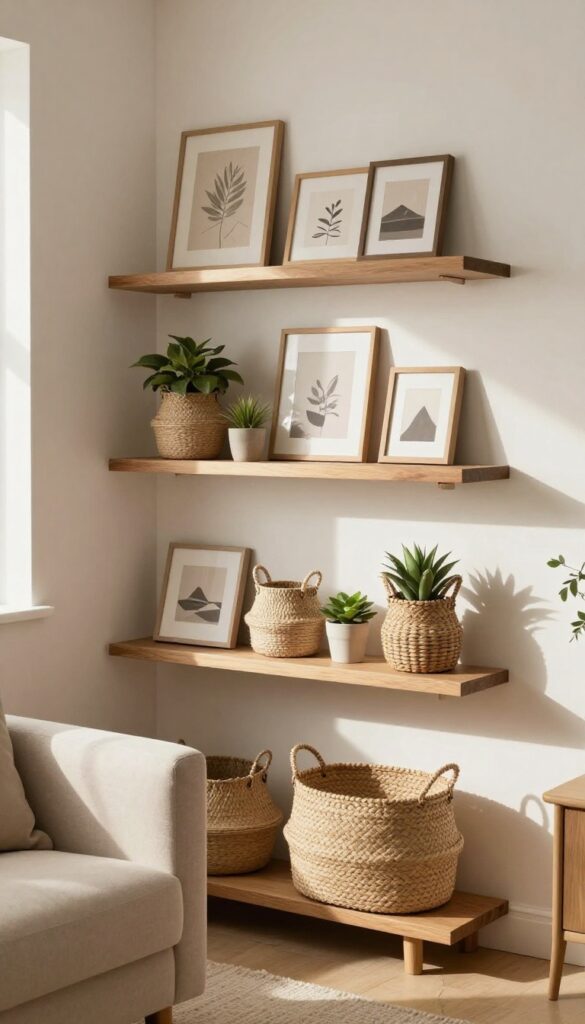
A corner doesn't need to be filled floor-to-ceiling with art to feel intentional. By combining floating shelves with woven baskets, you get a gallery wall that also hides the clutter that tends to collect in living rooms. The staggered heights add visual rhythm, while the baskets keep remotes, magazines, and small electronics out of sight but still easy to grab.
It's a smart, warm solution for anyone who wants style without sacrificing practicality.
This idea works especially well in a living room corner that feels too small for a console table but too empty to leave bare. The shelves draw the eye upward, making the ceiling feel higher, while the baskets ground the arrangement with texture and function. Choose warm wood tones or black metal shelves depending on your existing decor—both pair nicely with natural seagrass or cotton rope baskets.
For a cohesive look, stick to a neutral palette with one or two accent colors in the framed art.
Shelf Styling Tip
Place the largest basket on the bottom shelf to anchor the composition, then use smaller baskets on higher shelves. Mix in a few framed photos or small plants between the baskets to keep the display from feeling too heavy. Leave some negative space so the eye can rest.
Best Materials
Solid wood shelves (walnut or oak) add warmth, while black metal shelves lean modern industrial. For baskets, seagrass, jute, or handwoven cotton bring natural texture. Stick to baskets in neutral tones like beige, taupe, or light gray to keep the look cohesive.
Layout Tip
Install shelves at least 12 inches apart vertically, and stagger them so no two are aligned horizontally. This creates a dynamic, gallery-like feel. Keep the overall arrangement within a 3-foot-wide zone so it feels intentional without overwhelming the corner.
2. Corner Ladder Display with Hooks

A wooden ladder resting in a corner does more than hold frames—it adds instant architectural interest without any permanent changes. The lean creates a casual, collected look that feels warm and lived-in, especially when you mix in a soft throw and a few small hooks for hanging lightweight art. This idea works beautifully in living rooms where you want to display photos or prints but don't want to commit to drilling holes or mounting a heavy gallery wall.
The ladder becomes a flexible display system that you can rearrange anytime. Hook a few frames from the rungs, drape a chunky knit throw over one side, and let the whole setup feel effortless. The key is keeping the ladder stable—choose one with a wide base or secure it with a small bracket at the top if needed.
Stick to a cohesive color palette for the frames and textiles so the corner feels intentional, not cluttered.
Best Materials
- Go with a natural wood ladder—pine, oak, or bamboo—to keep the warmth factor high. Avoid glossy finishes; a matte or slightly distressed surface blends better with cozy decor. For frames, mix wood tones with black or brass metal for contrast.
- The throw should be a soft knit or woven cotton in a neutral like cream, beige, or soft gray.
Layout Tip
Position the ladder so it leans at a slight angle, not flush against the wall—this creates depth and makes the display more dynamic. Hang frames at varying heights along the rungs, clustering a few together on one side and leaving space on the other for the throw. Add a small plant or stack of books at the base to anchor the corner visually.
Finishing Touch
Drape a lightweight throw over one of the middle rungs so it cascades down softly, adding texture and a cozy vibe. Choose a throw with a subtle pattern or fringe to draw the eye without overwhelming the display. This simple layer makes the corner feel styled rather than just filled.
3. Magnetic Wall with Tin Frames
Imagine a corner where you can swap out art as often as you change your mind—no nails, no holes, no fuss. A magnetic wall makes that possible, and it adds a playful, industrial touch that feels both cozy and creative. By painting a section of the corner with magnetic paint and using lightweight tin frames with magnets underneath, you get a gallery wall that's endlessly flexible and surprisingly warm.
This idea is perfect for renters or anyone who loves to refresh their decor seasonally. The magnetic paint creates a subtle, textured surface that blends into the wall, so the focus stays on the frames and art. Tin frames bring a vintage, slightly rustic feel that pairs beautifully with warm tones like terracotta, mustard, and soft cream.
Plus, the ability to swap art instantly means you can adapt the corner to match holidays, moods, or new finds without any commitment.
Best Colors
- Stick with warm neutrals for the magnetic paint—think soft beige, warm gray, or a muted clay. These tones keep the corner feeling inviting and prevent the magnetic surface from looking too stark or industrial. For the tin frames, opt for aged brass, copper, or matte black to add richness and contrast.
- The art inside can be anything from botanical prints to family photos, but sticking to a cohesive color palette (like earthy greens and warm whites) keeps the display polished.
Layout Tip
- Arrange the frames in a loose grid or organic cluster, but leave a little breathing room between them so the magnetic surface shows through. A good rule is to keep spacing consistent—about 2 to 3 inches apart. Start with a central anchor piece (maybe a larger tin frame) and build outward.
- Because the frames are lightweight, you can easily adjust the layout until it feels balanced. Don't be afraid to overlap a few frames for a collected, layered look.
Finishing Touch
- Add a small floating shelf below the magnetic wall to hold a few tiny plants, a candle, or a stack of mini art prints. This anchors the corner and gives it a grounded, lived-in feel. The shelf also provides a place to rest frames while you're rearranging, making the whole setup even more practical.
- Choose a shelf in a warm wood tone to echo the cozy vibe of the tin frames.
4. Shadow Boxes with Keepsake Storage
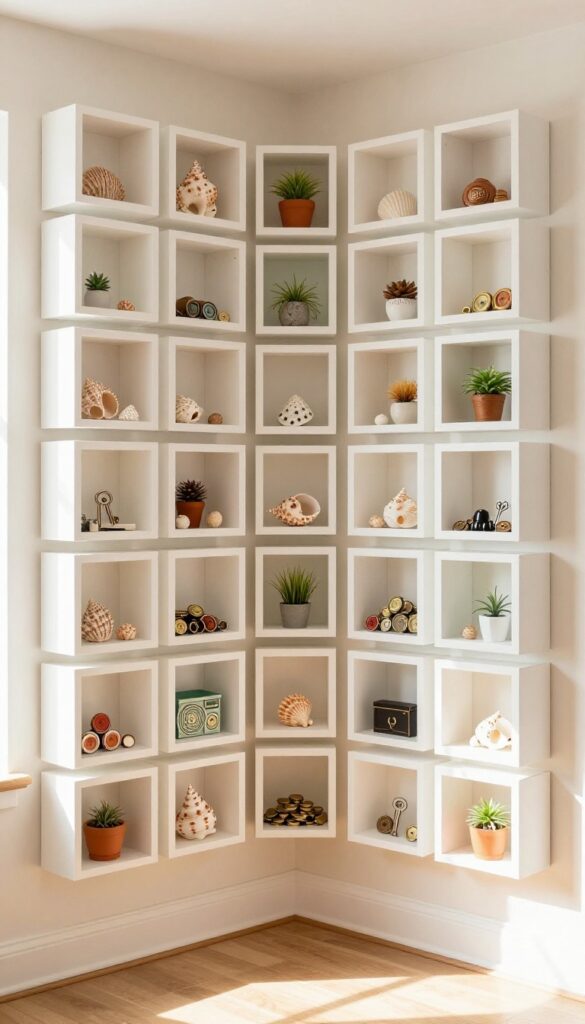
Shadow boxes bring a whole new layer of personality to a gallery wall. Instead of flat frames, these little depth-filled boxes let you tuck in small treasures—seashells from a beach trip, vintage buttons, a child's first drawing, or even tiny plants. The deeper ones double as clever storage for everyday clutter like keys, coins, or earbuds.
It's a warm, lived-in look that turns a forgotten corner into a meaningful display.
Arrange a set of shadow boxes in a grid. Fill them with small treasures and use the deeper boxes to store tiny items like keys or coins.
Best Colors
Stick to a unified color palette for the boxes themselves—white, black, or natural wood tones keep the focus on what's inside. For the items, lean into warm neutrals and muted hues like terracotta, sage, and cream. This keeps the display feeling cohesive and cozy, not chaotic.
Layout Tip
Go for a symmetrical grid of three by three or four by four for a clean, intentional look. Leave about two inches between each box so the arrangement breathes. If your corner is narrow, a vertical column of three boxes works just as well.
Storage Tip
Choose a few deeper shadow boxes (at least two inches deep) and position them at a reachable height. Use them to hold small everyday items you'd normally toss in a bowl—keys, sunglasses, or spare change. It keeps the clutter contained and adds function to the art.
5. Picture Rail with Clip-On Frames
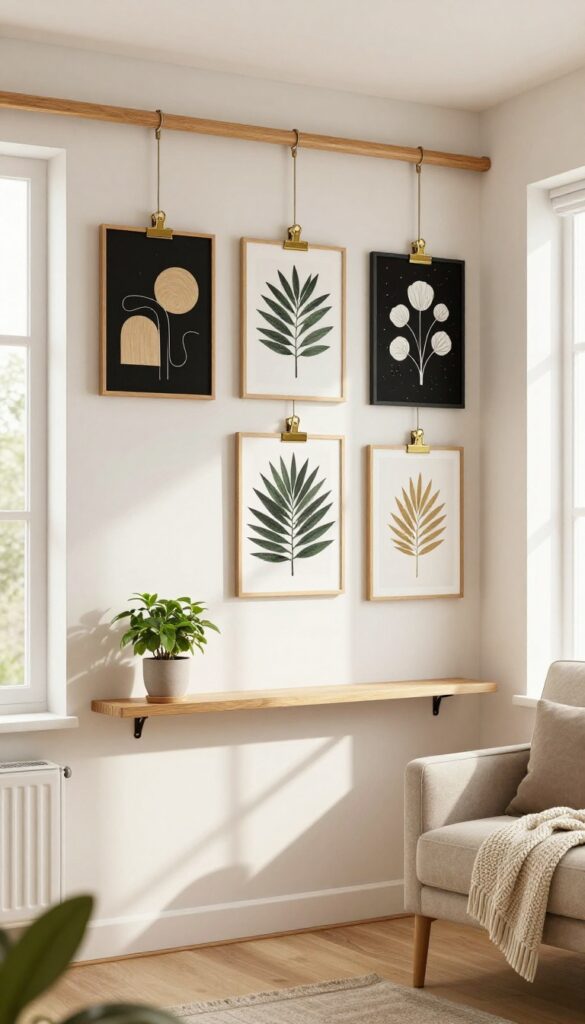
A picture rail is one of those ideas that feels both classic and totally fresh. Instead of hammering nails into the wall, you install a slim rail near the ceiling, then hang art using clip-on frames that hook right onto it. This setup is a dream for renters—no holes, no patching, just a clean look that you can rearrange whenever the mood strikes.
The corner becomes a rotating gallery, and the rail itself adds a subtle architectural detail that makes the room feel finished.
Picture rails work especially well in corners because they draw the eye upward, making the ceiling feel higher and the space more intentional. Use clip-on frames in a mix of sizes and finishes—think black, brass, or natural wood—to keep the display from feeling too uniform. The best part?
You can swap out prints seasonally or whenever you find something new without any commitment. It’s a low-effort way to keep your walls feeling current and personal.
Best Materials
Go for a wooden picture rail in a warm stain or painted white to match your trim. Clip-on frames work best in lightweight materials like acrylic or thin metal—avoid heavy glass that could pull the rail. Mix matte and glossy finishes for texture, and consider adding a few small shelves on the rail for tiny plants or trinkets.
Layout Tip
Start with one larger piece as the anchor, then layer smaller frames around it at varying heights. Leave a few inches between clips so the art breathes. For a corner, let the rail wrap around both walls and hang frames that face into the room—this creates a cohesive vignette that feels custom.
Storage Bonus
Use the rail to hang lightweight baskets or hooks for keys, sunglasses, or small mail. In a living room corner, this turns a purely decorative feature into a smart drop zone. Just keep it minimal so the art stays the star.
6. Corner Shelf Trio with Planters
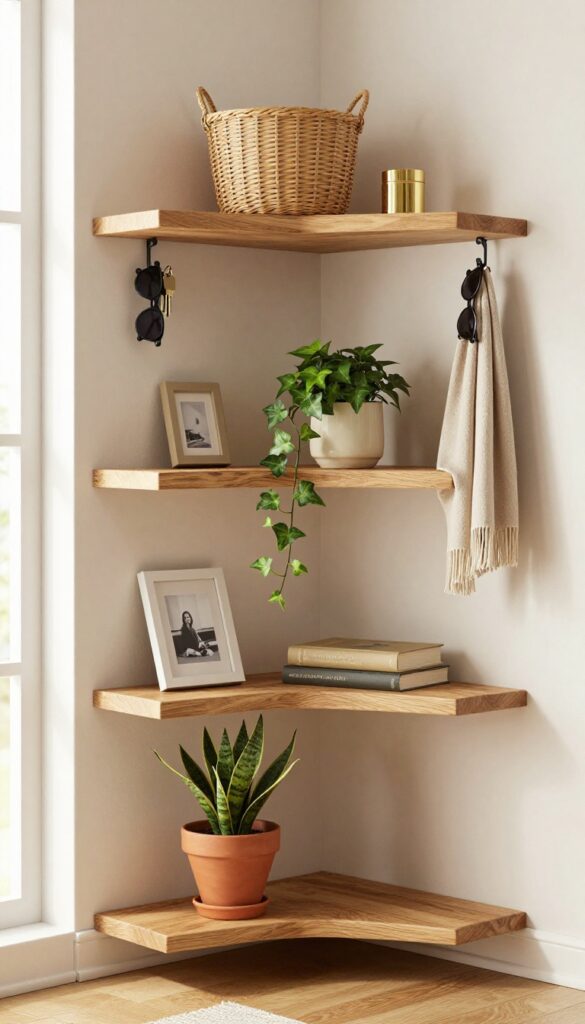
A cluster of corner shelves turns an empty nook into a vertical garden of memories. By mounting three shelves at staggered heights, you create a layered display that draws the eye upward and makes the room feel taller. The warm interplay of wood tones, trailing greenery, and small framed photos gives the corner a collected-over-time charm that feels both intentional and lived-in.
This setup works beautifully in a living room corner that gets moderate natural light. The key is to vary the shelf sizes and spacing so the arrangement feels dynamic rather than rigid. Use the bottom shelf for larger pots or stacked books, the middle one for a mix of photos and a small trailing plant, and the top shelf for a lightweight accent piece.
The hooks underneath each shelf add a practical touch for keys, small bags, or even a set of measuring cups if this is near the kitchen.
Best Materials
Opt for warm-toned wood like oak or walnut to keep the look cozy. Floating corner shelves with a natural finish or a soft matte stain work best. For the planters, choose terracotta or ceramic in earthy hues—cream, sage, or rust—to complement the wood without competing.
Shelf Styling Tip
Group items in odd numbers and vary the heights. Place a tall planter on one side of a shelf and a stack of two small books on the other. Lean a framed photo against the wall rather than centering it, and let a trailing pothos or ivy spill over the edge to soften the lines.
Storage-smart Detail
Install small brass or black hooks under each shelf to hold everyday items like keys, sunglasses, or a lightweight scarf. This keeps the clutter off surfaces while making the corner feel purposeful. Choose hooks that match the shelf hardware for a cohesive look.
7. Grid of Corkboards with Push Pins
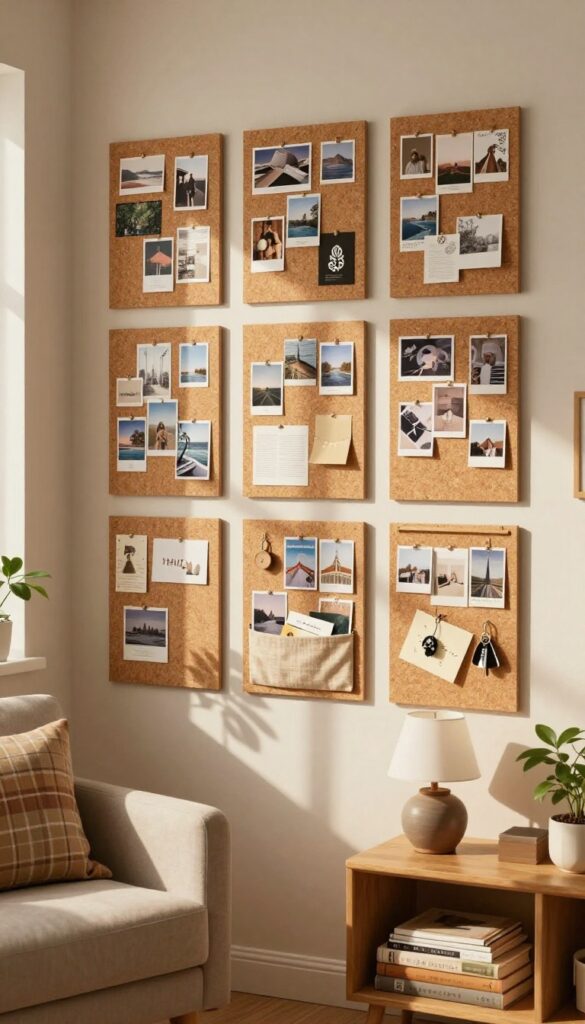
Turn that awkward corner into a command center for your life—and your art. A grid of corkboards feels warm, tactile, and endlessly customizable. It’s the kind of storage-smart idea that hides mail, to-do lists, and keepsakes in plain sight, all while adding texture and a cozy, collected vibe.
The cork itself brings a natural warmth that pairs beautifully with wood tones and soft lighting.
Cover the corner with a grid of corkboards. Pin up postcards, photos, and lightweight decor, and use the bottom edge to attach a small pocket for mail. The layered look of pinned items creates a living collage that evolves with your seasons and moods.
It’s practical without feeling utilitarian—just the right blend of function and personality.
Best Colors And Finishes
Stick with natural cork for warmth, or go for painted corkboards in muted tones like sage, blush, or charcoal. A whitewashed frame keeps it airy; a dark wood frame adds depth. The goal is to let the pinned items pop without visual chaos.
Layout Tip
Arrange the boards in a neat 2×2 or 3×3 grid with even spacing—about 2 inches between each. Use a level and painter’s tape to map it out first. This creates a structured backdrop that makes the pins feel intentional, not messy.
Storage-smart Detail
Sew or clip a small fabric pocket at the bottom of the bottom row to catch incoming mail, keys, or charging cables. Choose a fabric that ties into your room’s palette—like a warm linen or a subtle plaid—so it blends right in.
8. Vintage Window Frame as a Gallery
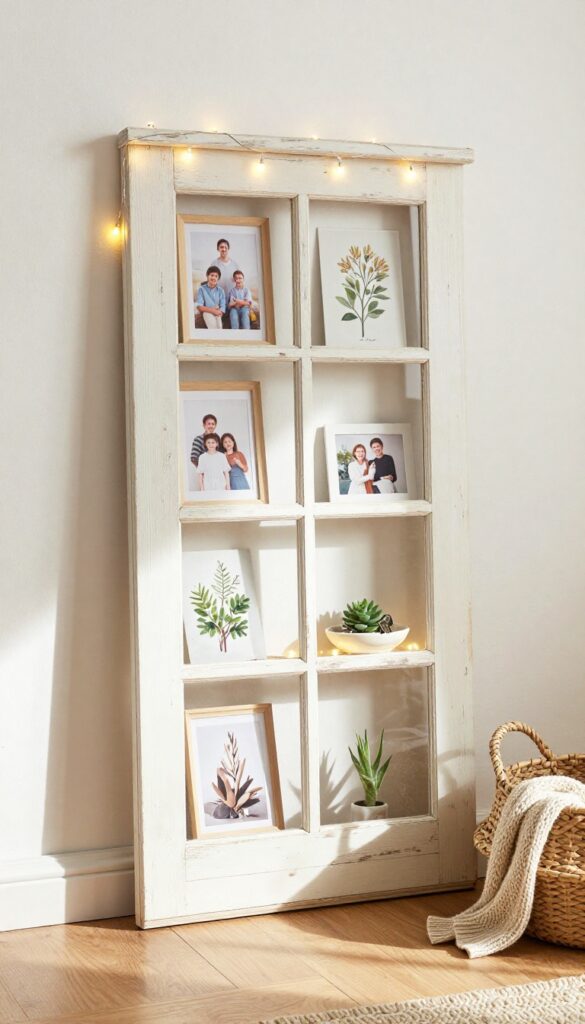
A vintage window frame leaning in a corner does more than display photos—it adds instant character and a built-in shelf for small storage. The glass panes create a natural gallery wall without any drilling, and the sill becomes a catch-all for keys, coins, or a tiny plant. It's a warm, cozy way to turn an empty corner into a functional focal point.
Hunt for an old wooden window frame at a flea market or salvage yard. Clean it up lightly, but keep the chipped paint for charm. Attach your favorite prints or family photos behind the glass using double-sided tape or small clips.
Lean the frame in a corner, and place a small ceramic dish on the sill to hold odds and ends. The result is a layered, storage-smart display that feels collected over time.
Best Materials
Look for a wood frame with original paint or a distressed finish—white, sage green, or pale blue work beautifully. Avoid frames with broken glass if you want the photo display feature. A sill width of at least 3 inches gives you room for a dish or a small vase.
Storage Tip
Use the sill as a landing spot for everyday items like sunglasses, mail, or a remote. Add a shallow bowl or a small tray to corral them. The glass panes keep photos dust-free, so you can swap them seasonally without extra cleaning.
Cozy Detail
Drape a string of warm fairy lights over the top of the frame for a soft glow in the evenings. Or tuck a small battery-operated candle on the sill. The mix of glass, wood, and warm light makes the corner feel instantly inviting.
9. Tension Rod with Hanging Frames
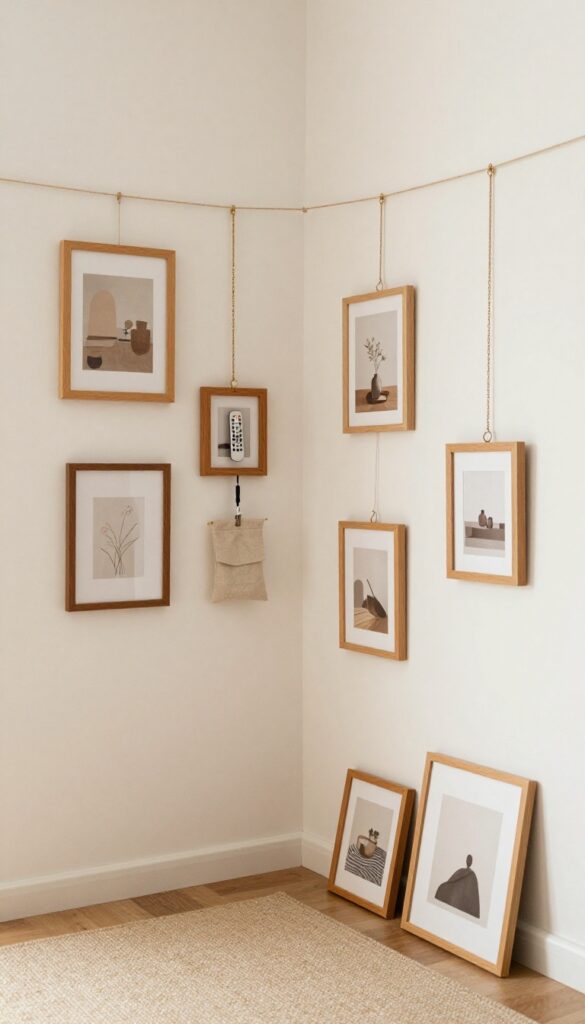
A tension rod isn't just for shower curtains. Wedge one between two corner walls, and you've got an instant gallery display that doesn't require a single nail. It's a renter's dream and a cozy way to layer art without committing to permanent holes.
The best part? You can swap out frames, ribbons, or chains whenever the mood strikes, keeping the corner feeling fresh and personal.
This setup works especially well in a snug living room where floor space is precious. By hanging frames from ribbons or chains, you add vertical interest without cluttering the walls. The tension rod itself becomes a subtle architectural detail, and the hanging elements create a soft, layered look that feels collected over time.
For a warm, cozy vibe, choose wooden frames in natural tones and mix in a few metallic accents for a hint of shine. The small pouch clipped onto the rod is a clever storage-smart touch—perfect for keeping charging cables, remote controls, or reading glasses within easy reach but out of sight.
Best Materials
- Opt for a tension rod with a matte black or brushed brass finish to complement the cozy aesthetic. For the hanging elements, choose natural jute ribbons or delicate brass chains—they add texture without overwhelming the frames. The frames themselves should be lightweight, like wood or thin metal, to avoid straining the rod.
- A small fabric pouch in a neutral linen or soft wool blend works well for storing cords and small essentials.
Layout Tip
- Vary the lengths of the ribbons or chains so the frames hang at different heights. This creates a dynamic, gallery-like feel that draws the eye upward. Place the largest frame slightly off-center for balance, and cluster smaller frames around it.
- Keep the overall arrangement within a 2-foot-wide area so it feels intentional, not scattered.
Storage-smart Detail
- Clip a small pouch onto the rod using a carabiner or a simple ring. Choose a pouch with a drawstring closure to hide cables neatly. Position it near an outlet if possible, so you can charge devices without cords trailing across the floor.
- This keeps the corner both beautiful and functional—a true win for a cozy, clutter-free living room.
10. Corner Pegboard Wall

A corner pegboard wall turns an awkward spot into a functional display area that feels intentional and warm. The key is choosing a pegboard color that blends with your wall or adds a subtle contrast—think soft sage, warm beige, or a muted terracotta. This setup is perfect for living rooms where you want to keep surfaces clear but still show off favorite frames, small plants, or daily-use items like keys and sunglasses.
The pegboard's grid pattern adds visual rhythm without feeling busy, especially when you arrange items in a balanced, slightly asymmetrical layout.
Install a pegboard cut to fit the corner. Use pegs to hold frames, small shelves, and hooks for hanging keys or jewelry. The mix of textures—wood pegs, metal hooks, and paper or canvas art—creates a collected look that feels curated, not cluttered.
For a cozy vibe, choose warm wood tones for the pegboard and accessories, and keep the arrangement airy by leaving some pegs empty. This idea works especially well in tight corners where a traditional gallery wall might feel cramped.
Best Colors And Materials
- Opt for a pegboard in a natural wood finish or a painted shade that complements your wall color. Warm neutrals like oatmeal, dusty rose, or soft olive green keep the look inviting. Pair with wooden pegs and small floating shelves in a similar tone.
- For a touch of contrast, use black or brass hooks for hanging items.
Layout Tip
Start by placing larger frames or shelves near the center of the pegboard, then work outward with smaller pieces. Leave a few pegs empty to avoid a cramped feel. Vary the heights of items—hang a small plant at eye level, a key hook lower, and a frame slightly higher—to create visual flow.
Cozy Detail
Add a small LED strip light along the top edge of the pegboard. The soft glow highlights your display and makes the corner feel warm in the evenings. Choose a warm white light (2700K) to keep the cozy mood intact.
11. Stacked Crates with Art Inside
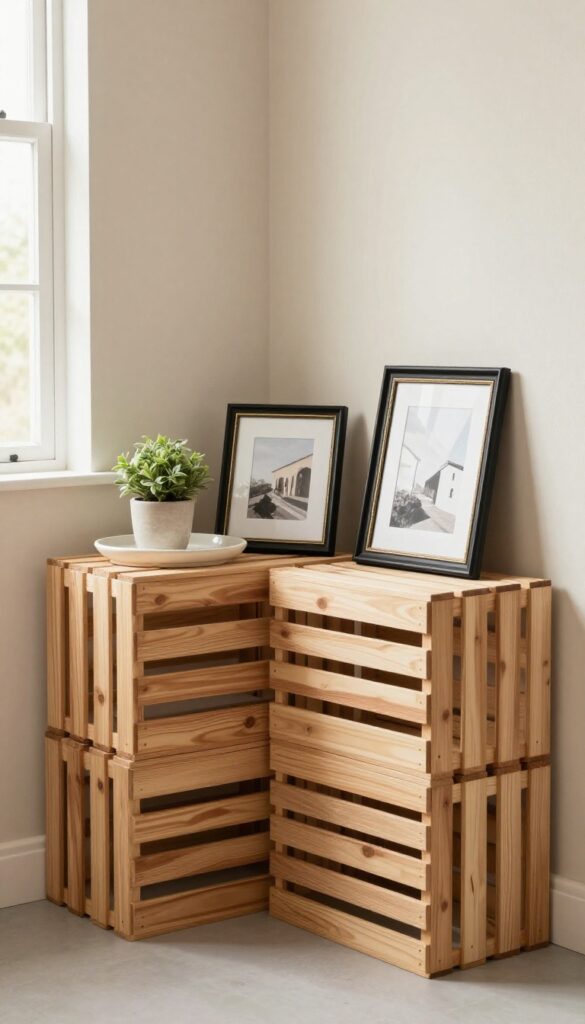
Wooden crates bring a rustic, farmhouse feel that instantly warms up a corner. Stacking them creates a vertical display that draws the eye upward, making the room feel taller while keeping the footprint small. The best part?
Each crate becomes a mini gallery for framed art, and the top doubles as a side table with hidden storage inside.
Stacked crates are a storage-smart solution that also doubles as a gallery wall alternative. Start with three or four wooden crates of the same size—painted or stained to match your room's palette. Place them in a corner, slightly staggered for visual interest.
Inside each crate, lean a small framed print, photo, or piece of art. The frames should be proportional to the crate opening so they don't look cramped. On top, add a tray or a small plant, and use the hollow space inside the top crate to stash remotes, coasters, or magazines.
This setup works especially well in a cozy living room where floor space is precious but you still want personality.
Best Colors & Wood Tones
- For a warm and cozy feel, choose crates in natural pine or a light walnut stain. If your room leans neutral, whitewashed crates keep things airy. Darker stains like espresso add contrast against light walls.
- Match the frame colors to the crate finish—black or dark wood frames pop against light crates, while gold or brass frames add a touch of elegance.
Layout Tip
Stack the crates so the openings face outward, but rotate one so its opening faces the wall for a hidden storage pocket. This breaks up the symmetry and gives you a spot to tuck away items you don't want on display. Secure the crates together with small brackets or wood glue so they don't shift.
Finishing Touch
Add a small LED strip or a battery-powered puck light under the top crate's lip to softly illuminate the art inside. This creates a warm glow that makes the corner feel intentional and cozy, especially in the evening.
12. Mirror Gallery with Hidden Shelf
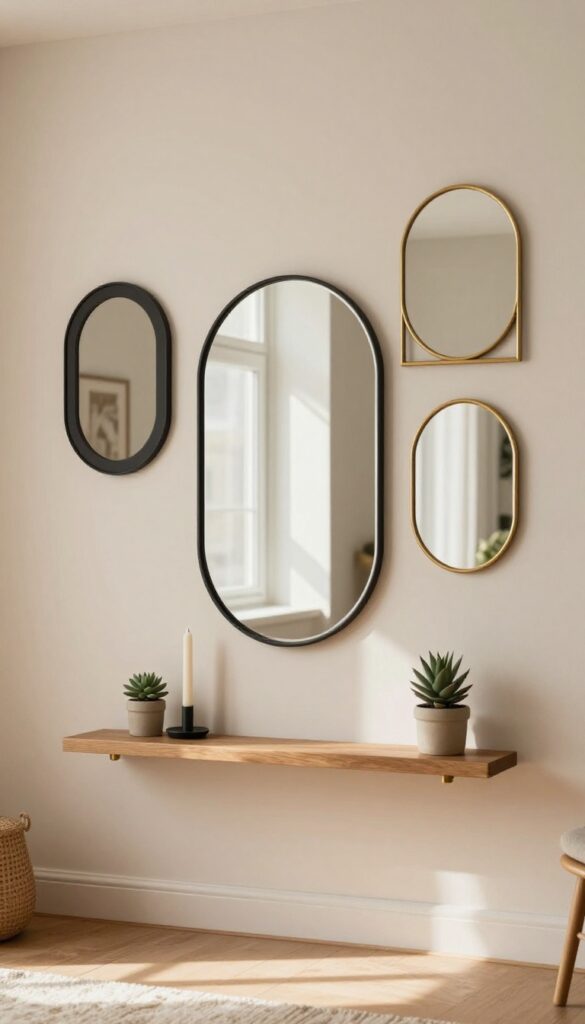
A corner full of mirrors does more than just look pretty—it bounces light around the room and makes the space feel bigger. The trick here is to mix different shapes and frame finishes so the arrangement feels collected over time. Behind one of those mirrors, tuck a slim floating shelf that stays hidden until you need it.
It's the perfect spot to stash a candle, a small plant, or even your phone, keeping the corner clean but still functional.
This idea works especially well in a darker corner that needs a little extra brightness. The mirrors catch whatever light is available and spread it around, while the hidden shelf adds storage without cluttering the visual. Choose frames in warm brass, wood tones, or matte black to keep the look cohesive.
For the shelf, go with a narrow floating style that matches the wall color so it blends in. Arrange the mirrors in a loose cluster, leaving one slightly lower or offset to hide the shelf behind it. The result is a corner that feels airy, intentional, and secretly practical.
Best Mirror Shapes And Sizes
Stick with round, oval, and arched mirrors to soften the corner's angles. Mix small and medium sizes—think 6 to 16 inches in diameter—and avoid anything too large that might overwhelm the space. A couple of sunburst or scalloped frames add texture without making the arrangement feel busy.
Shelf Placement And Styling
Mount the floating shelf about 6 to 8 inches below one of the larger mirrors so it's completely hidden from a straight-on view. Keep what you place on it minimal: a single taper candle, a tiny succulent, or a small dish for keys. The shelf should feel like a secret rather than a display.
Lighting Tip
Add a small picture light above the mirror cluster or a warm LED strip under the shelf to create a soft glow. This highlights the mirrors and makes the corner feel cozy in the evening. Avoid harsh overhead lights—go for warm white bulbs around 2700K to keep the mood relaxed.
13. Washi Tape Art Wall with Pockets
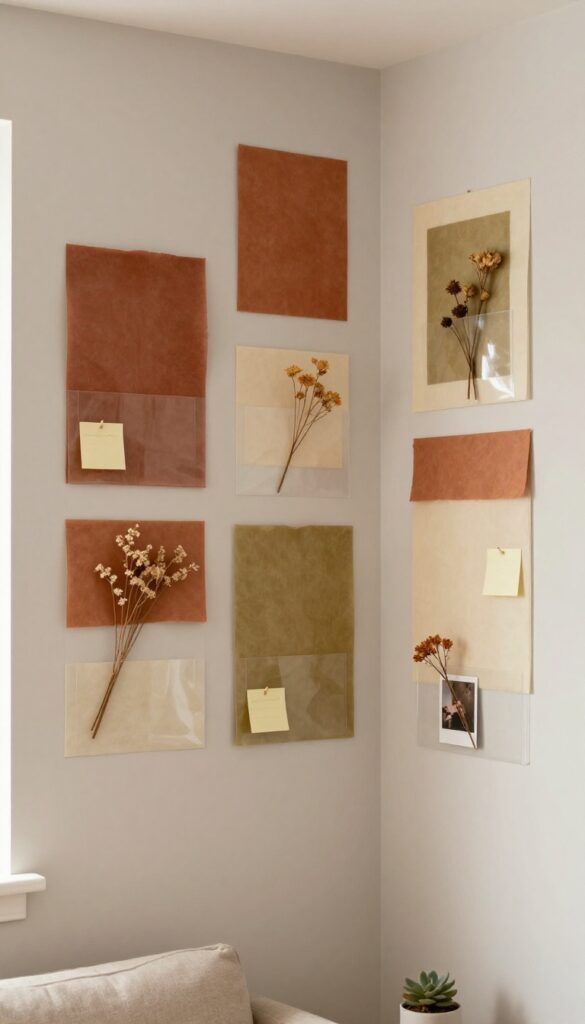
Renters and commitment-phobes, this one's for you. A washi tape gallery wall gives you all the visual impact of framed art without a single nail hole. The trick is to treat the tape like a design tool—think of it as creating floating frames that can shift, overlap, or even form geometric patterns.
Add a row of clear adhesive pockets beneath each frame, and suddenly your living room corner doubles as a command center for notes, photos, and tiny treasures.
The beauty of washi tape is how forgiving it is. You can peel it off and reposition it until the layout feels right. Start by choosing two or three coordinating tape patterns—maybe a thin metallic stripe, a muted floral, and a solid color that matches your wall.
Tape directly onto the wall to outline rectangles or squares, then pop in photos, postcards, or art prints. Below each frame, stick a clear adhesive pocket (the kind meant for ID badges or classroom displays). These hold sticky notes, dried flowers, or even a small calendar.
The whole setup feels playful and intentional, not messy. For a warm and cozy feel, stick to tapes in earthy tones like terracotta, olive, and cream, and use warm white or soft yellow lighting nearby.
Best Colors And Patterns
- Stick to two or three coordinating washi tape designs to keep the wall from looking chaotic. For a cozy living room, choose tapes in warm neutrals (beige, dusty rose, sage) and one subtle pattern like a tiny polka dot or thin stripe. Avoid neon or high-contrast combos—they'll fight with the relaxed vibe.
- If your wall is white or light gray, matte tapes in muted tones blend beautifully. For darker walls, metallic or white tapes pop nicely.
Layout Tip
- Plan your arrangement on the floor first. Lay out the photos and tape outlines to see the spacing before committing. Keep the pockets aligned in a row or staggered just slightly—too much randomness can look sloppy.
- A good rule is to leave about 3–4 inches between each frame and pocket grouping. For a corner, start the gallery at eye level and let it extend upward, drawing the eye naturally.
Storage-smart Detail
- The pockets are the real win here. Use them to stash items you reach for daily: charging cables, reading glasses, or a small notebook. Choose clear pockets with a strong adhesive back so they stay put.
- If you want extra coziness, swap clear pockets for soft fabric ones in linen or cotton—they add texture and warmth. Just make sure they're lightweight so the tape doesn't sag.
14. Corner Bookcase with Frame Inserts
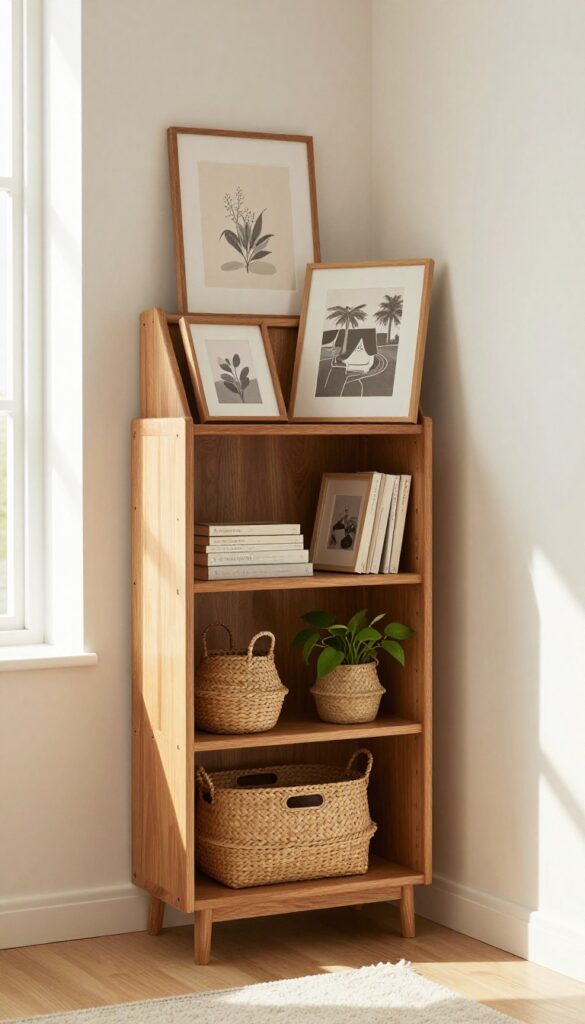
Tucked into an unused corner, a small bookcase does more than hold books—it becomes a mini gallery wall with built-in storage. By leaning framed art directly on the shelves, you create an ever-changing display that feels curated and personal. The lower shelves stay practical with baskets or bins for hiding remotes, chargers, or kids' toys, so the whole setup looks intentional, not cluttered.
This idea works especially well in living rooms where floor space is tight but vertical real estate is wide open. A corner bookcase with adjustable shelves lets you mix frame heights and sizes easily, and the leaning trick means you can swap out art whenever the mood strikes. Warm wood tones or a painted finish in a soft neutral keep the piece from competing with your wall decor—it just blends right in.
Best Materials
Look for a bookcase in solid wood or a wood veneer with a natural grain—oak, walnut, or maple add warmth without feeling heavy. If your style leans more modern, a matte black or creamy white finish works too. Avoid glossy surfaces that reflect light in distracting ways; you want the frames to be the focal point.
Shelf Styling Tip
Stack a few larger art pieces on the bottom shelf and smaller ones higher up for visual balance. Lean each frame at a slightly different angle—some against the back wall, some against the side—to create depth. Tuck a small trailing plant like pothos or a stack of coffee table books between frames to soften the look.
Storage Tip
Use woven baskets or fabric bins on the lowest shelves to catch everyday clutter. Choose baskets in a natural fiber like seagrass or jute to keep the warm, cozy vibe going. Label bins if you share the space, or just keep them neutral so they disappear into the bookcase's silhouette.
15. Macrame Wall Hanging with Pockets
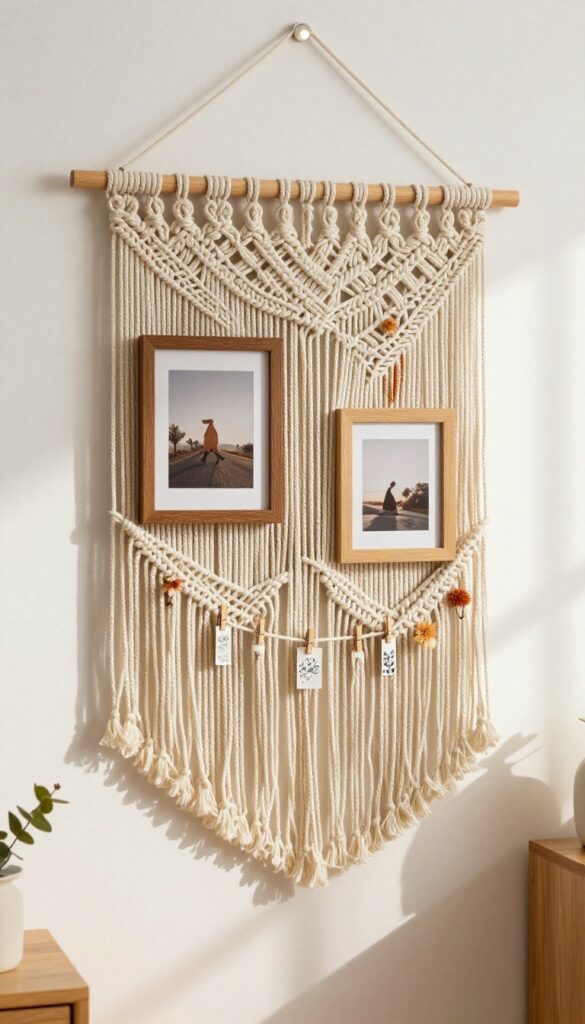
A macrame wall hanging brings instant texture and warmth to any corner, but when you add pockets, it becomes a clever storage solution too. This idea works especially well in a cozy living room where you want to display small photos without committing to a full gallery wall. The soft, woven fibers soften the look of framed pictures, and the fringe at the bottom gives you even more display space for lightweight mementos.
Choose a macrame piece that's large enough to fill the corner—think 24 to 36 inches wide. The pockets should be deep enough to hold a 4×6 photo frame snugly. Tuck in two or three frames with personal photos, and use mini clothespins or clips on the bottom fringe to hang postcards, dried flowers, or tiny art prints.
The overall effect feels collected and intentional, not cluttered. Stick to warm neutral tones like cream, beige, or soft terracotta to keep the look cohesive with a cozy aesthetic.
Best Colors
Natural undyed cotton or warm cream tones blend seamlessly with cozy living rooms. If your space leans boho, try a macrame with subtle rust or mustard threads woven in. Avoid stark white—it can feel cold against warm wood or soft lighting.
Storage Tip
Use the pockets for items you want to see often but keep off surfaces: small framed photos, a dried lavender sachet, or even a slim remote. The fringe clips are perfect for swapping out seasonal decor like mini ornaments or pressed leaves.
Finishing Touch
Hang the macrame from a wooden dowel or a brass rod for extra visual weight. Add a small LED puck light above or beside it to cast gentle shadows that highlight the woven texture—especially nice in the evening.
FAQ
How do I choose the right frames for a corner gallery wall?
Stick with a cohesive color palette or material—like all black or natural wood—to keep the corner from feeling chaotic. Mix frame sizes for visual interest, but keep the style consistent.
Can I create a gallery wall in a small corner without damaging walls?
Absolutely. Use removable adhesive hooks, washi tape, or tension rods to hang lightweight frames. Command strips work well for most frames under 5 pounds.
What's the best way to incorporate storage into a gallery wall?
Look for pieces with built-in storage like shadow boxes, floating shelves with baskets, or pegboards. You can also add small hooks or pouches behind frames for hidden storage.
How do I arrange frames in a corner without it looking awkward?
Start with a focal point—like a larger frame or mirror—at eye level. Then fan out smaller pieces around it, keeping the arrangement balanced but not perfectly symmetrical. Use the corner itself as a natural divider.
What lighting works best for a corner gallery wall?
A small picture light mounted above the main piece or a floor lamp placed nearby can highlight the display. Battery-operated puck lights on shelves also add a warm glow without wiring.
Conclusion
A corner gallery wall doesn't have to be just about looks. By weaving in storage-friendly elements like shelves, baskets, and hooks, you can turn an overlooked spot into a functional, cozy feature. The key is to mix your favorite art with pieces that serve a purpose, so every inch of your living room works harder for you.
Start small, experiment with layouts, and let your corner reflect your style while keeping clutter at bay. After all, a warm home is one where beauty and practicality live side by side.