13 Ideas for Christmas Cabinet Decorations in Your Home
A cabinet dressed for Christmas does more than fill an empty corner. It anchors a room, gives your holiday decor a home, and makes everyday spaces feel intentional instead of overlooked.
You do not need a full redesign to pull it off. A few well-placed pieces, a little texture, and some smart layering can turn a plain surface into the warmest spot in the house.
These thirteen ideas cover kitchens, living rooms, entryways, and everything in between. Pick a few that fit your space, your budget, and how much effort you actually want to put in.
1. Drape a Simple Garland Across the Top
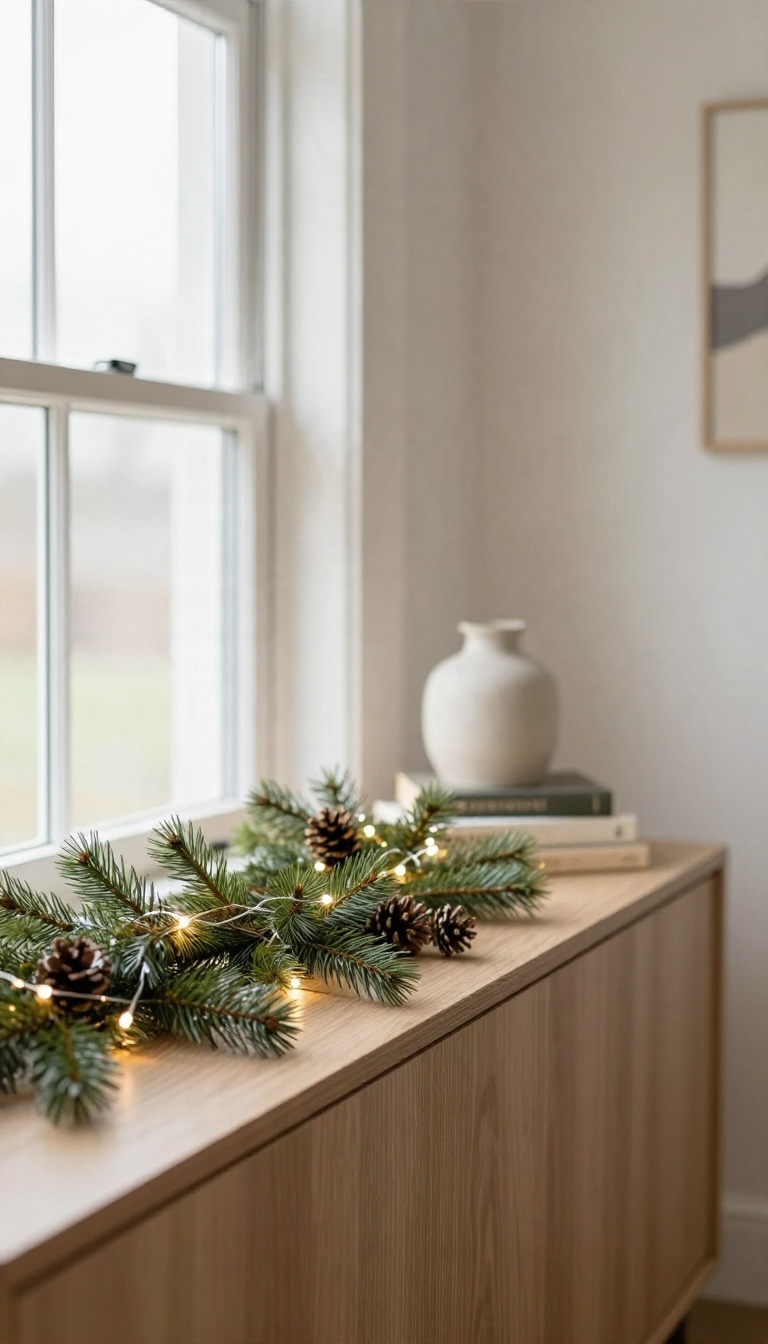
Start with the easiest win in the whole list. A single garland laid across the top of a cabinet instantly makes the piece feel dressed without covering up what you already like about it. The trick is resisting the urge to fuss with it too much.
You want the look of something that landed there naturally, not something pinned into perfect submission. Loose, slightly uneven, and a little wild is exactly the point. It softens the hard, straight edge of a cabinet top in a way that almost nothing else does for so little effort.
Faux evergreen is the practical pick here, and it has gotten genuinely good. Modern versions look full and realistic, they hold their shape, and you can bring them out year after year without a single needle on the floor. Real branches are lovely too, but they dry out and drop, which is a hassle on a surface you actually use.
Go for a garland that is a bit longer than the cabinet is wide. A little extra length lets the ends spill over the sides, which reads as relaxed and generous rather than measured. If yours is too short, it will look stranded in the middle, and no amount of fluffing fixes that.
Lights are optional but worth it. A strand of warm white fairy lights woven loosely through the branches gives a soft glow that makes the whole corner feel cozy after dark. Battery packs keep you from hunting for an outlet, and you can tuck the pack behind the garland where no one will see it.
Let It Look A Little Messy
Symmetry is the enemy of a natural-looking garland. Resist the urge to space every branch evenly or center everything to the millimeter. Instead, fluff the branches outward, let a few sprigs poke up higher than the rest, and leave the ends slightly uneven.
If you are working with a garland that looks a little flat out of the box, give it a good shake and bend the stems into shape. A few minutes of fluffing makes a big difference. The goal is a garland that looks like it grew that way, not one that was arranged by a committee.
Weave In The Lights
Wrap your light strand loosely around the garland instead of threading it in tightly. You want small pools of glow rather than a uniform string of bulbs. Start near one end and work your way across, letting the wire hide inside the branches.
Test the lights before you drape anything, because untangling a dead strand after it is woven in is a special kind of frustration. Once it is up, set the lights on a warm white setting and leave them. That soft glow is what makes the garland feel like decor instead of just greenery.
Anchor It Without Flattening It
A garland that slides around is annoying, but a garland strapped down looks stiff. A few small, clear command hooks or a couple of discreet floral ties at the back will hold it in place without squashing the shape. Let the front stay free and loose.
If the cabinet top is slick, a tiny piece of museum putty under the ends keeps them from creeping. You want it secure enough to survive a bumped elbow, but soft enough that it still looks like it was tossed there with ease.
2. Hang a Mini Wreath on Each Cabinet Door
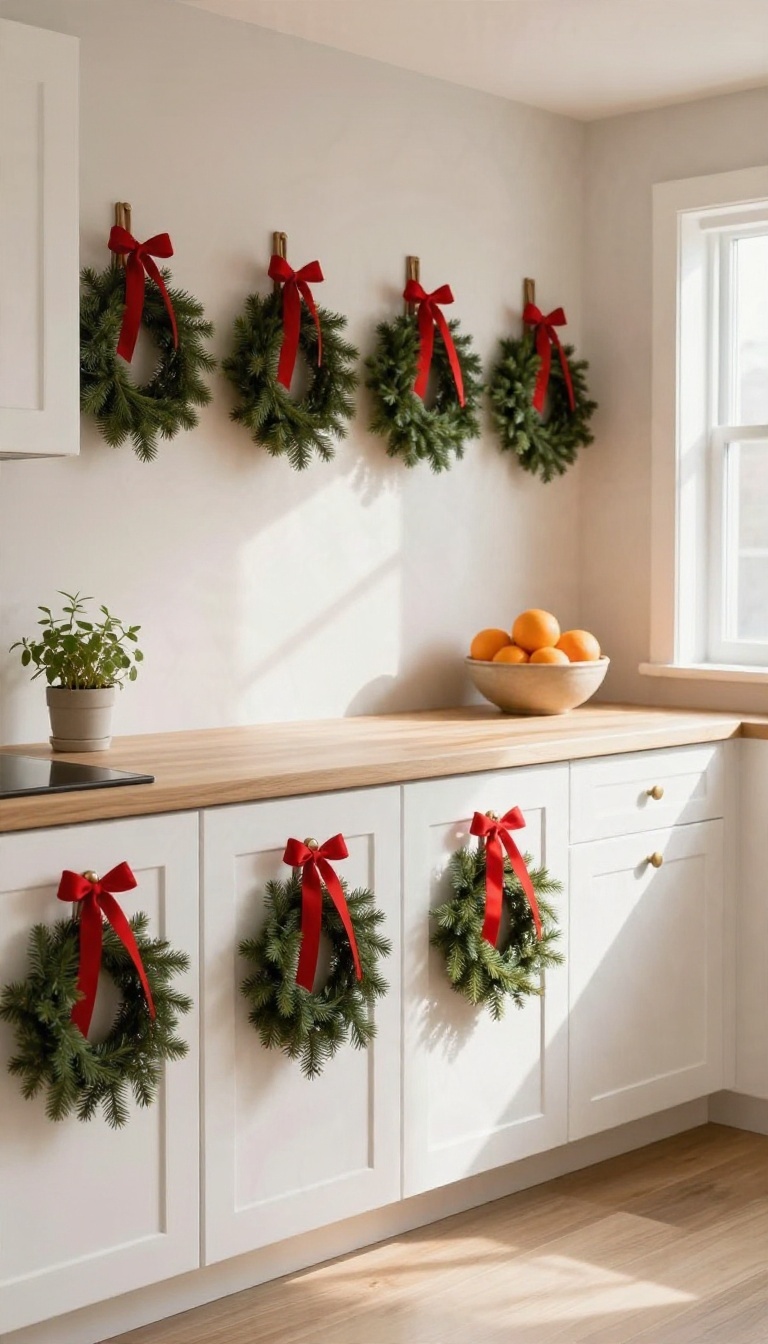
Mini wreaths bring a touch of Christmas to even the most functional spaces. Hanging one on each cabinet door instantly makes your kitchen or built-in feel festive without taking up any counter space. It's a small change that delivers a big dose of holiday spirit.
The best part is that mini wreaths are incredibly easy to hang and remove, so you can enjoy them all season and then pack them away just as quickly. They also work with almost any cabinet style, from sleek modern to rustic farmhouse. Plus, they don't interfere with handles or knobs, so your cabinets stay fully usable.
Choosing The Right Wreaths
Look for wreaths that are small enough to fit on the door without overwhelming it—typically 6 to 10 inches in diameter. You can find pre-made mini wreaths at craft stores or make your own using a wire ring and faux greenery. Consider the color scheme of your kitchen: traditional red and green, neutral whites and browns, or even a metallic theme can all work beautifully.
Hanging Without Damage
Use removable adhesive hooks or over-the-door hangers to avoid drilling into your cabinets. Command hooks work well and come off cleanly when the season is over. If your cabinets have handles, you can also tie the wreath to the handle with a pretty ribbon—just make sure it's secure and doesn't interfere with opening the door.
Styling For A Cohesive Look
For a polished appearance, hang a wreath on every cabinet door in a row. This creates a uniform, intentional look that's especially striking in a kitchen with many cabinets. If you have a large kitchen, you might choose to wreath only the upper cabinets or a select few to avoid visual clutter.
Add a small bow or a sprig of berries to each wreath to tie them together with the rest of your decor.
3. Style the Top with a Hot Cocoa or Coffee Station
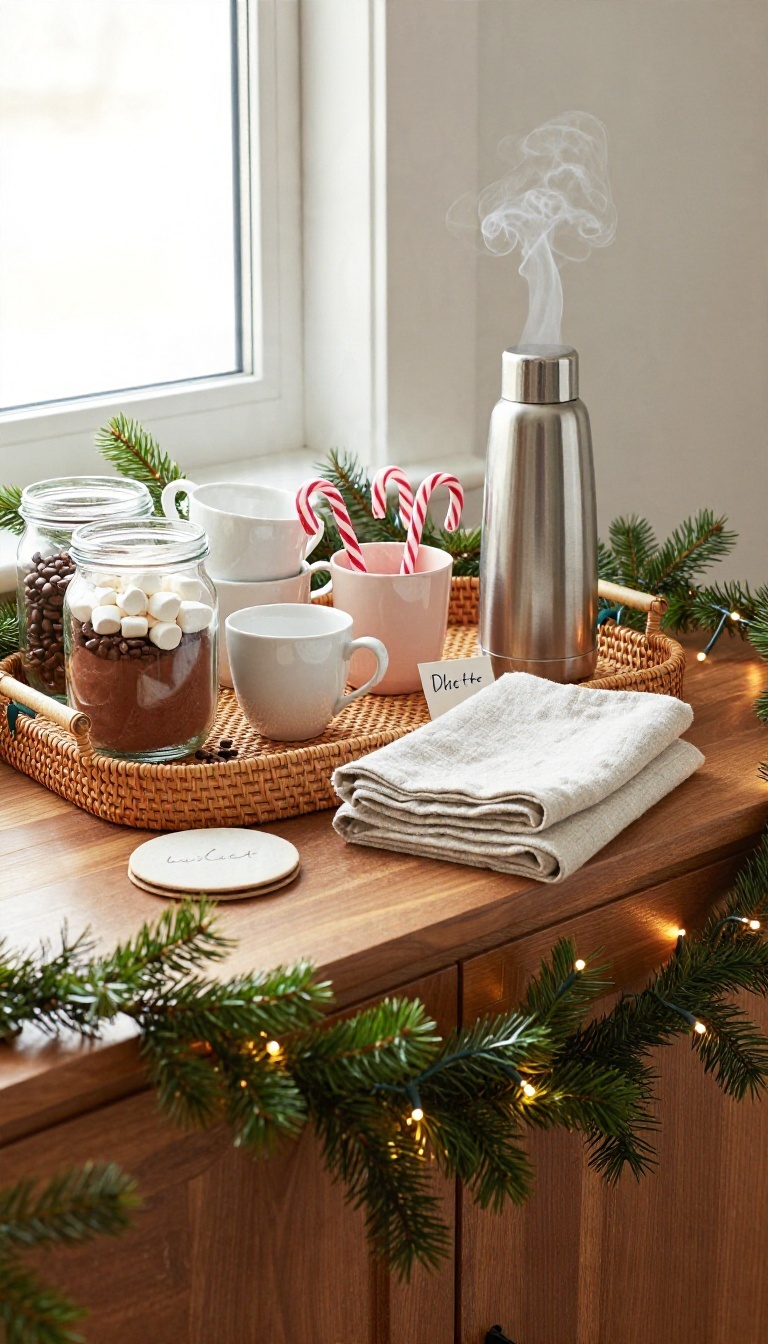
A cabinet top sits at the perfect height for a self-serve drink station. Guests can grab a mug, stir in some cocoa, and settle in without wandering into the kitchen. Better yet, the setup doubles as decor, so you get function and festive charm from the same square footage.
The trick is treating the station like a small styled vignette rather than a random collection of jars. Group items by height, keep the mugs within easy reach, and let one or two seasonal pieces carry the holiday feel. A tray helps contain everything and makes the whole thing easy to move when you need the surface back.
Build Around A Tray
Set a sturdy tray or shallow basket on the cabinet top to define the station. It keeps mugs, spoons, and jars from drifting apart and gives you a clean edge to work with. Choose something with a little texture, like woven rattan or dark wood, so it feels warm against the cabinet finish.
Everything else stacks inside that footprint, which keeps the setup tidy even when people are using it.
Stock It Like A Real Drink Bar
Fill glass jars with cocoa mix, marshmallows, and coffee beans so the station looks good and actually works. Add a small pitcher or thermos for hot water, and keep a short stack of mugs nearby. Candy canes standing in a cup add color and give people something to stir with.
A tiny sign with a handwritten note ties it together without feeling fussy.
Keep It Practical Day To Day
Place a small tray or coaster set for drips, and keep a cloth within reach so the surface stays clean. If the cabinet top is in a busy spot, leave a little open space for people to set down a mug. Swap perishables for shelf-stable items so you are not restocking every morning.
The station should feel easy, not like another chore.
4. Add Battery-Operated Candles for a Warm Glow

Real candles and cabinet tops rarely make good roommates. One wobble, one curious cat, one forgotten flame, and your cozy evening turns into a story you would rather not tell. Battery-operated candles solve that problem without giving up the glow.
The trick is treating them like decor, not a compromise. Cluster a few flameless candles in different heights on a tray, and suddenly a plain cabinet surface looks styled instead of staged. The light flickers softly, nothing needs a match, and you can walk away without a second thought.
Flameless candles have come a long way from the plastic-looking versions people used to hide. Today's better ones have a realistic wick, a gentle flicker, and a warm tone that reads like actual candlelight from across the room. They also work in spots where real flames simply do not belong.
Think above a kitchen counter, on a cabinet near curtains, or anywhere kids and pets roam. You get the ambiance with none of the worry. The key is arrangement.
A random candle here and there looks like clutter. A thoughtful cluster looks intentional.
Build A Tray Cluster
Start with a tray or a shallow platter to anchor the whole arrangement. It gives the candles a defined home and keeps them from drifting across the surface. Pick three to five candles in varying heights, then place the tallest near the back and the shorter ones toward the front.
Group them slightly off-center for a relaxed look. Add a sprig of faux greenery or a small pinecone or two, and you have a finished vignette in about five minutes.
Choose The Right Glow
Not all flameless candles are created equal. Look for ones with a warm amber tone rather than a cool white, since cool light reads as office, not Christmas. A real wax finish and a visible wick make a big difference up close.
If your cabinet is at eye level, that realism matters. For higher spots where people see them from a distance, a simpler version works just fine. Check that the flicker is subtle.
A steady, gentle movement feels cozy. A strobe-like flash feels like a warning signal.
Set It And Forget It
Many battery candles come with a built-in timer, which is the quiet hero of this whole idea. Set them to come on around dusk and turn off a few hours later, and your cabinet glows every evening without you lifting a finger. Keep a spare set of batteries in a drawer nearby so you are never caught with a dead candle mid-season.
Swap them once before December hits and you are set through the holidays.
5. Layer a Runner or Cloth for Instant Color
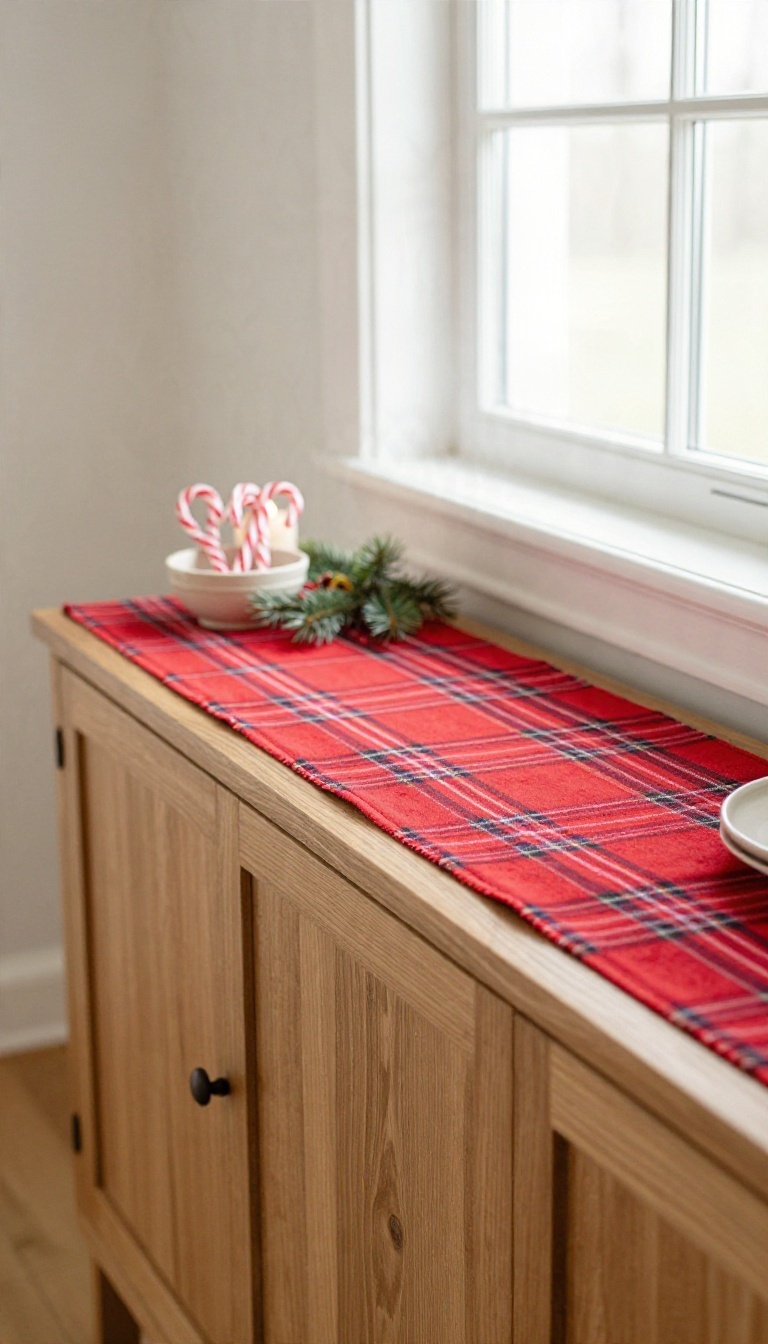
Fabric does a lot of quiet work on a cabinet top. A runner or a draped cloth adds color and texture in seconds, and it protects the wood from scratches, sticky candy canes, and whatever else the season throws at it. It also gives all your smaller decorations a shared base, so they read as one arranged scene instead of a scattered collection.
The best part is how forgiving this step is. You can swap a runner out next weekend if you change your mind, and nobody has to touch a drill or a paintbrush. Think of it as the foundation layer, the thing everything else sits on.
A runner works best on longer cabinet tops where you want to leave some wood showing at the edges. A full cloth suits wider surfaces or spots where you want a bigger block of color. Either way, measure before you buy, because a runner that hangs too short looks accidental and one that pools on the floor looks messy.
Choosing A Fabric That Fits The Room
Match the fabric to the room, not just the holiday. A red plaid runner feels right in a farmhouse kitchen, while a deep green velvet cloth suits a living room with warmer, moodier tones. If your cabinets are already busy with wood grain, go simple and solid.
If the surface is plain, a subtle pattern gives it some life. Texture matters as much as color. Burlap and linen feel rustic and relaxed, while velvet and satin read a little dressier.
You can also layer a narrow runner over a wider cloth for depth without spending much.
Keeping It In Place
Fabric on a smooth cabinet top tends to slide when someone bumps it. A strip of double-sided tape or a few small adhesive dots underneath will hold it steady without damaging the finish. For a draped cloth, tuck the corners neatly or pin them at the back where nobody will see.
If the cabinet sits near a doorway or a high-traffic path, keep the overhang short. Long edges catch sleeves and get pulled down constantly.
Working With What You Already Own
You do not need to buy anything new for this step. A scarf, a spare tablecloth folded in half, or even a piece of fabric from a craft bin can work if the color fits your scheme. Folded fabric gives you a cleaner edge than a raw cut, and it is easy to adjust.
Try a few options before you commit. Drape one, step back, and see how it reads from across the room. The right one usually makes the cabinet look finished before you have added a single ornament.
6. Display a Collection of Christmas Cards or Postcards

Christmas cards have a way of piling up on the counter, getting shuffled around, and eventually disappearing into a drawer. A cabinet gives them a proper home and turns a stack of paper into something you actually get to enjoy. The best part is that this display builds itself.
Every card that arrives in the mail adds to it, so the arrangement grows and changes all through December without you doing much at all.
The trick is to give the cards a structure to live inside, so the display looks intentional instead of cluttered. A few simple tools and a little planning on day one will carry you through the whole season.
Pick A Spot With A Little Backing
The back of a cabinet top is ideal because the wall gives cards something to lean against. If your cabinet sits against a plain wall, cards stay put and read like a row of little framed pictures. On a cabinet with glass doors, you can clip or tape cards to the inside and let them show through.
Either way, the cabinet becomes the frame and the cards do the talking.
Lean, Clip, Or String Them
Leaning is the lowest-effort option. Line cards along the back edge of the cabinet top, overlapping slightly so they look layered rather than lined up like soldiers. Small clips on a length of twine work well across the front of a cabinet or inside a door panel.
Binder clips, clothespins, or mini wooden pegs all hold a card without leaving marks. Pick one method and stick with it so the display stays cohesive as it grows.
Let It Fill In Through December
Start with the cards you already have and leave room for more. As new ones arrive, tuck them into the gaps or add them to the end of the row. This slow build is what makes the display feel personal, and it gives you a reason to look forward to the mail.
Family photos and postcards from past trips can fill the early gaps until the holiday cards catch up.
Keep It Tidy As It Grows
Once the display gets full, swap out the oldest cards for newer ones or move a few to a second spot. Group cards by size or color if the mix starts to feel busy. A quick reshuffle every week keeps the whole thing looking fresh and stops it from turning into a pile.
7. Use Baskets and Bins for Cozy Storage
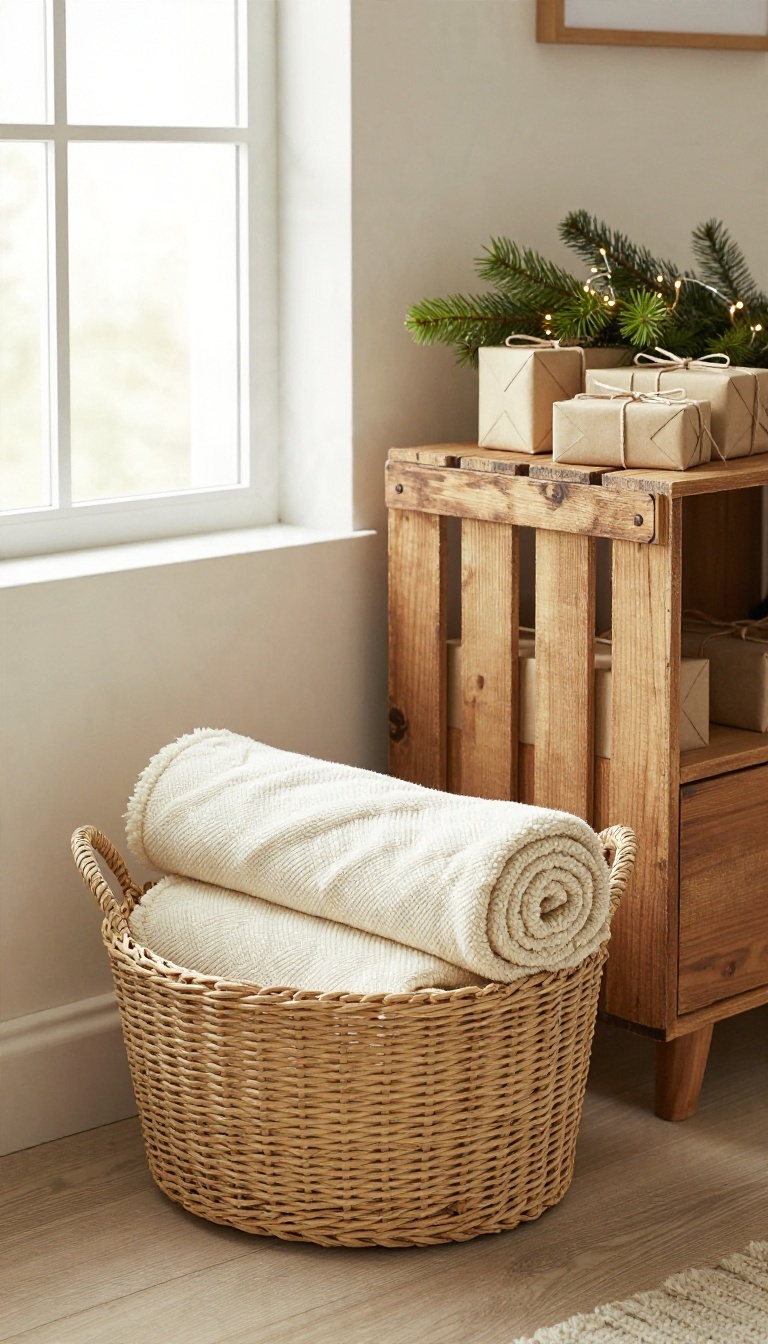
Clutter has a way of ruining a good-looking cabinet setup. Baskets and bins solve that problem while adding texture and warmth at the same time. They give every loose item a home, so the surface stays tidy without looking empty.
A woven basket on a cabinet top instantly makes the space feel softer. Pair it with a wooden crate or two and you get a layered, collected look that still reads as organized. The trick is choosing pieces that match the room's scale and actually hold what you need to store.
Pick Baskets That Fit The Space
Measure the cabinet top before you shop so the baskets don't swallow the whole surface. A low, wide basket works well on a narrow console, while a taller bin suits a deep kitchen cabinet. Stick to two or three pieces max so the arrangement stays clean and breathable.
Fill Them With Useful Things
Rolled throws, spare ornaments, and small wrapped gifts all look intentional when tucked into a basket. A bin near the entryway can hold gloves, hats, and dog leashes without looking messy. Just don't overstuff them, or the cozy effect disappears.
Mix Materials For Warmth
Seagrass, wicker, and aged wood bring natural texture that pairs well with greenery and lights. Add a fabric liner or a folded blanket peeking over the rim for extra softness. Keep the palette neutral so the baskets blend instead of competing with your other decor.
8. Set Out a Mini Christmas Tree

A small tabletop tree on a cabinet brings height and a classic holiday silhouette, and it works well in tight spaces where a full tree will not fit. It also gives you a chance to play with scale and create a focal point without overwhelming the room. Plus, a mini tree is easy to move, decorate, and store when the season ends.
A mini tree can be the star of your cabinet display, but it needs the right setting to look intentional. Start by choosing a spot where the tree won't block traffic or hide other decor. Then build around it with complementary pieces that enhance its shape and color.
Pick The Right Spot
Place the tree where it can be seen from the main seating area or entryway. Avoid corners where it might get bumped, and make sure it's not blocking cabinet doors or drawers. A spot near the center or slightly off-center often works best.
Choose A Tree That Fits
Tabletop trees come in many sizes and styles, from tiny bottlebrush trees to fuller mini pines. Measure your cabinet top first, then pick a tree that leaves room for other decorations. A tree that's too tall can look cramped, while one that's too small might get lost.
Decorate With Light Touches
Keep ornaments small and light so they don't weigh down the branches. A few tiny baubles, a strand of fairy lights, or a simple star on top can make a big impact. Avoid overloading the tree—simplicity keeps it looking elegant.
Anchor It With A Base
A mini tree can tip over easily, so use a sturdy base or a small basket filled with weights. A decorative pot or a piece of fabric wrapped around the base can also add style while keeping the tree stable.
9. Create a Snowy Village Scene
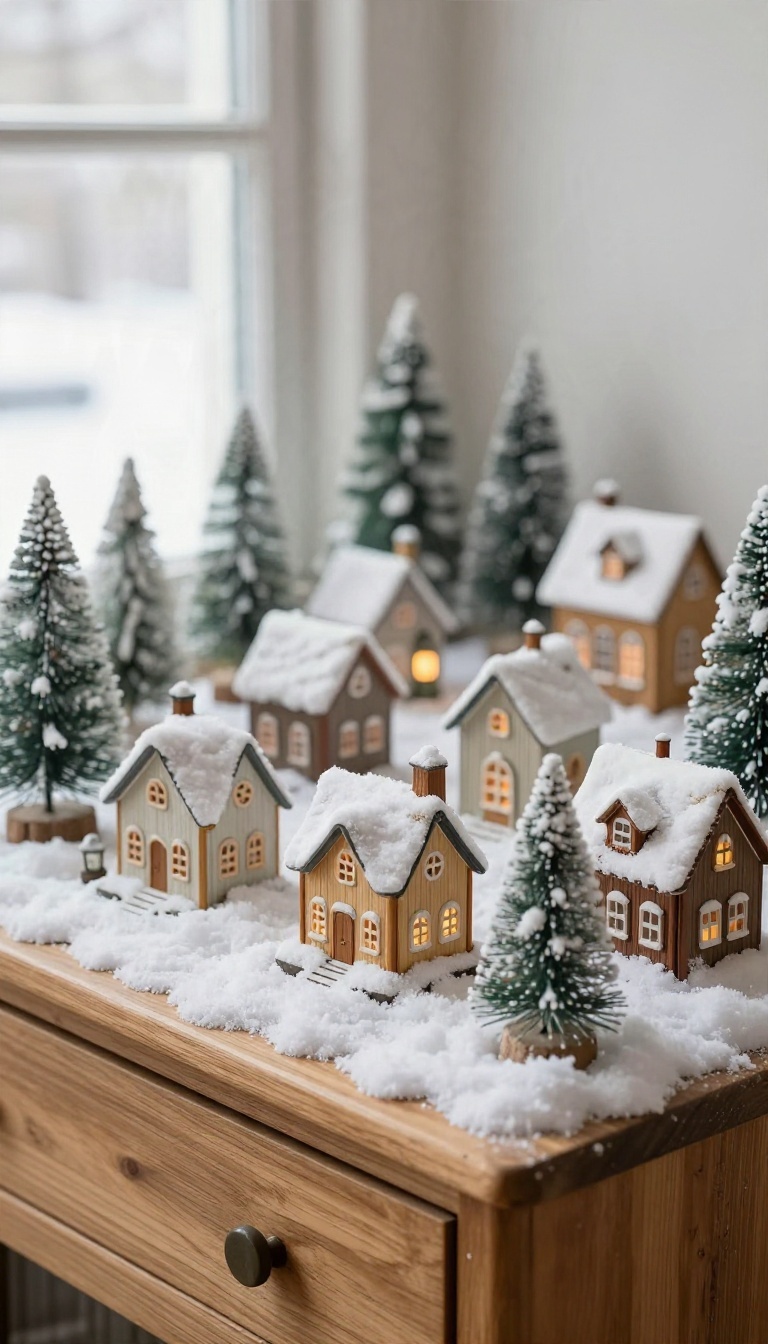
A tiny village on a cabinet top has a way of pulling people in. Guests drift toward it, lean closer, and start pointing out their favorite little house. That small moment of curiosity is exactly what makes this idea worth the counter space.
The setup itself is simple. You need a tray, a handful of miniature buildings, some bottle-brush trees, and faux snow. Stack them with a little care and you get a scene that looks collected over years, even if you assembled it in twenty minutes.
It also gives you a place to use pieces that might otherwise sit in a box. Grandma's ceramic cottage, a thrifted church, a tiny lantern — they all earn a spot here.
## Start With a Tray to Hold It All Together A shallow tray does more than look nice. It defines the scene, keeps the faux snow from wandering across the cabinet, and makes the whole thing easy to lift and move when you need to dust. Pick a tray with a little texture — wood, aged metal, or a woven rattan piece.
Something with a raised edge works best, since loose snow has a habit of escaping. Size it to your cabinet. A long, narrow tray suits a sideboard, while a round one feels right on a smaller console or hutch. ## Layer the Snow Before the Houses Go Down Resist the urge to sprinkle snow on top of everything at the end.
Build from the bottom up instead. Spread a thin base layer across the tray, then set your houses into it so they look like they're sitting in drifts rather than floating on a surface. Push a little snow up against the base of each building to settle them in.
Leave some areas bare or lightly dusted. Real snow doesn't fall evenly, and a flat white carpet reads as fake fast. ## Mix Heights and Shapes for a Real Village Feel A row of identical houses lined up like soldiers looks stiff. Vary the scale instead.
Put your tallest piece toward the back and slightly off-center. Group smaller cottages in front, and tuck a bottle-brush tree or two between them to break up the gaps. Odd numbers tend to look more natural than even ones.
Three houses and five trees usually beat four and four. ## Add One Small Detail That Tells a Story A village scene gets charming when it hints at life. A tiny bench, a lamppost, a miniature wreath on a door, or a little figure walking a path all do the trick. You only need one or two of these touches.
More than that and the scene starts to feel cluttered instead of cozy. If you have kids, let them place the figures. The result is usually a little off-kilter and a lot more fun.
Start With A Tray To Hold It All Together
A shallow tray does more than look nice. It defines the scene, keeps the faux snow from wandering across the cabinet, and makes the whole thing easy to lift and move when you need to dust. Pick a tray with a little texture — wood, aged metal, or a woven rattan piece.
Something with a raised edge works best, since loose snow has a habit of escaping. Size it to your cabinet. A long, narrow tray suits a sideboard, while a round one feels right on a smaller console or hutch.
Layer The Snow Before The Houses Go Down
Resist the urge to sprinkle snow on top of everything at the end. Build from the bottom up instead. Spread a thin base layer across the tray, then set your houses into it so they look like they're sitting in drifts rather than floating on a surface.
Push a little snow up against the base of each building to settle them in. Leave some areas bare or lightly dusted. Real snow doesn't fall evenly, and a flat white carpet reads as fake fast.
Mix Heights And Shapes For A Real Village Feel
A row of identical houses lined up like soldiers looks stiff. Vary the scale instead. Put your tallest piece toward the back and slightly off-center.
Group smaller cottages in front, and tuck a bottle-brush tree or two between them to break up the gaps. Odd numbers tend to look more natural than even ones. Three houses and five trees usually beat four and four.
Add One Small Detail That Tells A Story
A village scene gets charming when it hints at life. A tiny bench, a lamppost, a miniature wreath on a door, or a little figure walking a path all do the trick. You only need one or two of these touches.
More than that and the scene starts to feel cluttered instead of cozy. If you have kids, let them place the figures. The result is usually a little off-kilter and a lot more fun.
10. Hang Stockings or Ornaments from Knobs and Handles

Cabinet knobs and handles are already right there, so why not put them to work? Hanging small stockings or ornaments from them adds a festive touch without any damage to the cabinet surface. It is a simple swap that makes the hardware feel intentional rather than just functional.
You probably have a few knobs that could use a little holiday spirit. This trick works on kitchen cabinets, bathroom vanities, or that entryway console you walk past every day. The key is to keep it light and avoid anything too heavy that could pull on the hardware.
Pick The Right Spot
Not every knob is a good candidate. Choose ones that are sturdy and in a spot where people will actually see them. Kitchen island knobs or cabinet doors near a hallway are great because they get noticed.
Avoid handles that are loose or in high-traffic areas where they might get bumped.
Use Lightweight Decorations
Small stockings, miniature ornaments, or even a tiny garland loop work best. You do not want anything that could scratch the cabinet or pull the hardware out of alignment. If you are using a stocking, keep it empty or fill it with something very light like a few candy canes.
Secure Without Damage
A simple ribbon loop or a small hook that fits over the knob is all you need. Avoid adhesive hooks that could leave residue. If you are worried about scratches, put a small piece of felt behind the decoration where it touches the cabinet.
11. Add a Pop of Red with Ribbon and Bows

Red is the fastest way to make a cabinet look festive without moving a single thing inside it. A ribbon bow takes about thirty seconds to tie, costs almost nothing, and comes right off when the season ends. It also solves a common problem: cabinets can feel a little flat when the rest of the room is dressed up.
A small hit of color at the handle draws the eye and ties the piece into your tree, wreath, and mantel without a big commitment. The trick is keeping it looking intentional rather than like leftover gift wrapping. A few small choices about ribbon, placement, and scale make all the difference.
Pick A Ribbon That Holds Its Shape
Stiff ribbon beats floppy ribbon every time. Grosgrain, velvet, and wired ribbon hold a bow's shape and won't droop after a day or two, which matters on a surface people actually use. Satin looks lovely but slides loose on smooth handles.
If you love the shine, look for a satin-blend with a bit of body, or double the ribbon so it keeps some structure. Width matters too. A narrow ribbon suits small knobs, while a wider one works better across a long pull or a cabinet front.
Hold a spool up to the hardware before you commit.
Tie Bows That Stay Put
Start with a simple shoelace knot around the base of the knob, then build the loops on top. This keeps the bow centered and stops it from sliding down. For handles, wrap the ribbon around the bar once before tying so it grips.
Trim the tails at an angle or into a notch to keep them looking finished rather than frayed. If little hands are around, tuck the tails up or trim them short. Long ribbon on a low cabinet invites tugging, and a short tail looks tidier anyway.
Spread The Color Without Overdoing It
You don't need a bow on every door. Try one on a pair of handles, or alternate bows with bare knobs so the red reads as an accent instead of a theme. On a wide cabinet, a single ribbon swagged across the front can do more than a dozen small bows.
Secure the ends behind the doors and let the middle drape slightly. Match the red to something else nearby, like a throw, a bowl of ornaments, or the tree skirt. That small echo is what makes the color feel like part of the room.
Keep It Removable And Reusable
Skip the tape and the hot glue. Ribbon tied in a bow lifts off in seconds and leaves no residue on wood or metal. Store the bows loosely wound around a piece of cardboard so they keep their shape for next year.
A shoebox works fine. This is also the easiest idea to swap out mid-season. Change the ribbon to gold in January, or pull it entirely and let the cabinet breathe.
12. Style a Tray with Holiday Greens and Ornaments
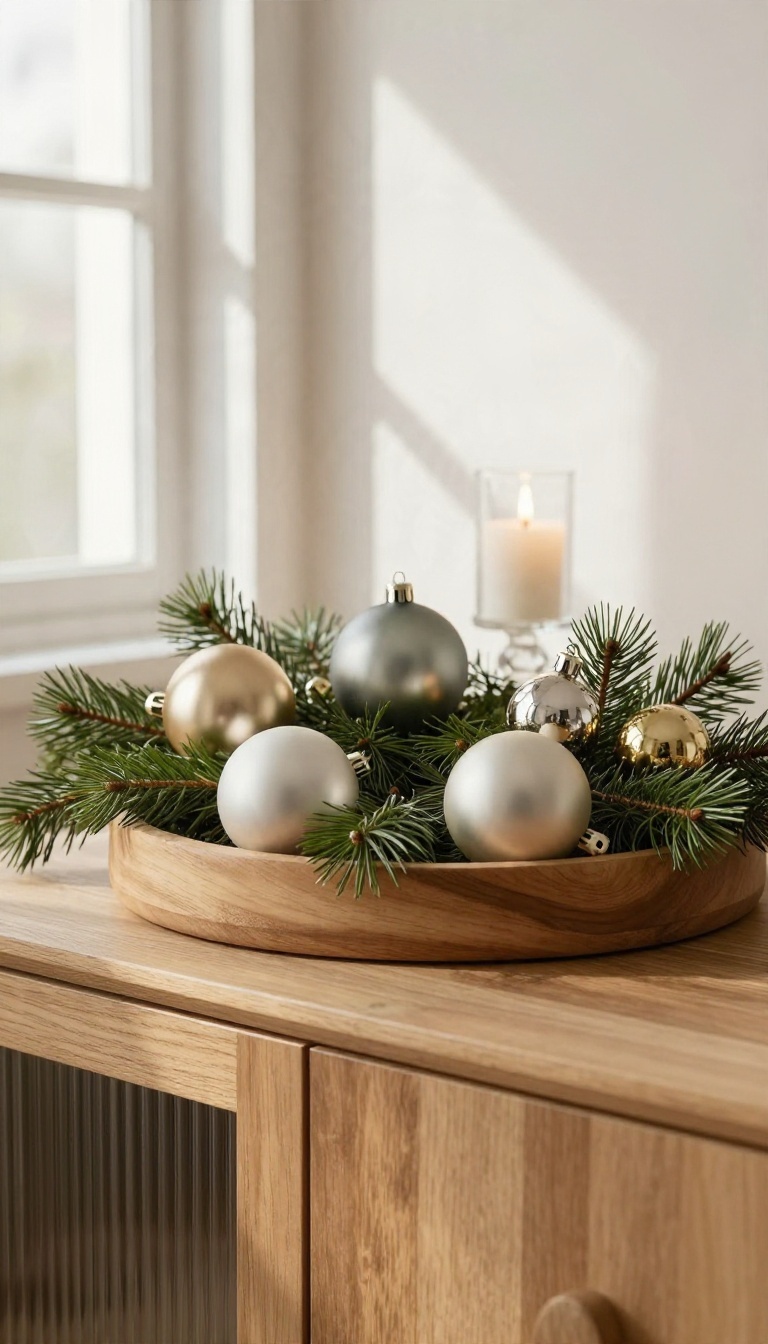
A tray turns a random assortment of decorations into a deliberate little scene. It gives small items like ornaments and greenery a defined home, so the cabinet top looks styled instead of scattered. The best part?
You can swap out the contents in seconds when you want a fresh look.
Start with a tray that fits your cabinet top without overwhelming it. A round wooden tray or a rectangular metal one works well, depending on your style. The tray acts as a boundary, so even a few pieces feel intentional.
Once you have your tray, layer in the holiday elements. Begin with greenery as the base, then add ornaments and a candle or two. The tray keeps everything contained, which makes it easy to move the whole arrangement when you need to clean or change things up.
Pick A Tray That Fits Your Space
Measure the depth of your cabinet top before you choose a tray. You want a little breathing room on each side so the tray doesn't look crammed. A tray that's too large will make the arrangement feel heavy, while one that's too small won't hold enough to make an impact.
Consider the material, too. Wood and metal are classic, but you can also use a mirrored tray for a bit of sparkle. Just make sure it's sturdy enough to hold everything without wobbling.
Layer Greens, Ornaments, And A Candle
Start with a bed of faux or fresh greenery. Cedar, pine, or a mix of both gives you texture and a nice scent. Arrange it loosely so it looks natural, not like a stiff bouquet.
Nestle a few ornaments into the greens. Vary the sizes and finishes—matte, shiny, metallic—to keep it interesting. Then add a candle in a holder that complements the tray.
A pillar candle or a jar candle both work; just make sure it's stable and won't tip over.
Keep It Easy To Refresh
The tray makes it simple to change your display without starting from scratch. After the holidays, swap the greens for winter foliage and the ornaments for pinecones. Or go minimalist with just a candle and a small vase.
Because everything sits on the tray, you can lift it off, dust the cabinet, and put it back in one motion. That ease is what makes this idea practical for real life, not just for photos.
13. Mix in Natural Elements Like Pinecones and Branches
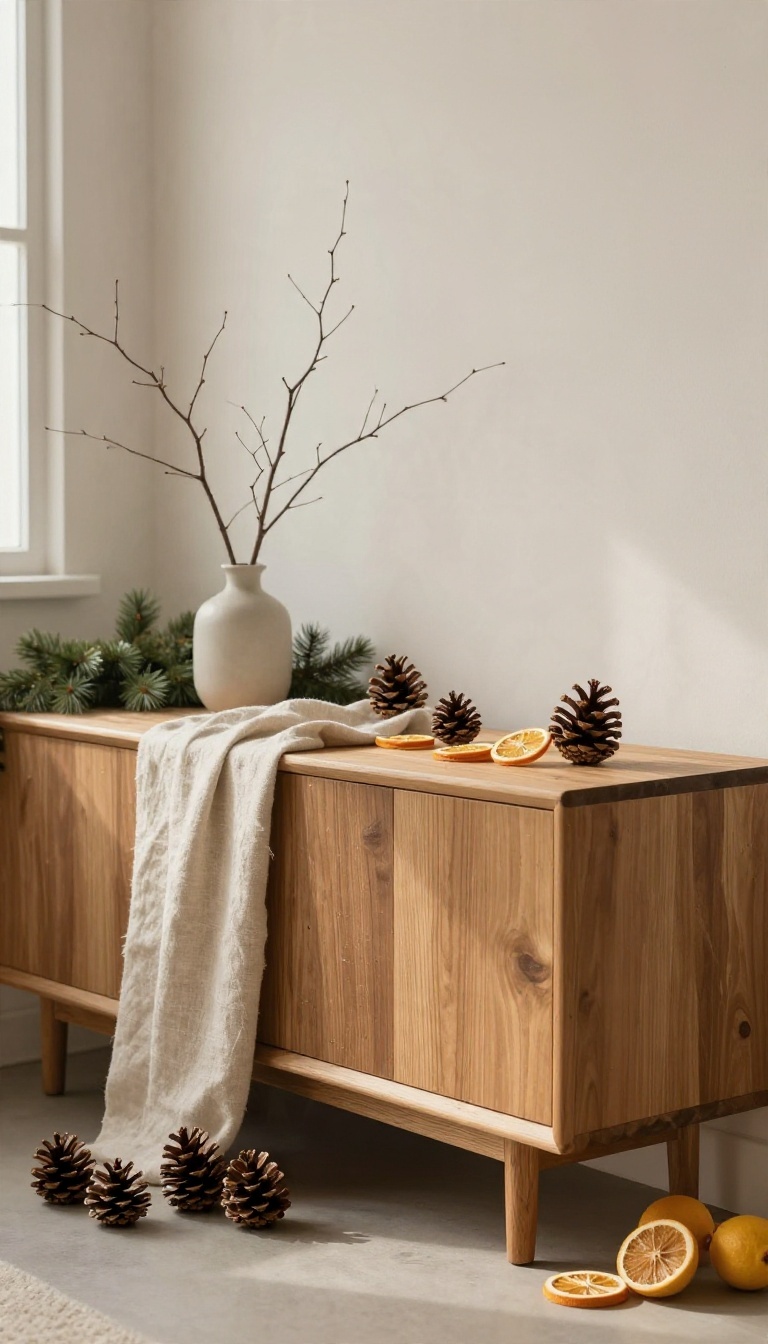
Shiny ornaments and bright lights have their place, but a cabinet covered only in gloss can start to feel a little one-note. Natural elements bring texture and a grounded, rustic warmth that balances all that sparkle. Pinecones, bare branches, and dried citrus are simple to find, easy to work with, and forgiving if you are not a perfectionist.
They also make a cabinet feel collected over time rather than bought all at once.
You do not need a forest floor to make this work. A handful of well-placed pieces goes a long way, especially when you mix sizes and let some things spill off the edge. The key is to treat natural elements as texture, not clutter.
Group them loosely, keep a few bare spots, and let the cabinet breathe. Start with what you already have or can gather. A walk outside might give you more than you expect, and dried citrus is as close as your oven.
Once you have your materials, layer them in without overthinking it.
Gather And Prep Your Materials
Pinecones are the easiest starting point. If you pick them up outside, give them a quick bake on low heat to dry them out and get rid of any hidden critters. Bare branches work too, especially thin ones with a little curve.
Dried citrus slices are simple: slice an orange or lemon thin, pat it dry, and bake it low and slow until it feels leathery. These prep steps take a little time but make everything last longer and look intentional.
Layer Textures Without Clutter
Place larger pinecones near the corners or at the base of a stack, then tuck smaller ones in between. Branches can go upright in a vase or lay horizontally along the cabinet top, depending on the look you want. Dried citrus adds a pop of color and a bit of translucence when light hits it.
Keep the arrangement loose and avoid lining everything up in a row. A little messiness reads as natural.
Balance Natural With Shiny
Natural elements work best when they have something to contrast with. Pair pinecones with a few glass ornaments or a metallic tray, and the textures play off each other. If your cabinet already has bright lights, keep the natural pieces matte and muted so they do not compete.
The goal is balance, not a takeover. A few natural touches can make the shiny stuff feel warmer and more inviting.
FAQ
How do I decorate a cabinet without damaging the finish?
Use removable hooks, ribbon ties, or freestanding decorations. Avoid adhesives that leave residue, and test any clip or hook on an inconspicuous spot first.
Can I decorate kitchen cabinets if I have limited counter space?
Yes. Focus on the cabinet tops, doors, and sides. Mini wreaths, hanging ornaments, and small trays take up little room and keep counters clear.
What are good Christmas cabinet decoration ideas for renters?
Renters can use command hooks, leaning decorations, and freestanding items like mini trees and baskets. Avoid nails or permanent fixtures, and keep everything easy to remove.
How do I keep cabinet decorations looking tidy?
Group items on trays, stick to a color palette, and edit as you go. Fewer, larger arrangements usually look cleaner than many small pieces scattered around.
Should I use real or faux greenery on cabinets?
Faux greenery is low-maintenance and reusable, while real greenery adds scent and texture. Either works well; just keep real greens away from heat sources and check for shedding.
Conclusion
Cabinet decorations give you a lot of holiday payoff without taking over a room. A garland, a few ornaments, or a simple ribbon can turn a plain surface into something that feels intentional and warm. You don't need to work through all thirteen ideas, and you definitely don't need to buy anything new.
Pick two or three that suit your cabinets and your schedule, then let the rest go. Start with what you already own, add slowly, and see how it looks before committing to more.