13 Budget-Friendly Wall Ideas to Give Your Living Room Instant Character
Does your living room feel a little flat? Sometimes all it takes is a fresh approach to the walls to wake up the whole space. You don't need a big budget or a contractor to make a dramatic difference.
Small changes—like rearranging what you already own or adding a single new element—can completely shift the energy of a room. The best part? Most of these ideas cost very little and take just an afternoon to pull off.
Whether you rent or own, these wall ideas are designed to be practical, stylish, and totally doable. Let's dive into 13 ways to give your living room the character it's been missing.
1. Gallery Wall with Thrifted Frames
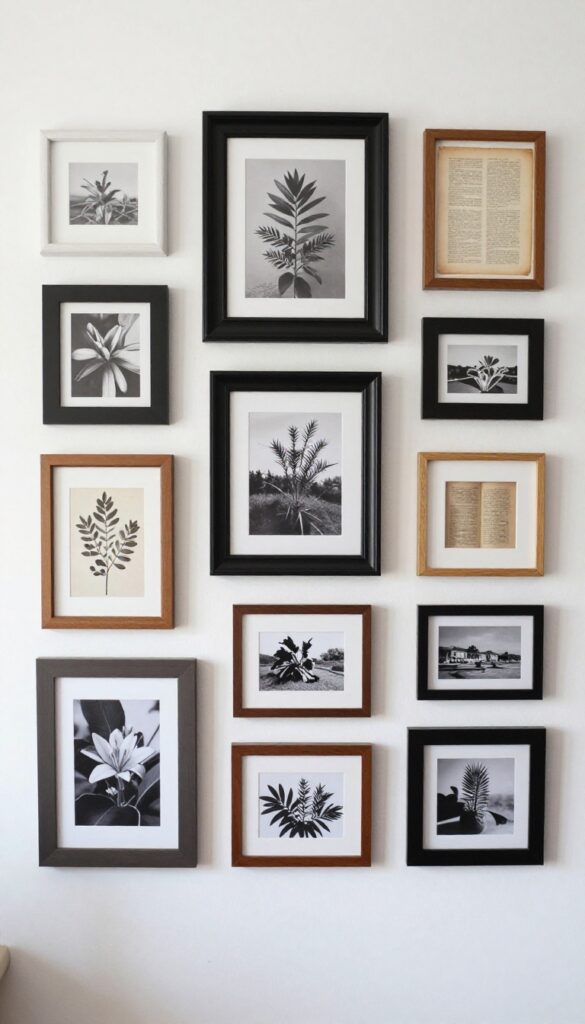
A gallery wall is one of the easiest ways to inject personality into a plain living room, and doing it with thrifted frames keeps the project budget-friendly. Scouring flea markets and secondhand shops for frames in all shapes and sizes adds a sense of discovery to the process. The result is a wall that feels curated over time, not bought in a hurry.
Start by collecting frames from thrift stores, garage sales, or online marketplaces. Look for sturdy frames with interesting details like ornate molding or unique shapes. You can either paint them all the same color for a unified look—matte black or white works well—or leave them as-is for an eclectic, collected-over-time feel.
Lay the frames out on the floor first to plan your arrangement, then transfer the layout to the wall using paper templates. Hang them close together (about 2–3 inches apart) for a cohesive cluster. Fill them with personal photos, art prints, or even pages from old books.
This wall becomes a conversation starter and a reflection of your style without costing a fortune.
Best Colors
If you decide to paint the frames, stick to one finish—like flat black, warm white, or a muted gold—to tie the mismatched shapes together. For a more playful look, leave frames in their original wood tones or paint them in a mix of pastels. Keep the artwork inside mostly black-and-white or neutral to avoid visual chaos.
Layout Tip
Create a balanced arrangement by starting with the largest frame in the center and working outward. Use a level and measuring tape to keep spacing even. For a relaxed vibe, don't stress perfection—slight asymmetry adds charm.
Budget-Friendly Swap
Can't find enough frames? Mix in other wall decor like a small mirror, a woven basket, or a ceramic plate. These add texture and break up the frames without costing much.
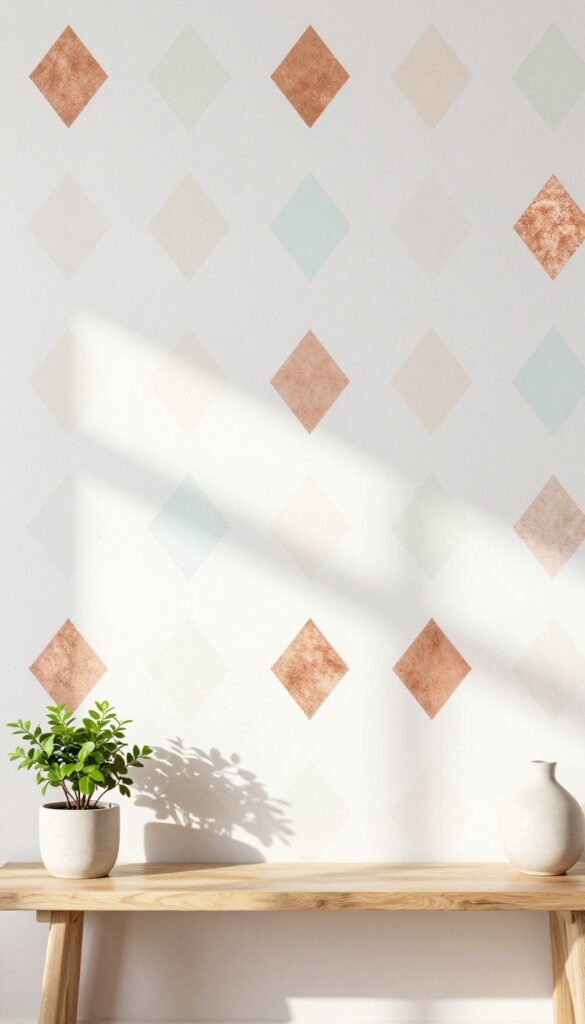
2. Peel-and-Stick Accent Wall
Peel-and-stick wallpaper has come a long way from the cheap, bubbly stuff your landlord used. Now you can find designs that look like real grasscloth, textured linen, or even hand-painted murals. The best part?
It comes off clean when you move out, so you can take your style with you or switch it up next season. Pick one wall that needs a punch—behind the sofa or the TV wall—and let the pattern do the work. It's an instant focal point with zero commitment.
A peel-and-stick accent wall is one of the easiest ways to add character to a living room without breaking the bank or your lease. The key is choosing a pattern that feels intentional, not chaotic. Think large-scale florals for a dramatic look, geometric prints for a modern edge, or textured neutrals for understated depth.
Apply it to the wall behind your main seating area or the TV wall to anchor the room. Because it's temporary, you can experiment with bold colors or patterns you'd normally hesitate to try. And if you get tired of it?
Just peel it off and start fresh.
Best Patterns For Small Spaces
- If your living room is on the smaller side, go with a pattern that has a light background and a subtle repeat. Small-scale geometrics or delicate botanicals keep the space feeling open. Avoid huge, dense prints that can overwhelm the room.
- A vertical stripe pattern can also make the ceiling feel higher, which is a nice trick for cozy apartments.
Application Tips For A Smooth Finish
- Prep your wall by wiping it down and letting it dry completely. Start at the top and work your way down, smoothing out bubbles with a plastic squeegee. If you're doing a feature wall with an outlet or window, cut the wallpaper slightly larger than needed and trim the excess with a utility knife.
- Take your time—rushing leads to crooked seams and air pockets.
Budget-Friendly Swap
Instead of covering the entire wall, use peel-and-stick wallpaper to create a large framed panel. Measure a rectangle in the center of the wall, apply the wallpaper inside that area, and add thin molding or washi tape around the edges. This uses less wallpaper and gives you a custom look for under $30.
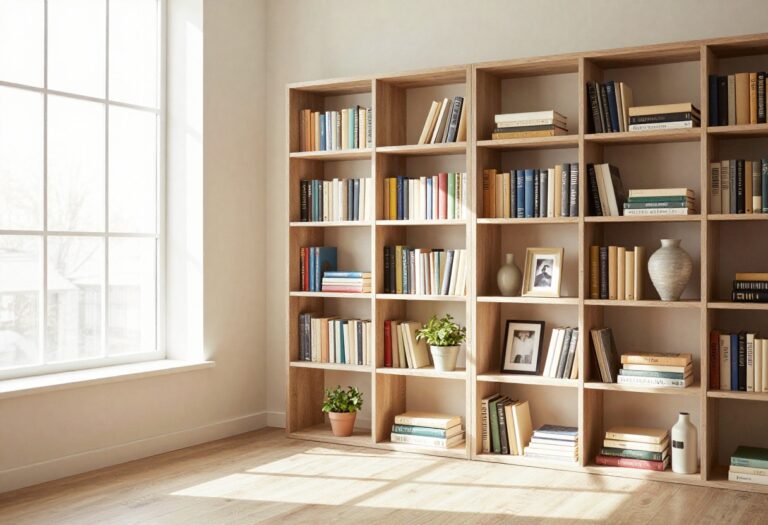
3. Floating Shelves with Curated Objects
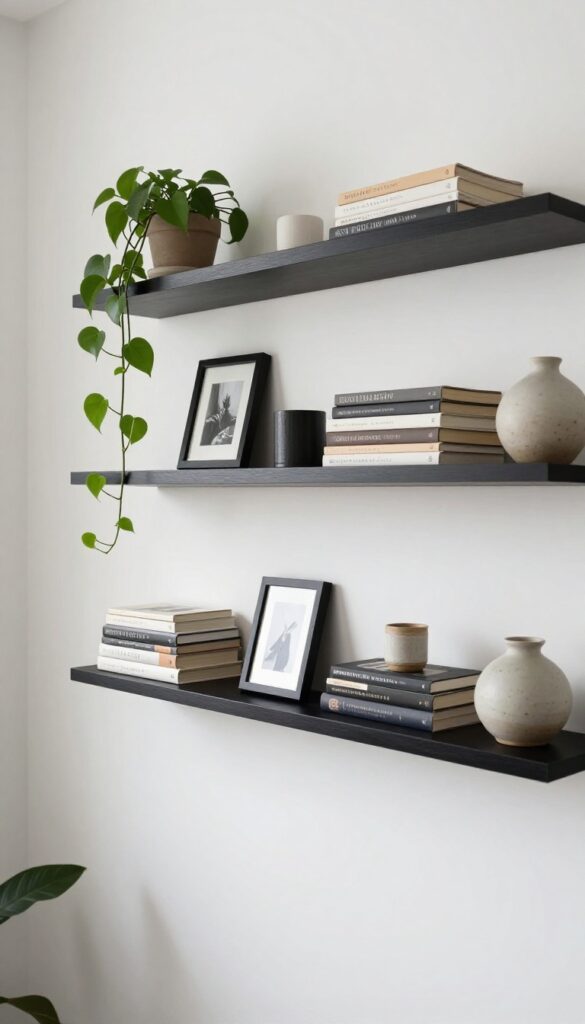
Floating shelves are a budget-friendly way to add character without committing to permanent changes. They draw the eye upward, making the room feel taller, and give you a rotating gallery for your favorite things. The key is to style them with intention—mixing books, plants, and ceramics in a way that feels collected, not cluttered.
Floating shelves work in any living room, but they shine when you treat them as a mini gallery. Start with a few sturdy shelves in a finish that contrasts your wall—black against white, or natural wood on a painted wall. Then layer items: stack a couple of books horizontally, lean a small framed photo, and add a trailing plant or a ceramic vase.
Keep the arrangement balanced but not perfectly symmetrical—odd numbers of objects often look more natural. Swap items seasonally to keep the display fresh without spending money. This is an easy, low-cost way to inject personality into a blank wall.
Budget-Friendly Swap
- You don't need expensive decor to make floating shelves look good. Thrift stores and flea markets are goldmines for unique ceramic pieces and vintage books. Spray paint a thrifted vase for a modern touch, or use dried eucalyptus from the grocery store instead of fresh flowers.
- The goal is to mix textures and heights, not to spend a lot.
Shelf Styling Tip
Start with a large anchor item—like a stack of books or a substantial vase—then build around it. Vary the heights: use book stacks to elevate smaller objects, and let a trailing plant drape over the edge for softness. Leave a little empty space so the eye can rest; overcrowding defeats the purpose.
Small-space Fix
In a small living room, floating shelves are a lifesaver because they use vertical space without taking up floor area. Install them above a sofa or console table, but keep the top shelf within easy reach so you can dust and rearrange. Stick to a cohesive color palette—neutrals with one accent color—to keep the look streamlined.
4. DIY Textile Wall Hanging
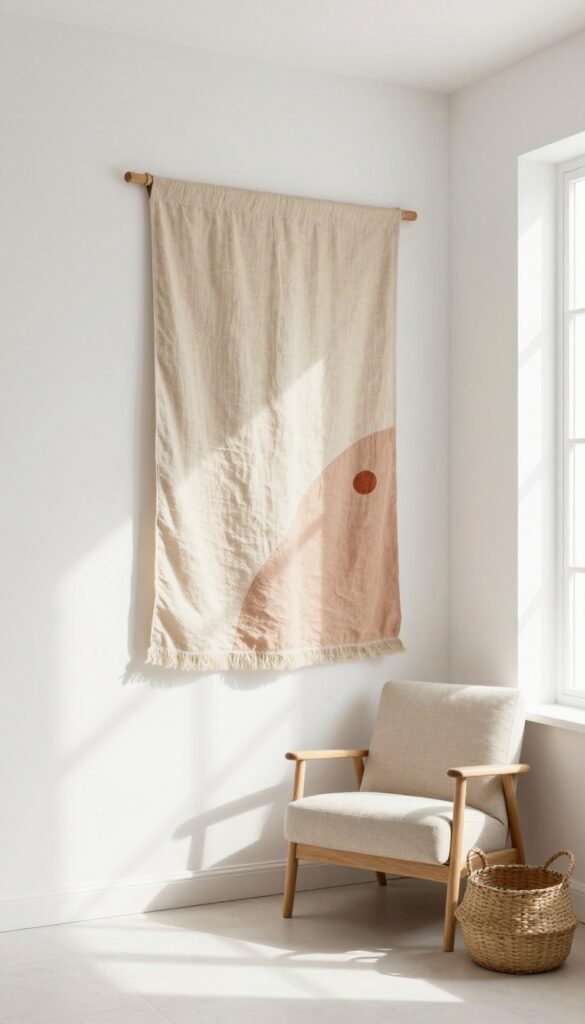
Walls that feel flat are often missing one thing: texture. A DIY textile wall hanging brings in softness, color, and a handmade touch without costing a lot. Whether you use a vintage scarf, a piece of linen, or a woven tapestry, this idea works in any room that needs a little warmth.
It's especially cozy above a bed, a reading nook, or a small sofa where you want the space to feel inviting.
A textile wall hanging is one of the easiest ways to add personality to a blank wall. You don't need special skills—just a fabric piece you love and a simple rod. The fabric softens the room acoustically and visually, making the space feel more lived-in.
Choose a pattern or color that ties into your existing palette, or go bold for a focal point. This is a budget-friendly swap that can change the whole mood of a corner.
Best Fabrics To Use
- Look for lightweight to medium-weight fabrics that drape nicely. Linen, cotton, wool blends, or even an old silk scarf work well. Thrift stores are goldmines for unique textiles—think tablecloths, curtains, or sarongs.
- Avoid anything too stiff or heavy, as it won't hang gracefully.
Hanging Method
- A wooden dowel or a simple curtain rod is all you need. Clip the fabric onto the rod with curtain rings or fold the top edge over and sew a pocket. For a no-sew version, use binder clips or wooden clothespins.
- Mount the rod with brackets or adhesive hooks if you're renting.
Styling Tip
Hang the textile so it's centered on the wall or above a piece of furniture. Leave a few inches of space between the bottom of the hanging and the furniture top. Pair it with a small shelf underneath to display a plant or a stack of books—this creates a layered, curated look.
5. Mirror Grouping for Light and Depth
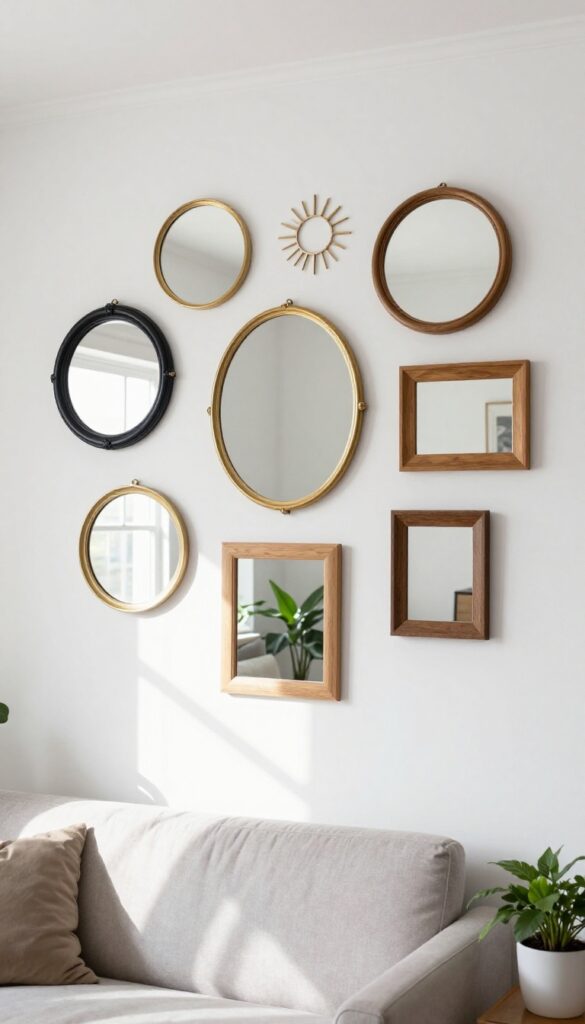
Mirrors are magic when you use them in a group. Instead of one lonely mirror over the sofa, try clustering several together on a wall. Different shapes—round, oval, rectangular, maybe a sunburst—add visual interest while bouncing light around the room.
The effect is instant: the space feels bigger, brighter, and more layered. And because you can mix frames, it's easy to pull together a collection on a budget.
A mirror grouping works especially well in living rooms that lack architectural detail or feel a bit flat. The varied outlines create a gallery-like feature without needing art. Plus, mirrors reflect whatever you put opposite them—a window, a lamp, or a plant—so you get double the visual payoff.
For a cohesive look, keep the frames within the same color family (black, gold, or natural wood) even if the shapes differ. Hang them close together, about two to three inches apart, to read as one intentional arrangement.
Budget-Friendly Swap
- Skip the pricey designer mirrors. Thrift stores, garage sales, and discount home shops are gold mines for inexpensive mirrors. You can spray-paint mismatched frames the same color for a unified look.
- Even basic IKEA mirrors work if you cluster them creatively. The key is variety in size and shape, not expensive materials.
Layout Tip
- Before hammering nails, lay the mirrors on the floor and play with the arrangement. Try a loose grid, a clustered organic shape, or a linear row. Take a photo to help you visualize.
- Once you're happy, trace each mirror's outline on kraft paper, tape the paper to the wall, and adjust until it feels balanced. Then hang the mirrors over the paper guides.
Lighting Pairing
Position your mirror grouping across from a window or a light source to maximize reflection. If natural light is limited, mount a picture light above the cluster or place a small lamp on a nearby console. The mirrors will amplify the glow, making the room feel brighter without extra fixtures.
6. Painted Geometric Pattern
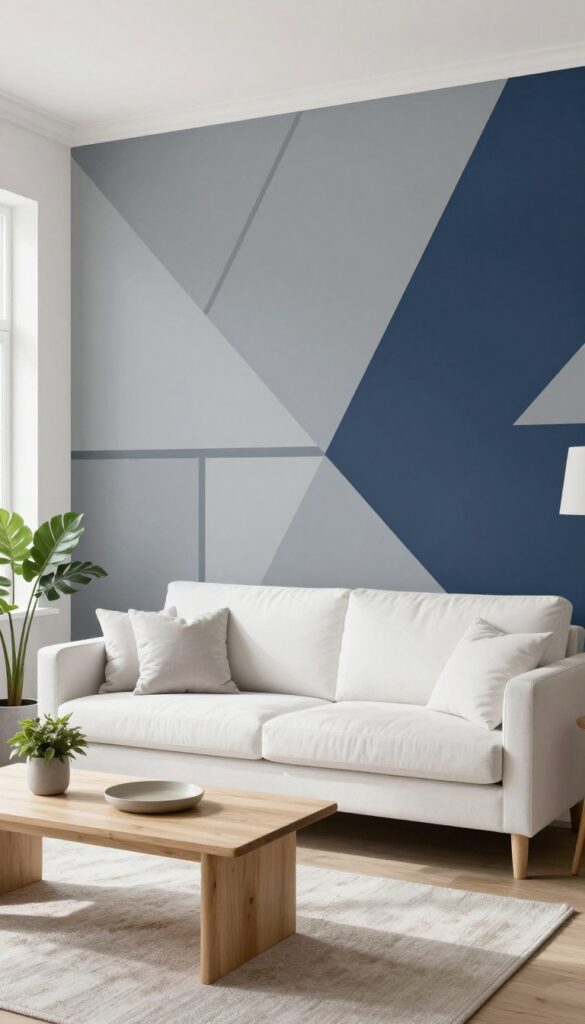
Geometric painted walls are a fantastic way to inject personality into a room without spending a lot. It’s a weekend project that can completely transform a space, making it feel modern and intentional. The best part?
You can customize it to fit your exact style and color palette.
Start by choosing a wall that will become the focal point—maybe behind the sofa or the TV. Use painter's tape to map out your design, whether it's bold triangles, clean stripes, or a more complex chevron. Pick two complementary paint colors; a neutral base with a pop of color works well, or go for two tones of the same hue for a subtle effect.
The key is to keep the lines crisp and the colors balanced. Once the tape comes off, you'll have a custom piece of art that cost a fraction of a gallery wall.
Best Colors
For a modern look, try a soft gray base with a deep navy geometric pattern. If you want more energy, use a warm white with a terracotta or mustard yellow design. Keep the rest of the room neutral to let the pattern shine.
Layout Tip
Before painting, sketch your design on paper and use a level to mark guide lines on the wall. For a cohesive look, extend the pattern slightly around corners or onto an adjacent wall for a wrap-around effect.
Budget-Friendly Swap
If you're nervous about committing, try removable wallpaper with a geometric print instead. It’s just as impactful but easier to change when you're ready for something new.
7. Hanging Plant Wall
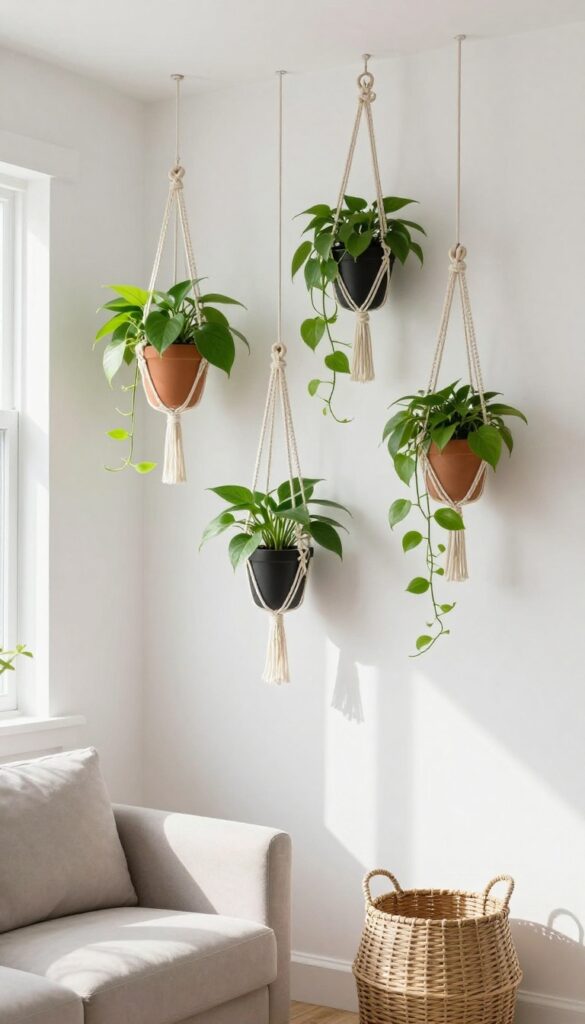
A blank wall doesn't have to stay empty. By mounting a few planters or hanging a macrame holder, you can turn that bare space into a living, breathing feature. Trailing plants like pothos or ivy soften the room and add a natural, organic feel that instantly warms up any corner.
This idea is perfect for renters or anyone on a budget because you can start small and build up over time. A single macrame hanger with a cascading plant costs next to nothing, yet it draws the eye upward and makes the room feel taller. Grouping three or four planters together creates a lush green cluster that feels like a mini indoor garden.
For the best visual impact, choose planters in similar tones—like matte black or terracotta—to keep the look cohesive. Watering is easy if you pick plants that like similar conditions; just check the soil once a week and give them a good soak. To keep leaves dust-free, wipe them gently with a damp cloth every month.
This wall works in any living room, especially near a window where the plants can thrive in indirect light.
Best Plants
Stick with trailing, low-maintenance varieties like pothos, philodendron, or string of pearls. They grow quickly, forgive occasional neglect, and look full without needing much effort. If you want a pop of color, try a variegated pothos or a purple tradescantia.
Budget-friendly Setup
Skip expensive designer planters and use small terracotta pots or even thrifted mugs. Macrame hangers are easy to DIY with a few YouTube tutorials, or you can buy them for under $10 each. Start with two or three plants and add more as your plant collection grows.
Styling Tip
Hang the planters at staggered heights to create movement and depth. Place the tallest one slightly off-center, then layer shorter ones around it. This arrangement feels more natural than a straight line and makes the wall look intentionally curated.
8. Oversized Wall Clock
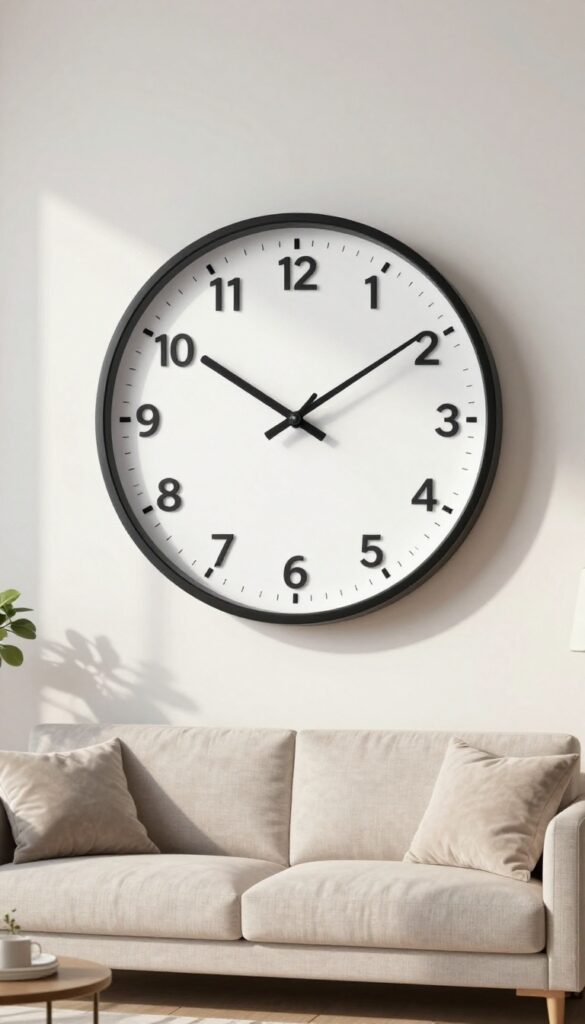
An oversized wall clock does more than tell time—it anchors a room with quiet confidence. The scale alone makes a statement, turning a functional object into a focal point that fills empty wall space without adding visual noise. For budget-conscious decorators, this is one of the easiest ways to make a big impact with a single, affordable piece.
Look for a clock with a clean, simple face in a neutral tone like matte black, warm wood, or soft white. The minimalist design keeps it from competing with other decor, while the size ensures it doesn't get lost on a large wall. It's practical, stylish, and surprisingly versatile.
A large wall clock works best when it's the main event on a bare wall. Position it at eye level in a spot where it can be seen from multiple seating areas—above a sofa, opposite the entryway, or at the end of a hallway. The key is to let it breathe: avoid crowding it with small frames or shelves.
Because the clock itself is simple, it pairs well with almost any color palette or furniture style. In a neutral living room, a black or white clock adds subtle contrast. In a room with warmer tones, a wooden clock brings texture.
The trick is choosing one that feels intentional, not just oversized.
Budget-Friendly Swap
- You don't need to spend a lot to get this look. Many home goods stores offer large wall clocks for under $50. Check discount retailers, online marketplaces, or even thrift stores for vintage finds.
- If you're handy, you can DIY one using a inexpensive clock mechanism and a large wooden or metal disc. The cost is low, but the visual payoff is huge.
Best Placement
- For maximum impact, hang the clock in a spot where it's not competing with other wall decor. A large wall behind a sofa or above a console table works perfectly. Avoid placing it near a window where it might get lost in natural light.
- Also, make sure the clock is easily readable from the main seating area—function matters as much as form.
Styling Tip
- Keep the surrounding area simple. A clock this size is a statement piece, so let it shine. If you want to add a little warmth, place a small plant or a stack of books on a nearby shelf.
- Avoid adding other wall art within a two-foot radius to maintain a clean, uncluttered look.
9. Fabric-Covered Panels
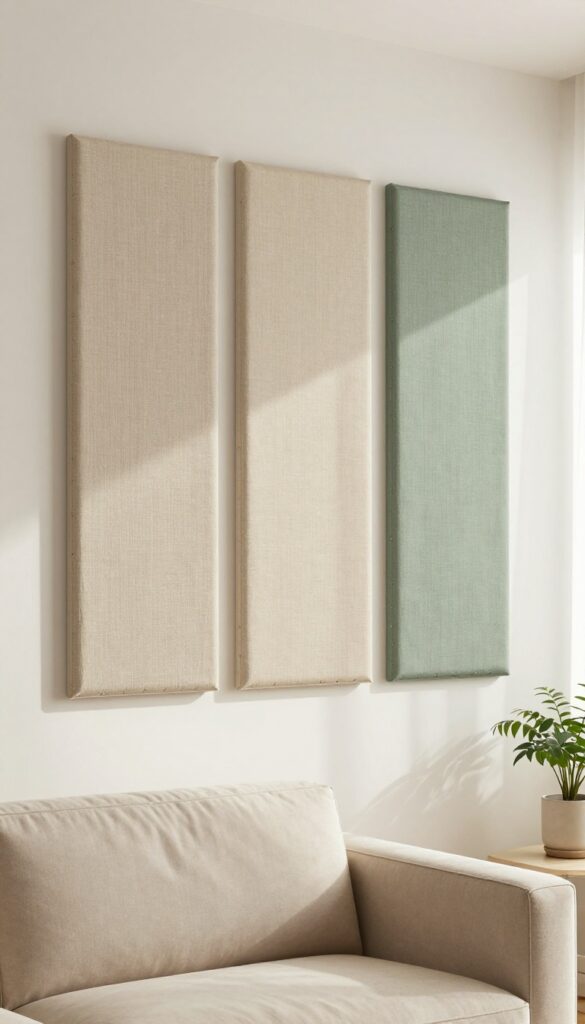
If your living room walls feel flat and uninspired, fabric-covered panels are a surprisingly easy fix. They add softness, texture, and a custom look without the commitment of wallpaper or the cost of wainscoting. Plus, they double as sound absorbers, making your space feel cozier and quieter.
Stretch fabric over foam core or plywood to create soft, upholstered wall panels. Attach them with adhesive strips for a renter-friendly installation. This adds texture and sound absorption on a budget.
Choose a fabric that complements your sofa or curtains for a pulled-together look.
Best Fabrics To Use
Linen, velvet, and cotton twill work best because they stretch nicely and hide wrinkles. Avoid slippery fabrics like silk or polyester satin, as they’re harder to keep taut. For a budget-friendly option, look for clearance upholstery remnants or even flat bed sheets in a solid color.
Layout And Placement
- You don’t need to cover an entire wall. A cluster of three to four panels behind the sofa creates a focal point. Or line them up along a narrow wall to visually widen the room.
- Leave a few inches of space between panels for a modern grid effect.
Finishing Touch
Add a thin trim of nailhead tape or decorative upholstery tacks around each panel for a polished, furniture-like finish. It’s a small detail that makes the panels look custom-built rather than DIY.
10. Chalkboard or Whiteboard Wall
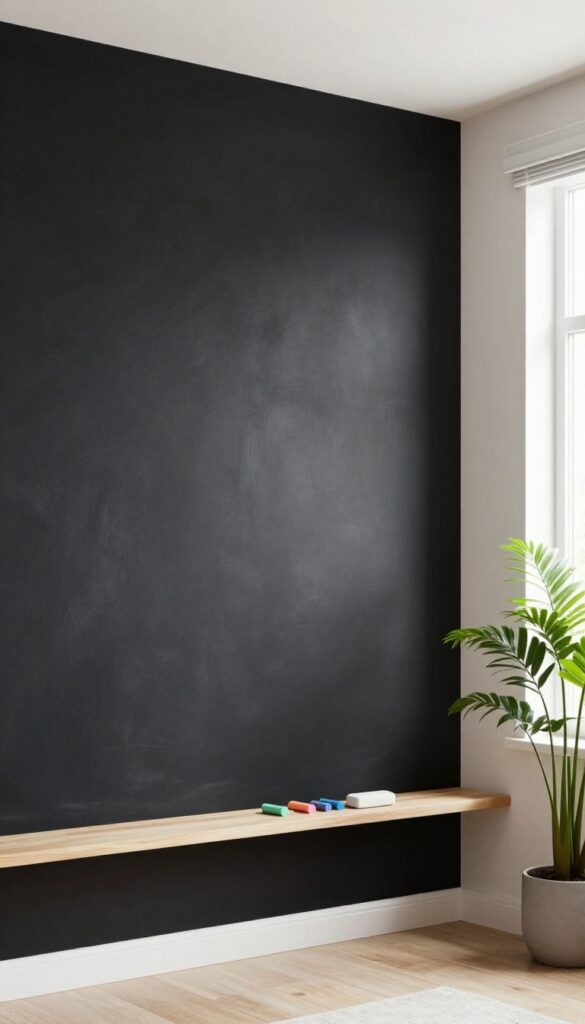
A chalkboard or whiteboard wall brings a playful, practical edge to a living room that feels a little too serious. It’s a spot where notes, doodles, or a rotating art display can live without taking up floor space. The matte black or crisp white surface adds a graphic punch that works with modern, industrial, or even cozy farmhouse styles.
Best of all, it’s a budget-friendly way to make a wall functional without sacrificing style.
Painting a section of wall with chalkboard or whiteboard paint turns it into an interactive canvas. Use it for grocery lists, family reminders, or let kids go wild with chalk while you sip coffee. In a creative space, it becomes a mood board for ideas or a gallery wall that changes weekly.
The key is keeping the area around it clean and intentional—add a small ledge for chalk or markers and a tray for an eraser. This idea shines in family rooms, home offices, or any spot where you want a little spontaneity.
Best Colors And Finishes
- Chalkboard paint typically comes in matte black, but you can also find it in dark green, navy, or even custom tints. For a whiteboard wall, stick with high-gloss white paint designed for dry-erase markers—it reflects light and keeps the room feeling open. If you’re hesitant about a full wall, try a large framed panel or a section behind a desk.
- The contrast between the dark chalkboard and lighter walls creates a natural focal point.
Budget-Friendly Swap
- Skip the expensive pre-made boards and buy a quart of chalkboard or whiteboard paint for under $20. You can cover a 4×4-foot section for less than $30, including a foam roller and painter’s tape. For a temporary option, use chalkboard contact paper—it peels off easily and costs around $10 per roll.
- Pair it with a simple wood frame made from trim pieces to give it a polished look without the price tag.
Styling And Finishing Touch
- Keep the area around the board clean to avoid a cluttered feel. Mount a slim shelf underneath to hold chalk, markers, and a small plant or photo frame. Use magnetic chalkboard paint if you want to hang lightweight art or notes with magnets.
- For a whiteboard wall, choose colorful markers that match your decor palette—neon pinks or muted earth tones keep it playful but intentional. Change the artwork weekly to keep the room feeling fresh.
11. Vintage Map or Print Collage
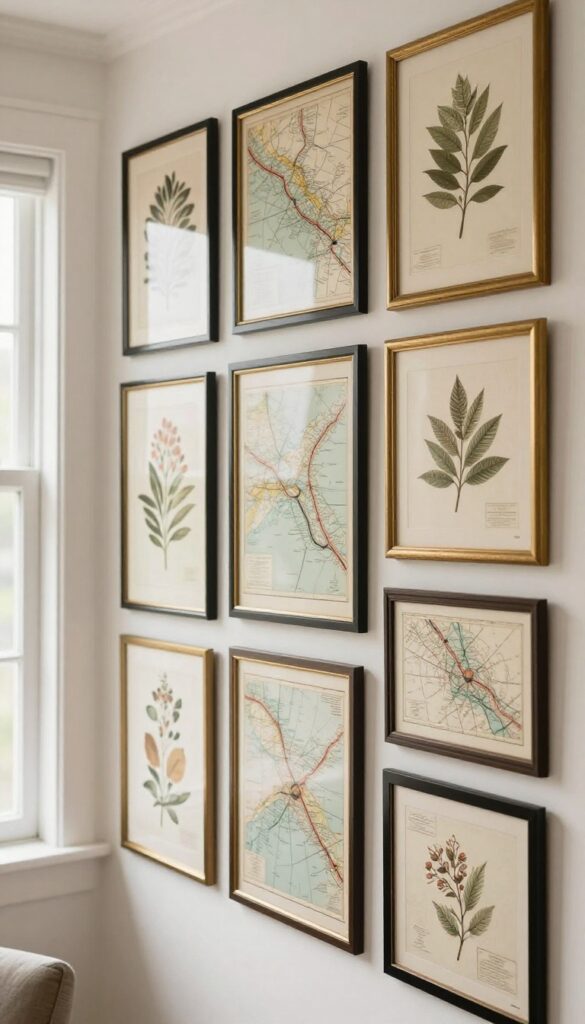
A wall full of vintage maps or botanical prints instantly adds character without costing a fortune. The trick is to mix frames—some matching, some mismatched—for that collected-over-time look. Thrift stores, flea markets, and online archives are goldmines for affordable prints that feel anything but cheap.
Start by choosing a theme: old maps of your favorite cities, botanical illustrations, or even vintage travel posters. Hunt for frames at thrift stores—paint them all the same color (black or gold works well) for a cohesive look, or keep them as-is for a more eclectic vibe. Lay the arrangement on the floor first to nail the spacing before hammering any nails.
A salon-style cluster feels curated, while a neat grid looks more modern. Either way, you'll have a conversation starter that costs pennies compared to store-bought art.
Where To Find Affordable Prints
The New York Public Library and other online archives offer thousands of free, high-resolution vintage prints you can download and print at home. Thrift stores often have old atlases or encyclopedia sets with beautiful illustrations you can cut out. Estate sales are another goldmine for original maps and botanical prints at bargain prices.
Framing On A Budget
Mix thrifted frames with inexpensive ones from IKEA or Target. Spray-paint mismatched frames the same color for instant cohesion. Use matting to make smaller prints feel larger and more polished—pre-cut mats are cheap and available at craft stores.
Layout Tips For A Polished Look
- For a salon wall, start with the largest piece in the center and work outward, keeping 2-3 inches between frames. For a grid, measure carefully and use a level. Stick to a consistent frame color or style for grids to keep it tidy.
- Use paper templates taped to the wall to test the arrangement before committing to nails.
12. Washi Tape Art
Washi tape is one of those materials that feels almost too simple to be decor, but that’s exactly what makes it brilliant. It’s inexpensive, comes in endless colors and patterns, and doesn’t commit you to anything permanent. For a living room that needs a little personality without a big budget or a lot of effort, a temporary tape mural can be the perfect solution.
You get a custom wall treatment that looks intentional and artistic, but you can peel it off in seconds whenever you’re ready for something new.
The beauty of washi tape art is that you don’t need to be a skilled artist to pull it off. Simple geometric shapes like triangles, stripes, or a repeating diamond pattern can look incredibly polished. You can also create a mini city skyline along one wall or frame a gallery wall of photos with tape borders.
Because the tape is repositionable, you can experiment until you get the layout just right. It’s a low-risk way to add color, structure, and a handmade feel to your space.
Best Colors And Patterns
- Stick to two or three complementary colors to keep the design cohesive. Metallic tapes like copper or gold add a subtle sheen that catches the light, while matte pastels keep things soft and airy. For a bolder look, mix a few patterned tapes with solid ones.
- The key is to plan your palette before you start taping so the final result feels intentional, not chaotic.
Layout Tip
- Start with a simple shape like a large triangle or a series of diagonal stripes. Use painter’s tape to mark the edges first, then fill in with washi tape. This helps you keep lines straight and spacing even.
- If you’re doing a city skyline, sketch the outline lightly in pencil first so you have a guide. The tape will cover the pencil marks easily.
Budget-Friendly Swap
If you want to cover a larger area without spending too much, look for washi tape rolls that are wider or come in multi-packs online. You can also use regular masking tape and paint over it for a similar look that’s still removable. Just make sure the paint is fully dry before peeling to avoid damaging the wall.
13. Repurposed Window Frame as Art
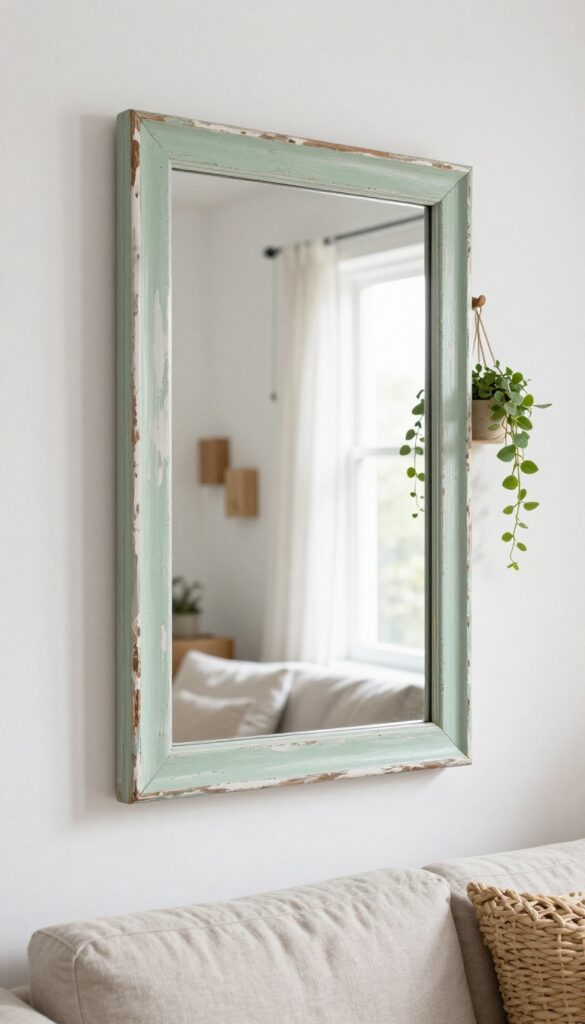
Old window frames have a way of adding instant character without costing a fortune. Whether you pick one up at a flea market or salvage one from a renovation, it brings texture, history, and a sculptural feel to a plain wall. The best part?
You can leave it rustic, paint it to match your room, or add a mirror for extra function.
Hang an old window frame on the wall as a unique decorative piece. Leave it as is or add a mirror behind the glass. It adds architectural interest and a touch of history.
Best Colors
For a budget-friendly look, keep the frame's original chipped paint—it adds authentic patina. If you want a cleaner feel, spray-paint it matte black, white, or a muted sage green. These colors blend with most living room palettes and make the frame pop without clashing.
Finishing Touch
Hang the frame slightly away from the wall using small wooden blocks behind it. This creates a shadow that emphasizes the frame's depth and makes it feel like a built-in architectural element. Add a simple hook on the frame to hold a small plant or a string of fairy lights for extra charm.
Budget-Friendly Swap
If you can't find a real window frame, check online marketplaces for a faux window frame or a large picture frame with multiple panes. You can also DIY one using old wooden lattice or reclaimed pallet wood arranged in a grid pattern.
FAQ
What is the cheapest way to decorate a living room wall?
The cheapest options include creating a gallery wall with thrifted frames, using washi tape for temporary art, or painting a geometric pattern. These ideas cost very little and can be done in an afternoon.
How can I add character to a rental living room without damaging walls?
Use removable solutions like peel-and-stick wallpaper, washi tape, or adhesive hooks for lightweight art and mirrors. Fabric wall hangings and command strips are also renter-friendly.
What wall decor makes a small living room look bigger?
Mirrors are the best choice—they reflect light and create depth. A large mirror or a grouping of smaller mirrors can make a room feel more spacious. Light-colored art also helps.
How do I choose a color scheme for my living room walls?
Start with a neutral base like white, beige, or gray, then add pops of color through art, textiles, or an accent wall. Consider the room's lighting and existing furniture for a cohesive look.
Can I mix different wall decor styles in one room?
Absolutely. Mixing styles—like modern frames with a vintage map or a sleek mirror with a boho wall hanging—adds personality. Keep a common color thread to tie everything together.
Conclusion
Adding character to your living room walls doesn't have to be expensive or complicated. With a little creativity and some budget-friendly materials, you can transform a bland space into one that feels personal and inviting. Start with one idea that excites you, and build from there.
Even a single change can make your living room feel like a completely new room. Happy decorating!