13 Christmas Card Display Ideas to Decorate Your Home
A pile of Christmas cards on the counter becomes a display you actually want guests to see. The right setup takes a few minutes, uses what you already own, and turns a messy stack into part of the decor instead of clutter.
Some of these ideas lean crafty, others are basically a hook and a ribbon. A few work on a bare wall, and several fit tight entryways or small apartments.
Pick one that matches your space and your patience level, then let the cards do the decorating.
1. Ribbon Wall Display
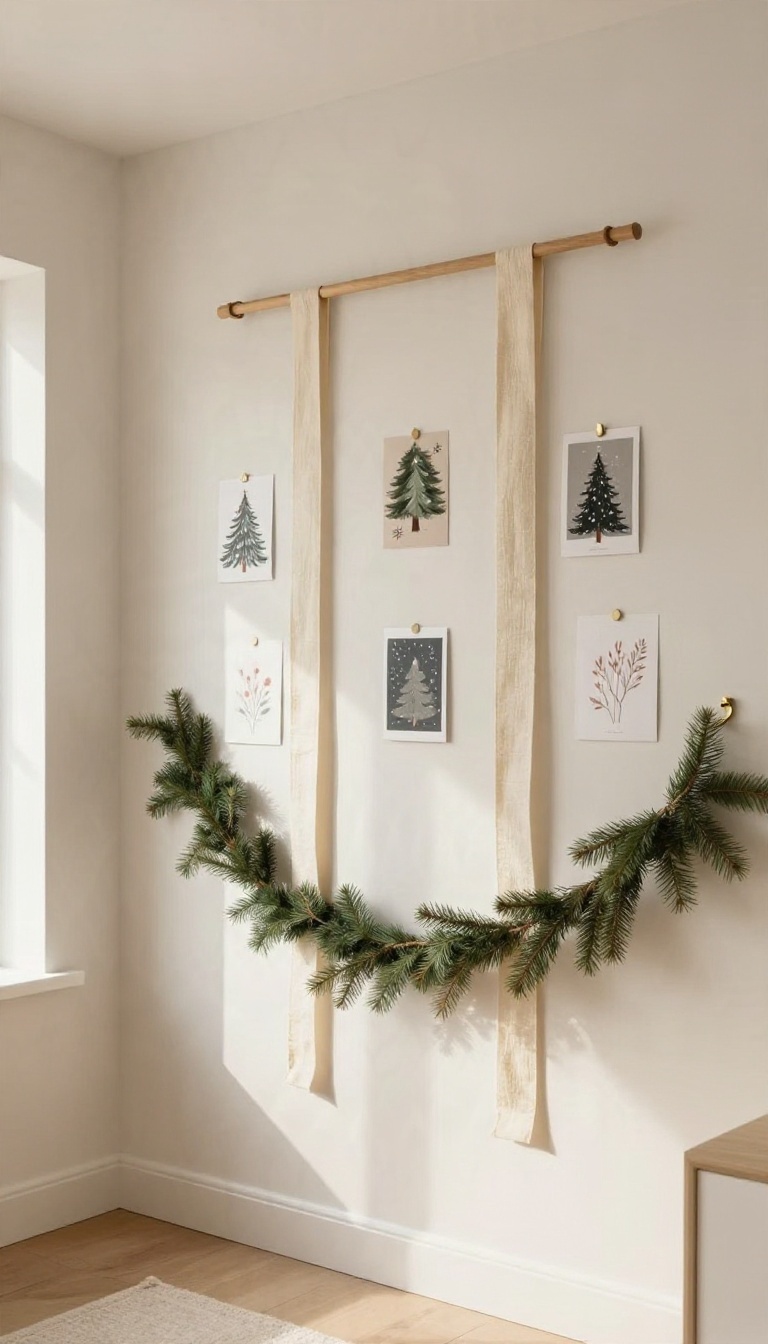
A blank wall and a couple of ribbons can solve your card problem in about ten minutes. This setup works because gravity does most of the job—you just give each card a place to sit. It's especially handy if you rent and don't want to patch a dozen holes come January.
Start by hanging two long ribbons vertically from something sturdy, like a curtain rod, a hook, or a small nail. Space them a few inches apart so the cards have room to breathe. Then tuck each card behind the ribbon, letting the ribbon hold it flat against the wall.
Stack them from the bottom up or top down, whichever looks better to you.
Choosing Your Ribbon
Go with something wide enough to grip the cards without covering the whole front. Grosgrain and velvet hold well, while thin satin tends to slip. Pick a color that plays off your cards or your room—red and green are safe, but a neutral like cream or black looks sharp too.
Anchoring It Without Damage
Command hooks are the renter's best friend here. Stick two above your display spot, loop the ribbon through, and let it hang. If you have a curtain rod nearby, just drape the ribbon over it and pin the back with a small clip.
No tools, no holes, no drama.
Arranging The Cards
Mix sizes and orientations so the wall doesn't look like a grid. Leave a little space between cards so the ribbon reads as a design element, not just a clamp. If you're short on cards early in December, start at the top and add more as the mail arrives.
2. Card Garland Across the Mantel

A stretch of twine and a handful of mini clothespins turn the mantel into a rotating gallery of holiday mail. Cards go up in seconds, and nothing gets taped, glued, or permanently attached to your walls. The whole setup takes about ten minutes, and it gets better as the season goes on and more envelopes land in the mailbox.
The mantel already draws the eye, so it makes sense to let it do double duty as card storage. A garland keeps everything visible and off the counter, and it looks intentional rather than improvised. You also get a built-in excuse to rearrange things whenever a new card shows up.
What You Need
Start with twine, baker's twine, or thin ribbon. Baker's twine adds a bit of color, while plain jute blends into a rustic mantel. Grab a pack of mini clothespins, the one-inch kind sold near the craft supplies, and a couple of small nails or removable hooks for the ends.
If you'd rather not put holes in the wood, use adhesive hooks rated for light weight. Command strips work well on painted or finished mantels and come off cleanly in January. Test one hook with a light tug before you hang anything.
Hanging It Straight
Attach your hooks near each end of the mantel, a little below the top edge so the garland sits in front of the stockings or decor. Tie one end of the twine, pull it snug, and tie the other. A slight droop looks warmer than a tight line, so don't over-tension it.
For a longer mantel, add a third hook in the middle to stop the twine from sagging too low. If your cards are heavy or oversized, double up the twine for extra strength.
Clipping And Swapping Cards
Clip each card to the twine with a mini clothespin, spacing them a few inches apart. Face the artwork or the message outward, whichever you like better. Leave a little room between cards so the garland doesn't look crowded.
When new cards arrive, just slide the clips along the twine to make space. No re-taping, no peeling, no fuss. If you run out of room, add a second strand below the first and stagger the cards for a layered look.
Small Tweaks That Help
Hang the garland at eye level when you're standing in the room, not sitting, so the cards read clearly. Keep it clear of candle flames and anything that gets warm. If you have pets or little kids, clip the cards higher or use a tighter twine so nothing swings loose.
3. Repurposed Shutter Card Holder
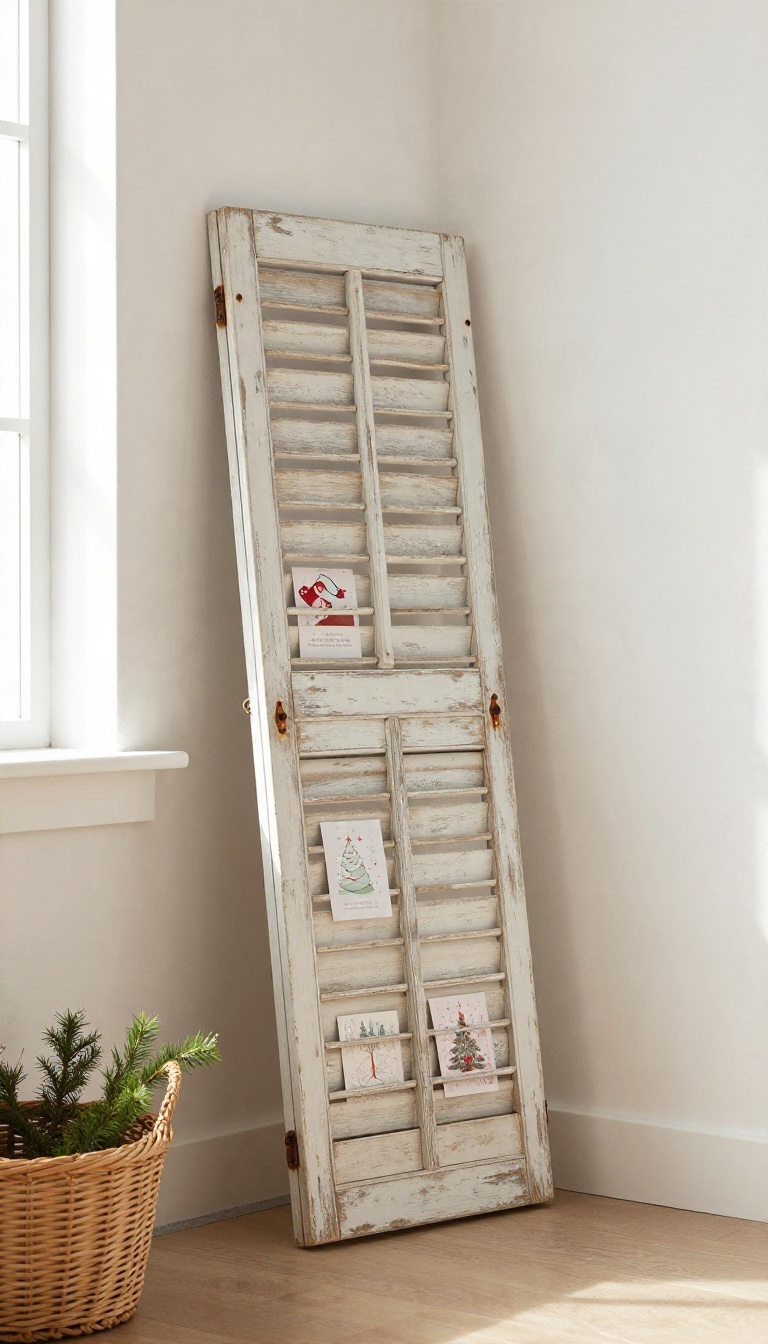
An old louvered shutter does most of the work here. Lean it against a wall, tuck cards into the slats, and you have a display that looks collected rather than arranged. Thrift stores and salvage yards sell these for a few dollars, often with chipped paint and a little rust on the hinges.
That wear is the point. The weathered finish slides right into farmhouse, vintage, and cozy rooms without trying too hard. It also holds a surprising number of cards, so a busy December mailbox never overflows onto the table.
Finding A Shutter Worth Using
Look for a wooden shutter with real louvers, not a plastic one with molded slats. Wood grips the cards better and takes paint if you want to change the color. Check that the slats still tilt.
You want them angled slightly upward so cards sit in the groove instead of sliding through. A quick test in the store saves a return trip. Size matters more than style.
A single narrow shutter fits a hallway nook, while a pair of tall ones leaned side by side makes a statement in a living room. Measure your wall before you fall in love with a set. If the paint is flaking, give it a light sanding and a coat of matte sealer.
That stops the mess and keeps the aged look intact.
Setting It Up In Five Minutes
Prop the shutter against the wall at a slight angle, then slide a rubber gripper or a rolled-up towel behind the base so it does not creep. On hardwood, a strip of shelf liner under the bottom edge adds grip. Tuck each card into a slat with the front facing out.
Leave a little space between them so the display breathes. Cards with heavier embellishments sit better in lower slats where they have more support. You can group cards by color or size if you like a tidy look, or just fill the slats as mail arrives.
Both work. Want it off the floor? Hang the shutter on the wall with two screws through the frame and skip the leaning altogether.
Making It Fit Your Room
A whitewashed shutter looks clean and bright against a neutral wall. A chipped green or blue one brings a farmhouse feel to a kitchen corner. For a vintage room, leave the original hardware and let the rust show.
Pair it with a small stool or basket at the base to anchor it visually. In a modern space, a single shutter painted matte black reads as sculptural rather than shabby. The cards still pop against the dark slats.
You can also swap the shutter out after the holidays and use it for photos or postcards the rest of the year. It earns its floor space that way.
4. Christmas Card Tree on the Wall
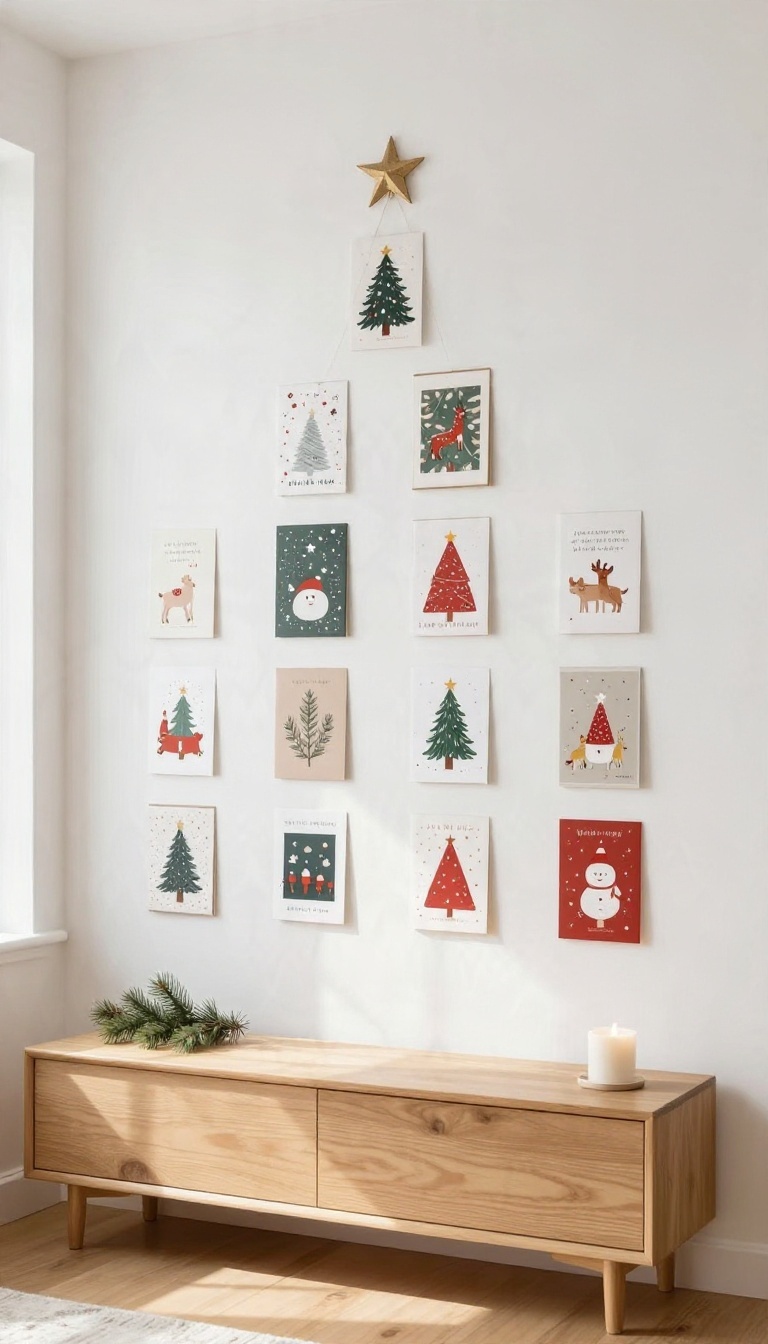
Cards pile up fast in December, and most of them end up in a sad stack by the fruit bowl. A wall tree fixes that by turning the whole collection into a shape people actually notice. You start wide along the bottom and work your way up, adding one fewer card each row until a single card sits at the top.
No box to drag out of the attic, no needles on the rug, and no watering schedule. Just cards, a blank wall, and a star to finish it off. It works in a hallway, above a couch, or on that awkward stretch of wall you never figured out how to fill.
The shape does the heavy lifting here. A triangle reads as a tree instantly, even when the cards themselves are mismatched and different sizes. That variety actually helps, since no two rows look exactly alike.
You can build it in one sitting or add to it as the mail keeps coming. Either way, the wall fills in fast and the cards stay visible instead of getting buried.
Laying Out The Rows
Start with the bottom row and make it the widest, maybe six to eight cards depending on your wall space. Keep the spacing even so the triangle stays clean as it rises. From there, drop one card per row as you go up.
Five, then four, three, two, and finally one at the peak. Step back every couple of rows to check the shape, since a crooked tree is hard to unsee once it's up.
Getting Cards To Stay Put
Painter's tape works for light cards and won't wreck paint, but it can peel off in dry winter air. Removable adhesive putty holds better and comes off clean on most walls. For heavier cards or glossy finishes, try small clips or a strip of low-tack mounting tape along the back edge.
Test one card first and give it an hour before committing to the whole tree.
Topping It Off
A paper star, a small ornament, or a wooden cutout all work as the topper. Tape it just above the top card so it reads as part of the tree rather than a separate decoration. If you want a little extra, drape a strand of battery-powered fairy lights down one side.
Keep it simple, though. The cards are the point, and the star just finishes the shape.
5. Wreath Frame Card Display
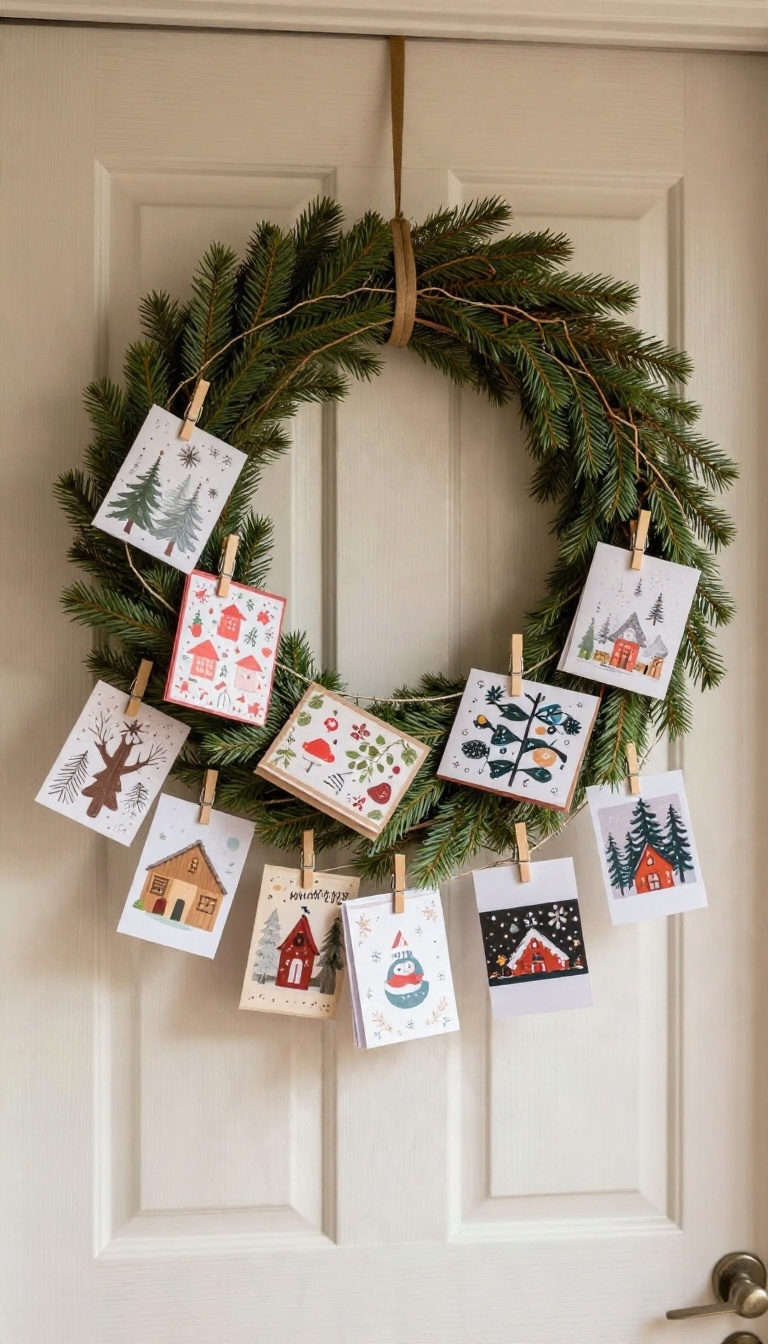
An empty wire wreath form makes a surprisingly good card holder, and it costs almost nothing. Hang it on the front door or a wall hook, then clip cards around the ring as they arrive. Guests get a little reading material while they wait for you to answer the door, and your entry stays festive without a trip to the store.
The form does the heavy lifting here. A bare wire wreath frame has two or three concentric rings, which gives you plenty of spots to attach cards at different depths. That layered look reads as intentional, even though you basically just hung a circle and started clipping.
You can buy a wire form for a few dollars at a craft store, or repurpose one from an old wreath you were ready to toss. Either way, give it a quick wipe first so last year's dust doesn't end up on your cards.
Hanging It Without Damage
A removable hook on the door or wall keeps things simple, and it holds the weight of a full ring of cards without sagging. If your door is metal, a magnetic hook works just as well and leaves no mark. For a wall spot, a small nail or a Command strip does the job.
Just check that the hook sits high enough that the bottom of the wreath clears the floor or any furniture below.
Clipping Cards So They Stay Put
Small binder clips, mini clothespins, or even paper clips will hold a card to the wire. Clothespins look the most festive, and you can paint them or leave them natural. Work your way around the ring and vary the heights a little so it doesn't look too uniform.
Mix photo cards with folded ones for texture, and leave a few gaps so the wire still shows through.
Keeping It Fresh All Season
Cards arrive over several weeks, so treat the wreath as a work in progress. Add new ones as the mail comes in, and shift older cards toward the back rings to make room. When the season ends, unclip everything and store the cards in a shoebox.
The form folds flat or hangs in a closet until next December, ready to go again.
6. Ladder Display in the Entryway
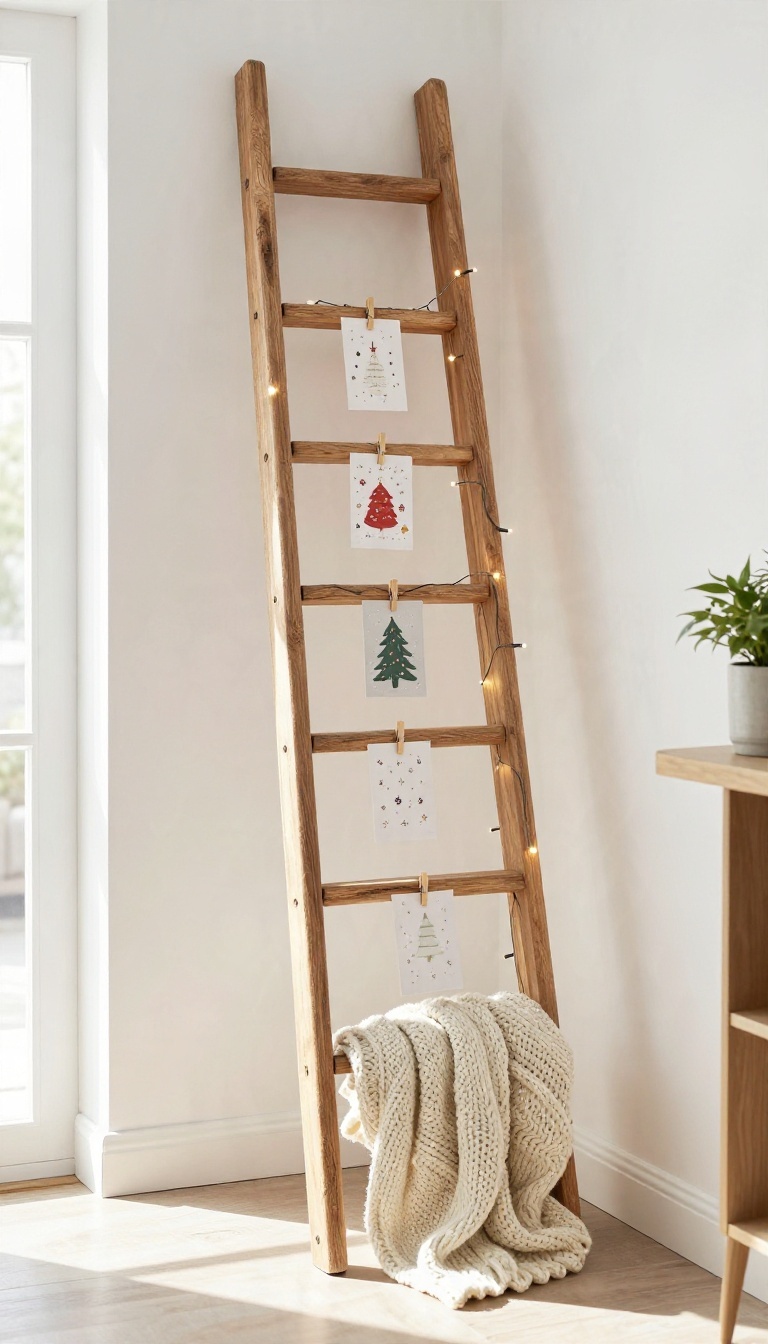
A wooden blanket ladder leans against the entryway wall, doing double duty as a card display and a spot for your favorite throw. It's a simple, rustic touch that greets guests with holiday cheer the moment they walk in. Best of all, you probably already have a ladder like this or can find one at a flea market for cheap.
The ladder's rungs are perfect for draping cards, and you can clip them on for a more secure hold. This setup keeps cards visible and organized without taking up floor space. Plus, it adds a cozy, farmhouse feel to your entryway that works with almost any decor.
Choosing The Right Ladder
Look for a ladder with at least four rungs and a sturdy build. Lean it against a wall in a spot where it won't get knocked over. If you're using a vintage ladder, check for stability and give it a quick clean before displaying cards.
Draping And Clipping Cards
Drape cards over the rungs so they hang evenly, or use small clips for a more secure hold. Mix and match sizes for visual interest. Leave a little space between cards so each one stands out.
Adding Extra Touches
Drape a festive throw blanket over one rung and wrap a strand of battery-operated lights around the ladder for a warm glow. This turns the ladder into a cozy focal point that's both functional and decorative.
7. Clip Ring or Binder Ring Stack
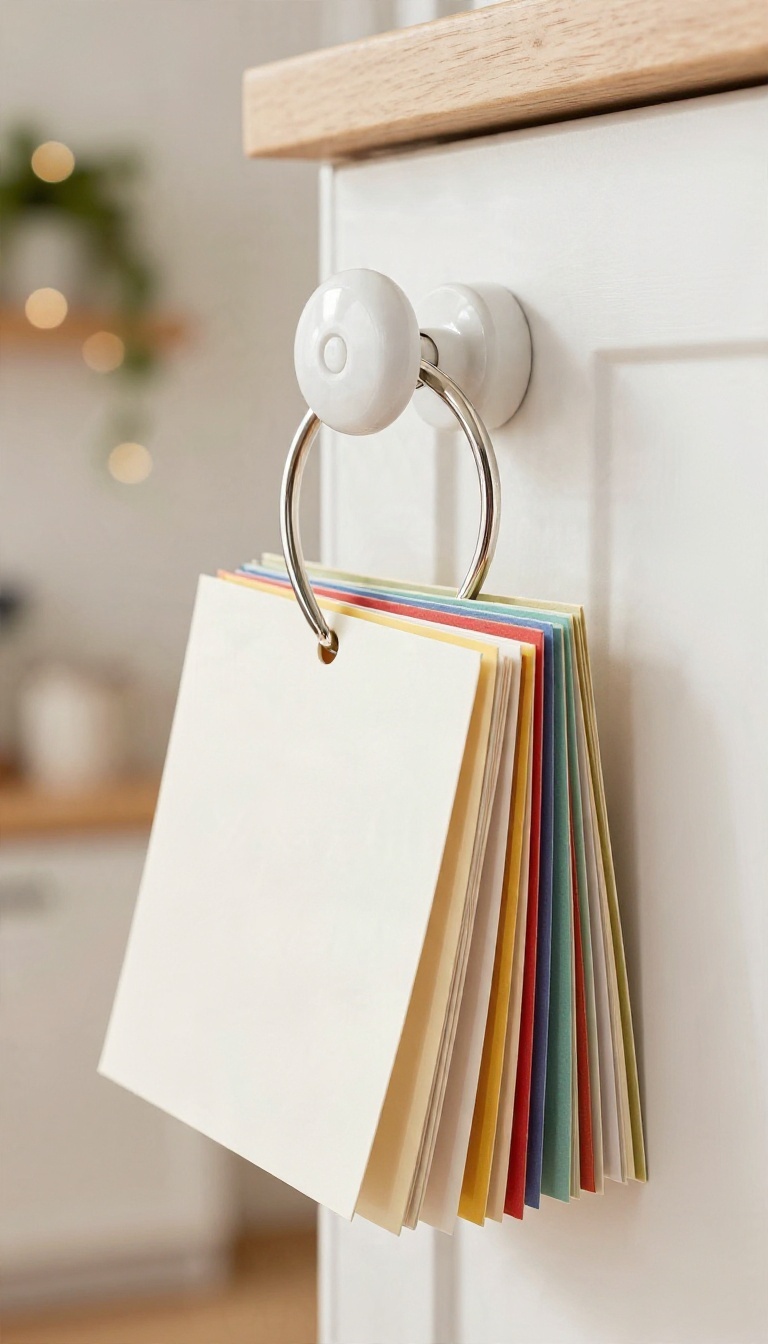
Binder rings are the quiet hero of small-space decorating. They hold a whole season's worth of cards in one tidy column, and you can hang that column just about anywhere a hook fits. No wall space?
Loop the ring over a cabinet knob, a closet handle, or a command hook on the side of a bookshelf. The cards stay visible, the counter stays clear, and nothing ends up sliding off the fridge.
The whole setup costs a couple of dollars and takes about five minutes. Grab a pack of large binder rings from the office supply aisle, punch a hole in the top corner of each card, and slide them on one at a time. As the stack grows, it reads like a little flip book of holiday greetings.
Guests can flip through it, and you get to keep every card without taping anything to a wall.
Punch And Load
A single hole punch in the top corner of each card is all it takes. Keep the holes in roughly the same spot so the stack hangs straight instead of leaning to one side. Load the newest cards at the front so the most recent arrivals stay visible.
If a card is flimsy or oversized, slip it between two sturdier ones to give it some support.
Pick Your Hanging Spot
Cabinet knobs, drawer pulls, and closet door handles are the easiest anchors because they need zero hardware. A small adhesive hook on the side of a bookshelf or the inside of a pantry door works just as well. For a bigger statement, hang two or three rings at different heights on one wall.
Staggering them fills the space without needing a lot of room.
Keep It Looking Neat
Cards tend to fan out as the ring fills up, so give the stack a gentle squeeze every few days to keep it compact. A ring that holds thirty cards or more starts to feel heavy, so split it into two stacks once it gets crowded. Add a small ribbon loop at the top if you want a softer look.
It also makes the stack easier to lift off the hook when you want to flip through it.
8. Framed Chicken Wire Board
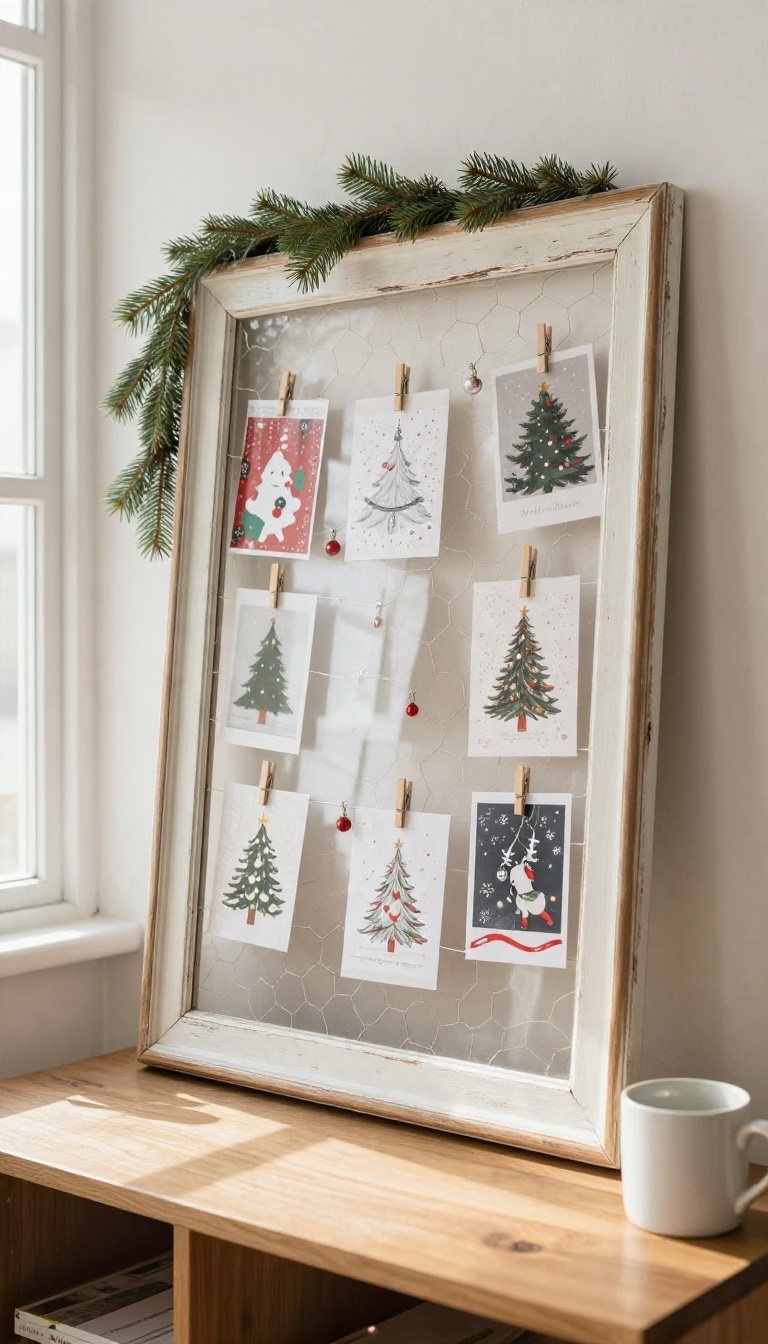
An old picture frame with the glass pulled out makes one of the best card displays you can put together in an afternoon. Staple chicken wire across the back, hang it on the wall, and you have a board that holds a whole season's worth of cards without looking like a craft project gone sideways. It reads as real decor, not a stopgap.
The trick is picking a frame that's big enough to matter. A large thrifted frame with some character, even chipped paint, works better than something small and precious. Once the wire is on, the cards do the rest.
This one earns its spot because it handles volume. Where a ribbon or a garland maxes out after a dozen cards, a framed wire board keeps swallowing more. It also gives you a place to clip other things, like a few photos or a small ornament, so the wall stays interesting all month.
What You'll Need
Grab a frame with a solid back, a roll of chicken wire with small openings, a staple gun, and some small clips or clothespins. Wire cutters help if you need to trim. That's the whole supply list, and most of it is probably in the garage already.
Putting It Together
Pull the glass and backing out of the frame, then cut the wire a little larger than the opening. Staple it across the back, pulling it snug as you go so it doesn't sag under the weight of the cards. Trim the edges and hang the frame with a sturdy hook or two, since it gets heavier as it fills up.
Hanging And Filling It
Clip cards straight onto the wire with small clips or mini clothespins. Spread them out at first and fill gaps as more arrive. A spot near the entry or above a console table works well, and the frame keeps everything looking tidy even when the board is packed.
9. Card Basket by the Door

The entryway is where the mail lands anyway, so put a container there and let it do the work. A woven basket, a vintage tin, or even a sturdy gift box gives every card an instant home the moment it comes through the door. No tape, no pins, no rearranging the wall—just drop and go.
This one wins on effort alone. You set the basket down once in early December and it handles the whole season for you. Cards stay contained instead of spreading across the kitchen counter.
Guests can flip through them while they wait, and you get a quick reread whenever you pass by. When the holidays wrap up, the whole thing lifts off the table in one motion.
Pick A Container That Suits Your Entry
A low, wide basket works best because cards stay visible and easy to grab. A tall bucket hides them, which is fine if you mainly want them off the counter. Vintage tins add a little character, and a deep wooden bowl does the job on a narrow console.
Make It Feel Intentional
Tuck a folded cloth or a small sprig of greenery in the bottom so the first few cards don't slump. A simple label or a chalk note nearby tells guests what the basket is for. Keep it near the door but out of the walking path so nobody knocks it over.
Keep It Working All Season
Flip through and straighten the stack every week or so, and pull out any envelopes that got left inside. If the pile grows past the rim, move older cards to a smaller tin and keep the newest ones up front. A quick tidy takes about thirty seconds.
10. Pegboard or Bulletin Board Corner

Cards pile up fast in December, and a pegboard or bulletin board gives them one dedicated home instead of scattering them across the mantel and fridge. Paint a small board to match your wall so it reads as part of the room, then use clips or pegs to pin each card in place. It's a tidy way to corral a growing collection, and it fits neatly in a hallway or home office where you actually pass by every day.
The appeal here is flexibility. A pegboard expands as more cards arrive, and a bulletin board lets you swap things around without leaving a mark. Both keep the display contained, which matters once the pile starts creeping past a dozen cards.
You don't need a big board to make this work. A small square or a narrow rectangle is enough, and it keeps the setup from taking over the wall. The key is placement, so pick a spot you see often but that doesn't compete with your main decor.
Pick The Right Board And Spot
A pegboard with evenly spaced holes gives you the most layout options, while a cork bulletin board is softer and easier to hang. Paint either one the same color as your wall so it blends in rather than shouting for attention. Hang it at eye level in a hallway, above a small desk, or on the side of a kitchen cabinet where the mail tends to land.
Clips, Pegs, And A Little Spacing
Binder clips, small wooden pegs, or decorative clothespins all hold cards without punching holes in them. Leave a little breathing room between cards so the board looks curated instead of crammed. If you're using a pegboard, add a tiny shelf or a hook at the bottom for a few extra cards or a sprig of greenery.
Keep It Fresh Through The Season
Rotate the cards as new ones arrive so the newest and most meaningful ones stay front and center. Take down the ones you've already read and tuck them into a basket nearby, or move them to a lower row. A quick reshuffle every week keeps the display from going stale and gives you a reason to look at it again.
11. Hanging Branch or Twig Tree

Bare branches have a way of looking elegant even when they're just sitting in a bucket. Stand a few in a vase, hang your cards from the twigs, and you get a sculptural centerpiece that happens to hold a month's worth of mail. It's a natural fit for minimalist rooms where a glittery store-bought tree would feel like too much.
The whole thing comes together in under an hour, and most of that time is drying paint. You're basically building a small indoor tree that earns its keep through December and looks intentional the entire time.
Pick And Prep Your Branches
Look for branches with plenty of side twigs and a few good forks, since those give you spots to hang cards. Curly willow, birch, and dried manzanita all work well, and a walk around the yard after a storm often turns up plenty of free options. Trim them to a height that clears your table by a foot or so, then give them a quick rinse and let them dry fully before painting.
Paint For The Look You Want
A coat of matte white spray paint gives you that clean, wintry look, while metallic gold adds a little warmth without going full sparkle. Work outside or in a well-ventilated garage, and do two light coats instead of one heavy one to avoid drips. Let each coat dry completely, then flip the branches and hit the spots you missed.
Set It Up And Hang The Cards
Anchor the branches in a heavy vase with sand, gravel, or floral foam so the whole thing stays put when someone bumps the table. Tie a small ribbon loop through each card and drape them across the twigs at different heights. Keep the heaviest cards low and near the center, and leave a little breathing room so the branch shape still shows through.
12. Window or Mirror Tape Display
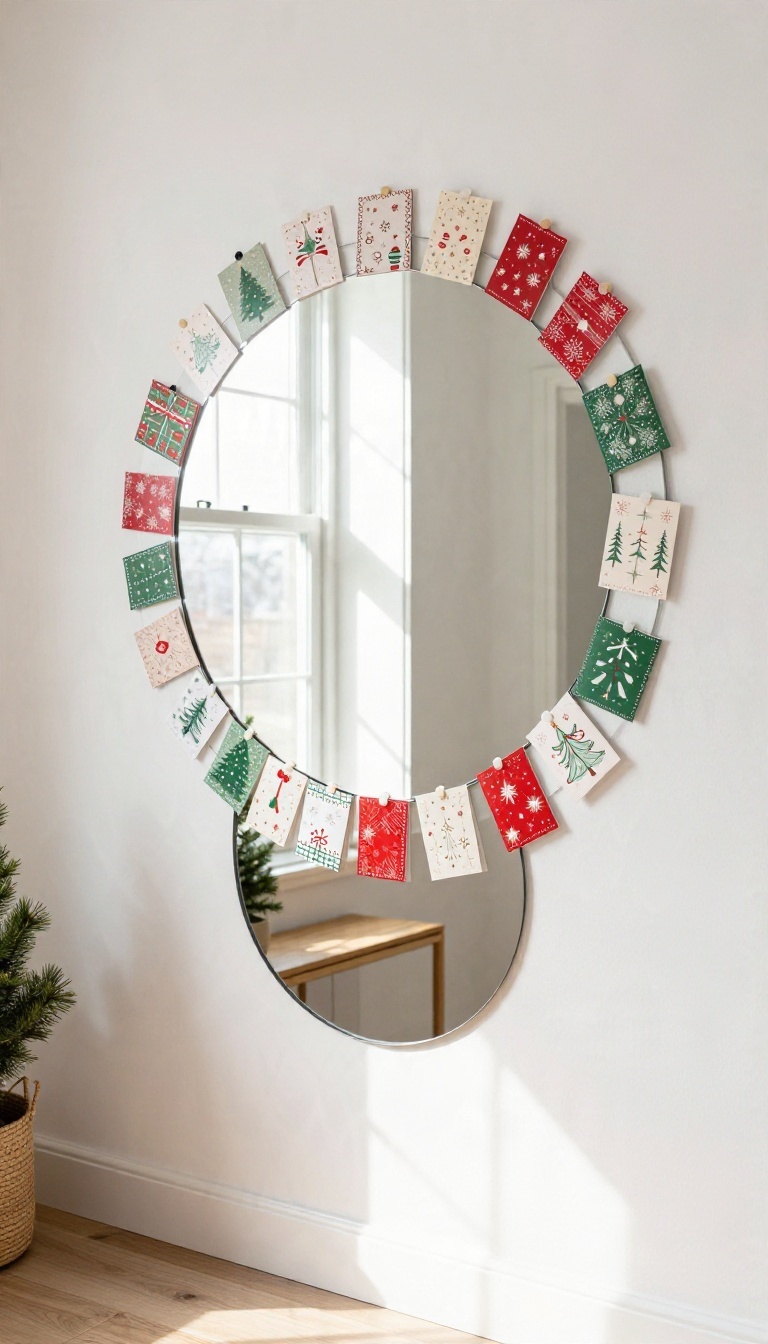
Tape and a mirror or window frame get you a card display in about five minutes flat. No tools, no holes, no hardware to buy. It's the option you reach for when the cards are already piling up and you just want them up on the wall.
The trick is picking the right adhesive and placing cards where they'll actually be seen. A mirror in the hallway or a window near the front door does double duty here, catching light and giving all those greetings a spot that feels intentional.
Removable tape and putty are the whole supply list. Both peel off cleanly at the end of the season, which matters if you rent or just hate patching nail holes in January. You don't need to arrange anything perfectly.
A loose grid or a casual scatter both read as festive, and you can rearrange as new cards arrive in the mail.
Pick The Right Adhesive
Painter's tape is the safest bet for painted frames and glass, since it lifts off without pulling finish. Mounting putty works well on mirrors and holds small cards without sliding. Skip anything labeled permanent or heavy-duty.
Double-sided foam tape can leave residue or peel paint, and that's the opposite of what you want from a temporary display.
Work Around The Frame, Not The Glass
Tape cards to the frame itself or the wall just outside it, so the mirror stays usable. On a window, stick cards along the trim or the mullions between panes. If you have a big mirror, arrange cards in a border around the edges and leave the center clear.
You still get the reflection, and the cards frame it nicely.
Keep It Looking Tidy
Stick to one tape color or hide the tape behind the card's top edge. A small piece at the top and one at the bottom keeps cards from curling without showing much adhesive. Swap cards out as more arrive, and pull the oldest ones down so the display doesn't get crowded.
A little breathing room between cards makes the whole thing look deliberate.
13. Card Book or Album Keepsake

Most Christmas cards get a week on the mantel and then a one-way trip to the recycling bin. A card book gives the good ones a second life. Punch a hole in the corner of each card, thread them onto rings or ribbon, and you've got a flip-through keepsake that stores flat and comes back out every December.
The appeal here is simple: nothing gets lost. You keep the handwritten notes from Grandma, the photo cards from friends who moved away, and the funny one your coworker slipped in with the gift exchange. When the season ends, the whole stack goes into a drawer as one tidy object instead of a loose pile you'll sort through later and probably toss.
It also solves a display problem. Once the cards are bound, they can sit on a coffee table, lean on a shelf, or hang from a hook near the tree. You get the decoration now and the archive later.
What You Need
A single-hole punch, a couple of binder rings or a length of ribbon, and a stack of cards. That's it. A corner rounder or hole punch guide helps if you want the holes lined up neatly, but eyeballing it works fine too.
If you'd rather not punch the cards themselves, slip each one into a clear plastic sleeve first and punch through the sleeve. It protects the fronts and lets you add or remove cards without making new holes.
Binding It So It Holds
Punch one hole in the top-left corner of every card, about a half inch in from each edge. Stack them in the order you want, then run a binder ring through the holes. Two rings spaced a few inches apart keep a thicker book from fanning open.
Ribbon works just as well and looks a little softer. Thread it through, tie a loose bow, and trim the ends. Leave a little slack so the pages turn without tearing.
Making It Look Intentional
A bound card book reads as decor when you give it a home. Set it in a shallow basket on the entry table, prop it against a stack of books, or hang it from a hook on the wall with the cover facing out. You can also add a cover.
Cut a piece of cardstock or chipboard to size, punch it the same way, and write the year on the front. Next year's book goes right beside it, and after a few seasons you've got a small shelf of Christmases past.
FAQ
How do I display Christmas cards without damaging my walls?
Use removable adhesive putty, damage-free hooks, or ribbon hung from an existing rod or hook. Command strips and clips work well on painted walls and come off clean in January.
What's the best way to display cards in a small apartment?
Go vertical. A ribbon on the back of a door, a clip ring on a cabinet knob, or cards taped around a mirror all use space you already have without adding furniture.
Can I display cards on a rental-friendly budget?
Yes. Twine, clothespins, binder rings, and removable tape cost a few dollars total. Thrifted frames and shutters add character for very little money.
How many cards can a ribbon display hold?
A single ribbon can hold fifteen to twenty cards if you space them a few inches apart. Use two or three ribbons side by side for a bigger collection.
What should I do with Christmas cards after the holidays?
Save the meaningful ones in a card book or album, recycle the rest, or cut them into gift tags for next year. Keeping a small stack is a nice way to remember the season.
Conclusion
Pick two or three display ideas that fit your space and your card count, then set them up where you'll actually see them every day. A ribbon strung over a doorway or a basket by the entry beats a perfect arrangement tucked in a back room. Cards are meant to be looked at, not filed away.
Rotate them as new ones arrive, let the kids add a few, and don't fuss over straight lines. When January comes, you'll have a whole season of hellos to pack up—and a spot already picked for next year.