15 Wall Paneling Ideas Living Room Walls Can Show Off
Wall paneling is one of those design moves that instantly upgrades a room without requiring a full renovation. It adds texture, depth, and a custom look that feels intentional. And the best part?
You don't need a huge budget to make it happen. From simple DIY-friendly options to clever material swaps, there are plenty of ways to bring paneling into your living room without overspending.
Whether you're renting or own, these ideas are designed to be approachable and easy to picture in your own space. Let's walk through 15 wall paneling ideas that give your living room walls something to show off.
1. Classic Beadboard on a Budget
Beadboard brings instant cottage charm to any living room, but real wood can get pricey fast. The good news? You can fake it beautifully with MDF sheets or peel-and-stick panels that cost a fraction of the real thing.
Paint everything white or a soft pastel like pale blue or blush to keep the space feeling bright and open. This trick works especially well in smaller rooms or rentals where you want character without permanent changes.
Beadboard is a timeless choice that adds cottage charm without the cost of real wood. Use MDF beadboard sheets or peel-and-stick panels for an affordable DIY project. Paint it white or a soft pastel to keep the room bright and airy.
Best Colors
White is the go-to for a classic look, but don't shy away from soft pastels like sage green, powder blue, or butter yellow. These hues keep the room light while adding a subtle pop of color. For a more dramatic effect, try a deep navy or charcoal on just one accent wall.
Budget-Friendly Swap
- Skip the real wood tongue-and-groove and pick up MDF beadboard sheets at your local home improvement store—they're about half the price. Even cheaper? Peel-and-stick beadboard wallpaper.
- It's renter-friendly and takes just an afternoon to install.
Finishing Touch
Add a thin chair rail or a simple shelf where the beadboard meets the upper wall. This creates a clean transition and gives you a perfect spot to lean small art or display a few favorite objects.
2. Vertical Shiplap with a Modern Twist
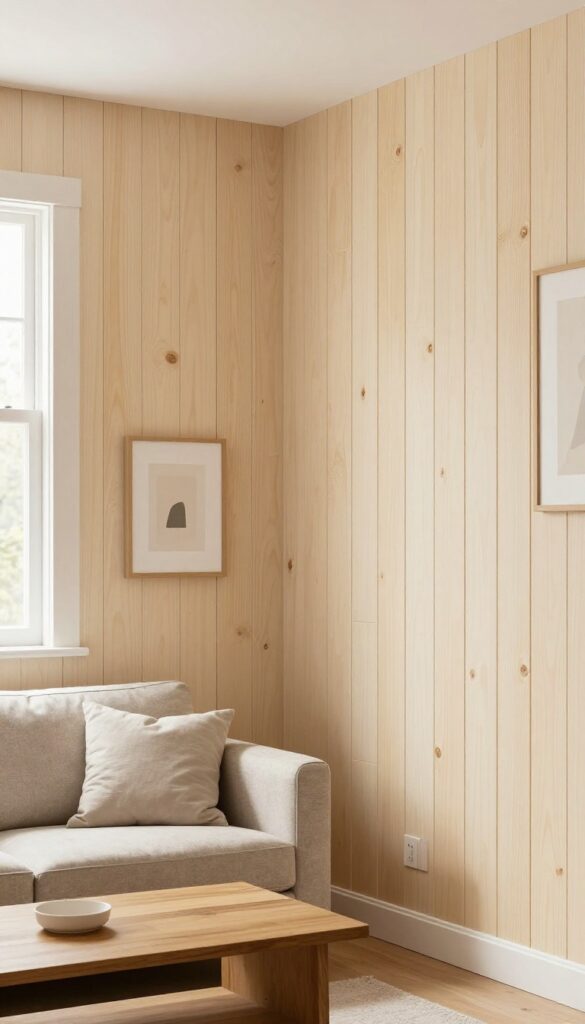
Shiplap doesn't have to run horizontal to make an impact. By installing vertical planks, you draw the eye upward, making ceilings feel higher and the room more spacious. This approach uses plywood strips with intentional gaps, creating a crisp, modern look that's surprisingly budget-friendly.
Paint them in a soft neutral like warm white or pale greige, and you've got a textured feature wall that feels both fresh and timeless.
Vertical shiplap is a smart way to add architectural interest without breaking the bank. Standard plywood cut into 6- or 8-inch strips costs a fraction of real tongue-and-groove boards. Leave a small gap between each strip (about 1/8 inch) for that clean, contemporary feel.
Install them from floor to ceiling for maximum height illusion, or stop at chair-rail height for a wainscoting effect that still lifts the room. Paint in a single color to keep the look seamless, or try a slightly darker shade than your other walls for subtle contrast. This works beautifully in living rooms with low ceilings, narrow layouts, or anywhere you want a calm, structured backdrop for furniture and art.
Best Colors
Stick with light neutrals to amplify the airy effect. Soft white, warm ivory, or pale stone gray keep the wall feeling open and bright. For a bolder move, try a muted sage or dusty blue on the shiplap while keeping surrounding walls white—this adds depth without overwhelming the room.
Budget-Friendly Swap
- Skip expensive pre-made shiplap panels. Have a lumber yard cut sanded plywood into 6-inch-wide strips. You'll save 50% or more, and the raw edges can be lightly sanded and painted for a seamless finish.
- Use construction adhesive and a nail gun for quick installation.
Finishing Touch
Add a slim floating shelf at the midpoint or top of the shiplap to break up the vertical lines. Style it with a trailing plant, a small stack of books, or a ceramic vase. This creates a natural pause for the eye and makes the wall feel intentionally curated.
3. Geometric MDF Shapes for Instant Drama
If you want a wall treatment that feels modern, sculptural, and surprisingly affordable, geometric MDF shapes are the way to go. By cutting medium-density fiberboard into hexagons, diamonds, or chevron patterns, you can create a custom accent wall that looks like a high-end installation but costs a fraction of the price. The key is painting the shapes in a contrasting color—think deep navy against a white wall, or soft blush on a gray backdrop—so they really stand out.
This DIY project is perfect for renters or anyone who wants a bold look without committing to permanent wallpaper or expensive paneling.
Geometric MDF shapes bring instant texture and visual interest to a living room wall without overwhelming the space. The clean lines and repeating patterns create a sense of order and movement, making the wall feel like a piece of art. Because MDF is lightweight and easy to cut, you can experiment with different layouts before committing.
Arrange the shapes in a tight grid for a structured look, or scatter them in a random pattern for a more organic feel. Either way, the result is a focal point that draws the eye and sparks conversation.
Best Colors
- For maximum impact, choose a paint color that contrasts sharply with your wall. A matte black or charcoal on a light wall creates a dramatic, graphic effect. If you prefer something softer, try a muted sage green or dusty rose against a warm white.
- For a cohesive look, pick up a color from elsewhere in the room—like a throw pillow or rug—so the wall feels intentional.
Layout Tip
- Before gluing or nailing anything, lay the shapes on the floor to test the arrangement. This lets you tweak spacing and orientation without damaging the wall. For a chevron pattern, mark a vertical centerline and work outward to keep the angles consistent.
- For hexagons, start at the top center and work down to avoid awkward cuts at the edges.
Budget-Friendly Swap
Instead of buying pre-cut shapes, pick up a large sheet of MDF from a hardware store and cut your own using a jigsaw or circular saw. Many stores will cut the sheet into smaller pieces for free if you ask. This can cut costs by half and gives you total control over the size and shape.
4. Reclaimed Wood Planks on a Dime
Rustic charm doesn't have to come with a hefty price tag. Reclaimed wood planks, sourced from old pallets or salvage yards, bring warmth and texture to your living room walls without breaking the bank. The key is in the finish: sanding and staining each plank in slightly different shades creates that coveted weathered, layered look that feels both authentic and curated.
It's a DIY-friendly project that also scores points for being eco-conscious, giving new life to materials that might otherwise end up in a landfill.
For a truly budget-friendly makeover, start by collecting pallets from local businesses or checking online marketplaces for free or cheap wood. Salvage yards are another goldmine, often selling reclaimed lumber by the piece. Once you have enough planks, sort them by width and condition.
Sand each one lightly to remove rough spots and splinters, but leave some of the original patina for character. Then, apply stains in varying shades—think honey, walnut, and driftwood—to create a patchwork effect. Install the planks horizontally for a classic farmhouse look, or go vertical to make the ceiling feel higher.
This wall treatment works beautifully behind a sofa, as an accent behind a TV, or to define a reading nook. Pair it with neutral furnishings and plenty of greenery to let the wood shine.
Sourcing And Prep Tips
- Start by checking local hardware stores for free pallet bins or ask small businesses if they have pallets to give away. Salvage yards often sell reclaimed wood by the pound, making it incredibly affordable. Before installation, let the wood acclimate to your home's humidity for a few days to prevent warping.
- Sand each plank with medium-grit sandpaper, then wipe away dust. For a cohesive look, group planks by similar color tones before staining.
Installation And Layout
- Measure your wall and plan the layout on the floor first. Use a stud finder to mark studs, then attach furring strips horizontally for a stable base. Nail or screw each plank into the furring strips, leaving a small gap between boards for an authentic rustic feel.
- Stagger the seams for a more natural look. If you're renting, consider using a removable adhesive instead of nails.
Finishing Touches
- Seal the wood with a matte polyurethane to protect it from dust and sunlight. Add a floating shelf above the paneling to display small plants or framed photos. For a cozy vibe, install warm LED wall sconces that cast a soft glow on the textured surface.
- The wood's natural variations will add depth and interest without needing extra decor.
5. Board and Batten with Simple Supplies
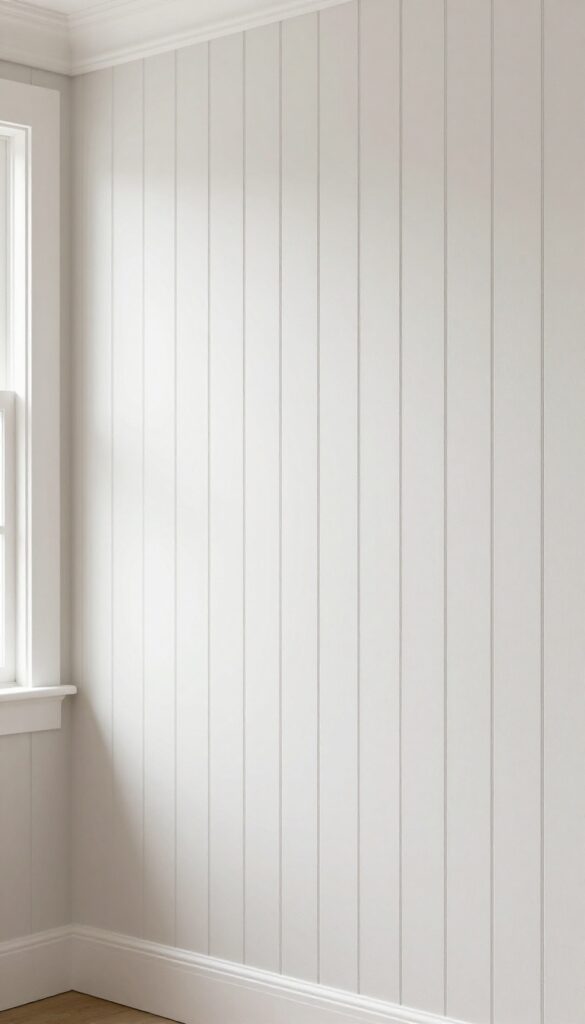
Board and batten is one of those wall treatments that looks like a major renovation but actually costs very little. You just need thin MDF strips and a flat base, then paint everything the same color for a seamless, built-in look. The vertical lines add height and structure, making any living room feel more polished without overwhelming the space.
It's a classic choice that works in modern, farmhouse, or traditional homes, and the best part is you can install it in a weekend.
Board and batten uses vertical battens over a flat base, creating a structured grid. Use thin MDF strips and paint everything the same color for a seamless finish. It's a classic look that costs little but feels custom.
Budget-friendly Materials
- MDF is your best friend here. It's cheap, easy to cut, and takes paint beautifully. You'll also need a level, measuring tape, construction adhesive, and a nail gun or hammer and finishing nails.
- Skip the plywood backing if your wall is already smooth—just paint the wall as your base and attach the battens directly. That saves even more money and keeps the project lightweight.
Best Colors For A Seamless Look
- Painting everything the same color is what makes board and batten look intentional rather than added on. Soft whites, warm greiges, or muted blues work well. If you want contrast, paint the battens a shade darker than the wall for subtle depth.
- Just avoid high-gloss finishes unless you're going for a very modern vibe—satin or eggshell keeps it soft and livable.
Layout Tip For Small Spaces
- In a small living room, keep the battens spaced 12 to 16 inches apart. That creates enough rhythm without making the wall feel busy. You can also run the battens from floor to ceiling to draw the eye upward, making the room feel taller.
- For a more dramatic effect, stop the battens at chair-rail height and paint the upper wall a lighter color.
6. Wainscoting with a Painted Accent
Wainscoting is one of those details that instantly makes a room feel more finished, like the walls were actually part of the design plan instead of just an afterthought. The best part? You don’t have to panel the entire wall to get that custom look.
By installing pre-cut MDF panels on the lower half and painting the upper section a complementary shade, you create a two-tone effect that adds depth and interest without overwhelming the space. It’s a budget-friendly way to bring in texture and architectural charm, especially in living rooms where you want a focal point that doesn’t scream for attention.
Wainscoting with a painted accent works beautifully in living rooms because it defines the space without taking up any floor area. The lower paneling adds a tactile element that contrasts with smooth upper walls, and the color break helps visually lower or raise the ceiling depending on your paint choices. For a clean, modern feel, go with white wainscoting and a soft gray or pale blue above.
If you want something cozier, try a warm beige on the panels and a deeper taupe on top. The key is keeping the palette simple so the architectural detail stands out.
Best Colors For The Two-tone Look
- Stick with colors that have a clear contrast but still feel harmonious. For a classic pairing, use bright white on the wainscoting and a muted navy or sage green above. If you prefer a softer scheme, try off-white panels with a dusty rose or light charcoal upper wall.
- The contrast doesn’t have to be dramatic—even a slight difference in undertones can make the wainscoting pop.
Budget-Friendly Swap
- Skip custom millwork and use pre-primed MDF panels from the home store. They come in sheets that are easy to cut and install with construction adhesive and a nail gun. For the chair rail and trim, buy stock molding—it’s cheap and paints up nicely.
- This whole project can cost under $200 for an average living room wall.
Finishing Touch
Once the paint is dry, add a simple floating shelf above the wainscoting line. Style it with a few small plants, a stack of books, or a ceramic vase. This draws the eye up and makes the two-tone wall feel intentional and layered.
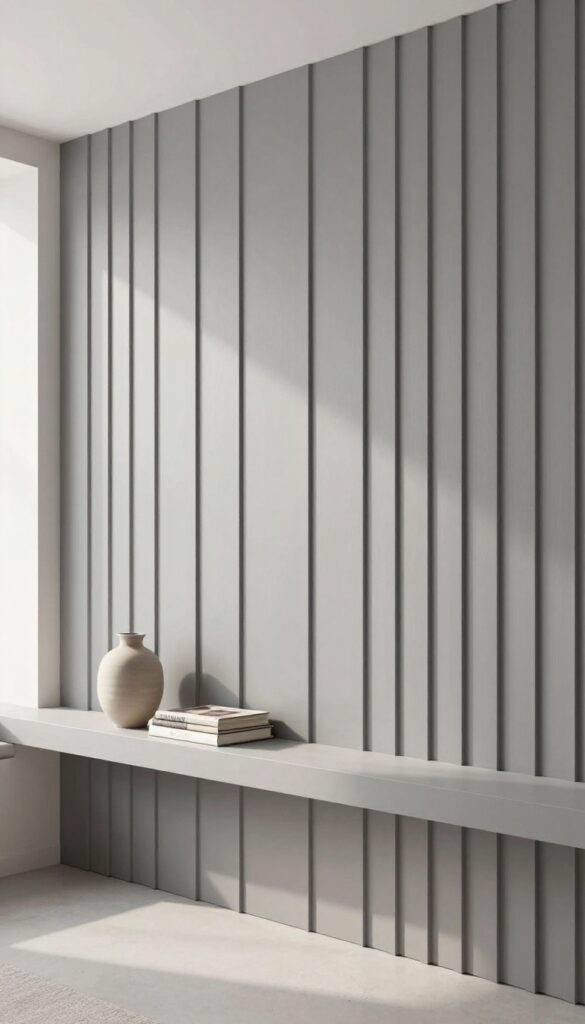
7. Slatted Wood Wall with Spaced Battens
A slatted wood wall brings instant texture and warmth to a living room without overwhelming the space. By spacing thin battens evenly apart, you create a rhythmic pattern that adds depth and a modern feel. This project is budget-friendly when you use basic pine or poplar strips, and you can leave them natural for a light, airy look or stain them for a richer organic tone.
This wall treatment works especially well behind a sofa or as an accent in a dining area. The gaps between battens allow the wall color to peek through, so you can play with contrast—dark wood on a white wall, or light wood on a charcoal backdrop. It’s a weekend-friendly DIY that makes a big impact without the cost of full paneling.
Best Materials And Prep
- Pine or poplar lattice strips are affordable and easy to cut. Sand them smooth before painting or staining. For a clean look, use a level and spacers to keep gaps consistent—about 1.5 to 2 inches apart works well.
- Prime and paint the wall behind it if you want a crisp contrast.
Budget-Friendly Swap
Instead of expensive hardwood, choose pre-primed MDF strips. They take paint beautifully and cost less than half the price. You can also use reclaimed wood for a rustic feel—just make sure the widths are uniform for a polished result.
Finishing Touch
Add a floating shelf above the slatted wall to display a few small plants or art. The wood tones will tie the shelf into the wall, creating a cohesive focal point. Keep decor minimal to let the texture shine.
8. Plywood Groove Panels for a Custom Look
Plywood sheets with routed grooves offer a clever way to fake expensive tongue-and-groove paneling without the hefty price tag. The routed lines create a clean, linear pattern that feels modern and intentional. Once painted in a matte finish, the surface looks seamless and polished, making it a smart choice for anyone wanting a custom wall treatment on a budget.
This approach works especially well in living rooms where you want to add architectural interest without overwhelming the space. The grooves can be spaced evenly or in a more random pattern for a contemporary twist. Because plywood comes in large sheets, installation is faster than traditional paneling, and the smooth painted surface reflects light softly, making the room feel airy and bright.
Best Colors
Matte white or soft gray keep the look crisp and minimalist. For a bolder statement, try deep navy or charcoal to create a cozy accent wall. The matte finish is key—it hides imperfections and gives the panels a velvety, high-end feel.
Budget-Friendly Swap
Instead of buying pre-routed panels, rent a router and cut the grooves yourself on standard plywood. This saves money and lets you customize the spacing. Use a straight edge guide to keep lines perfectly parallel.
Finishing Touch
Add a thin floating shelf at the midpoint or top of the paneling to break up the vertical lines and display a few curated objects. This little detail makes the wall feel built-in and intentional.
9. Fabric-Wrapped Panels for Soft Texture
Nothing softens a room quite like fabric on the walls. Fabric-wrapped panels bring warmth, texture, and a touch of acoustic comfort without the permanence of wallpaper or the expense of upholstered walls. They’re surprisingly easy to DIY, making them a smart choice if you’re working with a modest budget but still want a designer look.
Stretch your chosen fabric over foam core or plywood, attach them to the wall, and suddenly your living room feels cozier and more polished.
Fabric-wrapped panels are essentially custom wall art that also helps absorb sound. They work especially well in living rooms where you want to reduce echo or add a soft backdrop for a TV or sofa. The best part?
You can change the fabric whenever you want a new look, so it’s a flexible investment. For a budget-friendly approach, use high-density foam board from a craft store and inexpensive fabric like linen or cotton canvas. Attach the fabric with spray adhesive or a staple gun, then mount the panels with heavy-duty double-sided tape or picture-hanging strips.
Arrange them in a grid or as a single large panel behind a seating area.
Best Fabric Choices
- Stick with natural fibers like linen, cotton, or wool blends for a timeless feel. Neutral tones such as oatmeal, taupe, or soft gray blend seamlessly with most decor. If you want a subtle pattern, try a small-scale geometric or a faint stripe.
- Avoid heavy velvet or slippery silk, as they’re harder to stretch neatly and can be expensive.
Layout And Placement
For maximum impact, create a feature wall behind the sofa or a reading nook. Use three to five panels in a horizontal row for a modern look, or arrange them in a checkerboard pattern for visual interest. Leave about an inch of space between panels to let the wall color peek through, which adds depth without extra cost.
Budget-Friendly Swap
Instead of buying new fabric, repurpose old curtains, duvet covers, or even thrifted bedsheets. Wash them first to remove wrinkles and ensure a clean stretch. Foam core boards are cheaper than plywood and lighter to hang, but plywood lasts longer if you want a permanent solution.
10. Painted Molding Grids for Architectural Interest
Molding grids are a clever way to fake architectural details that would normally cost thousands. By arranging inexpensive wood strips into rectangles across a wall and painting everything the same color, you create a subtle, textured look that feels custom and intentional. The best part?
It's a weekend project that transforms a flat wall into something sophisticated without any major construction.
This technique works especially well in living rooms where you want a focal point without adding bulky furniture. The grid pattern adds rhythm and structure, making the room feel more polished. Keep the spacing consistent and the rectangles proportional to your wall size for the most professional finish.
A monochromatic palette keeps the look clean and modern, while the shadows cast by the molding add depth throughout the day.
Best Colors
- Stick with a single color for both the wall and the molding to maintain a seamless, high-end look. Soft whites, pale grays, or muted blues work beautifully. For drama, try a deep charcoal or navy.
- Avoid high-gloss paint on the molding—satin or eggshell sheen keeps the effect subtle and reduces glare.
Budget-Friendly Swap
- Instead of costly custom millwork, use pine lattice strips or MDF boards from the hardware store. They're cheap, easy to cut, and take paint well. Pre-primed versions save time.
- You can also use adhesive caulk to fill gaps for a seamless look without needing a nail gun.
Layout Tip
- Plan your grid on paper first. For a standard 8-foot wall, aim for 2-3 rows of rectangles. Leave equal space between them and from the floor and ceiling.
- Use a level and painter's tape to map out the design before nailing anything. Symmetry is key to making it look intentional.
11. Corrugated Metal Panels for Industrial Edge
If your living room needs a dose of raw, urban character, corrugated metal panels deliver it fast. These sheets bring an industrial edge that feels both rugged and refined, especially when you let the metal breathe as an accent wall. The best part?
They're budget-friendly and surprisingly easy to install, so you can transform a plain wall over a weekend without breaking the bank.
Corrugated metal panels create an instant focal point with their rhythmic ridges and cool, reflective surface. The silvery-gray tones work beautifully with warm woods, soft textiles, and greenery, balancing the hard edge with cozy touches. For a truly budget-friendly approach, use galvanized steel sheets (often available at hardware stores for under $20 each) and mount them with construction adhesive or screws into studs.
Leave the metal raw for a true industrial look, or give it a coat of matte black or deep navy for a more polished feel. Pair with a reclaimed wood console, a chunky knit throw, and a few leather poufs to soften the space without losing the edge.
Best Colors & Finishes
- Raw galvanized steel offers a classic silvery sheen that reflects light and makes a room feel larger. For a warmer take, look for panels with a bronze or copper tone. If you want to go darker, spray-paint the panels matte black or charcoal gray for a moody, sophisticated backdrop.
- Avoid glossy finishes—they can feel too commercial.
Installation Tips
- Measure your wall and order panels cut to size if possible. Use a level to mark stud locations, then attach the panels with self-tapping screws (paint the screw heads to match). For a renter-friendly option, use heavy-duty double-sided tape or construction adhesive—just test a small area first.
- Leave a small gap at the floor for air circulation.
Finishing Touch
Soften the metal with a large area rug in a natural fiber like jute or a plush wool blend. Add a floor lamp with a warm bulb to cast soft shadows across the ridges. A few trailing plants on a nearby shelf will introduce organic texture and keep the industrial look from feeling cold.
12. Peel-and-Stick Wall Panels for Renters

Renting doesn't mean you have to live with plain white walls forever. Peel-and-stick wall panels give you the look of real wood, tile, or brick without the permanent commitment—or the hefty price tag. They go up in minutes, come down just as easily, and can transform a bland living room into something that actually feels like yours.
Whether you want a cozy shiplap accent wall or a sleek herringbone pattern, these panels offer a budget-friendly way to add texture and personality to your space.
Peel-and-stick panels are a game-changer for renters who crave character without risking their security deposit. They're lightweight, easy to cut with a utility knife, and stick firmly to smooth, clean walls. Most brands use high-quality adhesive that removes cleanly when you're ready to move out.
The best part? You can change your mind anytime. Swap out a faux brick wall for a wood slat look whenever the mood strikes.
Just make sure to test a small piece first to ensure your wall paint is compatible with the adhesive.
Best Styles For A Living Room
- Faux shiplap panels create a farmhouse feel that works well behind a sofa or TV. Herringbone patterns add a touch of elegance and look stunning as a fireplace surround. If you prefer an industrial vibe, go for faux brick or concrete panels.
- For a modern, organic look, try wood-look panels in a warm oak or walnut finish. Stick with neutral tones to keep the room feeling open and airy.
Installation Tips
- Start with a clean, dry wall. Wipe down the surface with rubbing alcohol to remove any dust or grease. Measure and cut each panel carefully, leaving a small gap at the edges for expansion.
- Press firmly from the center outward to eliminate air bubbles. For best results, install panels in a staggered pattern to mimic real materials. Use a level to keep lines straight, and avoid placing panels near heat sources like radiators.
Budget-Friendly Swap
- Instead of covering an entire wall, create a small accent section behind a media console or a reading nook. This uses fewer panels and still makes a big visual impact. You can also mix panels with paint—for example, panel the lower half of a wall and paint the upper half for a wainscoting effect.
- Shop sales at home improvement stores or online retailers for the best deals, and consider buying a few extra panels for future repairs.
13. Half-Wall Paneling with a Shelf Top
Half-wall paneling already adds texture and structure, but topping it with a narrow shelf turns it into a functional display spot. This trick works especially well in living rooms where you want a bit of architectural interest without committing to full-height paneling. The shelf becomes a natural ledge for small plants, framed photos, or stacked books, making the wall feel purposeful.
Painting the paneling a darker shade than the upper wall creates contrast that draws the eye and anchors the room.
This budget-friendly idea is perfect for renters or anyone looking to update a room without a major renovation. You only need enough paneling to cover the lower half of the wall, plus a simple wooden shelf to cap it. The result is a built-in look that costs a fraction of custom millwork.
It works especially well in living rooms with standard 8-foot ceilings, as the horizontal line visually widens the space. For a cohesive look, choose a paneling style that matches your room's vibe—shiplap for farmhouse, beadboard for cottage, or flat panels for modern.
Best Colors
- Go two-tone for maximum impact. Paint the paneling and shelf a deep shade like navy, charcoal, or forest green, and keep the upper wall a soft white or light neutral. This creates a clear visual break that makes the room feel taller.
- If you prefer a more subtle look, use the same color for both but choose a matte finish for the paneling and a satin finish for the shelf to add subtle contrast.
Shelf Styling Tip
Keep the shelf clutter-free to maintain the clean look. Arrange items in odd numbers—three small vases or a stack of books with a single candle on top. Use the shelf to display pieces that tie into your room's color palette, like a ceramic bowl that echoes the paneling color or a trailing plant that softens the hard edge.
Budget-Friendly Swap
Instead of real wood paneling, use MDF or even peel-and-stick wall panels to keep costs low. You can also repurpose old baseboards or trim to create a custom shelf. For the shelf top, a simple pine board painted to match is an affordable alternative to pre-made shelving.
14. Recycled Cardboard Tiles for Eco-Friendly Texture
If you love the look of textured wall panels but want something that won't break the bank (or the planet), recycled cardboard tiles are a clever alternative. These lightweight squares are made from compressed cardboard, often with a honeycomb or geometric pattern, and they bring a surprising amount of warmth and dimension to a wall. The best part?
They're easy to install, easy to paint, and cost a fraction of traditional wood or MDF panels. A single accent wall covered in these tiles instantly feels intentional and modern, with a subtle eco-friendly story behind it.
Recycled cardboard tiles are having a moment in budget-friendly home decor, and for good reason. They mimic the look of more expensive materials like cork, wood, or even plaster, but at a fraction of the cost. The tiles come in sheets or individual squares, often with a self-adhesive backing or a simple glue-on application.
Once installed, they create a soft, textured surface that absorbs sound and adds a cozy, organic feel to any room. Paint them in a matte finish—think warm white, soft gray, or even a muted clay tone—to keep the look clean and sophisticated. This is a perfect weekend project for renters or homeowners who want a big visual impact without a big commitment.
Best Colors And Finishes
- Stick with matte paints for the most natural look. Flat or eggshell finishes work best because they don't reflect light and let the texture shine. Neutral tones like off-white, beige, or light taupe keep the room feeling airy, while deeper shades like charcoal or olive green add drama.
- If you want to highlight the pattern, try a two-tone effect by painting the tiles one color and the wall behind another.
Installation Tips
- Before applying, make sure your wall is clean and smooth. Use a level to mark a straight starting line, especially if the tiles have a directional pattern. Most cardboard tiles can be cut with a utility knife, so you can easily fit them around outlets or corners.
- Apply a strong construction adhesive or use the peel-and-stick backing if available. Work in small sections and press firmly for a few seconds.
Where To Use Them
An accent wall behind a sofa or bed is the most popular spot, but don't stop there. Try them on the ceiling of a cozy reading nook, inside open shelving units, or as a backsplash in a kitchen or bathroom (just seal them with a clear matte varnish if they'll be near moisture). In a small apartment, a single cardboard tile wall can define a dining area without adding visual weight.
15. DIY Herringbone Pattern with Scrap Wood
If you're handy with a saw and have a stash of leftover wood, this herringbone wall treatment is a budget-friendly way to make a big impact. The pattern draws the eye and adds texture without costing much—just time and patience. Paint or stain the pieces in a single hue for a cohesive look that feels custom and intentional.
Cut scrap wood into small rectangles and arrange them in a herringbone pattern. This labor-intensive but low-cost project creates a stunning focal point. Stain or paint the pieces in a single color for a cohesive look.
Best Wood Types
Pine or plywood scraps work well because they're affordable and easy to cut. For a more refined finish, use oak or poplar. The key is consistent thickness so the pattern lies flat.
Layout Tip
Mark a vertical centerline on your wall and lay out the first V shape there. Work outward in both directions to keep the pattern symmetrical. Use spacers for even gaps between pieces.
Finishing Touch
Seal the wood with a matte polyurethane to protect it from dust and light wear. A single dark stain color like walnut or charcoal makes the herringbone pop against a lighter wall.
FAQ
What is the cheapest way to add wall paneling to a living room?
The cheapest options include using MDF sheets, peel-and-stick panels, or reclaimed wood from pallets. DIY installation also saves on labor costs.
Can I install wall paneling in a rental apartment?
Yes, peel-and-stick panels or removable fabric panels are renter-friendly. They can be taken down without damaging the walls.
How do I choose the right paneling style for my living room?
Consider your room's size and style. Vertical paneling can make ceilings look higher, while horizontal panels widen a narrow room. For a modern look, try slats or geometric patterns.
Do I need to paint wall paneling?
Not necessarily. Some paneling looks great with a natural stain or clear coat. Painting is a budget-friendly way to match your decor and refresh the look.
How do I maintain wall paneling?
Dust regularly with a soft cloth or vacuum attachment. For painted paneling, wipe with a damp cloth as needed. Avoid harsh cleaners that can damage the finish.
Conclusion
Wall paneling is a versatile way to add character and warmth to your living room without stretching your budget. Whether you go for classic beadboard or a modern slatted wall, each idea brings its own personality to the space. The key is to choose a style that fits your home and your DIY comfort level.
Start with one accent wall and see how it transforms the room. With a little creativity and some affordable materials, you can achieve a high-end look that feels uniquely yours.