17 Deep Cleaning Bathroom Tips for a Full Fresh Reset
A deep clean bathroom isn't just about wiping counters—it's about resetting every surface until it feels brand new. You'll tackle hidden grime, mineral deposits, and mold that daily cleaning misses.
These 17 tips target the toughest spots, from showerheads to grout lines, so you can work smarter, not harder. Each method uses common household ingredients or basic tools to deliver visible results.
Ready to transform your bathroom into a fresh, sparkling space? Let's dive into the step-by-step strategies that make a full reset achievable.
1. Start with a Dry Sweep to Remove Loose Debris
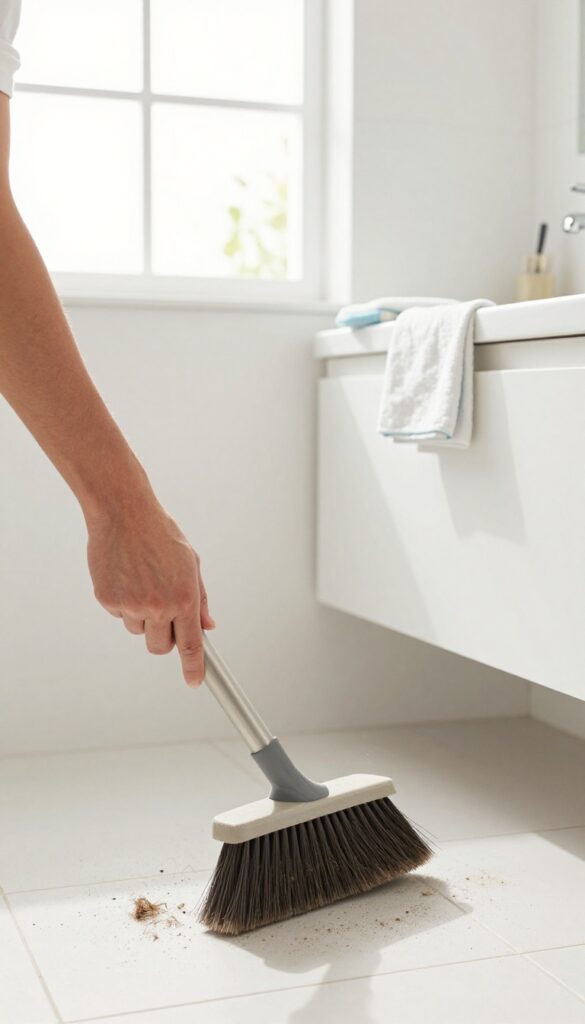
Before you bring out the sprays and scrub brushes, take a few minutes to clear the battlefield. A dry sweep—using a broom, vacuum, or microfiber duster—picks up hair, dust, and other loose particles that would otherwise turn into a muddy mess when wet. This simple first step makes every cleaning product work better and saves you from rinsing and re-scrubbing later.
Grab a soft-bristled broom or a vacuum with a brush attachment and go over the floor, baseboards, and corners. Don't forget the vanity top, windowsill, and any shelves. Use a dry microfiber cloth or a duster to wipe down light fixtures and the top of the toilet tank.
This quick pass removes the bulk of debris so your wet cleaning steps can focus on grime, not dirt.
Why Dry First?
Wet cleaning pushes loose debris around, often leaving it trapped in corners or stuck to wet surfaces. By sweeping or vacuuming first, you prevent that gritty residue from scratching surfaces or clogging drains. It also keeps your cleaning cloths and sponges cleaner longer.
Tools That Work Best
A vacuum with a crevice tool is ideal for edges and tight spots. For hard floors, a microfiber dust mop picks up fine dust without scattering it. On tile walls, a long-handled duster or a microfiber cloth on a swiffer handle works wonders.
Don't Skip The High Spots
Ceiling corners, vent covers, and the top of the shower door collect cobwebs and dust. Use an extendable duster or a vacuum with a hose attachment to reach these areas. Clearing them now prevents dust from falling onto freshly cleaned surfaces later.
2. Soak Showerheads in Vinegar to Bust Mineral Deposits
Hard water deposits can clog your showerhead and reduce water pressure over time. Instead of scrubbing in place, remove the showerhead and let vinegar do the heavy lifting. This simple soak dissolves mineral buildup, restoring full flow and shine.
Start by unscrewing the showerhead from the arm. If it's stuck, wrap a cloth around the nut for grip. Place the showerhead in a plastic bag or bowl filled with undiluted white vinegar, making sure all nozzles are submerged.
Let it soak for at least two hours—overnight for heavy deposits. After soaking, scrub any remaining residue with an old toothbrush, then rinse thoroughly with water. For fixed showerheads, fill a bag with vinegar, tie it around the head with a rubber band, and let it soak.
This method is cheap, non-toxic, and incredibly effective.
Why Vinegar Works So Well
White vinegar is mildly acidic, which breaks down the calcium and lime scale in hard water deposits. Unlike harsh chemical descalers, vinegar is safe for most metal and plastic finishes when used correctly. It's also inexpensive and readily available.
Step-by-step Soaking Process
Remove the showerhead and place it in a container of vinegar. Ensure all nozzles are submerged. Let it sit for 2–4 hours, or overnight for stubborn buildup.
Remove and scrub with a toothbrush, then rinse thoroughly with water before reattaching.
What About Fixed Showerheads?
If your showerhead is not removable, fill a plastic bag with vinegar and secure it around the head with a rubber band. Soak for the same duration, then remove the bag and scrub the nozzles. Rinse by running the shower for a minute.
3. Attack Soap Scum with a DIY Baking Soda Paste
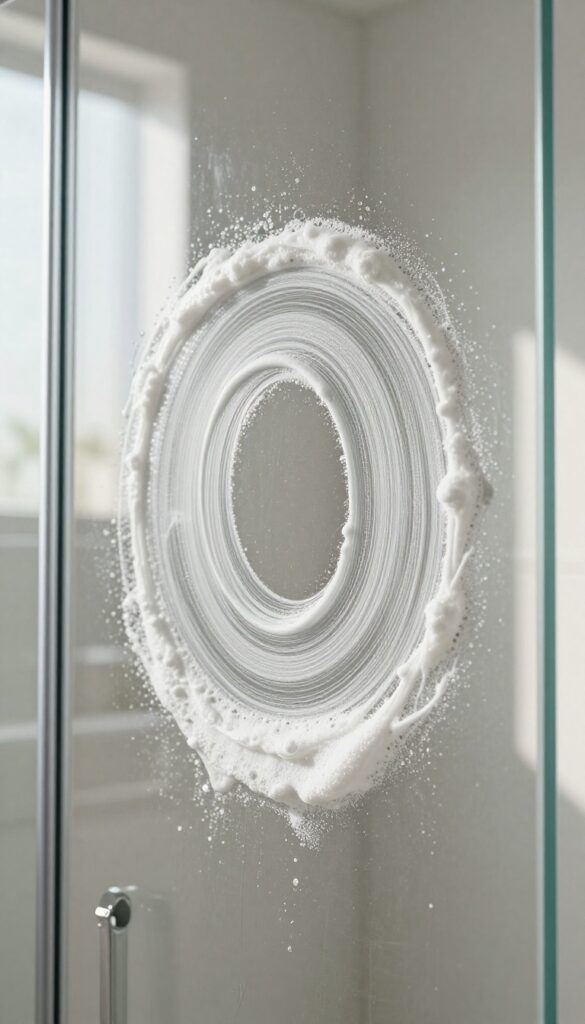
Soap scum builds up fast on glass doors and tiles, leaving a cloudy film that dulls your bathroom's shine. Instead of reaching for harsh chemical sprays, you can make a simple paste with baking soda and water that cuts through grime without scratching surfaces. This gentle abrasive lifts soap residue and hard water deposits, restoring clarity to glass and a clean feel to tiles.
Mix three parts baking soda with one part water to form a thick, spreadable paste. Apply it generously to the affected areas—shower doors, wall tiles, or even the sink. Let it sit for 5 to 10 minutes so the baking soda can break down the scum.
Then scrub gently with a non-abrasive sponge or microfiber cloth, working in circular motions. Rinse thoroughly with warm water and dry with a clean towel to prevent new spots from forming. For stubborn buildup, add a splash of white vinegar to the paste for extra cleaning power.
Why Baking Soda Works So Well
Baking soda is mildly alkaline, which helps dissolve fatty acids in soap scum. Its fine grit provides gentle abrasion that lifts grime without scratching glass or tile. Unlike commercial cleaners, it's non-toxic and safe for most surfaces, including fiberglass and acrylic.
Pro Tips For A Streak-free Finish
After scrubbing, rinse with distilled water to avoid mineral streaks. Dry the surface immediately with a microfiber cloth to prevent water spots. For extra shine, follow up with a vinegar-water spray (1: 1 ratio) and buff dry.
When To Avoid This Method
Don't use baking soda paste on natural stone surfaces like marble or granite, as the abrasiveness can etch the finish. Also avoid it on any surface with a wax or sealant coating that might be damaged.
4. Bleach or Hydrogen Peroxide for Mold and Mildew
Mold and mildew love the damp corners of your bathroom—especially caulk and grout. Left unchecked, they not only look ugly but can also affect air quality. The good news is you don't need harsh commercial products; a simple bleach solution or hydrogen peroxide works wonders.
Mix one part bleach with ten parts water in a spray bottle, or use 3% hydrogen peroxide straight. Spray the affected areas, let it sit for 10 minutes, then scrub with an old toothbrush. Rinse thoroughly with water and ventilate the room to clear fumes.
For stubborn spots, repeat or make a paste with baking soda and bleach.
Why These Work
Bleach kills mold spores on contact and whitens surfaces, while hydrogen peroxide is a gentler alternative that still disinfects. Both penetrate porous grout and caulk, tackling growth at the root.
Safety First
Always wear gloves and open a window or turn on the exhaust fan. Never mix bleach with ammonia or vinegar—it creates toxic fumes. Test on a hidden area first to check for discoloration.
5. Deep Clean Grout with a Grout Brush and Cleaner
Grout lines are notorious for trapping dirt, soap scum, and mildew, turning your pristine tile into a grimy mess. A deep scrub with the right tools can restore that fresh-from-installation look. No need for harsh chemicals if you prefer natural options—just a stiff brush and some elbow grease.
Start by choosing your cleaner: a commercial grout cleaner for tough stains, or a paste made from baking soda and water for a gentler approach. Apply the cleaner to the grout lines and let it sit for 5-10 minutes to break down grime. Then, using a grout brush or an old toothbrush, scrub in small circular motions, working the cleaner deep into the porous surface.
Rinse thoroughly with water and wipe away residue with a damp cloth. For stubborn spots, repeat the process or add a little white vinegar to the paste. Avoid using bleach on colored grout, as it can cause discoloration.
Why Grout Gets So Dirty
Grout is porous, meaning it absorbs moisture and debris easily. Over time, soap residue, body oils, and minerals from hard water settle into the tiny pores, creating a breeding ground for mold and mildew. Regular wiping isn't enough—you need to scrub deep to lift that embedded grime.
Best Tools For The Job
A dedicated grout brush with stiff bristles is ideal, but an old toothbrush works in a pinch. For larger areas, consider a grout cleaning pen or a drill attachment with a brush head. Always test your tool on a small, hidden spot first to ensure it won't scratch the tile.
Natural Vs. Commercial Cleaners
Baking soda and vinegar are effective for light to moderate grout stains. For heavy buildup or mold, a commercial grout cleaner with oxygen bleach or hydrogen peroxide may be necessary. Whichever you choose, always ventilate the room and wear gloves to protect your skin.
6. Descale Faucets and Fixtures with Lemon or Vinegar
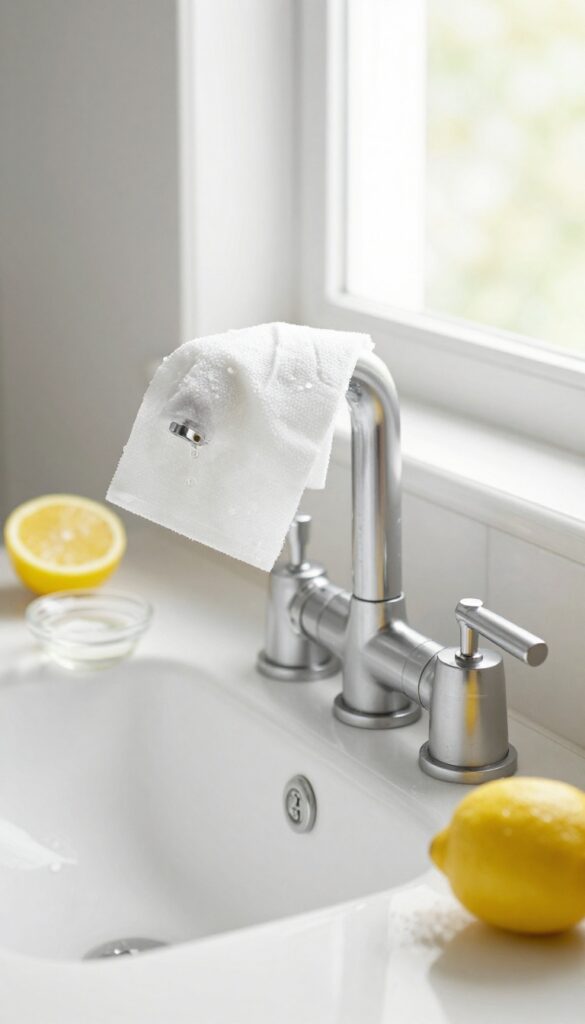
Hard water stains and mineral buildup can make even the cleanest bathroom look dull. Faucets, handles, and shower fixtures are magnets for these deposits, but you don't need harsh chemicals to restore their shine. A simple soak with vinegar or a scrub with lemon cuts through the grime naturally.
The Vinegar Wrap Method
Soak a few paper towels in white vinegar and wrap them around the base of your faucet and handles. Make sure the towels are saturated so they cling to the metal. Let them sit for 30 minutes—this gives the acid time to dissolve calcium and lime deposits.
Remove the towels and wipe the fixtures clean with a dry cloth. For stubborn spots, use an old toothbrush dipped in vinegar to scrub crevices.
Lemon Power For Tough Spots
If you prefer a fresh scent or need extra scrubbing power, cut a lemon in half and dip the cut side in coarse salt. Use the lemon half like a scrubber on faucet heads, handles, and even shower arms. The citric acid breaks down mineral crusts while the salt provides gentle abrasion.
Rinse thoroughly with water and buff dry with a microfiber cloth for a streak-free finish.
Preventing Future Buildup
After descaling, give your fixtures a quick wipe with a dry towel after each shower or sink use. This simple habit prevents water spots from forming and keeps mineral deposits from coming back. For extra protection, you can apply a thin layer of car wax or a specialized metal sealant to faucets—it creates a barrier that repels water and grime.
7. Refresh Toilet Bowl with a Pumice Stone
Toilet bowl stains from hard water and minerals can look stubborn, but a pumice stone makes quick work of them without harsh chemicals. This natural volcanic rock is abrasive enough to scrub away rings and deposits but gentle on porcelain when used correctly. It's a game-changer for restoring that like-new look to your toilet.
Start by wetting the pumice stone thoroughly—never use it dry, as that can scratch the porcelain. Gently rub the stone against the stain, applying light pressure. The stone will wear down slightly as it works, which is normal.
Flush the toilet to rinse away the residue, and repeat if needed. For tough rings, you can also dip the stone in water while scrubbing to keep it lubricated. After use, rinse the stone and let it air dry.
Store it away from your regular cleaning tools to avoid confusion.
Why Pumice Works So Well
Pumice is a porous, abrasive stone formed from volcanic lava. Its rough texture effectively scrubs away mineral deposits and calcium rings without scratching the porcelain surface—as long as it's wet. Unlike chemical cleaners that require soaking and scrubbing, pumice provides physical abrasion that lifts stains quickly.
Step-by-step Application
First, ensure the toilet bowl is wet. You can either flush first or add water. Wet the pumice stone under running water.
Gently rub the stained area in a circular motion. You'll see the stain start to fade almost immediately. Flush to rinse.
If any stain remains, repeat the process. For deep-set rings, you may need to scrub for a minute or two. Always keep the stone wet to prevent scratching.
Safety And Maintenance Tips
Never use a dry pumice stone on porcelain—it can cause permanent scratches. Test on an inconspicuous area first if you're unsure. After each use, rinse the stone and let it dry completely.
Store it in a dry place. Pumice stones are inexpensive and can be used multiple times before they wear down. Replace when it becomes too small to hold comfortably.
8. Wash Shower Curtains and Liners in the Machine
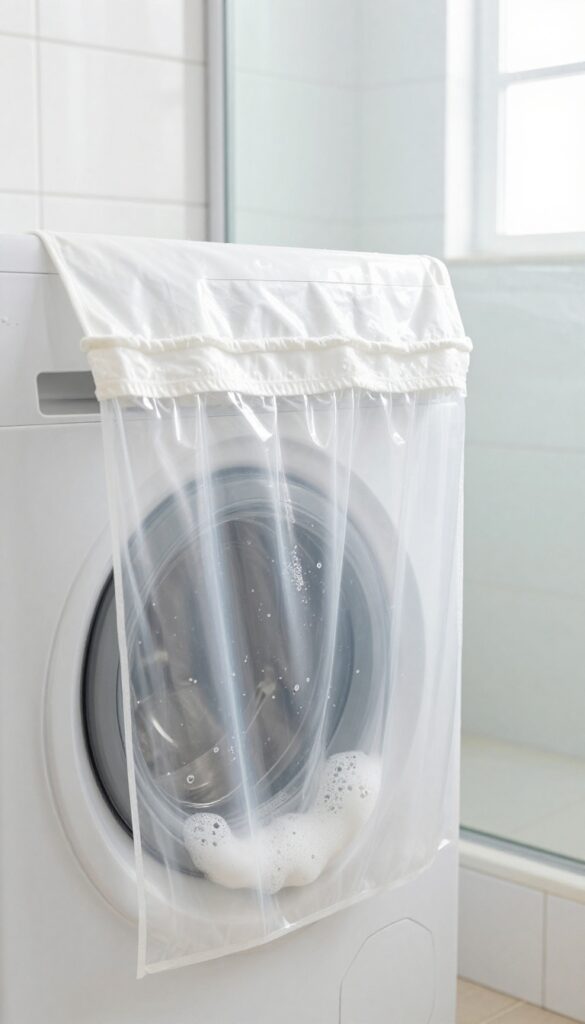
Shower curtains and liners collect soap scum, mildew, and hard water deposits over time. A quick machine wash can bring them back to life without scrubbing. Just toss them in with detergent and a cup of white vinegar to break down grime and kill odors.
Most fabric shower curtains and plastic liners are machine-washable, but always check the care label first. Remove any metal rings or hooks to prevent rust stains or damage to the machine. Use warm water on a gentle cycle, adding half a cup of baking soda along with the vinegar for extra deodorizing power.
After the wash, hang the curtain or liner back on the rod immediately to drip dry—this prevents wrinkles and stops mildew from forming on damp fabric. For stubborn mildew spots, pre-treat with a paste of baking soda and water before washing.
Why Vinegar Works
White vinegar is a natural disinfectant and deodorizer that cuts through soap scum and mineral deposits without harsh chemicals. It also helps restore the fabric's softness and remove yellowing. Don't worry about the smell—it rinses out completely during the cycle.
Drying Tips To Avoid Mildew
Never leave a wet curtain bunched up in the laundry basket or dryer. Hang it straight on the rod with the bottom spread out so air can circulate. If your liner is plastic, you can also wipe it down with a microfiber cloth after hanging to speed drying.
9. Scrub Under and Around the Toilet Base
The toilet base is a magnet for dust, hair, and mystery grime. It's also one of those spots that gets ignored because, frankly, it's awkward to reach. But once you clean it, you'll wonder why you waited so long.
That ring of buildup around the floor and the exposed bolts can make an otherwise clean bathroom feel dingy.
Why It Gets So Grimy
Every time you mop or wipe the floor, moisture and dirt collect at the seam where the toilet meets the tile. Over time, that moisture traps dust and hair, forming a stubborn crust. The bolts and caps also accumulate dust and can even rust if neglected.
Tools You'll Need
Grab a small stiff-bristled brush or an old toothbrush, a microfiber cloth, and a gentle cleaner like dish soap mixed with warm water or a diluted vinegar solution. Avoid harsh bleach near the wax ring—it can degrade the seal over time.
Step-by-step Scrubbing
Start by spraying the cleaner around the base and let it sit for a minute. Use the brush to scrub the gap between the toilet and the floor, working in a circular motion. Pay special attention to the bolts and the back of the bowl where grime hides.
Wipe away residue with a damp cloth, then dry the area to prevent new buildup.
Maintenance Tips
Add this to your monthly deep clean routine. A quick wipe with a disinfectant wipe after mopping can keep the area fresh. If you notice persistent moisture or a bad smell, check the wax seal—it may need replacing.
10. Clean Exhaust Fan Vents for Better Airflow
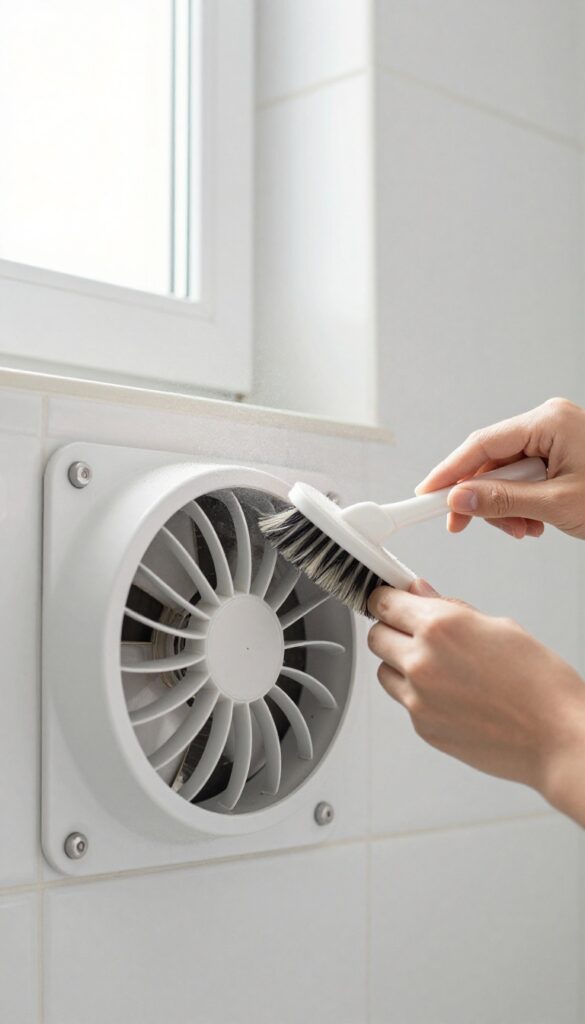
Your bathroom exhaust fan works hard to remove moisture and odors, but when its vents get clogged with dust, it can't do its job. A dirty fan not only reduces airflow but also becomes a fire hazard and a breeding ground for mold. Cleaning it takes just a few minutes and makes a huge difference in air quality and efficiency.
Vacuum The Vent Cover First
Start by turning off the fan at the circuit breaker to be safe. Use a vacuum with a brush attachment to gently remove loose dust and debris from the vent cover. This prevents dirt from falling into the fan housing when you remove the cover.
Wash The Cover With Soapy Water
Most vent covers pop off easily with a gentle tug or a flathead screwdriver. Soak the cover in warm, soapy water for a few minutes, then scrub with a soft brush to remove grime. Rinse thoroughly and let it air dry completely before reinstalling.
Clean The Fan Blades Inside
With the cover off, use a narrow brush or a microfiber cloth to wipe the fan blades and the interior housing. A can of compressed air can also blow out stubborn dust. Be careful not to bend the blades.
Once clean, replace the cover and restore power.
11. Wipe Down Cabinet Interiors and Drawers
Cabinet interiors and drawers collect dust, crumbs, and product spills over time. When was the last time you actually looked inside your bathroom vanity? A deep clean here makes a big difference in how fresh your bathroom feels.
Empty everything out—every bottle, every tube, every forgotten sample. Wipe the shelves with a damp cloth and a mild cleaner or soapy water. Let them dry completely before putting anything back.
While you're at it, toss anything expired or unused. You'll gain space and peace of mind.
Declutter First
Pulling everything out gives you a chance to sort and purge. Check expiration dates on medicines, skincare, and makeup. Toss anything past its prime or that you haven't used in a year.
Group like items together so restocking is organized.
Wipe All Surfaces
Use a microfiber cloth and a gentle all-purpose cleaner or a vinegar-water mix. Don't forget corners, edges, and the inside of the cabinet door. For sticky residue, a little baking soda paste works wonders.
Let It Breathe
Leave cabinet doors and drawers open for at least 30 minutes to air out. This prevents musty smells and ensures no moisture gets trapped. Once dry, line shelves with non-slip drawer liner if you want to keep things tidy longer.
12. Polish Mirrors with a Microfiber Cloth and Vinegar
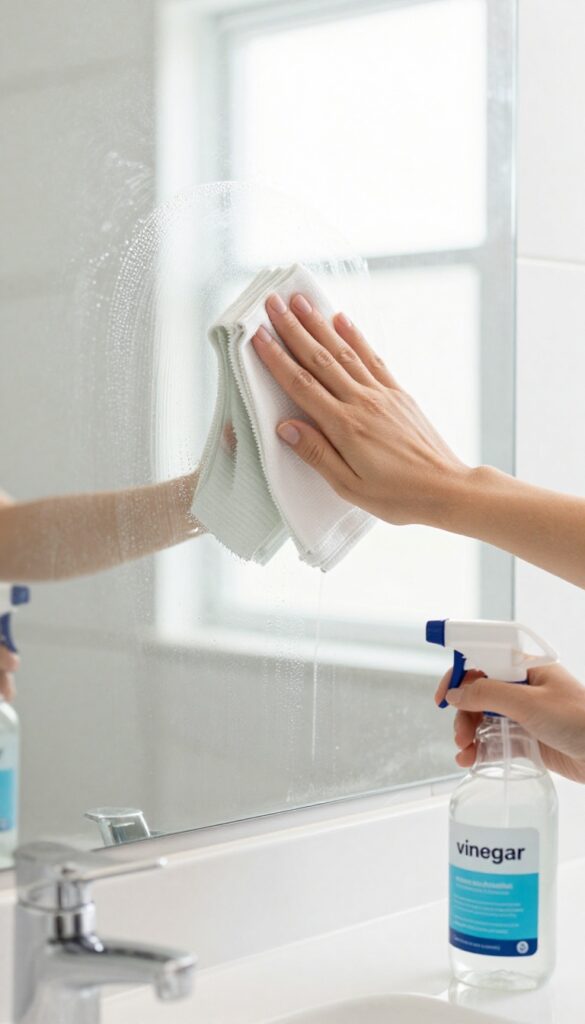
Streak-free mirrors can feel impossible, but the right technique makes all the difference. A simple vinegar and water solution cuts through grime and leaves glass sparkling without harsh chemicals. The secret is in the cloth and the motion—not the product.
Mix equal parts water and white vinegar in a spray bottle. Spray the solution onto a clean microfiber cloth—never directly onto the mirror to avoid drips running down the edges. Wipe in a zigzag pattern from top to bottom, overlapping each pass slightly.
This prevents streaks and ensures even coverage. For stubborn spots, let the solution sit for a few seconds before wiping. Finish by buffing with a dry section of the cloth for extra shine.
Why Microfiber Works Best
Microfiber traps dust and dirt without scratching. Unlike paper towels, it doesn't leave lint or fibers behind. Use a fresh cloth for mirrors to avoid transferring residue from other surfaces.
The Zigzag Technique
Wiping in a zigzag pattern reduces visible streaks compared to circular motions. Start at the top left, work your way down in a continuous S-shape, and finish at the bottom right. This method also helps you track which areas you've covered.
When To Use A Squeegee
For large mirrors or glass shower doors, a squeegee can speed up the process. Spray the solution on the glass, then pull the squeegee across in overlapping horizontal strokes, wiping the blade dry between passes.
13. Degrease Vanity and Countertops with Dish Soap
Vanity surfaces and countertops take a daily beating—hair products, toothpaste splatters, and hand lotions leave behind a greasy film that regular cleaners often miss. Dish soap is your secret weapon because it's designed to break down oils without harsh chemicals. A simple wash with warm, soapy water restores the surface to a clean, matte finish.
Mix a few drops of blue Dawn or any grease-cutting dish soap into a bowl of warm water. Dip a soft microfiber cloth, wring it out well, and wipe down the entire vanity and countertop area. Pay extra attention to the area around the sink where toothpaste and shaving cream accumulate.
Rinse by going over the surface with a clean, damp cloth to remove any soap residue, then dry with a fresh towel to prevent water spots.
Why Dish Soap Works Best
Dish soap contains surfactants that lift and suspend oils, making it easy to wipe away sticky buildup. Unlike all-purpose sprays that can leave a residue, dish soap rinses clean, leaving surfaces streak-free. It's also gentle enough for most countertop materials like quartz, granite, and laminate.
Target The Tricky Spots
Don't forget the areas around faucet handles, soap dispensers, and the back edge of the counter where dust and product residue collect. Use an old toothbrush dipped in the soapy water to scrub into crevices. For stubborn dried-on toothpaste, let the soapy water sit for a minute before wiping.
Drying Is Key
After rinsing, always dry the surface thoroughly with a clean microfiber cloth. This prevents water spots and keeps the counter looking polished. A quick final buff with a dry cloth also removes any remaining streaks.
14. Sanitize Trash Can Inside and Out
The bathroom trash can collects more than just used cotton balls and empty bottles—it traps moisture, bacteria, and odors that can linger even after you take out the bag. A quick wipe won't cut it. To truly reset your bathroom, you need to give the can itself a deep clean.
Taking the trash can outside is the first step. Use a disinfectant spray or a bleach solution (1 part bleach to 9 parts water) to coat the entire interior and exterior. Let it sit for 5-10 minutes to kill germs.
Then scrub with a stiff brush, paying extra attention to the bottom and rim where grime builds up. Rinse thoroughly with a garden hose, then let it dry completely in the sun—UV rays help kill remaining bacteria and eliminate odors. Once dry, reline with a fresh bag and add a dryer sheet or baking soda at the bottom to keep it fresh longer.
Why Outdoor Drying Makes A Difference
Sunlight is a natural disinfectant. Drying the can in direct sunlight not only evaporates moisture that could lead to mold but also helps break down any lingering smells. If you don't have outdoor space, dry it in a well-ventilated area and wipe with a dry cloth.
Don't Forget The Lid And Rim
The lid and rim are high-touch areas that often get overlooked. Use an old toothbrush or a small scrub brush to get into the crevices where the lid snaps on. These spots can harbor bacteria that transfer to your hands every time you toss something away.
15. Wash Bath Mats and Rugs on a Hot Cycle
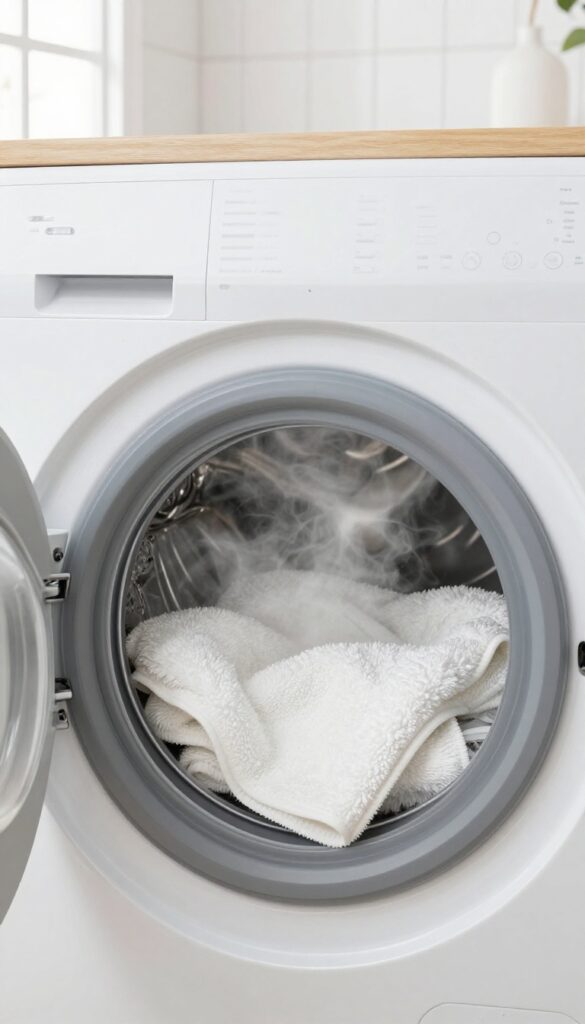
Bath mats and rugs sit on damp floors, soaking up water and hiding bacteria, mildew, and soap scum. A simple shake or vacuum isn't enough—they need a proper hot wash to kill germs and restore freshness. Here's how to deep clean them without ruining the fibers.
Check The Care Label First
Before tossing anything in the machine, look for the care tag. Most cotton or synthetic bath mats can handle hot water, but rubber-backed mats may require cold or warm washes to prevent the backing from cracking. If the label says dry clean only, spot clean instead.
Wash With Hot Water And The Right Additives
Use the hottest water setting recommended on the label. Add your regular detergent plus a half cup of white vinegar or oxygen bleach to break down residue and kill mold spores. For white mats, a small amount of chlorine bleach works, but test an inconspicuous spot first.
Dry Completely To Prevent Mold
Mold loves dampness, so drying is just as important as washing. Tumble dry on low heat or air dry in direct sunlight. Make sure the mat is bone-dry before putting it back on the floor—any moisture left can lead to musty smells and mildew growth.
16. Organize and Declutter Countertops and Shelves
Countertops and shelves are the first things you see when you walk into a bathroom. When they're piled with bottles, jars, and random items, the room feels chaotic no matter how clean it is. Decluttering is a crucial step in your deep clean because it instantly makes the space look and feel fresher.
Start by removing everything from your counters and shelves. Wipe down all surfaces thoroughly, then take a hard look at each item. Only put back what you use daily or weekly—move the rest to a cabinet or drawer.
Use a small tray or a shallow basket to group everyday essentials like hand soap, lotion, and a toothbrush holder. This keeps them organized and easy to grab without looking messy. For shelves, limit decorative items to one or two pieces, like a small plant or a pretty jar.
The goal is to create breathing room so the bathroom feels open and calm.
The Tray Method
A simple tray can transform a cluttered counter. Choose a waterproof tray—like a bamboo or ceramic one—and place all your daily products on it. This corrals items into one visual zone, making the surface look intentional rather than scattered.
Plus, cleaning is easier because you can lift the whole tray and wipe underneath.
Store Smart, Not Out Of Sight
Don't just shove everything into a cabinet and forget it. Use clear bins or drawer dividers inside cabinets to keep like items together—hair tools in one bin, first-aid supplies in another. Labeling helps everyone in the household know where things belong, so the clutter stays away longer.
Less Is More On Shelves
Open shelves need extra restraint. Stick to a few visually pleasing items, like rolled towels in a stack, a single candle, or a glass jar with cotton balls. Avoid stacking products or cramming bottles.
A minimalist shelf looks cleaner and is easier to dust.
17. Finish with a Deep Floor Scrub
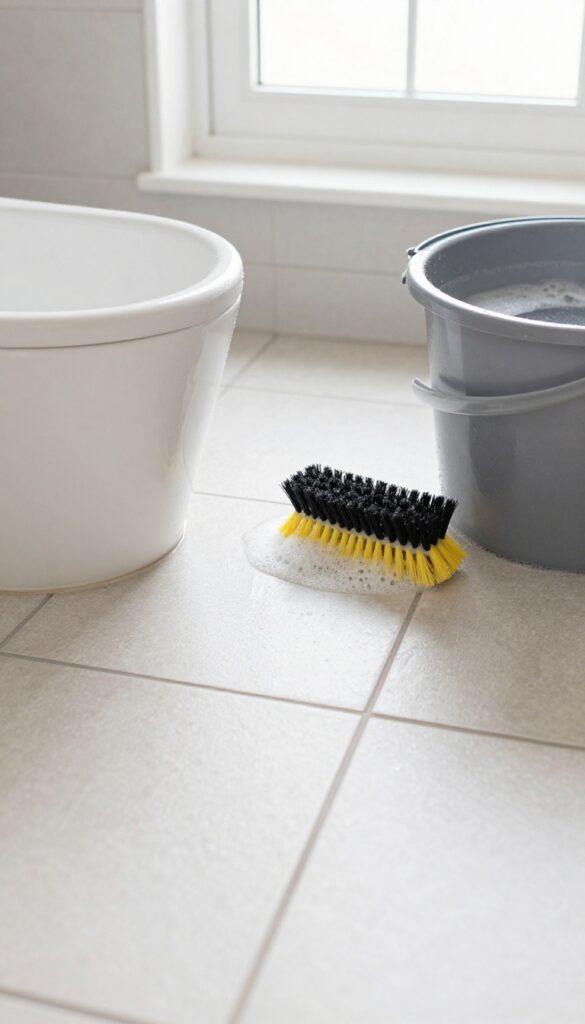
After tackling every surface, don't let a grimy floor undo all your hard work. Bathroom floors collect hair, dust, soap residue, and hidden grime that a quick swish can't remove. A deep floor scrub is the final step that ties the whole reset together, leaving the room feeling truly clean from top to bottom.
Start by removing everything from the floor—bath mats, trash can, scale, and any other items. Sweep or vacuum thoroughly to pick up loose debris, especially in corners and under the toilet base. Pay attention to areas where hair tends to accumulate.
Once the floor is free of dry debris, it's time to mop. Choose a cleaner that's appropriate for your floor type: a neutral pH cleaner for tile and stone, a gentle formula for vinyl or laminate, or a specific wood-safe product if you have engineered wood. Avoid over-wetting, as excess moisture can damage some flooring or seep into grout lines.
For tile floors, use a stiff-bristled scrub brush to work the cleaner into grout lines, where dirt and mildew love to hide. Rinse the mop frequently and change the water when it gets dirty. After mopping, let the floor air dry completely before replacing items.
This prevents trapping moisture underneath bath mats, which can lead to mold growth. A dry floor also shows off the fresh, clean look you've worked hard to achieve.
Prep The Floor Properly
Clear everything off the floor—bath mats, trash can, toilet brush, and any other items. Sweep or vacuum thoroughly, focusing on corners and under the toilet where hair and dust collect. A clean start ensures your scrub doesn't just push dirt around.
Choose The Right Cleaner
Match your cleaner to your floor type. For ceramic or porcelain tile, a mild detergent or a vinegar-water solution works well (avoid vinegar on natural stone). For vinyl or laminate, use a manufacturer-recommended cleaner to avoid dulling the finish.
Always test a small area first if you're unsure.
Scrub Grout Lines
Tile floors have grout lines that trap dirt and mildew. After applying cleaner, use a stiff scrub brush (or an old toothbrush for tight spots) to work the solution into the grout. For stubborn stains, make a paste of baking soda and water, apply it, let it sit for 10 minutes, then scrub.
Rinse thoroughly.
Mop And Dry Completely
Use a clean mop or microfiber cloth to apply the cleaning solution, working in sections. Rinse the mop often and change dirty water. After mopping, allow the floor to air dry fully before replacing bath mats and other items.
This prevents moisture from being trapped and keeps the floor looking fresh longer.
FAQ
How often should I deep clean my bathroom?
Aim for a deep clean every 1-3 months, depending on usage and humidity. High-traffic bathrooms may need monthly attention.
Can I use vinegar on natural stone surfaces?
No, vinegar is acidic and can etch natural stone like marble or granite. Use a pH-neutral stone cleaner instead.
What's the best way to prevent mold in the bathroom?
Improve ventilation by running the exhaust fan during and after showers. Wipe down wet surfaces and fix any leaks promptly.
How do I remove hard water stains from glass shower doors?
Use a mixture of equal parts white vinegar and water, spray on, let sit, then scrub with a non-abrasive pad. Rinse and squeegee dry.
Is bleach safe for colored grout?
Bleach can discolor colored grout. Test in an inconspicuous area first, or use a hydrogen peroxide-based cleaner as a safer alternative.
Conclusion
A truly deep-cleaned bathroom isn't just about appearances—it's about creating a space that feels fresh, hygienic, and genuinely relaxing. By tackling each area with these targeted methods, you're not just scrubbing surfaces; you're resetting the entire room for a cleaner, more enjoyable experience every day. Take it one tip at a time, and don't feel pressured to do everything at once.
Even implementing a few of these deep cleaning strategies will make a noticeable difference in how your bathroom looks and feels. Your fresh reset starts now.