23 Fridge Cleaning Hacks for Fresh Shelves and Drawers
A clean fridge isn't just about looks—it keeps your food fresher longer and cuts down on waste. But scrubbing every nook and cranny can feel like a chore. These 23 hacks turn fridge cleaning into a quick, satisfying routine.
You don't need harsh chemicals or expensive tools. Most tricks use items you already have at home, like baking soda, vinegar, and lemon. Each tip targets a specific problem, from sticky shelves to funky odors.
Ready to make your fridge sparkle? Let's dive into simple solutions that save time and keep your produce crisp.
1. Use Baking Soda as a Natural Deodorizer
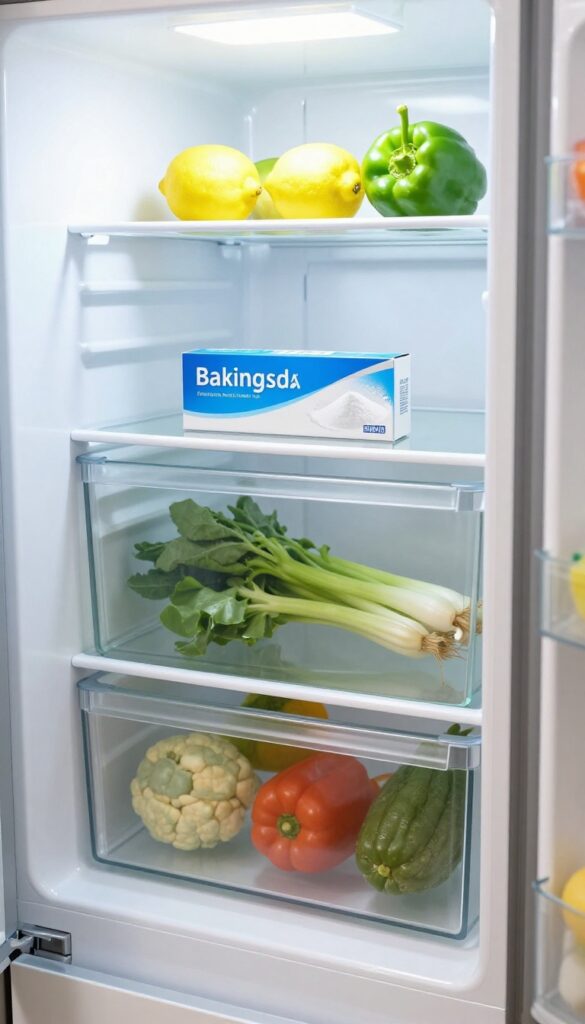
Baking soda is a fridge hero for a reason. It quietly absorbs odors without adding any scent of its own. Just place an open box on a shelf and let it work its magic.
Replace it every three months to keep smells at bay.
An open box of baking soda placed on a middle shelf will absorb odors from leftover garlic, onions, and forgotten leftovers. For faster results, pour the baking soda into a shallow bowl to expose more surface area. Don't forget to write the replacement date on the box so you remember to swap it out.
Where To Place It
Set the box on a middle shelf where air circulates freely. Avoid corners or behind tall containers. The more airflow, the better it traps smells.
How To Extend Its Life
Stir the baking soda once a week to refresh its surface. If it starts clumping, it's time for a new box. You can also add a few drops of lemon essential oil to the box for a light citrus boost.
When To Replace
Mark your calendar for a three-month swap. If your fridge smells funky before then, replace it sooner. A fresh box is cheap insurance against odors.
2. Line Shelves with Easy-Clean Mats
Spills happen. A jar of sauce tips over, a berry gets squished, and suddenly you're scrubbing dried-on mess from a glass shelf. Clear shelf liners make cleanup a breeze—just lift out the mat, rinse it in the sink, and wipe the shelf beneath.
No scrubbing, no soaking.
Shelf liners are a small investment that saves big time. Look for flexible, non-slip mats that are dishwasher safe or easy to hand wash. Clear ones let your fridge's color show through, keeping things looking neat.
Cut them to size so they fit snugly, and replace them every few months if they get stained or warped.
Choose The Right Material
Not all liners are created equal. Avoid paper or fabric—they absorb moisture and get gross fast. Instead, pick silicone or heavy-duty PVC.
These materials are waterproof, non-stick, and can handle cold temperatures without cracking. Bonus: they often have a slight grip so items don't slide around.
Cut And Fit Like A Pro
Measure each shelf before cutting. Use a ruler and a sharp utility knife or scissors. Leave a tiny gap around the edges so air can circulate—this prevents condensation under the mat.
For shelves with curved corners, trace the shape onto cardboard first, then transfer to the liner.
Quick Maintenance Routine
Once a week, pull out the mats and give them a quick rinse under hot water. For sticky spots, scrub with a soft brush and mild dish soap. Let them air dry completely before putting them back.
This habit keeps your fridge looking clean without a full deep-clean every time.
3. Store Herbs in Water Like Flowers
Fresh herbs are a quick way to elevate any meal, but they tend to wilt in the fridge within days. The trick is to treat them like cut flowers—trim the stems and place them in a jar with water. Cover loosely with a plastic bag to create a mini greenhouse, and they'll stay perky for up to two weeks.
This method works best for hardy herbs like parsley, cilantro, dill, and mint. Softer herbs like basil prefer room temperature, but for fridge storage, this hack keeps them crisp and ready to use. Change the water every few days and trim the stems slightly to keep them absorbing moisture.
Which Herbs Work Best?
Sturdy herbs with thick stems—like rosemary, thyme, and sage—also benefit from this method. For delicate herbs such as basil, store them at room temperature instead, as cold damages their leaves.
How To Set It Up
Fill a clean jar or glass with about an inch of water. Trim the bottom of the herb stems at an angle, remove any leaves that would sit below the waterline, and place them in the jar. Loosely cover the tops with a plastic bag and secure it with a rubber band or just tuck it around.
Store on a fridge shelf, not in the door where temperatures fluctuate.
Pro Tips For Maximum Freshness
Don't crowd the jar—herbs need airflow. Change the water every two to three days to prevent sliminess. If the leaves start to droop, re-trim the stems and refresh the water.
This trick also works for scallions and asparagus.
4. Use a Lemon and Vinegar Spray for Stubborn Stains

Some fridge stains just won't budge with a simple wipe. Dried-on sauce, sticky jam spills, or mysterious crusty spots need a little extra firepower. That's where this simple homemade spray comes in—it's natural, cheap, and surprisingly effective.
Mix equal parts lemon juice and white vinegar in a spray bottle. Shake gently to combine. Spray the solution directly onto the stain and let it sit for 10 minutes.
The acidity breaks down grime while the lemon leaves a fresh scent. After the wait, wipe clean with a damp cloth. For tough spots, give it a gentle scrub with a soft sponge.
Why It Works
Both lemon juice and vinegar are acidic, which helps dissolve mineral deposits, grease, and dried food. The lemon also cuts through any lingering odors, leaving your fridge smelling clean—not like a salad.
Best Uses
This spray is perfect for glass shelves, plastic drawers, and rubber seals. Avoid using it on unsealed wood or aluminum surfaces, as the acid could cause damage. Test on a small hidden area first if you're unsure.
Storage Tip
Make a fresh batch each time you clean—it doesn't keep well. Label the bottle so nobody mistakes it for water. Store it under the sink, not in the fridge, to keep the spray at room temperature.
5. Keep Drawers Crisp with Paper Towels
Vegetable drawers are supposed to keep produce fresh, but they often turn into a soggy mess. The culprit is excess moisture trapped inside. A simple layer of paper towels can fix that without any fancy gadgets.
Line the bottom of your vegetable and fruit drawers with a few dry paper towels before loading them up. The towels absorb extra condensation, keeping greens crisp and berries from getting mushy. Replace them every few days or when they feel damp.
Why It Works
Fridges cycle humidity as temperatures fluctuate. Paper towels act like a sponge, pulling moisture away from your produce. This slows down spoilage and stops that slimy film from forming on lettuce or spinach.
How To Do It Right
Use plain white paper towels without dyes or scents. Lay one or two sheets flat on the drawer bottom, covering the entire surface. Don't layer them too thick—you still want airflow.
If you use reusable cloths, wash them in hot water between uses.
When To Swap Them Out
Check the towels every time you grab veggies. If they feel wet, swap in fresh ones. In a busy fridge, that might be every two to three days.
For lightly used drawers, once a week is fine. Toss used towels or compost them if they're unbleached.
6. Freeze Leftovers in Portion-Sized Containers
Leftovers pile up fast, and before you know it, the fridge is a maze of mismatched Tupperware. Freezing single servings in small, stackable containers solves two problems at once: it clears fridge space and gives you ready-to-go meals. No more digging through mystery containers or tossing spoiled food.
Choose The Right Containers
Square or rectangular containers stack better than round ones. Look for BPA-free plastic or glass with tight-sealing lids. Silicone molds work well for soups and sauces—pop out the frozen block and store in a bag.
Keep a stash of 8-ounce and 16-ounce sizes for versatility.
Label Everything Clearly
Use a permanent marker or label maker to write the dish name and date. Include a “use by” date—most leftovers stay good for 3 months. Stick the label on the top or side so you can read it without pulling containers apart.
A simple system prevents freezer burn and forgotten meals.
Cool Before Freezing
Hot food raises the freezer temperature and can cause ice crystals. Let leftovers cool on the counter for 30 minutes, then refrigerate until chilled. Portion into containers, leaving a half-inch headspace for expansion.
Freeze flat on a tray, then stack once solid.
Plan Your Freezer Layout
Group similar items together: soups on one shelf, casseroles on another. Keep a “eat soon” bin near the front for meals you plan to use within a week. Rotate older containers forward.
This system keeps your freezer organized and your fridge less cluttered.
7. Use a Toothbrush for Tight Crevices
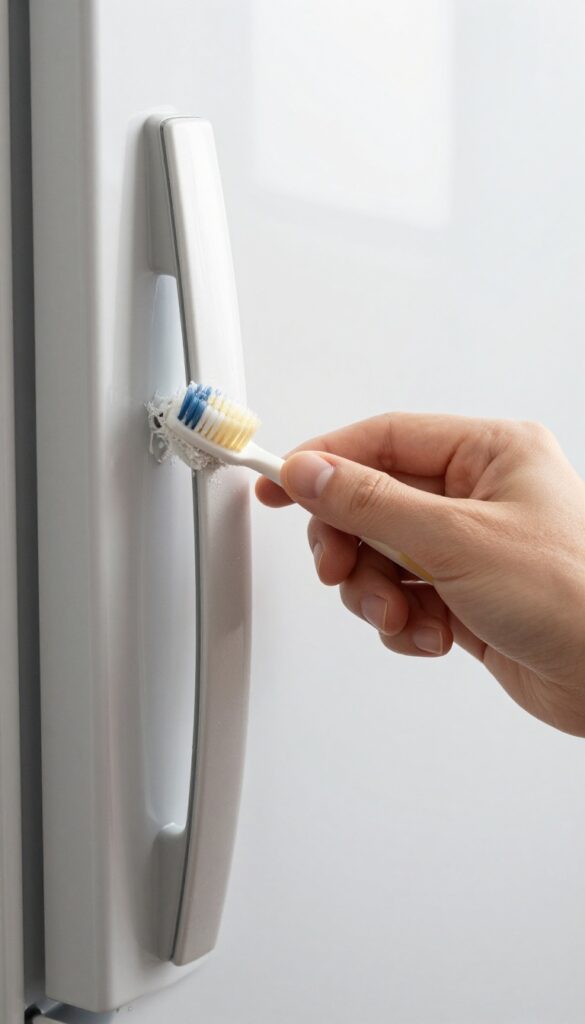
An old toothbrush reaches into gasket folds and corner grooves where grime hides. It's the perfect tool for those spots your sponge can't touch. Give your fridge a deep clean without any fancy equipment.
A toothbrush is a precision cleaning tool that targets stubborn dirt in narrow spaces. Its small head and firm bristles dislodge buildup without scratching surfaces. Plus, it's easy to maneuver around delicate seals and edges.
Tackle The Door Gasket
The rubber gasket around your fridge door collects dust, crumbs, and even mold over time. Dip an old toothbrush in warm soapy water and scrub along the folds. Wipe away loosened grime with a damp cloth.
This simple step improves the seal and keeps cold air in.
Clean Shelf Tracks And Slide Rails
Many fridge shelves sit on plastic tracks that accumulate sticky residue. Use the toothbrush to scrub these grooves, especially where the shelf meets the wall. Rinse with a vinegar-water solution to prevent buildup.
Your shelves will glide smoothly again.
Reach Behind The Crisper Drawers
The area behind vegetable drawers is a magnet for spills and debris. Remove the drawers and use the toothbrush to scrub the back wall and bottom edges. Pay extra attention to corners where moisture collects.
This prevents mold and keeps your produce fresh.
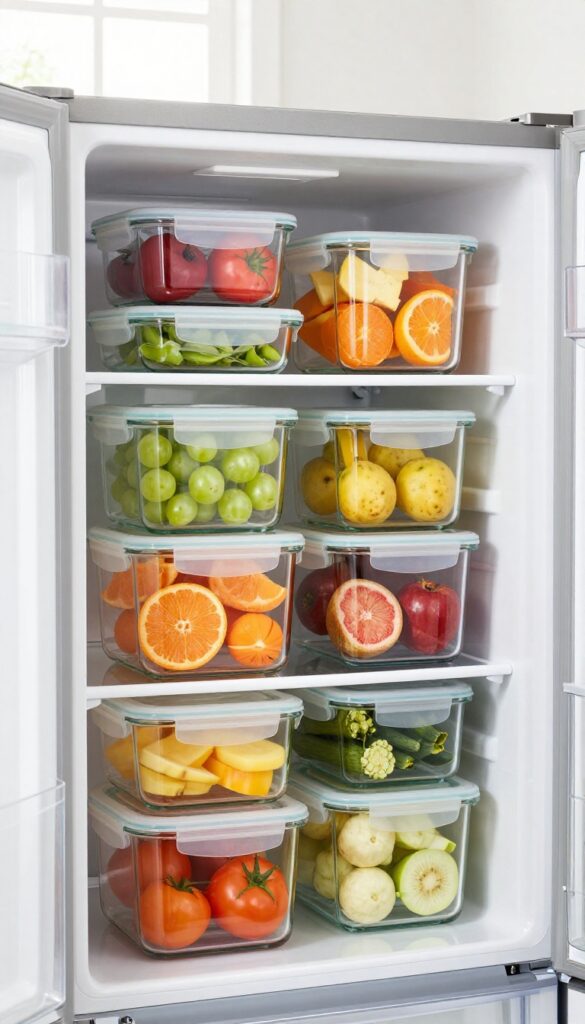
8. Organize with Clear Bins for Similar Items
Grouping similar items in clear bins is a game-changer for fridge organization. It not only makes finding what you need a breeze but also simplifies cleaning. When you need to wipe down a shelf, just pull out the entire bin instead of moving each bottle or container one by one.
Clear bins create designated zones in your fridge, so condiments, dairy, snacks, and drinks each have their own home. This prevents items from getting lost in the back and expiring unnoticed. Plus, the transparency lets you see at a glance when you're running low on something.
Choose The Right Bins
Opt for bins that are BPA-free and dishwasher safe. Rectangular bins maximize shelf space better than round ones. Measure your fridge shelves before buying to ensure a snug fit without wasting space.
Label Zones For Easy Access
Use a label maker or simple sticky labels to mark each bin's category—like "Dressings, " "Yogurts, " or "Cheese. " This helps everyone in the household put things back in the right spot and keeps the fridge tidy.
Clean As You Go
When you pull out a bin to grab something, take a moment to wipe the shelf underneath. A quick swipe with a damp cloth prevents sticky spills from hardening. Rotate bins weekly to check for expired items and give the entire fridge a once-over.
9. Wipe Down Handles and Buttons Weekly
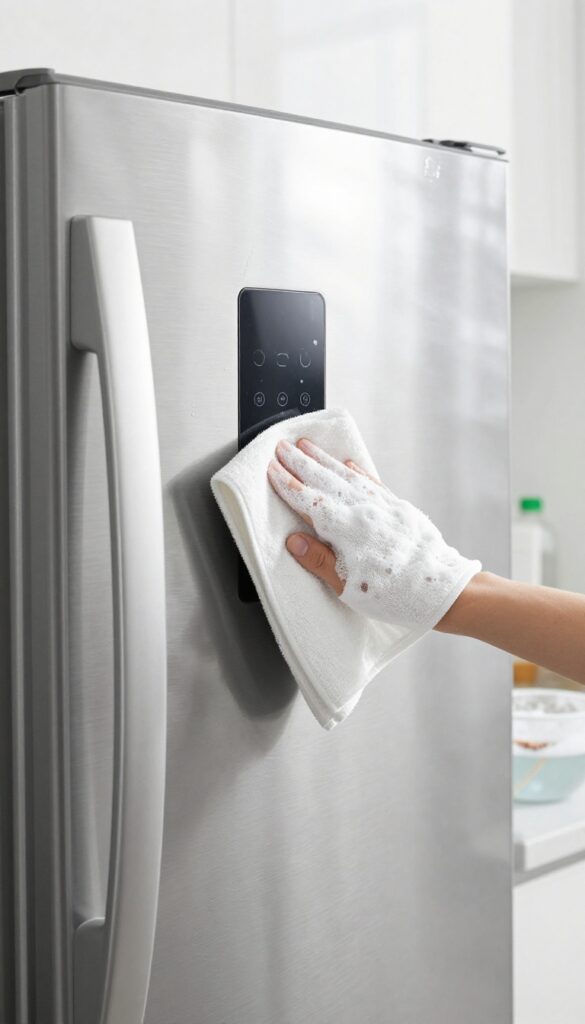
Fridge handles and control panels are high-touch zones that collect grease, food residue, and bacteria. A quick weekly wipe keeps them clean and reduces cross-contamination. You don't need special wipes—just a mild soap solution and a soft cloth.
Start by unplugging the fridge or turning off the control panel if possible. Dip a microfiber cloth in warm water mixed with a few drops of dish soap. Wring it out well so no excess drips into the electronics.
Wipe the handles, buttons, and any surrounding surfaces. For stubborn grime around buttons, use a cotton swab dipped in the solution. Dry everything with a clean cloth to prevent streaks and moisture damage.
Why Handles And Buttons Need Special Attention
These surfaces get touched multiple times a day with hands that may be carrying raw meat juices or sticky residues. Over time, grime builds up in crevices and around buttons, making them harder to clean and potentially harboring bacteria. Regular wiping prevents that buildup and keeps the fridge looking new.
Best Cleaning Solutions For Different Surfaces
For stainless steel handles, use a mild soap solution or a dedicated stainless steel cleaner to avoid streaks. For plastic or rubberized buttons, stick to soap and water—harsh chemicals can damage the finish. Avoid abrasive scrubbers that can scratch surfaces.
A 50/50 vinegar and water solution works well for disinfecting, but test on an inconspicuous area first.
How Often And When To Clean
Aim for a weekly wipe-down, ideally on the same day you do other kitchen cleaning. If you cook frequently or have young children, consider wiping handles every few days. A quick spray with a disinfectant and a dry cloth takes less than a minute and makes a big difference in hygiene.
10. Use a Vacuum with a Brush Attachment for Coils
Most people forget that the fridge has a backside. Those coils underneath or behind your fridge work hard to keep things cool, but they also pull in dust and pet hair. When they get clogged, your fridge runs longer and louder, wasting energy and shortening its life.
A quick vacuum every six months fixes that.
Condenser coils release heat from inside the fridge. When dust builds up on them, the fridge has to work harder to push that heat out. That means higher electricity bills and more wear on the compressor.
Cleaning them is one of the easiest maintenance tasks you can do. You don't need special tools. A standard vacuum with a brush attachment works perfectly.
The brush loosens the dust without damaging the delicate fins. Just unplug the fridge first, pull it away from the wall, and gently vacuum the coils. If you have a long crevice tool, that helps reach tight spots.
How often should you do this? Every six months is the sweet spot. If you have pets that shed, check every three months.
You'll notice the fridge runs quieter and cools more consistently after a good cleaning. Plus, it can extend the life of your appliance by years.
Where To Find The Coils
Not all fridges hide their coils in the same place. Most modern fridges have them underneath the front or back, behind a grille. Older models often have them exposed on the back.
Check your manual if you're unsure. The grille usually pops off with a gentle pull or a screwdriver. Once you see the coils, you'll know exactly where to vacuum.
What To Do If Coils Are Caked With Dust
If it's been years since the last cleaning, a vacuum might not be enough. Use a coil cleaning brush (a long, skinny brush with stiff bristles) to loosen the heavy buildup first. Then vacuum it up.
Be gentle—bending the fins can reduce airflow. After a deep clean, stick to a regular schedule so it never gets that bad again.
11. Store Eggs in Their Original Carton
Eggs are one of those items where storage really matters. The fridge door might seem convenient, but it's actually the warmest part of the refrigerator. Keeping eggs in their original carton on a middle shelf protects them from temperature swings and absorbs less odor.
Why The Door Is A Bad Spot
The door is subject to constant temperature changes every time you open it. Eggs stored there can spoil faster. The middle shelf maintains a more stable temperature, keeping eggs fresh longer.
The Carton Is Your Best Friend
The carton cushions eggs from bumps and blocks light, which can degrade quality. It also contains any leaks if a shell cracks. Plus, the printed expiration date stays visible.
Bonus Tip: Check For Freshness
Before storing, do the water test: place an egg in a bowl of water. If it sinks, it's fresh. If it floats, toss it.
This quick check prevents bad eggs from contaminating others.
12. Use a Fridge Thermometer to Check Temperature
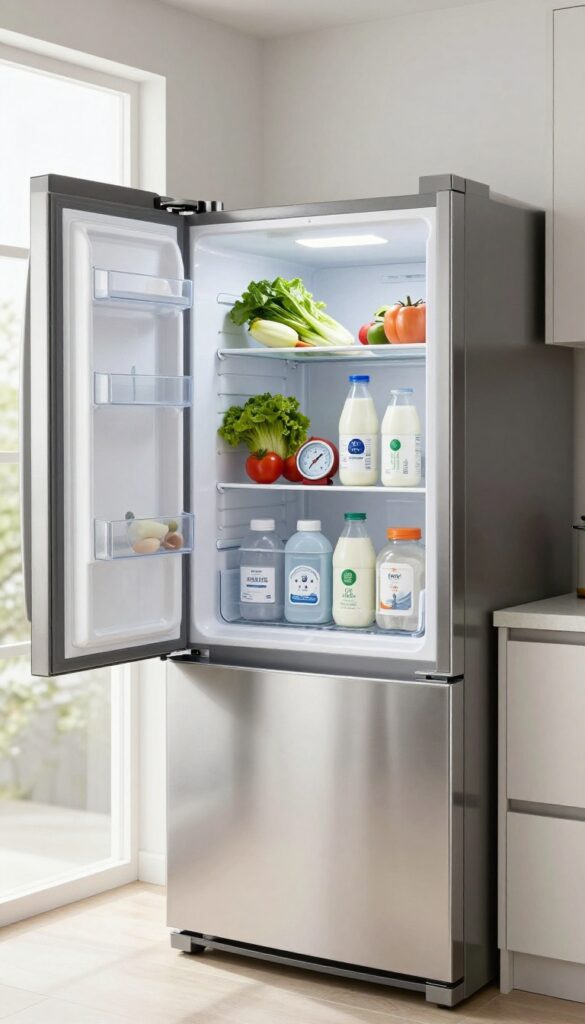
You might assume your fridge is always at the right temperature, but that's not always true. A simple thermometer can reveal if your settings are off, which affects food safety and freshness. Keeping the interior at the optimal range prevents spoilage and saves you money.
Why Temperature Matters
Bacteria grow rapidly between 40°F and 140°F, so your fridge should stay below 40°F. The sweet spot is 37–40°F. At this range, perishables like dairy, meat, and leftovers stay safe longer.
A thermometer takes the guesswork out of adjusting dials.
How To Place It Right
Put the thermometer in the center of the middle shelf, away from walls and the door. That's where temperature is most stable. Check it after the fridge has been closed for a few hours.
If it reads above 40°F, lower the setting gradually.
What To Do If It's Off
If the thermometer shows a higher reading, first check door seals for gaps. Clean the condenser coils if they're dusty. Also avoid overpacking, which blocks airflow.
A consistent reading in the safe zone means your fridge is working efficiently.
13. Soak Removable Parts in Warm, Soapy Water
Shelves and drawers take the brunt of spills and crumbs. Instead of scrubbing them inside the fridge, pop them out and give them a proper bath. Warm, soapy water loosens grime without harsh scrubbing, and drying them fully before reinstalling prevents mold and mildew.
Removing shelves and drawers is easier than you think. Most slide out or lift up with a simple release mechanism. Check your manual if they feel stuck.
Once out, fill your sink or a large basin with warm water and a few squirts of dish soap. Let them soak for 15–20 minutes to dissolve sticky residues. For stubborn spots, use a soft sponge or cloth—avoid abrasive scrubbers that can scratch plastic or glass.
Rinse thoroughly with clean water and dry completely with a lint-free towel or let them air dry on a dish rack. Never put them back wet, as moisture encourages bacteria growth and odors.
Why Soaking Works Better
Soaking loosens dried-on food and grime without elbow grease. The warm water softens sticky residues, and the soap breaks down grease. This method is gentler on your fridge parts and saves you time compared to scrubbing in place.
What To Avoid
Don't use hot water on glass shelves—it can cause thermal shock and cracking. Also avoid bleach or harsh chemicals that can damage plastic and leave residues. Stick to mild dish soap and warm water for safe, effective cleaning.
Drying Tips
After rinsing, shake off excess water and dry with a microfiber cloth. Let parts sit out for an hour to ensure no hidden moisture. If you're in a hurry, use a clean towel and pat dry.
Always check corners and crevices where water hides.
14. Use a Squeegee to Wipe Down Glass Shelves
Glass shelves look sleek, but they show every water spot and smudge. A rubber squeegee is the secret to streak-free glass without harsh chemicals. It's faster than wiping with a cloth and leaves no lint behind.
A squeegee is a game-changer for glass shelves. After spraying a little vinegar-water solution, run the squeegee from top to bottom in one smooth motion. Wipe the blade dry between strokes.
You'll get crystal-clear shelves in seconds.
Why A Squeegee Works Better
Cloth towels often leave fibers or smears. A squeegee's rubber blade pushes water and grime off the glass, leaving a spotless finish. It also reaches into corners better than a sponge.
Best Technique For Glass Shelves
Start at the top corner and pull the squeegee horizontally across the shelf. Overlap each stroke slightly. For vertical strokes, work from the center outward.
Wipe the blade after each pass to avoid redepositing dirt.
Quick Maintenance Between Deep Cleans
Keep a small squeegee in your cleaning caddy. When you notice fingerprints or spills, give the shelf a quick once-over. It takes 30 seconds and keeps your fridge looking fresh without a full scrub.
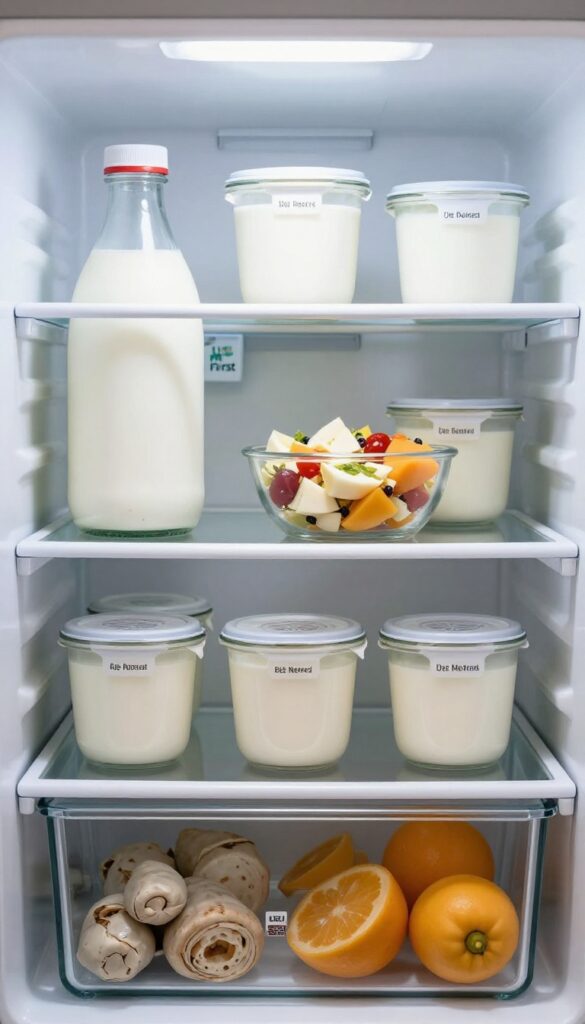
15. Store Cut Produce in Airtight Containers
Cut produce is a double-edged sword: it's convenient for snacking, but it also dries out fast and picks up weird fridge smells. The fix is simple—switch from plastic wrap to airtight containers. This small change keeps your fruits and veggies fresh, crisp, and odor-free for days.
Airtight containers create a sealed environment that locks in moisture and blocks out odors. This means your cut melon won't taste like last night's garlic, and your celery sticks stay crunchy. Plus, it reduces waste because you're less likely to toss limp, sad produce.
Choose The Right Container
Not all containers are created equal. Glass or BPA-free plastic with a snug silicone seal works best. Avoid containers that are too large—excess air space still lets produce dry out.
Look for ones with vents if you're storing items that release ethylene gas, like apples or cantaloupe.
Prep Before Storing
Wash and dry your produce thoroughly before cutting. Moisture is the enemy here—any leftover water speeds up spoilage. Pat everything dry with a clean towel or use a salad spinner.
Then, cut into uniform pieces so they stack neatly and seal properly.
Label And Rotate
Use a dry-erase marker or sticky labels to note the date you cut the produce. This helps you use older items first. Place newer containers toward the back and bring older ones forward.
A quick glance tells you what needs eating, cutting down on forgotten leftovers.
16. Use a Coffee Filter to Absorb Moisture
Crisp greens can turn into a sad, slimy mess when moisture builds up in the crisper drawer. A simple coffee filter can help you keep that humidity in check without any fancy gadgets.
Place a dry, unused coffee filter at the bottom of your crisper drawer before adding your leafy greens. The filter will soak up excess moisture, preventing water from pooling and your lettuce from wilting. Replace it every time you restock the drawer for best results.
Why It Works
Coffee filters are highly absorbent and food-safe. They trap condensation without adding any taste or chemicals to your produce. This hack is especially handy for delicate greens like spinach and arugula.
How To Use It
Simply lay one or two filters flat on the bottom of the crisper. If you have a lot of greens, you can also tuck a filter between layers. Swap it out weekly or whenever it feels damp.
17. Label Everything with a Date
Leftovers and open packages can turn into science experiments if you forget when they went in. A simple label with a date solves that problem instantly. It takes seconds and saves you from guessing games later.
Grab a roll of masking tape and a permanent marker. Whenever you store leftovers or open a jar, write the date on a piece of tape and stick it on the container. This small habit keeps your fridge organized and reduces food waste because you'll actually eat things before they go bad.
What To Label
Label anything with a limited shelf life: cooked meals, opened sauces, dairy products, and cut produce. Even sealed packages benefit from a date so you know when you bought them.
How To Make It Stick
Use masking tape instead of sticky notes—it holds better in cold, damp conditions. Write clearly with a permanent marker so the date doesn't smudge. Place the label where you'll see it first, like on the lid or front of the container.
A Quick System
Adopt a simple date format like "11/15" or "Nov 15. " For leftovers, add a brief description if the container isn't clear. Pair this with a "first in, first out" rule: put newer items behind older ones so you grab the oldest first.
18. Clean the Drip Pan Underneath the Fridge
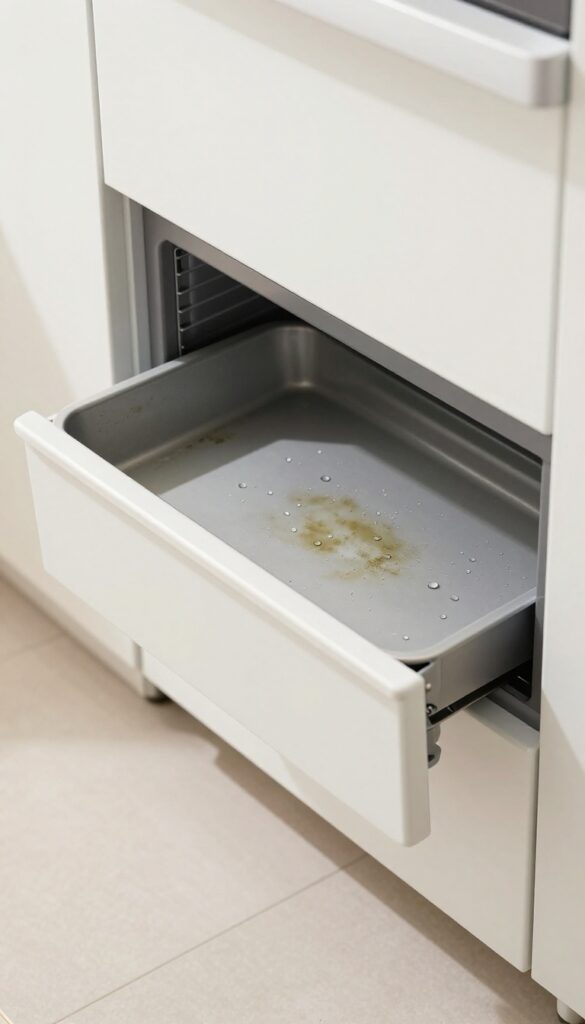
Most people forget about the drip pan tucked under the fridge. This shallow tray collects condensation from the defrost cycle, and over time it becomes a breeding ground for mold, mildew, and foul smells. If your kitchen has a musty odor you can't trace, the drip pan is likely the culprit.
Cleaning it is simple and makes a huge difference.
How To Access The Drip Pan
First, unplug the refrigerator and pull it away from the wall. On most models, the drip pan is behind the front grille at the bottom. Remove the grille by unscrewing it or popping it off with a flathead screwdriver.
Slide the pan out carefully—it may have water in it. If your fridge has a sealed system, check the manual; some pans are not meant to be removed by the user.
Cleaning The Pan Thoroughly
Empty any water into a sink or bucket. Wash the pan with hot, soapy water and a scrub brush. For stubborn mold, spray with a 50/50 vinegar and water solution and let it sit for 10 minutes before scrubbing.
Rinse well and dry completely. Avoid bleach, as it can damage the pan and create harmful fumes.
Prevent Future Odors
Once the pan is clean and dry, add a tablespoon of baking soda to the bottom. This will absorb moisture and neutralize odors until the next cleaning. Mark your calendar to check the drip pan every three months—it's a small habit that keeps your fridge smelling fresh.
19. Use a Magnetic Spice Rack on the Side
The sides of your fridge are prime real estate that often goes unused. By attaching magnetic spice racks or containers, you can store small items like spice jars, sauce packets, or even tweezers without taking up any shelf space. This hack is perfect for small kitchens where every inch counts.
Magnetic spice racks come in various styles—from simple magnetic strips to tiered shelves. They stick securely to the side of most metal refrigerators. Use them for frequently used spices, condiment packets, or even small kitchen tools like measuring spoons.
Just make sure the magnets are strong enough to hold the weight and that the containers are sealed to avoid spills.
Choosing The Right Magnetic Rack
Look for racks with strong neodymium magnets or adhesive magnetic backing. Some are designed as narrow shelves, others as small bins. Consider the depth of your fridge side—if it's recessed, a slim profile works best.
Also, opt for rust-proof materials like stainless steel or coated metal, especially if your fridge is near a sink.
What To Store And What To Avoid
Store lightweight items: spice jars, tea bags, or single-serve condiment packets. Avoid heavy bottles or glass containers that could fall. Also, keep items away from the fridge's ventilation grille—usually at the back or bottom—to prevent overheating.
Installation And Safety Tips
Clean the fridge side with rubbing alcohol before attaching the rack to ensure a strong hold. Test the magnet strength by placing a few items first. If you have a stainless steel fridge, check that the surface is magnetic (some are not).
For non-magnetic fridges, use adhesive strips designed for metal surfaces.
20. Rotate Stock with 'First In, First Out'
Ever reach for a yogurt only to find it expired last week? That's a sign you need a better rotation system. The 'first in, first out' (FIFO) method is a simple habit that saves money and reduces waste by ensuring older items get used before newer ones.
It's a small change with big payoff for your fridge's freshness.
FIFO isn't just for restaurants—it works wonders at home. When you unpack groceries, move older items to the front and place new ones behind. This way, you naturally grab the oldest first.
It's especially helpful for perishables like dairy, meats, and leftovers. Over time, you'll notice less waste and fewer surprises.
Label And Date Everything
Make FIFO foolproof by adding dates. Use a marker or sticky labels to write the purchase or prep date on containers. For leftovers, note the day you cooked them.
This takes the guesswork out of what's old and what's new, so you always know which item to grab first.
Designate A 'use Me First' Zone
Create a dedicated spot—like a small bin or a specific shelf—for items that need to be eaten soon. Pop leftovers, soon-to-expire dairy, and ripe fruit there. When you're hungry, check that zone first.
It's a visual cue that cuts down on forgotten food.
Make It A Grocery Unpacking Ritual
Turn FIFO into a habit by doing it every time you stock up. As you unload bags, take two extra minutes to shift older items forward. Pair it with a quick wipe-down of the shelf, and you've got a cleaning win too.
Consistency is key—soon it'll feel automatic.
21. Use a Mesh Bag for Small Items
Small items like cheese wedges, loose berries, or half-used lemons tend to get lost in the fridge shuffle. Tucking them into a mesh produce bag keeps them visible, contained, and easy to grab.
Mesh bags let air circulate around your food, reducing moisture buildup that leads to mold. They also make it simple to see what you have at a glance, so nothing gets forgotten in the back of a drawer. Plus, you can toss the whole bag into the crisper or on a shelf without worrying about items rolling away.
Choose The Right Bag
Look for reusable mesh bags with a drawstring or zipper closure. Avoid solid plastic bags—they trap moisture and defeat the purpose. Cotton muslin bags work too, especially for cheese.
Group By Use
Keep similar items together: one bag for cheese wedges, another for small fruit like apricots or plums, and a third for loose herbs. Label bags with a dry-erase marker if you want to track freshness.
Easy Cleanup
When a bag gets dirty, just toss it in the laundry or hand wash with soap. Mesh dries quickly, so you can reuse it the same day. No more scrubbing sticky residue off shelves.
22. Deep Clean with a Steam Cleaner
Sometimes a wipe-down just doesn't cut it. Sticky spills, dried-on sauce, and grime in tight corners call for something stronger—but not chemical-laden. A handheld steam cleaner blasts away buildup with high-temperature steam, sanitizing as it goes.
It's a game-changer for fridge deep cleans, especially if you have kids or raw food spills.
Steam cleaning is fast, chemical-free, and reaches where cloths can't. The heat kills bacteria and loosens gunk without scrubbing. Just be careful with plastic parts—keep the nozzle moving to avoid warping.
After steaming, wipe everything dry with a microfiber cloth to prevent water spots and moisture buildup.
Why Steam Works So Well
Steam heat melts sticky residues and kills most germs on contact. It's especially useful for rubber gaskets and drawer tracks where grime hides. No rinsing needed—just steam, wipe, and you're done.
Best Spots To Steam
Focus on shelves with dried spills, the vegetable crisper corners, and the door bins where condiment drips collect. The condenser coils (if accessible) can also get a gentle steam to remove dust, but let them cool first.
Steam Safety Tips
Always unplug the fridge before steaming near electrical parts. Test a small hidden area first to ensure the plastic can handle the heat. Keep the steam nozzle moving to avoid damage, and never direct steam at glass shelves—thermal shock can crack them.
23. Keep a Small Trash Can Nearby for Quick Disposal
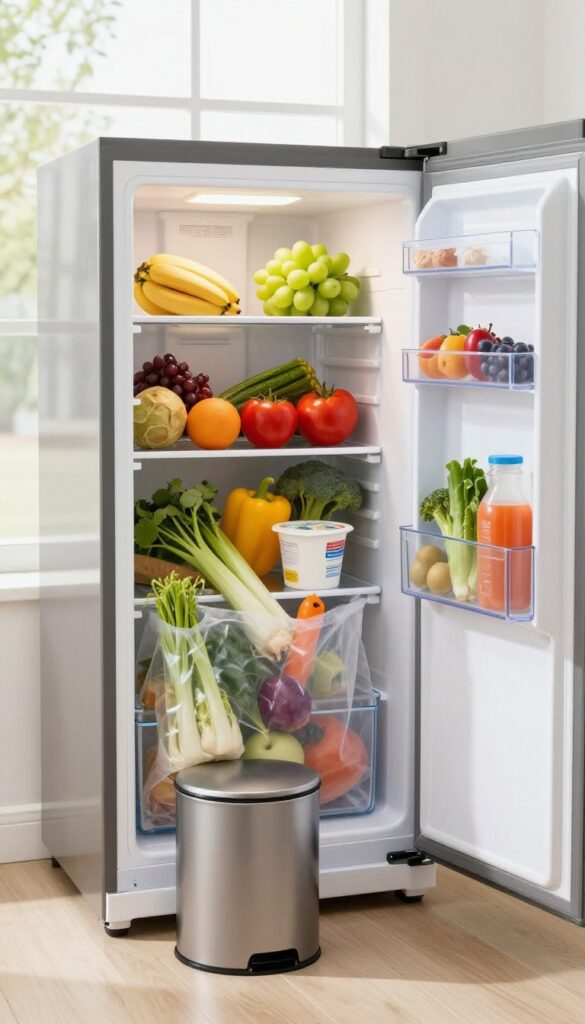
You're mid-cleaning, holding a wilted bunch of spinach, and you have to walk all the way to the main bin. That small delay can make you hesitate, and the expired item ends up back in the fridge. A mini trash can right next to the fridge removes that friction entirely.
Choose The Right Size
A tiny bin, about the size of a shoebox, works best. It should be small enough to sit beside the fridge without being in the way, but big enough to hold a few bags of expired produce. Look for one with a lid to contain smells.
Keep It Stocked With Bags
Line the mini bin with small grocery bags or produce bags. That way, when it fills up, you can just tie it off and toss it in the main trash. No extra step of finding a bag.
Empty It After Each Clean
Make it a habit to empty the mini bin as soon as you finish cleaning the fridge. If you leave it, it becomes just another smelly chore. A quick trip to the main bin keeps everything fresh.
FAQ
How often should I clean my fridge?
Do a quick wipe-down weekly and a deep clean every three to four months. Regular maintenance prevents buildup and odors.
What's the best natural cleaner for fridge stains?
A mix of equal parts white vinegar and water works well. For tough stains, add a little baking soda to make a paste.
How do I get rid of strong odors in my fridge?
Place an open box of baking soda on a shelf. You can also put a bowl of coffee grounds or activated charcoal inside for a few days.
Can I put glass shelves in the dishwasher?
Check the manufacturer's instructions. Many tempered glass shelves are dishwasher-safe, but plastic parts may warp. Hand washing is safer.
What temperature should my fridge be set to?
Keep your fridge between 37°F and 40°F (3°C to 4°C). Use a thermometer to verify, as built-in dials can be inaccurate.
Conclusion
A clean fridge doesn't require a full day of scrubbing. Pick two or three hacks that target your biggest pain points—like sticky shelves or smelly drawers—and make them part of your weekly routine. You'll keep food fresher longer and save time on deep cleans.
Start with the methods that feel easiest to you. Small, consistent habits are what keep those shelves looking spotless and your groceries lasting. Your fridge will thank you, and so will your future self.