11 Small Narrow Backyard Ideas for Smart Outdoor Layouts
You step onto a narrow patio that's barely wider than a car, and somehow it still feels like a place you'd actually want to sit. That's the whole trick with small backyards: the square footage stays the same, but the layout does the heavy lifting.
A few smart moves with seating, greenery, and lighting can make a tight strip of outdoor space feel intentional instead of awkward. Most narrow yards fail for one simple reason.
Everything gets shoved against the house or lined up in a single boring row. Shift a few pieces, go vertical, and add layers at different heights, and the same space suddenly reads as a real outdoor room.
1. Create a Zigzag Seating Nook
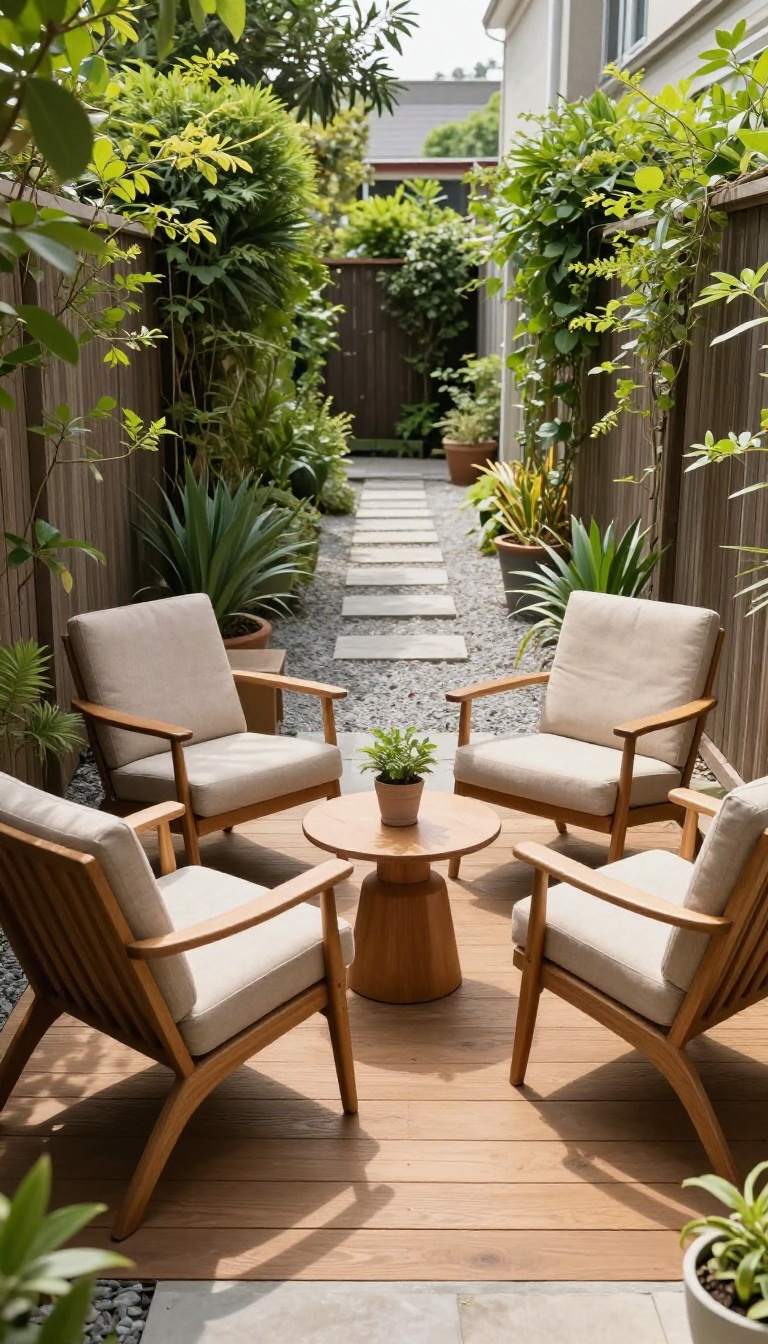
A single bench lined up against a narrow wall can make your yard feel like a waiting room. Instead, angle two or three chairs in a zigzag pattern to break that corridor feel and carve out a cozy conversation spot. It's a small change that shifts the whole energy of the space.
The zigzag layout works because it interrupts the straight sightline that makes narrow yards feel like tunnels. When chairs face each other at slight angles, they create a natural pocket for talking, not just sitting in a row. You don't need much room—just enough to stagger the pieces so they overlap visually.
Start by placing your largest chair near one end, angled toward the center. Add a second chair facing it but offset by a foot or two, and a third if you have space, turned slightly outward. This arrangement feels intentional and invites people to lean in, rather than stare straight ahead.
Pick Chairs That Fit The Angle
Not every chair works in a zigzag. Look for pieces with a smaller footprint—think armless accent chairs, folding bistro seats, or low-profile loungers. Avoid bulky recliners that eat up walking room.
Swivel chairs are a bonus because you can adjust the angle without moving the whole piece.
Keep Walking Space Clear
The biggest risk with angled seating is blocking the path. Leave at least 18 inches between the chairs and any wall or planter so people can still move through. If your yard is extra tight, use just two chairs and a small side table between them.
That's enough to create the nook without crowding.
Add A Small Anchor Point
A tiny table or a sturdy plant stand in the middle of the zigzag gives the arrangement a focal point. It also doubles as a spot for drinks or a lantern. Keep it low so it doesn't visually cut the space in half.
A round table works better than a square one here because it softens the angles.
2. Use a Slim Bistro Set for Two
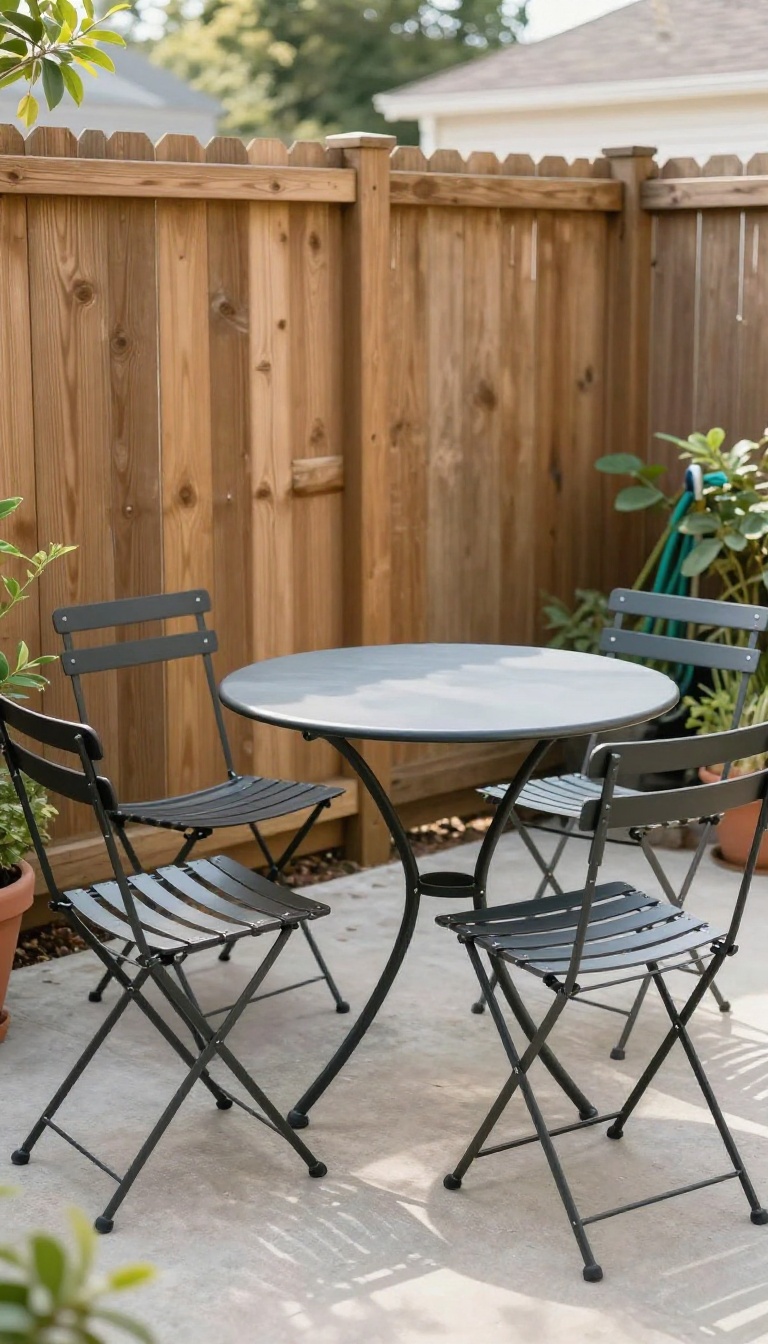
A round bistro table with two chairs is the goldilocks of narrow backyard furniture. It seats just enough people to feel social, but it takes up a fraction of the floor space that a full dining set demands. The round shape helps too, since there are no sharp corners jutting into your walking path.
The real win with a bistro set is how easily it tucks into spots that feel unusable. A strip of patio beside the fence, the nook under a window, or that awkward corner where the hose lives can all become a destination with the right table. Two chairs also keep the setup from looking crowded, which matters when your yard is only a few feet wide.
Pick A Table That Fits The Gap
Measure the width of your narrowest walkway before you buy anything. You want at least 24 to 30 inches of clear space left over for people to pass through. A table around 24 inches across usually hits the sweet spot for two people without swallowing the whole patio.
Push It Against The Wall
Slide the table close to a fence or the side of the house so only the chairs need breathing room. That keeps the center of your yard open and makes the space feel wider than it actually is. If your surface is uneven, look for adjustable feet or add small rubber pads to stop the wobble.
Choose Chairs You Can Fold
Folding or stacking chairs let you clear the path in seconds when you need to move something through. They also make off-season storage easy, which is a big deal in a yard with no shed. Look for slim metal or resin frames that won't visually block the view down the length of your space.
3. Install a Vertical Garden on the Fence
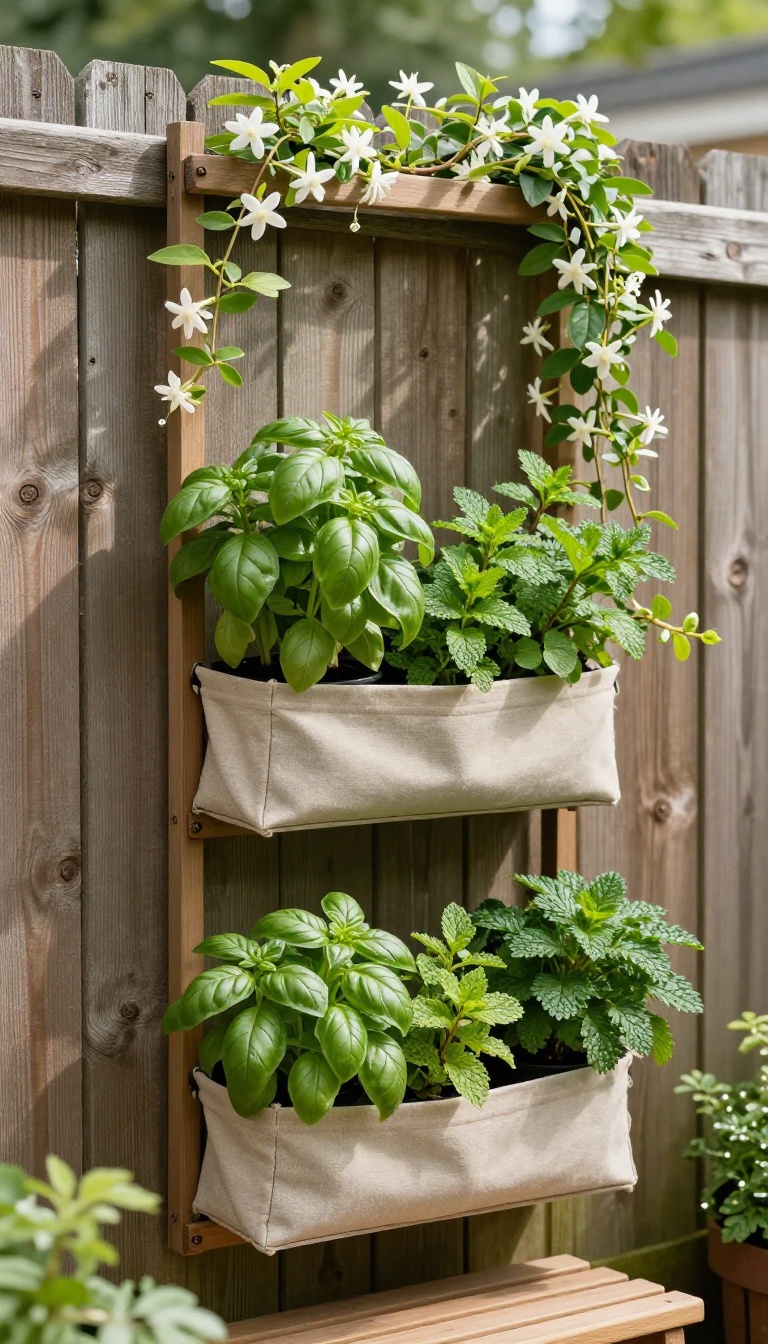
That bare fence staring back at you isn't just a boundary—it's a blank canvas. Instead of letting it sit there doing nothing, turn it into a living wall that pulls double duty. You get privacy, color, and fresh herbs without sacrificing an inch of ground space.
Vertical gardens are a game-changer for narrow yards because they use the one surface you already have: the fence. Whether you go with pocket planters, a trellis, or a modular system, you're essentially stacking your greenery upward. This frees up the floor for seating, a grill, or a small water feature.
Plus, a green wall softens harsh fence lines and makes the space feel more enclosed and cozy.
Pick Your System: Pockets, Trellises, Or Panels
Pocket planters are fabric or plastic pouches that hang directly on the fence. They're cheap, easy to install, and perfect for herbs like basil, mint, and parsley. Trellises work best for climbing plants such as jasmine, clematis, or even cucumbers.
If you want a cleaner look, modular wall panels with individual pots give you a uniform grid that's simple to maintain. Choose based on how much time you want to spend watering and pruning.
Choose Plants That Love Vertical Life
Not everything thrives in a wall garden. Look for compact growers with shallow roots. Herbs are a no-brainer: thyme, oregano, and chives all do well.
For flowers, try petunias, ferns, or creeping Jenny. If you want edible greens, lettuce and spinach are great picks. Avoid large shrubs or anything that needs deep soil—they'll struggle and look sad.
Keep It Watered Without The Hassle
Vertical gardens dry out faster than ground beds because they're exposed to more air and sun. Install a drip irrigation line with a timer, or use self-watering pockets that have a built-in reservoir. If you go the manual route, check moisture every couple of days, especially in summer.
A quick misting in the morning keeps everything happy without soaking your fence.
Mount It Right So It Lasts
Before you hang anything, make sure your fence can handle the weight. A flimsy picket fence might need extra support, like a sturdy trellis anchored to posts. Use stainless steel screws and brackets to avoid rust.
If you're renting, opt for freestanding vertical planters that lean against the fence instead of drilling into it. Either way, leave a small gap between the garden and the fence for airflow to prevent rot.
4. Add a Narrow Water Feature
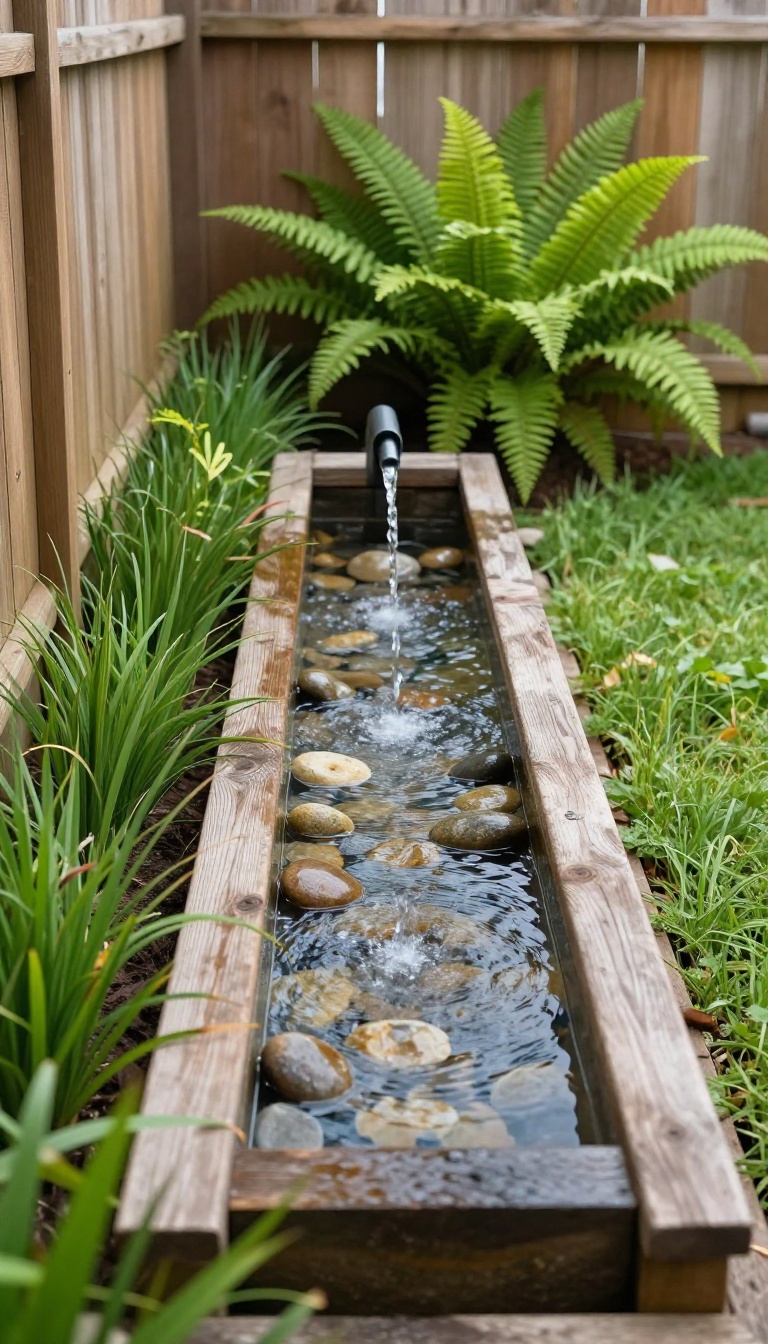
Water has a way of pulling a tight space together. A slim, recirculating fountain or a small trough with a spout brings movement and sound without eating up your square footage. It tucks along a side wall, and the gentle trickle does double duty by masking street noise.
You don't need a pond to get the effect. A narrow water feature works like a piece of living art—it catches light, adds a vertical element, and gives the eye something to follow. The key is keeping it slim and self-contained so it fits in a strip as narrow as 12 to 18 inches.
Recirculating models plug into a standard outlet and don't require a water line, which makes them renter-friendly and easy to maintain. Place it against a fence or the side of the house, and suddenly that dead edge becomes the most interesting part of the yard.
Pick The Right Style For Your Space
A wall-mounted fountain saves every inch of floor space and looks custom. If you prefer something freestanding, a tall, narrow trough with a single spout creates a clean vertical line. For a more natural look, a slim stacked-stone fountain adds texture without spreading out.
Just make sure the footprint stays under two feet wide so you can still walk past it.
Sound That Works For You
The sound of water is the real magic here. A soft trickle is calming, but if you live near a busy road, aim for a slightly stronger splash to drown out traffic. Adjust the flow with a simple valve, and add smooth river rocks to change the tone.
Test it at different times of day to see how it blends with your neighborhood noise.
Keep It Simple To Maintain
Recirculating fountains need occasional water top-offs and a quick scrub every few weeks. Use distilled water if your tap water is hard, and keep a small brush handy for the pump intake. In colder months, drain the feature and store it if it's not freeze-proof.
A cover during heavy rain keeps debris out and saves you cleaning time.
5. Build a Floating Deck with Built-in Storage
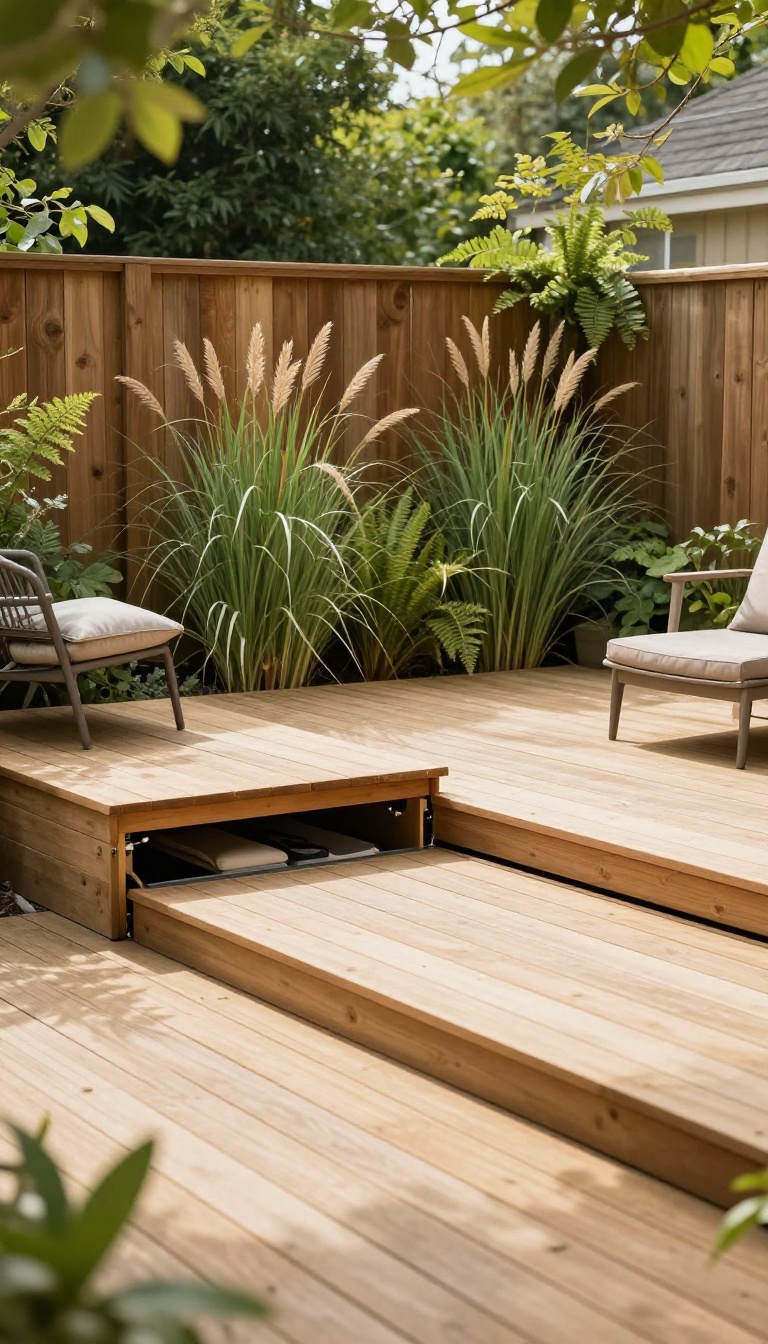
A floating deck sits low to the ground and doesn't need a concrete foundation, which makes it perfect for a narrow yard. You can run it the full width of the space and still leave a thin planting strip along one side. The real win is what goes underneath: lift-up panels or pull-out drawers that swallow tools, cushions, and kids' toys without eating into your seating area.
Most narrow yards waste the ground plane because everything sits on top of it. A floating deck flips that by turning the floor itself into storage. It's a simple build that solves two problems at once: you get a clean, level surface for furniture, and you get a place to hide the stuff that usually clutters a small patio.
Why Low Decks Work In Tight Spaces
A floating deck typically sits 6 to 12 inches off the ground, so it doesn't block sightlines or make the yard feel walled in. That low profile keeps the space open while still defining a clear zone for lounging or dining. Unlike a raised deck, you don't need stairs or railings, which saves precious inches on both ends.
Storage That Disappears
The trick is to design access points before you lay the deck boards. Lift-up panels with hidden hinges work well for cushions and seasonal items you don't need every day. Pull-out drawers on casters are better for grilling tools, garden gloves, or pet toys that you grab often.
Either way, the storage vanishes the moment you close it.
Leave Room For Green
Don't deck the entire width. A 12- to 18-inch planting strip along the fence or house gives you space for tall grasses, ferns, or a climbing vine. That strip softens the hard edge of the deck and adds a layer of green at eye level.
It also gives you a spot to hide drip irrigation or lighting cables.
6. Hang String Lights for Evening Ambiance
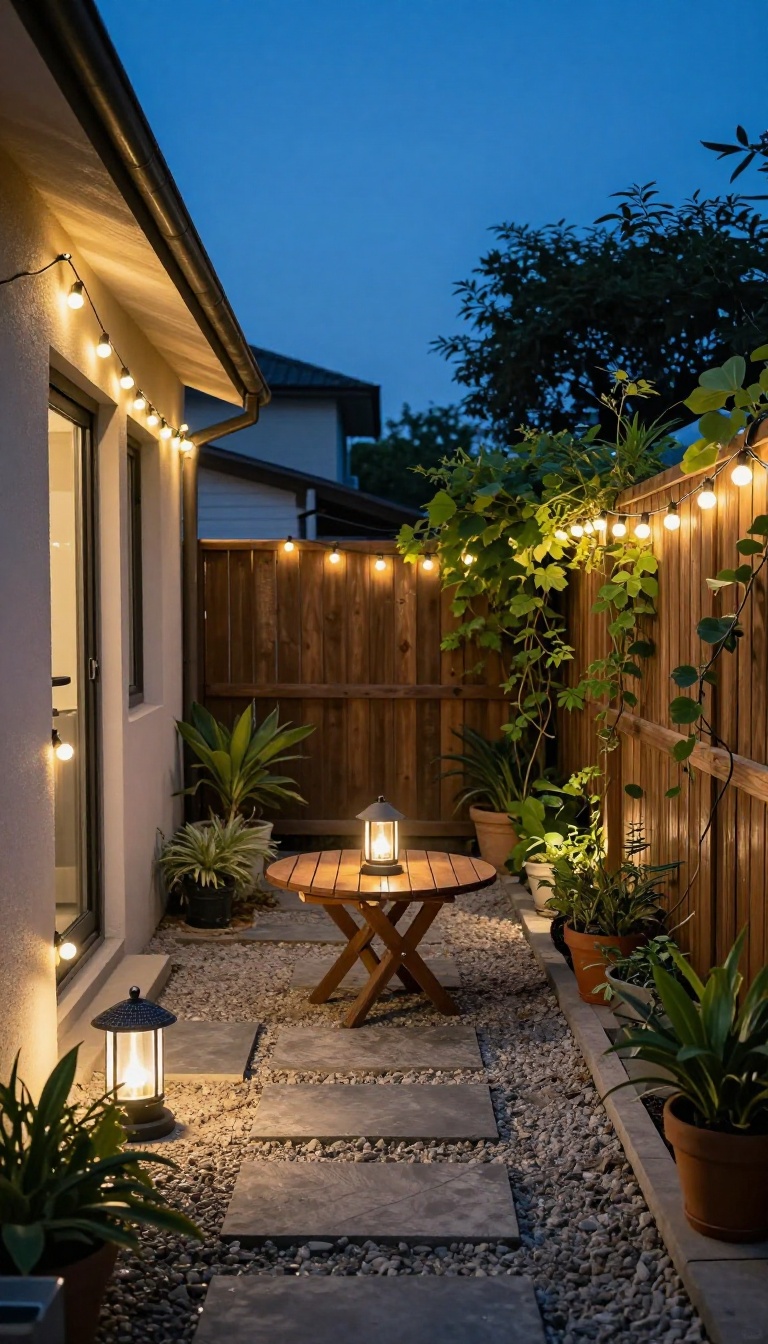
Once the sun drops, a narrow yard can turn into a dark tunnel fast. String lights change that by adding a warm layer of light exactly where you need it—overhead. They also draw the eye upward, so the space feels taller and wider after dark.
The best part? You don't need a big budget or an electrician. A few strands of weatherproof lights and a couple of anchor points can transform the whole mood.
Pick The Right Lights
Go with LED string lights rated for outdoor use. Look for thick rubberized cords and shatterproof bulbs—they'll survive rain, wind, and the occasional bump. Warm white (around 2700K) feels cozy without looking like a carnival.
Map Your Anchor Points
You need two solid points to string between. The house wall is one. The other can be a fence post, a tree, or a dedicated pole you sink into the ground.
Keep the run straight or create a gentle zigzag for a relaxed look.
Hang Them Safely
Use screw-in hooks or cup hooks on wood, and zip ties on metal posts. Leave a little slack so the wire doesn't pull tight in cold weather. If you're crossing a walkway, keep the lowest point at least 7 feet up so nobody clotheslines themselves.
Layer With Other Glow
String lights alone can feel flat. Add a few solar path lights along the edge or a small lantern on the table. The mix of overhead and low light makes the yard feel deeper and more inviting.
7. Use Mirrors to Fake More Width
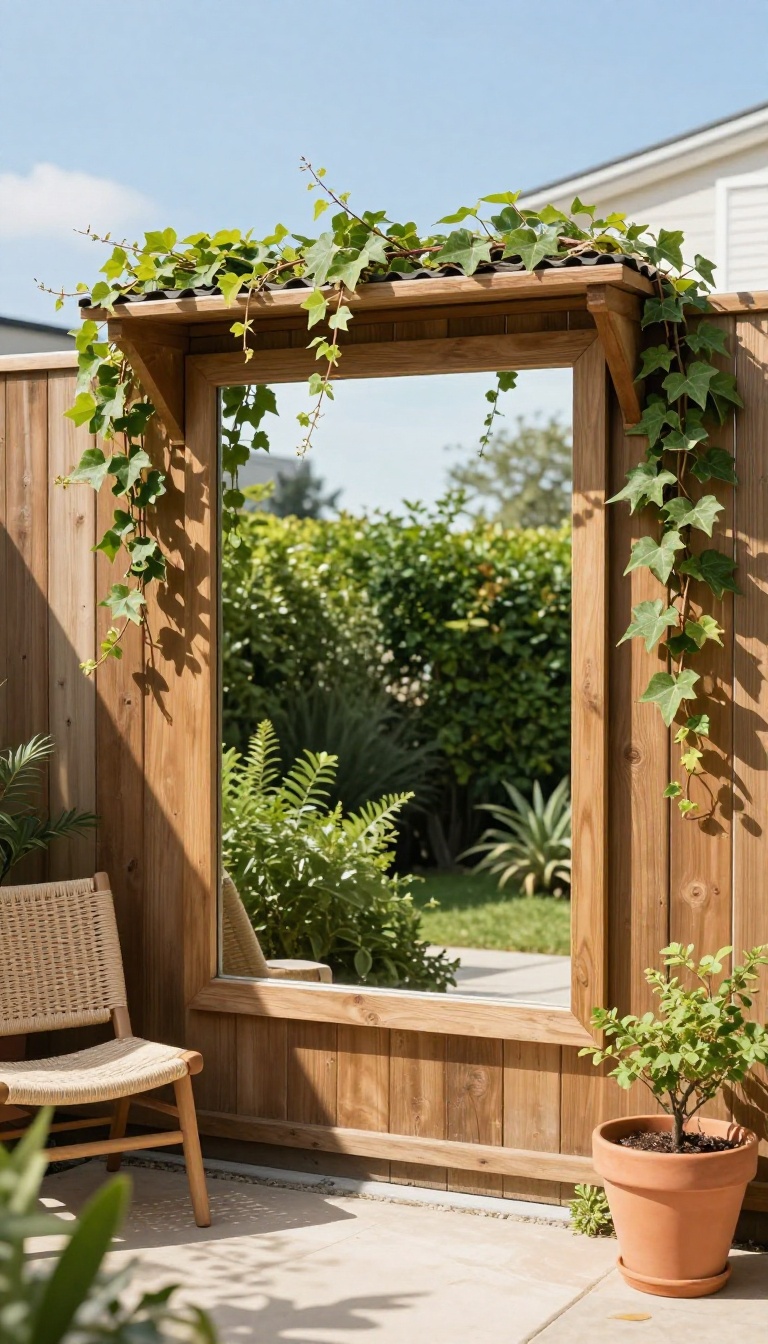
A mirror on a side fence can make a narrow yard feel twice as wide. It reflects light and greenery, tricking the eye into seeing depth where there's only a wall. This trick works best in shaded spots where a little brightness goes a long way.
Hang a weather-resistant mirror on a fence or wall that gets some light. It bounces back the sky, plants, and any open space, creating the illusion of more room. The effect is subtle but powerful, especially in tight, dim areas.
Pick The Right Spot
Place the mirror where it catches something worth reflecting—a leafy shrub, a colorful pot, or a patch of sky. Avoid pointing it at a blank wall or your neighbor's window. A side fence that faces your seating area works well because you'll see the reflection while relaxing.
Choose A Durable Mirror
Regular glass mirrors won't survive outdoors. Look for acrylic or glass with a weatherproof backing, or mirrors made for outdoor use. Frameless or simple-framed styles blend in better and won't distract from the reflection.
Style It Like A Window
Treat the mirror like a faux window. Add a frame, surround it with climbing plants, or hang it above a small console. This makes it look intentional, not like a random mirror stuck on a fence.
The reflection then feels like a real view.
8. Plant a Slim Privacy Screen
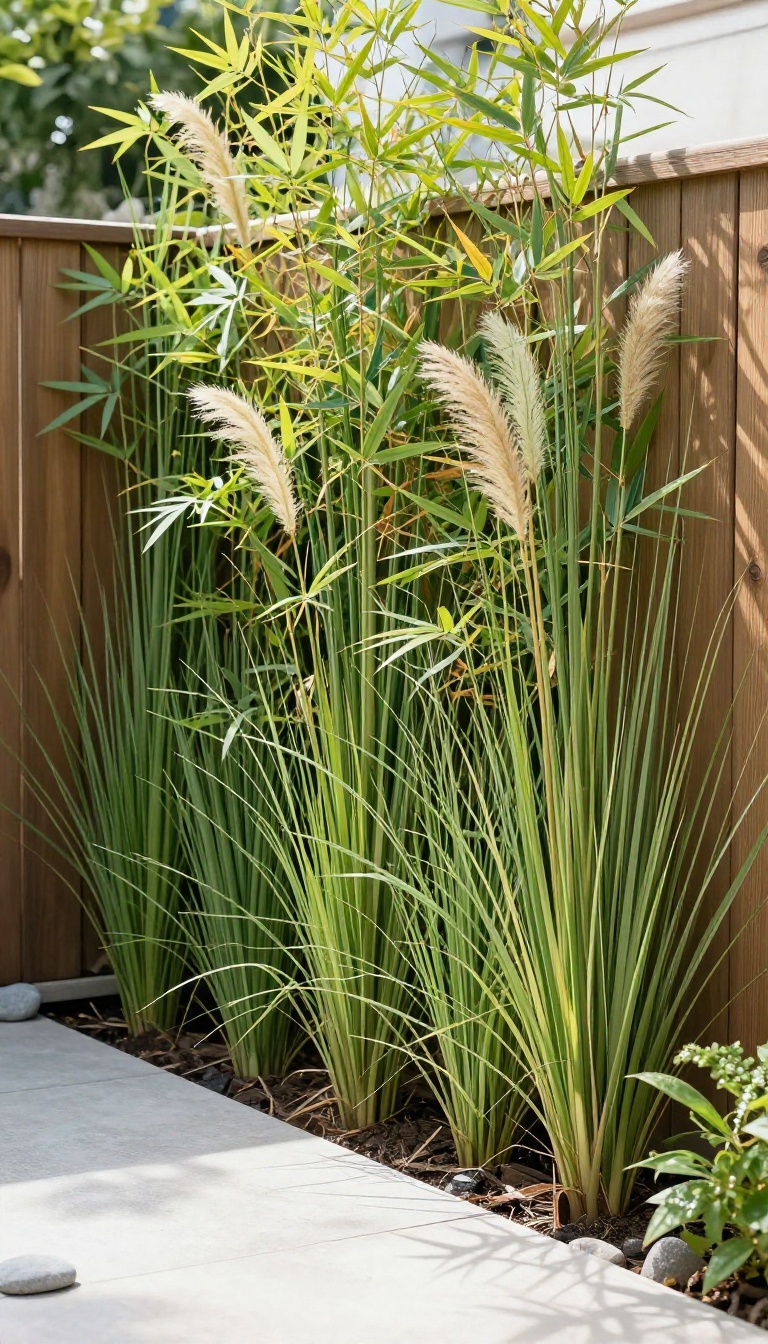
A living wall of greenery does two jobs at once: it blocks the view from nosy neighbors and softens the hard edges of a narrow yard. Unlike a fence, plants add texture, movement, and a little bit of nature. The key is picking varieties that stay slim and don't turn into a tangled mess.
Bamboo, tall grasses, and columnar shrubs are your best bets for a tight footprint. They grow up rather than out, so you get height without losing precious floor space. Just avoid running bamboo—it will send shoots everywhere and take over before you know it.
Go Clumping, Not Running
Clumping bamboo stays in a neat cluster and won't invade your whole yard. It's the polite cousin of running bamboo, which spreads like crazy underground. Look for Fargesia or Bambusa varieties—they're well-behaved and perfect for narrow beds.
Tall Grasses For A Soft Screen
Ornamental grasses like miscanthus or feather reed grass give you a breezy, natural look. They sway in the wind and add sound, which makes the space feel alive. Cut them back in late winter and they'll come back fuller each year.
Columnar Shrubs That Stay Skinny
If you want something evergreen, try columnar shrubs like 'Sky Pencil' holly or Italian cypress. They grow straight up and stay narrow, so they fit in the tightest spots. They also give you year-round privacy, even when everything else dies back.
9. Add a Fold-Down Bar or Prep Station
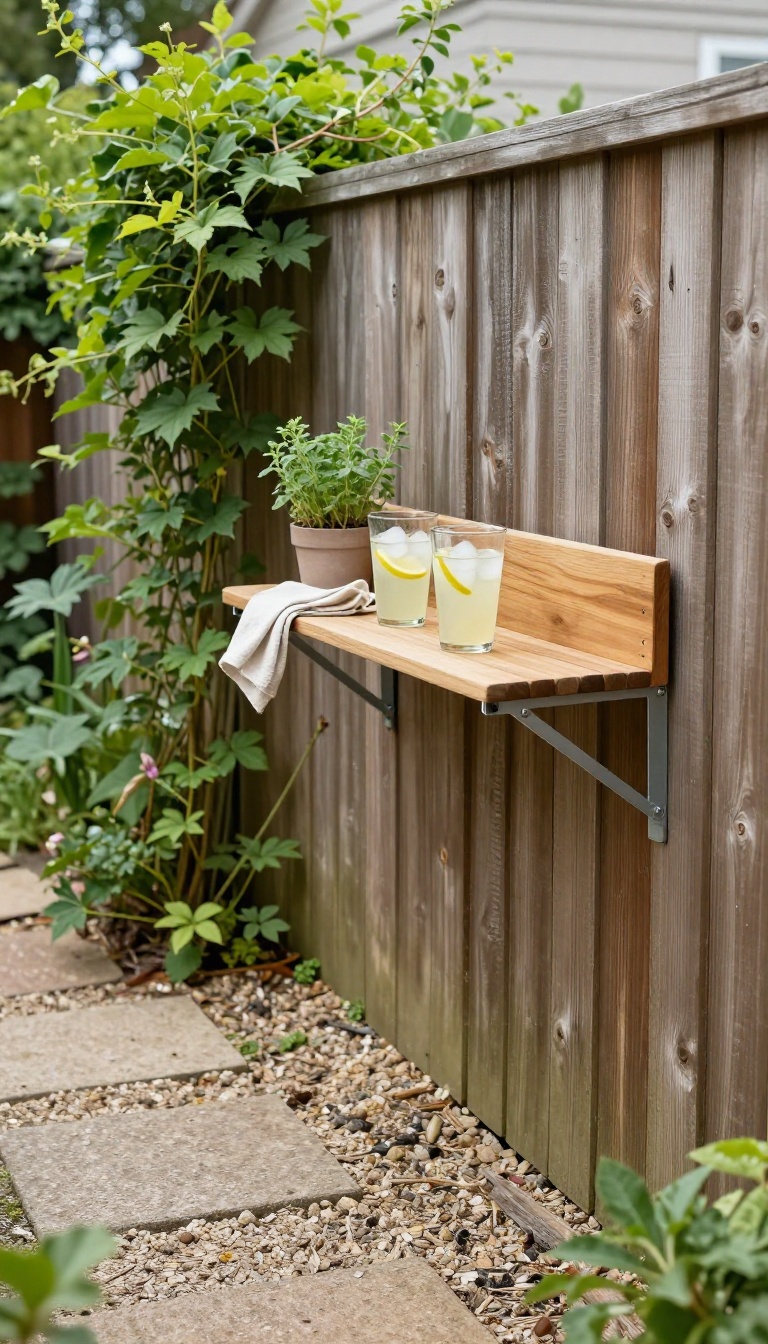
A fold-down bar or prep station is one of those small-space moves that feels almost like cheating. It's a wall-mounted shelf that flips up when you need it and drops flat when you don't. That means you get a real surface for drinks, snacks, or potting without sacrificing a single inch of your narrow path.
In a skinny yard, every permanent piece of furniture is a trade-off. A fixed bar table eats floor space even when nobody's using it. A fold-down version only exists when you need it, then disappears against the wall or fence.
That's the whole appeal: function on demand, zero footprint the rest of the time. You don't need a custom build to pull this off. Plenty of ready-made folding shelves and drop-leaf brackets are designed for exactly this kind of tight spot.
The key is picking a spot where the shelf won't block a walkway when it's down and won't smack anyone when it's up.
Pick The Right Spot
Look for a stretch of wall or fence that's already doing nothing. The side of a shed, the back of a garage wall, or a sturdy fence panel all work. Just make sure the ground below stays clear so you can stand and use the shelf comfortably.
Avoid spots right next to a gate or a main traffic path. You want the shelf to fold down without becoming a shin-height obstacle. A little breathing room on both sides makes it feel intentional instead of crammed in.
Choose Your Hardware
Basic folding shelf brackets are cheap and easy to install. They lock the shelf flat against the wall when not in use and hold it steady when it's up. Look for brackets rated for at least 50 pounds if you plan to set down drinks, tools, or a small cooler.
For a more polished look, a drop-leaf table hinge gives you a cleaner fold and a slightly wider surface. Either way, mount the brackets into studs or solid wood. A wobbly bar is worse than no bar at all.
Make It Work For Your Routine
If you entertain, treat it as a drink station. Add a small tray, a bottle opener, and a couple of unbreakable glasses that live on a nearby hook. When guests leave, everything comes inside and the shelf folds flat.
If you garden, use it as a potting bench. Keep a bag of soil and a few tools in a weatherproof bin underneath. The shelf gives you a clean surface to work on, and the path stays open when you're done.
10. Lay a Gravel or Paver Path with Curves
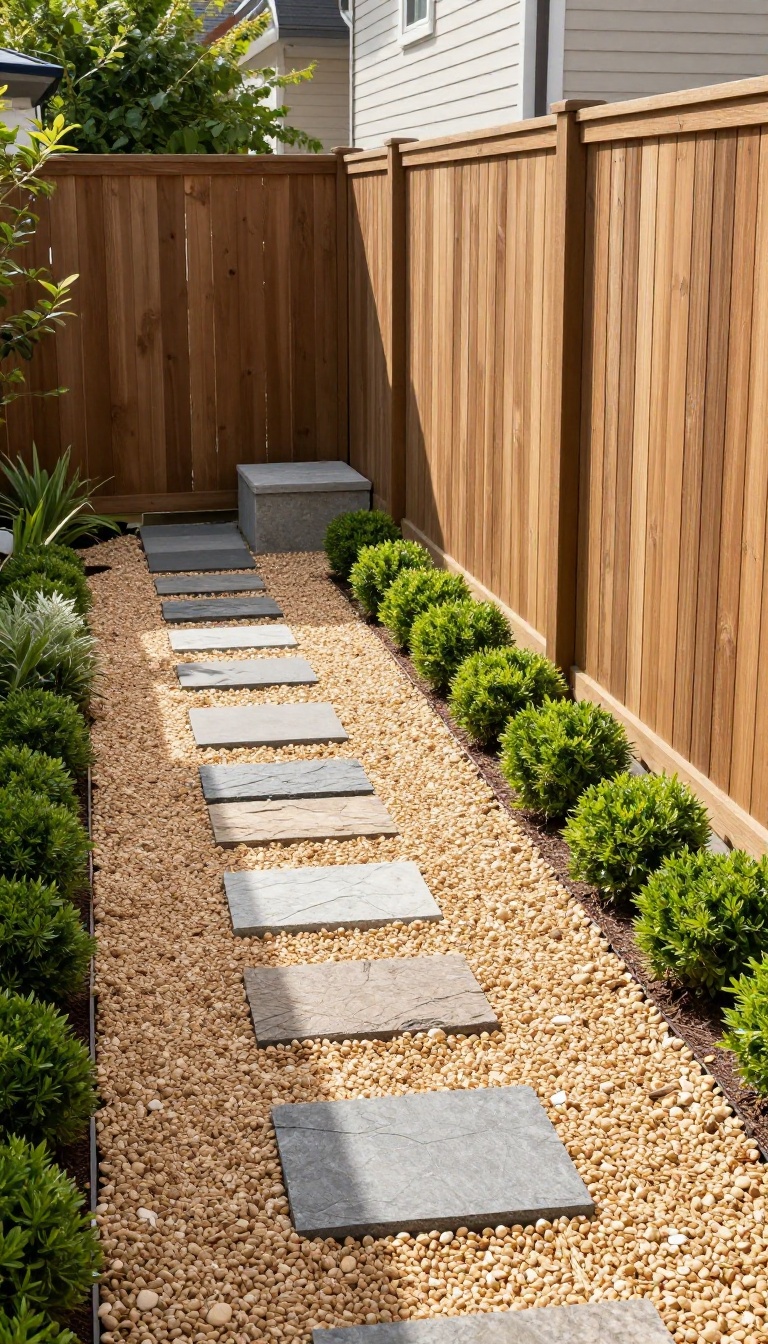
Straight lines are efficient, but they also make a narrow yard read like a hallway. A path that bends, even slightly, breaks up that tunnel effect and gives your eye somewhere to wander. It's one of the cheapest ways to make a small space feel like it has more to explore.
The curve doesn't need to be dramatic. A soft S-shape or a gentle arc toward a seating nook is enough to slow your pace and stretch the perceived distance. Pair it with the right material and the path does double duty as a design feature, not just a way to get from the gate to the grill.
Pick A Material That Matches Your House
Gravel, flagstone, and pavers all read differently, so start with what your home already says. A brick house with traditional trim looks natural next to clay pavers or bluestone. A modern build with clean lines pairs well with large-format concrete pavers or dark crushed granite.
Loose gravel is the easiest and cheapest option, and it curves without any cutting. The trade-off is that it migrates into beds and needs occasional raking. Flagstone gives you a more organic look with irregular shapes, but it costs more and takes a steadier hand to set.
Pavers sit in the middle: tidy, durable, and available in enough colors to match almost anything.
How To Plan The Curve
Sketch the path on paper before you dig anything. Mark a few stakes in the yard and run a garden hose between them to test the shape in real space. Step back and look from inside the house, because that's the view you'll live with most.
Keep the curve gentle. Sharp zigzags eat up width and make the path harder to walk. A radius of four to six feet usually feels right in a narrow yard, and it leaves enough room for planting on the outside of the bend.
Aim the path at something worth walking toward: a bench, a small water feature, or a cluster of pots. A curve that leads nowhere feels random, but one that ends at a destination feels designed.
Base Prep And Edging
A path is only as good as what's under it. Dig down about four inches, tamp the soil, and add a layer of compacted crushed stone. That base keeps pavers from sinking and stops gravel from disappearing into the mud after a hard rain.
Edging matters more than most people expect. Steel, stone, or buried brick keeps gravel in place and gives the path a crisp line. Without it, loose stone spreads into the lawn and the curve slowly blurs into a mess.
For gravel, go with a rounded or angular stone about three-eighths of an inch. Anything smaller turns dusty, and anything larger is uncomfortable underfoot. A weed barrier underneath saves you hours of pulling later.
Planting The Edges
The space between the path and the fence is prime real estate. Tuck low growers like creeping thyme, liriope, or dwarf mondo grass along the border so the path feels set into the yard instead of dropped on top of it. Vary the height as you move along the curve.
A few taller grasses or a small shrub at the bend add depth and hide the fact that the yard is only a few feet wide. Keep plants off the walking surface so the path stays usable. If you want the path to glow at night, run a low-voltage line under the base before you close it up.
A few small stake lights along the outer edge make the curve visible after dark and turn the whole yard into a moodier space.
11. Zone with Rugs and Outdoor Lighting
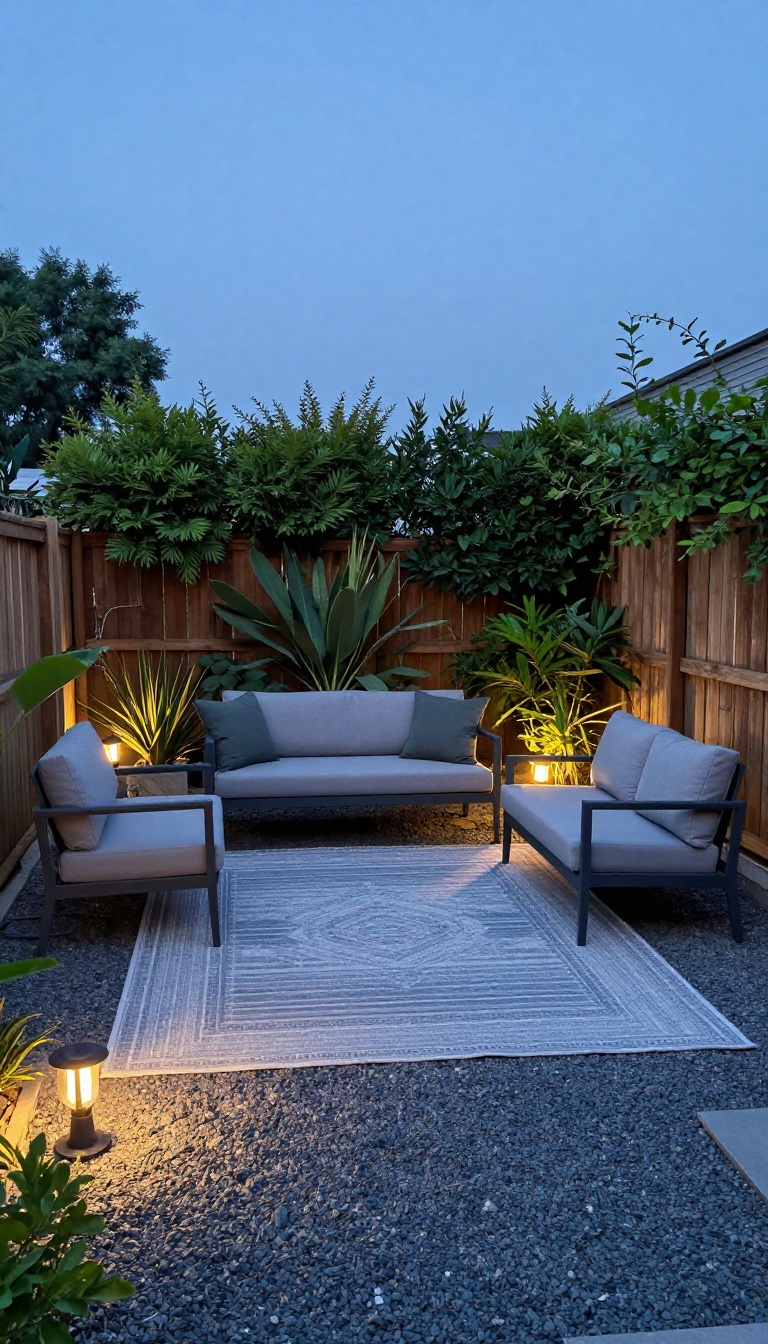
An outdoor rug does more than soften the ground underfoot. It draws a clear boundary around your seating area, telling the eye where one zone ends and another begins. Add a few small solar path lights along the walkway, and suddenly your narrow strip has two distinct spaces: a cozy hangout and a clear route through it.
In a long, skinny yard, everything can blur together without visual cues. A rug acts like an anchor for your furniture, while lights create a soft edge that guides movement. Together, they split one awkward corridor into separate, functional zones without adding bulk.
Pick A Rug That Fits The Space
Measure your seating area first, then choose a rug that extends a few inches beyond the furniture. In a narrow yard, a runner or a rectangular rug works better than a round one because it follows the natural lines of the space. Look for weather-resistant materials like polypropylene or recycled plastic—they handle sun and rain without fading or molding.
A pattern or bold color can also add personality and distract from the tight dimensions.
Light The Path, Not The Whole Yard
Solar path lights are perfect for narrow yards because they need no wiring and cast a small, focused glow. Place them every 3 to 4 feet along one side of your walkway to create a subtle border. Avoid lining both sides—that can make the path feel like a runway.
Instead, stagger them slightly for a natural look. At night, these lights define the route and keep people from cutting across your rug.
Connect The Zones With Color And Texture
Tie the rug and lights together by repeating a color or material. For example, if your rug has navy blue accents, choose path lights with dark metal stakes or add a few blue cushions. This visual thread makes the two zones feel intentional rather than accidental.
Keep the palette simple—two or three colors max—so the narrow space doesn't feel cluttered.
FAQ
How do I make a narrow backyard feel wider?
Use mirrors, horizontal lines, and light colors. Keep the center clear and place furniture along the edges. A curved path also helps.
What plants work best in a narrow side yard?
Choose columnar or clumping plants like bamboo, tall grasses, or slender evergreens. They grow up, not out, so they fit tight spaces.
Can I fit a dining table in a narrow backyard?
Yes, if you choose a slim bistro table or a narrow rectangular one. Push it against a wall or fence when not in use.
How do I add privacy without blocking light?
Use a mix of tall, airy plants and open trellises. String lights or a slatted screen also add privacy while letting some light through.
What's the cheapest way to upgrade a narrow yard?
Start with string lights, a small outdoor rug, and a few potted plants. These are low-cost and make a big visual impact.
Conclusion
A narrow yard rewards you for thinking in zones instead of square footage. Pick one idea that solves your biggest frustration right now, whether that's privacy, storage, or a spot to sit with coffee. Get that working first, then add the next piece when you're ready.
You'll probably find that the layout keeps shifting as you live with it, and that's fine. Small outdoor spaces are never finished, they just get smarter. Give it a season and you'll wonder how you ever managed with a plain strip of grass.